Hi everyone, As the title of the tags I posted, today I would like to share my understanding of Android Architecture MVVM (Model – View – ViewModel) with you. I would like to briefly introduce about MVVM for You haven’t defined what it is
As its name implies, MVVM (Model – view – ViewModel) consists of 3 main components
Map of MVVM
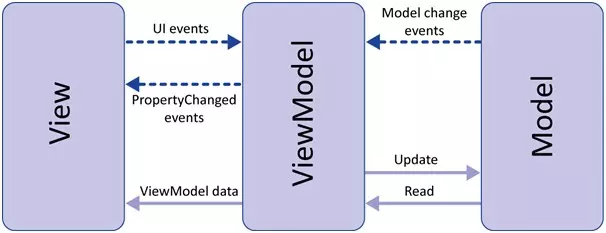
first . Model Including classes working with data (Local query (SQLite)) This is very good Google support in the Room Database section, Implementing request Data from API (Https, …) must be outstanding. is the Retrofit, is it right? Next, the model receives requests to retrieve and change data from the View model. And the final note is that it does not directly communicate with the View 2 class. ViewModel. That’s strange
. View model Will receive events from View, From events (Events like click, Touch, …), then send read and update requests to the Model class. Contains LiveData variables that store temporary
” data and View classes will listen (Observable) Changes of Livedata to update the UI. The good thing is that the Viewmodel will not interfere or be affected by the UI so when we have Rotate, it will not be affected. In addition, the ViewModel will listen for events when data from the Model class changes and changes the LiveData variables. 3 View: Includes UI display classes. Does not contain processing code inside. Listening and observing Live Data data changes from Viewmodel Classes and updating corresponding UIs
The theory is too long. But I have tried, the package calls back to my understanding in the most accurate and concise way. Now comes the example directly and, I will just demo the code and will explain each component in it.
B1: The first error part when you follow the example is wrong, the main reason  Wrong implementation with the sample code .
Build Gradle (App ):
// Room components implementation “androidx.room:room-runtime:$rootProject.roomVersion” annotationProcessor “androidx.room:room-compiler:$rootProject.roomVersion” androidTestImplementation “androidx.room:room-testing:$rootProject.roomVersion”
// Lifecycle components implementation “androidx.lifecycle: lifecycle-extensions: $ rootProject.archLifecycleVersion” annotationProcessor “androidx.lifecycle: lifecycle-compiler: $ rootProject.archLifecycleVersion”
** Build Gradle Project **
}
** B2: Initialize Word class with 1 attribute as mStringword **
public class Word {
}
@Entity (tableName = “word_table”). @PrimaryKey @NonNull @ColumnInfo (name = “word”) In this class we have used the Room Database, using the corresponding Anotation.
B3: Initialize Interface WordDao (For each Entity you create a DAO class because this is the class that performs queries to SQLite and obviously different tables, the handling must be separate.) And forget to forget @Dao On Interface
@Dao public interface WordDao {
@Query (“SELECT * from word_table ORDER BY word ASC”) LiveData <List <Word>> getAlphabetizedWords ();
** B4: Create a class WordRoomDatabase **
@Database (entities = {Word.class}, version = 1, exportSchema = false) abstract class WordRoomDatabase extends RoomDatabase {
}
** B5: Create Repository ** 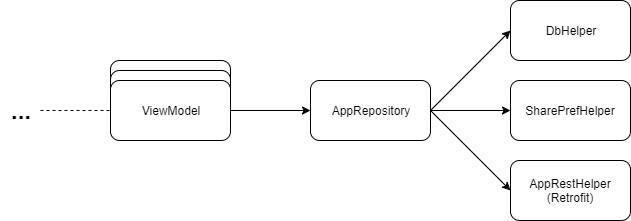
}
** B6: Create a ViewModel (The good part is paying attention to it here  )) **
)) **
}
1 2 3 4 5 6 | Ở Phần tạo viewmodel này . Các bạn luôn nhớ Việc sử dụng Live data để cập nhật data cho UI Là 1 điều vô cùng quan trọng bởi vì : Bạn có thể đặt observer vào dữ liệuvà chỉ cập nhật UI khi dữ liệu thực sự thay đổi. Repository và giao diện người dùng được phân tách hoàn toàn bởi ViewModel. Không call Database từ ViewModel (tất cả điều này được xử lý trong Repository), làm cho code dễ kiểm tra hơn. |
B7: Add XML
In the res / style tag Please add yourself:
<item name = “android: layout_width”> match_parent </item> <item name = “android: layout_marginBottom”> 8dp </item> <item name = “android: paddingLeft”> 8dp </item> <item name = ” android: background “> @android : color / holo_orange_light </item> <item name =” android: textAppearance “> @android : style / TextAppearance.Large </item> </style>
1 2 | Tiếp theo tạo 1 file Xml : có tên Là Recycleview_item : |
<LinearLayout xmlns: android = “http://schemas.android.com/apk/res/android” android: orientation = “vertical” android: layout_width = “match_parent” android: layout_height = “wrap_content”>
</LinearLayout>
In Main_activity:
<androidx.constraintlayout.widget.ConstraintLayout xmlns: android = ” http://schemas.android.com/apk/res/android ” xmlns: app = ” http://schemas.android.com/apk/res-auto ” xmlns: tools = ” http://schemas.android.com/tools ” android: layout_width = “match_parent” android: layout_height = “match_parent”>
</androidx.constraintlayout.widget.ConstraintLayout>
** B8: Add RecycleViewAdapter **
}
1 2 3 4 5 6 7 | Việc tạo Adapter thì cũng không có gì là khó lắm nên mình không đề cập sâu đến. Trong MainActivity thêm đoạn code RecyclerView recyclerView = findViewById(R.id.recyclerview); final WordListAdapter adapter = new WordListAdapter(this); recyclerView.setAdapter(adapter); recyclerView.setLayoutManager(new LinearLayoutManager(this)); |
** B9: Create a new activity: named NewwordActivity ** Code Xml:
<LinearLayout xmlns: android = “http://schemas.android.com/apk/res/android” android: orientation = “vertical” android: layout_width = “match_parent” android: layout_height = “match_parent”>
<EditText android: id = “@ + id / edit_word” android: layout_width = “match_parent” android: layout_height = “wrap_content” android: fontFamily = “sans-serif-light” android: hint = “@ string / hint_word” android: inputType = “textAutoComplete” android: padding = “@ dimen / small_padding” android: layout_marginBottom = “@ dimen / big_padding” android: layout_marginTop = “@ dimen / big_padding” android: textSize = “18sp” />
<Android Button: id = “@ + id / button_save” android: layout_width = “match_parent” android: layout_height = “wrap_content” android: background = “@ color / colorPrimary” android: text = “@ string / button_save” android: textColor = “@ color / buttonLabel” />
</LinearLayout>
1 2 | Code Java: |
public static final String EXTRA_REPLY = “com.example.android.wordlistsql.REPLY”;
private EditText mEditWordView;
@Override public void onCreate (Bundle savedInstanceState) {super.onCreate (savedInstanceState); setContentView (R.layout.activity_new_word); mEditWordView = findViewById (R.id.edit_word);
}}
** B10: Data connection with UI **
@Override public void onChanged ( @Nullable final List <Word> words) {adapter.setWords (words); }});
Through the 10 Steps above, you have succeeded in a small program using MVVM Model. RoomDatabase, and LiveData Android JetPack components. Do not know how to arrange layout or expression problem for the first time writing, I hope you can give me suggestions to improve, through this article is my little share about MVVM. Thank you for reading. Thank all 
Link Docs reference: https://developer.android.com/jetpack/docs/guide Link Code Lab: https://codelabs.developers.google.com/codelabs/android-room-with-a-view/#0