Concept of film
Introduce
- Boots up
- Create and define project parameters
- Screen interface
- Basic operations with File
- Works with Windows, Project, Monitor source, Monitor Program, Timeline
- Basic tools group – Render work area
- Practice basic editing
I. Concept of movies
persistence of vision. Image retention “allows people to see a series of different images in one continuous motion. The whole process of filmmaking and watching movies to this day is based on this theory. 
motion on film
Actually motion on film is just a continuous display of still images (illustration below) 
Frame rate per second Frame per second (FPS)
- The number of frames displayed in 1 second is called the image rate per second (FPS)
- Plastic films have 24 frames per second (24FPS)
- PAL (Phase Alternate Line) video with 25 frames per second (25FPS)
- NTSC (National Television Standards Committee) Video
- 29.97 images per second (30FPS)
- Videos used for 15 FPS websites and many other options
4: 3 and 16: 9 video frames There are 2 types of video frame sizes that are widely used today: 4: 3 and 16: 9 corresponding to 2 types of monitor monitors (as shown below) 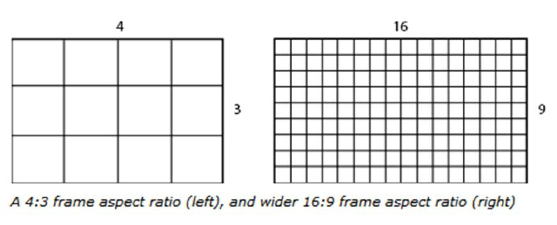
Pixel pixels for video (pixel aspect ratio) In addition to regular pixels, we have rectangular pixels. For video, it is conventional that X = width of pixels, Y = height of pixels For example: X / Y = 2: 1 Usually people only write X value, and Y implies 1, instead of PAL video pixel is 1.07: 1 only recorded 1.07)
Lines for Scanning (Fields) The images displayed on the screen are generated by the lines of scanning, depending on the type of video there will be different scan lines!
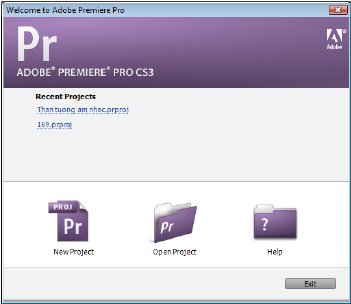
II. Introduction Adobe Premiere is a video editing and effects editing program for Digital Videos. Application in the fields of television, advertising and video editing for websites … III. Start Start- Programs -Adobe Master Collection CS3 – Adobe Premiere Pro CS3
IV. Create and define project parameters Click on new project to create new project
Determine the parameters of the project, choose the editorial system: NTSC or PAL
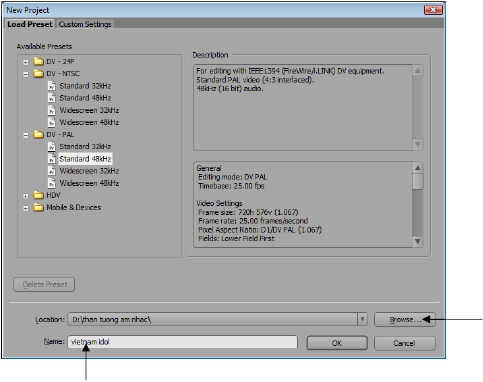
Click the browse button to select a location
Name the project
Note: the project should be saved in the directory
V. Interface
- Title Bar: Contains icons and program names, current document names
- Command Menu Bar: Contains the program icon, chapter menu commands
- submit.
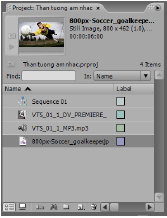
- Project panel: contains video, image, audio data, etc.
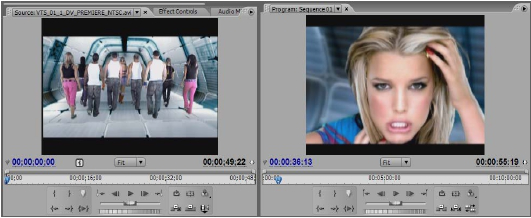
Monitor panel: including Source monitor (left) for browsing original video, Monitor Program (right) for reviewing product videos
Timeline panel: default includes 3 Video tracks and 3 Audio tracks, Timeline panel contains clips edited and reviewed on the program groove monotor grogram

1 2 | Lưu ý: giao diện có thể thay đổi bằng cách rê chuột vào giữa các bảng, tách rời bảng |
(hold Ctrl + drag on the table’s name), turn the panel on and off, then save the interface or return the interface to default Go to the Window Workspace menu, select New Worksapce to save the interface or Reset Current Workspace to return the default to the default view.
VII. Work with the Project panel, Monitor source, Monitor Program, Timeline
Working with the Project Import table some video, image, and audio data to organize in the Project table

2
Film editor
- Working with editorial toolkit
- Fast, Slow, Revere motion, freeze
- Photoshop for movies
- Working with Audio track
- Refined weight project
- Save the packaging
- Export the movie
- Practice editing
I. Working with the editing toolkit
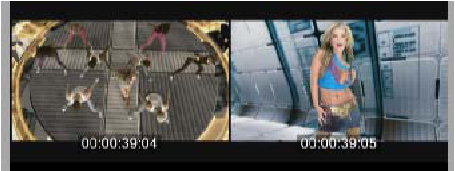
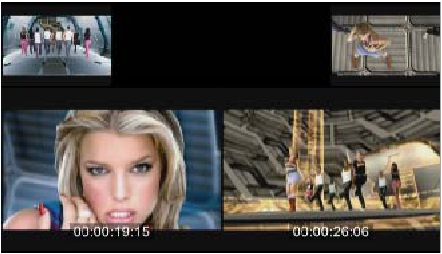
Ripple Tool Properties: Allows shortening and stretching clips but leaving no space on time line Operation: o Click between two adjacent clips – drag to cut Appearance Monitor shows serial image between 2 clips
Rolling Tool Properties: Shorten the left clip to extend the right clip, shorten the right clip to extend the left clip Actions: o Click between two adjacent clips – drag to cut Appearance Monitor shows the serial image between 2 clips
Slip tool
Characteristics: Selecting images in a truncated clip o Click right in the middle of the clip – drag to view the image Appears the Monitor shows the serial image between 3 clips. Two large monitors display the image clip that is being scanned, the small monitor is the image of the two side clips
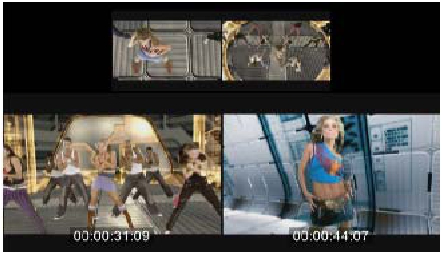
Slide tool
- Characteristics: Moving the clip between changes the length of 2 clips on the side
- Actions: o Click on the middle of the clip -drag to operate
II. Fast, Slow, Reverse motion, freeze
Fast, Slow, Reverse motion o Properties: slow down or stop the speed of motion (people, cars …) video clip o Operation: o Select clip on timeline – choose command- Clip- Speed Duration o Speed> 100: fast motion (Fast Motion) o Speed <100: slow motion (Slow Motion) o Reverse Speed: reverse motion
Freeze Properties: stop video picture.
1 2 | Thao tác: |
o Select clip on timeline – choose command- Clip- Video Option- Frame Hold o In Point: stop image at point In o Out Point: stop image at Out point o Marker 0: stop image at marker clip
III. Photoshop for movies
Choose the right image type for the movie choose the right purpose for using photoshop for the movie Actions: o Run Photoshop program -choose File-New -preset-choose film & Video- Choose the file type corresponding to the project o Save and save the layer!
Import photoshop file into Premiere Actions: o Choose File – Imort – choose photoshop image file
Import as – footage- choose layer (select each layer) o Import as – sequence (import all layers and create sequence) o Footage Dimensions: select Document size to fit the frame, crop size layer to fit the object
IV. Exercise with audio track
Increase or decrease the volume Properties: adjust the sound effects, increase or decrease the manipulation Actions: o Open the audio track on the Timeline o Locate the reader click the Add and Remove Keyframe button o Use the select tool to move the Key up to increase tone, decrease volume o Click in the middle of the volume bar (yellow to increase or decrease the total sound clips)
Link and split audio links
Properties: helps separate sounds from video clips or associate sound with pictures after adjusting sound to images
o Split link: right click clip on timeline – Unlink o Link: select image clip and audio clip – right click clip on timeline – Link
V. Reduce project weight Properties: Permanently remove redundant videos Actions: o Select clip with Marker on monitor source – operate monitor source-select Clip-make subclip command
BECAUSE. Save packaging Characteristics: save all data to a folder, subclips will be cut off when saving the package (Trim project) Actions: o Save project before saving package o Choose Project – Project Manager command o Choose Create New Trimmed Project: cut subclips o Collect files and Copy to New Location: save this format does not cut off subclips o Exlude Unuseclip Clips: only copy clips on Timeline o Include Preview Files: if checked will bring Preview files 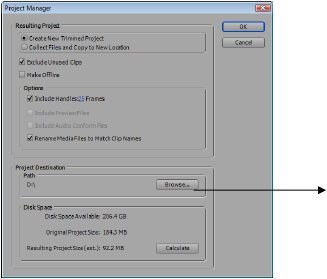
VII. Export movie Operation: o Check the work area area o Activate timeline – choose File -Export -Movie command-click the Setting button o File type: select the file type to export o Range: choose to export the timeline or export the Work area selection o Export audio: check if you want to export video with sound o Go to Tab Video to check the correct system to export – ok!