Today’s article will cover the configuration settings for Presto and its administration interface.
1. Configuration
Presto Verifier
Presto Verifier can be used to test Presto against another database (such as MySQL) or to test two Presto clusters against each other.
Create database in MySQL
Open MySQL Server and create a database using the following command:
1 2 | create database test |
You have just created a database “test” in the server. Create the table and load it with the following query.
1 2 3 4 5 6 7 8 9 10 11 12 13 14 15 16 17 18 19 20 21 22 | CREATE TABLE verifier_queries( id INT NOT NULL AUTO_INCREMENT, suite VARCHAR(256) NOT NULL, name VARCHAR(256), test_catalog VARCHAR(256) NOT NULL, test_schema VARCHAR(256) NOT NULL, test_prequeries TEXT, test_query TEXT NOT NULL, test_postqueries TEXT, test_username VARCHAR(256) NOT NULL default 'verifier-test', test_password VARCHAR(256), control_catalog VARCHAR(256) NOT NULL, control_schema VARCHAR(256) NOT NULL, control_prequeries TEXT, control_query TEXT NOT NULL, control_postqueries TEXT, control_username VARCHAR(256) NOT NULL default 'verifier-test', control_password VARCHAR(256), session_properties_json TEXT, PRIMARY KEY (id) ); |
Add Configuration Settings
Create a property file to configure the verifier –
1 2 3 4 5 6 7 8 | $ vi config.properties suite = mysuite query-database = jdbc:mysql://localhost:3306/tutorials?user=root&password=pwd control.gateway = jdbc:presto://localhost:8080 test.gateway = jdbc:presto://localhost:8080 thread-count = 1 |
Here, in the query-database field , enter the following details – mysql database name, username and password.
Download JAR file
Download the Presto-verifier jar file at the following link:https://repo1.maven.org/maven2/com/facebook/presto/presto-verifier/0.149/ => Download presto-verifier-0.149-executable.jar
Execute JAR
Execute the JAR file using the command
1 2 3 | $ mv presto-verifier-0.149-executable.jar verifier $ chmod+x verifier |
Run Verifier
Run verifier using the following command:
1 2 | $ ./verifier config.properties |
Create Table
Create a simple table in the “test” database using the following query:
1 2 | create table product(id int not null, name varchar(50)) |
Insert table
After creating the table, insert 2 records using the following query:
1 2 3 | insert into product values(1,’Phone') insert into product values(2,’Television’) |
Run the Verifier query
Execute the following sample query in the verifier terminal (./verifier config.propeties) to check the verifier result.
Query form
1 2 3 4 5 | insert into verifier_queries (suite, test_catalog, test_schema, test_query, control_catalog, control_schema, control_query) values ('mysuite', 'mysql', 'default', 'select * from mysql.test.product', 'mysql', 'default', 'select * from mysql.test.product'); |
Here, the query select * from mysql.test.product mentions the list mysql, test is the database name, and product is the table name. In this way you can access the mysql connector using the Presto server.
Here, two similar select queries are tested against each other to see performance. Similarly, you can run other queries to test the performance results. You can also connect 2 Presto clusters to check performance results.
2. Administrative tools
In this chapter, let’s discuss the administrative tools in Presto. Let’s get started with Preso’s Web Interface.
Web display
Presto provides a web interface for tracking and managing queries. It can be accessed from the port number specified in the Config Properties of the coordinator. Start the Presto server and the Presto CLI. You can then access the web interface from the following url – http: // localhost: 8080 /
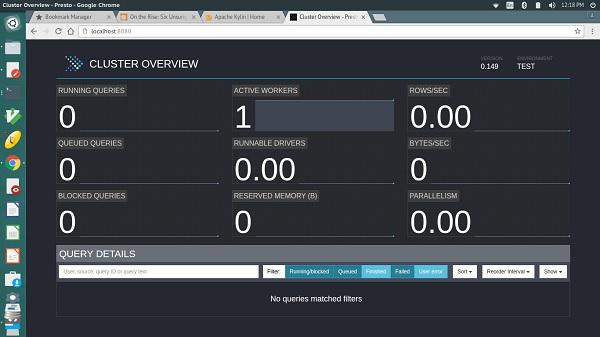
You will see an interface similar to the one above.
Here, the main page has a query list with information such as the unique query ID, query text, query status, percent complete, username, and query origin. The last running queries first, followed by the completed or incomplete queries are displayed at the bottom.
Performance tuning on the Presto
If the Presto cluster is experiencing any performance related issues, change your default configuration settings to the following.
Config Properties
- task. info -refresh-max-wait – Reduces the coordinator workload.
- task.max-worker-threads – Split process and assign to each worker node.
- distributed-joins-enabled – Hash-enabled distributed joins.
- node-scheduler.network-topology – Set the network topology to the scheduler.
Install JVM
Change your default JVM settings to the following. This will be helpful for diagnosing garbage collection problems.
1 2 3 4 5 6 7 8 9 10 11 12 13 14 | -XX:+PrintGCApplicationConcurrentTime -XX:+PrintGCApplicationStoppedTime -XX:+PrintGCCause -XX:+PrintGCDateStamps -XX:+PrintGCTimeStamps -XX:+PrintGCDetails -XX:+PrintReferenceGC -XX:+PrintClassHistogramAfterFullGC -XX:+PrintClassHistogramBeforeFullGC -XX:PrintFLSStatistics = 2 -XX:+PrintAdaptiveSizePolicy -XX:+PrintSafepointStatistics -XX:PrintSafepointStatisticsCount = 1 |