1. Introduction
Android Jetpack is a collection of components and tools that help you quickly create Android applications. These components combine the Support Library and Architecture Components.
Android Jetpack can be classified into four main components:
- Foumdation (Example: ktx, appcompat, multidex, test)
- Architecture (Example: Data Binding, Lifecycles, ViewModel, Livedata, Room, Paging, Navigation, WorkManager)
- Behavior (Example: Download manager, Media, Notifications, Permissions, Sharing, Slices)
- UI (Example: Animations, Auto, Emoji, Fragment, Layout, Palette, TV, Wear OS)
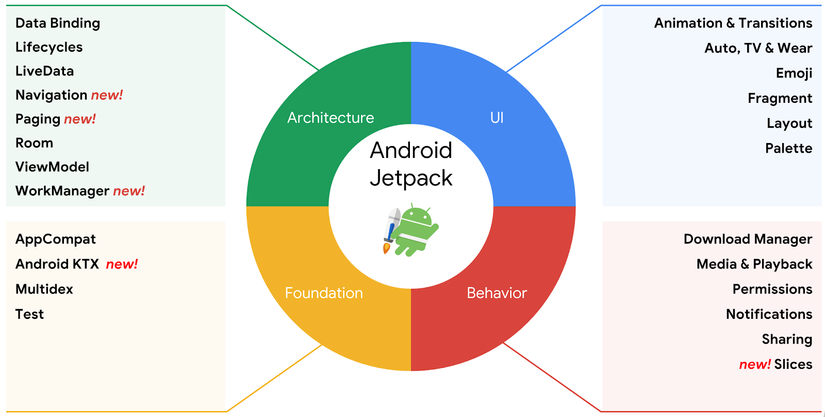
Components of Android Jetpack.
In this article, we will learn about Navigation .
Navigation refers to interactions that allow users to navigate through, in and out of the different content sections of your application.
Navigation in Android Jetpack helps you deploy navigation, from simple Button clicks to more complex navigation components like the app bar and navigation drawer.
The Navigation component also ensures a consistent and predictable user experience by following established guidelines.
The Navigation component consists of three main parts described below:
- Navigation graph: The XML file contains all information related to navigation in a centralized location. It includes all the individual content areas in your application, called destinations , as well as links that users can navigate through your application.
- Navhost: An empty container that displays the destinations from your navigation graph . Navigation includes a default Navhost declaration, NavhostFragment, showing the destination fragments.
- NavController: An application navigation management object in Navhost. NavControll coordinates conversion of destination content in Navhost as users move within your application.
2. Set up
You need Android Studio 3.2 RC or higher to use Android Jetpack including Navigation. Also, for the scope of this article, knowledge of Kotlin is required.
Step 1: Create a new Android project, add a blank activity.
Step 2: Add the following dependencies to the app / build.gradle file and sync project:
1 2 3 4 | def nav_version = "1.0.0-alpha05" implementation "android.arch.navigation:navigation-fragment-ktx:$nav_version" implementation "android.arch.navigation:navigation-ui-ktx:$nav_version" |
In addition, to support the transfer of values between views in a navigation, we need to use the more typesafe plugin.
Add navigation-safe-args-gradle-plugin to the project’s build.gradle file as follows:
1 2 3 4 5 6 7 8 9 10 11 12 13 14 15 16 17 18 19 20 21 22 23 24 25 26 27 | buildscript { ext.kotlin_version = '1.2.61' repositories { google() jcenter() } dependencies { classpath 'com.android.tools.build:gradle:3.2.0-rc02' classpath "org.jetbrains.kotlin:kotlin-gradle-plugin:$kotlin_version" classpath 'android.arch.navigation:navigation-safe-args-gradle-plugin:1.0.0-alpha05' // NOTE: Do not place your application dependencies here; they belong // in the individual module build.gradle files } } allprojects { repositories { google() jcenter() } } task clean(type: Delete) { delete rootProject.buildDir } |
In app / build.gradle , we will add the following plugin:
1 2 | apply plugin: 'androidx.navigation.safeargs' |
Step 3:
To implement Navigation, Android introduces a new type of resource called Navigation. Right click on res => New => Android resource file. Select a title and select Navigation
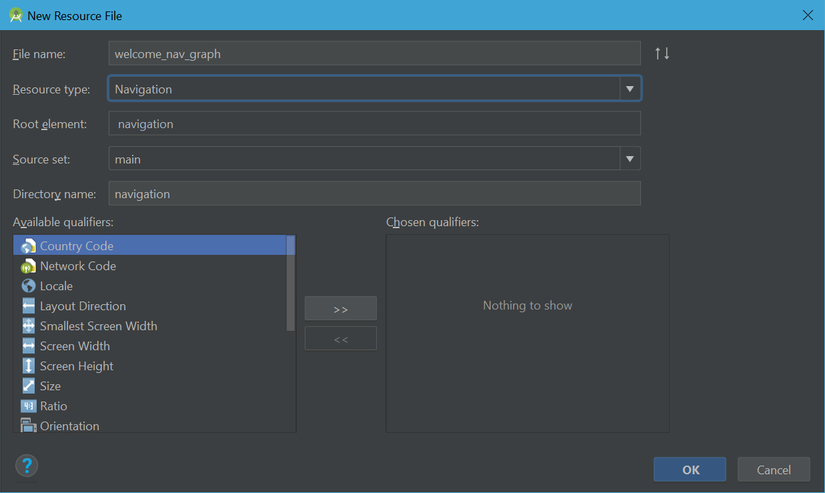
File navigation after creation will be as follows:
1 2 3 4 5 6 | <?xml version="1.0" encoding="utf-8"?> <navigation xmlns:android="http://schemas.android.com/apk/res/android" xmlns:app="http://schemas.android.com/apk/res-auto" android:id="@+id/welcome_nav_graph"> </navigation> |
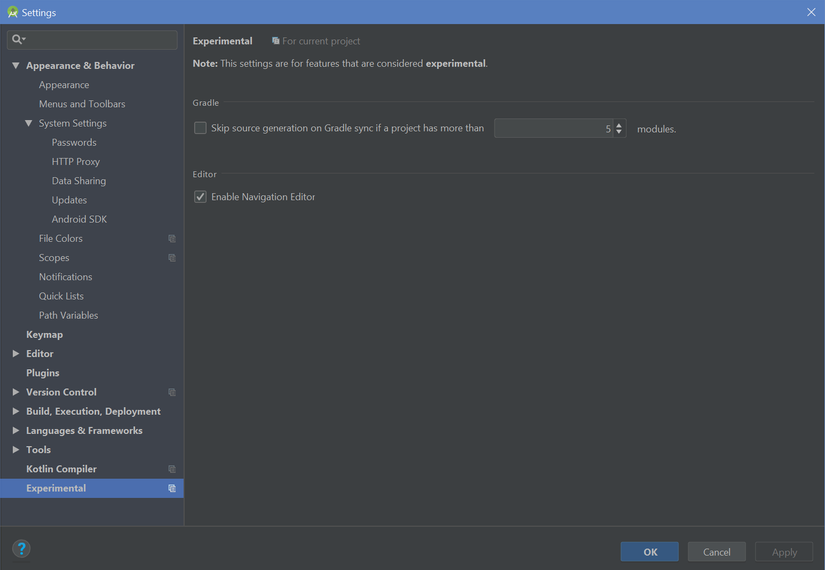
Step 4: If you cannot create Navigation, select Enable Navigation Editor
Step 5:
In the graph navigation xml file, navigate to Design and click on the New Destination icon as follows: 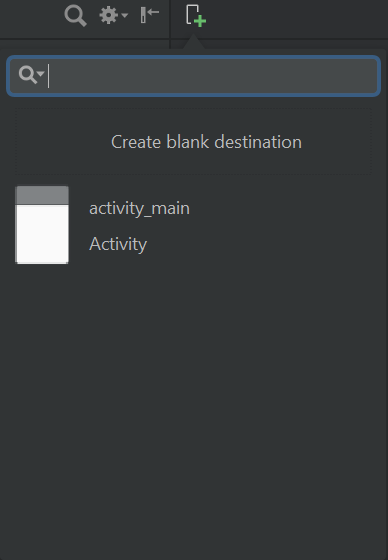
We will create two fragments by clicking Create Blank Destination . Creating MainFragment and DestinationFragment When creating two fragments, the xml navigation file will look like this:
1 2 3 4 5 6 7 8 9 10 11 12 13 14 15 16 17 18 19 | <?xml version="1.0" encoding="utf-8"?> <navigation xmlns:android="http://schemas.android.com/apk/res/android" xmlns:app="http://schemas.android.com/apk/res-auto" xmlns:tools="http://schemas.android.com/tools" android:id="@+id/welcome_nav_graph" app:startDestination="@id/mainFragment"> <fragment android:id="@+id/mainFragment" android:name="com.praszapps.mysamplenavapp.MainFragment" android:label="fragment_main" tools:layout="@layout/fragment_main" /> <fragment android:id="@+id/destinationFragment" android:name="com.praszapps.mysamplenavapp.DestinationFragment" android:label="fragment_destination" tools:layout="@layout/fragment_destination" /> </navigation> |
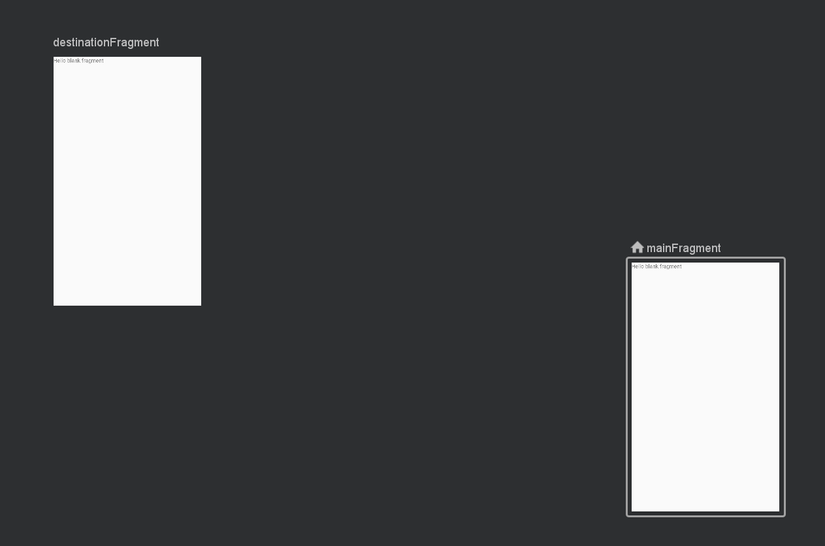
The design view will display the following:
3. Add Action
In order for the framework to understand where the destination comes from, you must specify an action. You must add action tag inside source / home fragment
1 2 3 4 5 6 7 8 9 10 11 12 13 14 15 16 17 18 19 20 21 22 23 | <?xml version="1.0" encoding="utf-8"?> <navigation xmlns:android="http://schemas.android.com/apk/res/android" xmlns:app="http://schemas.android.com/apk/res-auto" xmlns:tools="http://schemas.android.com/tools" android:id="@+id/welcome_nav_graph" app:startDestination="@id/mainFragment"> <fragment android:id="@+id/mainFragment" android:name="com.praszapps.mysamplenavapp.MainFragment" android:label="fragment_main" tools:layout="@layout/fragment_main" > <action android:id="@+id/action_mainFragment_to_destinationFragment" app:destination="@id/destinationFragment" /> </fragment> <fragment android:id="@+id/destinationFragment" android:name="com.praszapps.mysamplenavapp.DestinationFragment" android:label="fragment_destination" tools:layout="@layout/fragment_destination" /> </navigation> |
4. Add Arguments
For example, you would pass a value of “name” from MainFragment to DestinationFragment, then you would display “Welcome $ name”. You can pass many such parameters.
In the xml navigation file, add the <argument /> tag to the destination fragment.
- android: name – Id of the parameter.
- app: argType – What is the data type. Currently supporting inferred, integer, string, reference
- android: defaultValue (optional) – The default value received by the fragment in case no source fragment is not passed into any value.
Once completed, the XML navigation file will look like this:
** welcome_nav_graph.xml **
1 2 3 4 5 6 7 8 9 10 11 12 13 14 15 16 17 18 19 20 21 22 23 24 25 26 27 | <?xml version="1.0" encoding="utf-8"?> <navigation xmlns:android="http://schemas.android.com/apk/res/android" xmlns:app="http://schemas.android.com/apk/res-auto" xmlns:tools="http://schemas.android.com/tools" android:id="@+id/welcome_nav_graph" app:startDestination="@id/mainFragment"> <fragment android:id="@+id/mainFragment" android:name="com.praszapps.mysamplenavapp.MainFragment" android:label="fragment_main" tools:layout="@layout/fragment_main" > <action android:id="@+id/action_mainFragment_to_destinationFragment" app:destination="@id/destinationFragment" /> </fragment> <fragment android:id="@+id/destinationFragment" android:name="com.praszapps.mysamplenavapp.DestinationFragment" android:label="fragment_destination" tools:layout="@layout/fragment_destination" /> <argument android:name="nameToShow" android:defaultValue="Andy" app:argType="string" /> </navigation> |
5. Create XML layout
fragment_main.xml
1 2 3 4 5 6 7 8 9 10 11 12 13 14 15 16 17 18 19 20 21 22 23 24 25 26 27 28 29 30 31 32 33 34 35 36 | <?xml version="1.0" encoding="utf-8"?> <android.support.constraint.ConstraintLayout xmlns:android="http://schemas.android.com/apk/res/android" xmlns:app="http://schemas.android.com/apk/res-auto" xmlns:tools="http://schemas.android.com/tools" android:id="@+id/frameLayout" android:layout_width="match_parent" android:layout_height="match_parent" tools:context=".MainFragment"> <EditText android:id="@+id/enterName" android:layout_width="match_parent" android:layout_height="wrap_content" android:hint="What is your name?" android:inputType="textPersonName" app:layout_constraintBottom_toBottomOf="parent" app:layout_constraintEnd_toEndOf="parent" app:layout_constraintStart_toStartOf="parent" app:layout_constraintTop_toTopOf="parent" /> <Button android:id="@+id/buttonWelcomeMe" android:layout_width="wrap_content" android:layout_height="wrap_content" android:layout_marginStart="8dp" android:layout_marginTop="8dp" android:layout_marginEnd="8dp" android:layout_marginBottom="148dp" android:text="Welcome Me" app:layout_constraintBottom_toBottomOf="parent" app:layout_constraintEnd_toEndOf="parent" app:layout_constraintStart_toStartOf="parent" app:layout_constraintTop_toBottomOf="@+id/enterName" /> </android.support.constraint.ConstraintLayout> |
** fragment_destination.xml **
1 2 3 4 5 6 7 8 9 10 11 12 13 14 15 16 17 18 19 20 21 | <?xml version="1.0" encoding="utf-8"?> <android.support.constraint.ConstraintLayout xmlns:android="http://schemas.android.com/apk/res/android" xmlns:app="http://schemas.android.com/apk/res-auto" xmlns:tools="http://schemas.android.com/tools" android:id="@+id/frameLayout2" android:layout_width="match_parent" android:layout_height="match_parent" tools:context=".DestinationFragment"> <TextView android:id="@+id/welcomeWithNameTv" android:layout_width="wrap_content" android:layout_height="wrap_content" tools:text="Hello Andy!" app:layout_constraintBottom_toBottomOf="parent" app:layout_constraintEnd_toEndOf="parent" app:layout_constraintStart_toStartOf="parent" app:layout_constraintTop_toTopOf="parent" /> </android.support.constraint.ConstraintLayout> |
activity_main.xml
1 2 3 4 5 6 7 8 9 10 11 | <?xml version="1.0" encoding="utf-8"?> <android.support.constraint.ConstraintLayout xmlns:android="http://schemas.android.com/apk/res/android" xmlns:app="http://schemas.android.com/apk/res-auto" android:id="@+id/fragment_container" xmlns:tools="http://schemas.android.com/tools" android:layout_width="match_parent" android:layout_height="match_parent" tools:context=".MainActivity"> </android.support.constraint.ConstraintLayout> |
6. Coding
1. MainActivity
MainActivity.kt
1 2 3 4 5 6 7 8 9 10 11 12 13 14 | import android.support.v7.app.AppCompatActivity import android.os.Bundle import androidx.navigation.fragment.NavHostFragment class MainActivity : AppCompatActivity() { override fun onCreate(savedInstanceState: Bundle?) { super.onCreate(savedInstanceState) setContentView(R.layout.activity_main) val host = NavHostFragment.create(R.navigation.welcome_nav_graph) supportFragmentManager.beginTransaction().replace(R.id.fragment_container, host).setPrimaryNavigationFragment(host).commit() } } |
2. MainFragment
MainFragment.kt
1 2 3 4 5 6 7 8 9 10 11 12 13 14 15 16 17 18 19 20 21 22 23 24 25 26 27 28 29 30 31 32 33 34 35 36 | import android.os.Bundle import android.support.v4.app.Fragment import android.view.LayoutInflater import android.view.View import android.view.ViewGroup import androidx.navigation.fragment.findNavController import kotlinx.android.synthetic.main.fragment_main.* class MainFragment : Fragment() { override fun onCreateView(inflater: LayoutInflater, container: ViewGroup?, savedInstanceState: Bundle?): View? { // Inflate the layout for this fragment return inflater.inflate(R.layout.fragment_main, container, false) } override fun onViewCreated(view: View, savedInstanceState: Bundle?) { super.onViewCreated(view, savedInstanceState) // Sending data from one fragment to another fragment buttonWelcomeMe.setOnClickListener{ val name = enterName.text.toString() if(name.isEmpty()) { enterName.error = "Please enter a name" } else { val action = MainFragmentDirections.actionMainFragmentToDestinationFragment() action.setNameToShow(name) findNavController().navigate(action) } } } } |
3. DestinationFragment
DestinationFragment.kt
1 2 3 4 5 6 7 8 9 10 11 12 13 14 15 16 17 18 19 20 21 22 23 | import android.os.Bundle import android.support.v4.app.Fragment import android.view.LayoutInflater import android.view.View import android.view.ViewGroup import kotlinx.android.synthetic.main.fragment_destination.* class DestinationFragment : Fragment() { override fun onCreateView(inflater: LayoutInflater, container: ViewGroup?, savedInstanceState: Bundle?): View? { // Inflate the layout for this fragment return inflater.inflate(R.layout.fragment_destination, container, false) } override fun onViewCreated(view: View, savedInstanceState: Bundle?) { super.onViewCreated(view, savedInstanceState) val name = DestinationFragmentArgs.fromBundle(arguments).nameToShow welcomeWithNameTv.text = "Hello $name!" } } |
7. Conclusion
Run the app and we will get the following result: