I. Introduction
Development applications that use the API are becoming popular, the most popular authentication methods today are using token-based.  . In this tutorial, I will provide an overview of token-based authentication and deployment in the API application in Rails 5.
II. What is Token-based authentication?
Token-based authentication, also known under a different name ( JON WEB TOKEN authentication ) is a way to handle user authentication in applications. It is an alternative to ** session-base authentication **.
- The most notable difference between token authentication and session authentication is that session authentication is server dependent. A suspect will be created containing the user’s login information. The entire login log file will be stored on the server. Token authentication does not store anything on the server but will generate unique tokens and use it to check every time a request is sent from the user. Unlike session authentication, using a token will not associate the user with the login information. Many applications such as Facebook, Google, and Github have approached this method.
III. The benefits of using this method.
- Cross-domain / CORS Cookies and CORS must not be confused with each other. This approach allows you to make an AJAX call to any server where you use HTTP headers to transfer user information.
- Stateless (it is a design that communicates between the client and the server and keeps no trace. After the user submits the request, the server processes it and returns the data. The connection will then be disconnected.) Reduce the storage of user information on the server.
- Separation Not tied to a specific authentication scheme. Tokens can be created anywhere, so the API can also be called from anywhere with a single authentication command instead of multiple calls being called for authentication.
- Ready for mobile devices. Cookies are a problem when storing user information in mobile applications. The use of tokens has greatly simplified this process.
- CSRF (Cross Site Request Forgery) Because the application does not rely on cookies for authentication, it cannot be attacked by CSRF technology. (attack technique using user authentication rights to a website)
- Performance On the server-side download side, searching for user information in the database with user-submitted information, token authentication will take less time. This makes token authentication faster than the traditional method.
IV. How does Token authentication work?
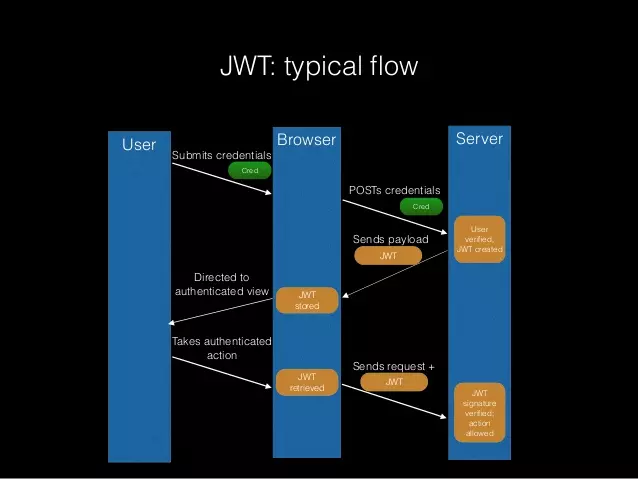
The token-based authentication method is very simple. The user enters his login information and sends a request to the server. If the login information is correct, the server will generate an encrypted token using a predefined algorithm.Example : HMACSHA256 , also known as JSON web token (JWT). The client hosts JWT and makes all subsequent requests to the server with the token attached. The server authenticates the user by comparing the JWT sent with the request to the request it has saved in the database. Here is a simple diagram of the process:
V. What information does the JWT token contain?
Header  Including token type (JWT) and type of encryption algorithm (HS256) encoded in base-64.
Payload  Contains information about the user and his or her role. For example, the token payload may contain e-mail and password.
Signature  The signature is a unique key that identifies the title generation service. In this case, the token signature will be the base 64 encrypted version of the Rails application’s secret key (Rails.application.secrets.secret_key_base). Since each application has a unique base key, this secret key acts as the signature of the token .
BECAUSE. Use token authentication with Rails 5.
Time to practice. The first step is to create a new Rails 5 API-only application:
rails new api-app --api
By appending –api to the end of the builder, an only-API application will be created. API-only applications are recent additions to the Rails platform. 
There are several requirements that need to be met before we can use the token-based method:
- A way of encoding and decoding a JWT token must be done.
- We need methods to check if the user is authenticated.
- We need a model
- Controller to create and log in users.
- We need routes to navigate the application.
1. Create User Model 
1 2 | rails g model User name email password_digest |
run migrations.
1 2 | rails db:migrate |
By running these methods, we have created the User model with name, e-mail and password fields in the database. The has_secure_password method must be added to the model to ensure the password is correctly encrypted into the database. Has_secure_password is part of bcrypt ruby, so we have to install it first.
Add it to gemfile:
1 2 3 | #Gemfile.rb gem 'bcrypt', '~> 3.1.7' |
install it
1 2 | bundle install |
With the gem installed, add the has_secure_password method to the User model:
1 2 3 4 5 6 | #app/models/user.rb class User < ApplicationRecord has_secure_password end |
2. Encryption and decryption of the JWT token When the user model is implemented, the deployment of JWT token creation can begin. Gem jwt will help encrypt and decode tokens using the HMACSHA256 algorithm available in the Rails application.
Add jwt gem.
1 2 | gem 'jwt' |
install it
1 2 | bundle install |
Once the gem is installed, it can be accessed via the global JWT variable. Because the method will be used to request packaging.
Initialize a JsonWebToken class containing singleton class to encrypt and decode tokens .
1 2 3 4 5 6 7 8 9 10 11 12 13 14 15 16 17 18 | # lib/json_web_token.rb class JsonWebToken class << self def encode(payload, exp = 24.hours.from_now) payload[:exp] = exp.to_i JWT.encode(payload, Rails.application.secrets.secret_key_base) end def decode(token) body = JWT.decode(token, Rails.application.secrets.secret_key_base)[0] HashWithIndifferentAccess.new body rescue nil end end end |
The first method: encode , get three parameters: user ID, expiration time (1 day) and unique base key of your Rails application to generate unique token. The second method: decode , get the token and use the app’s secret key to decode it.
Two cases in which these methods will be used:
- To authenticate users and generate tokens for users using encode .
- To check if the user’s token added in each request is correct using the decode .
To make sure everything works, the contents of the lib directory must be included when downloading the Rails application.
1 2 3 4 5 6 7 8 9 10 | #config/application.rb module ApiApp class Application < Rails::Application #..... config.autoload_paths << Rails.root.join('lib') #..... end end end |
3. Authenticating users Instead of using its own control methods, simple_command was used. For more information on installation, see the article Simple_command . Adding them to the gem file.
1 2 | gem 'simple_command' |
install it
1 2 | bundle install |
Then, the alias methods of simple_command can easily be used in a class by adding the SimpleCommand prepend. Go to the AuthenticateUser class
1 2 3 4 5 6 7 8 9 10 11 12 13 | class AuthenticateUser prepend SimpleCommand def initialize() #this is where parameters are taken when the command is called end def call #this is where the result gets returned end end |
The command retrieves the user’s e-mail and password then returns the user, if the login information matches.
1 2 3 4 5 6 7 8 9 10 11 12 13 14 15 16 17 18 19 20 21 22 23 24 25 26 27 | # app/commands/authenticate_user.rb class AuthenticateUser prepend SimpleCommand def initialize(email, password) @email = email @password = password end def call JsonWebToken.encode(user_id: user.id) if user end private attr_accessor :email, :password def user user = User.find_by_email(email) return user if user && user.authenticate(password) errors.add :user_authentication, 'invalid credentials' nil end end |
The command takes parameters and initializes an instance of the class with the email and password attributes accessible in the class. The private method user uses login information to check if the user exists in the database with User.find_by_email . If the user is found, use the authenticate method. This method has been integrated by installing gem has_secure_password. It is used to check if the user’s password is correct. If everything is correct, user information will be returned . Otherwise, the method will return nil .
4 Check user authorization. The token creation has been done, but there’s no way to check if the token added to the request is valid or not. The authorization command must take headers and request and decode the token using the decode method in the singleton class of JsonWebToken.
1 2 3 4 5 6 7 8 9 10 11 12 13 14 15 16 17 18 19 20 21 22 23 24 25 26 27 28 29 30 31 32 33 34 35 36 | # app/commands/authorize_api_request.rb class AuthorizeApiRequest prepend SimpleCommand def initialize(headers = {}) @headers = headers end def call user end private attr_reader :headers def user @user ||= User.find(decoded_auth_token[:user_id]) if decoded_auth_token @user || errors.add(:token, 'Invalid token') && nil end def decoded_auth_token @decoded_auth_token ||= JsonWebToken.decode(http_auth_header) end def http_auth_header if headers['Authorization'].present? return headers['Authorization'].split(' ').last else errors.add(:token, 'Missing token') end nil end end |
Explain each method in the class. 
- The http_auth_header method takes tokens from the headers when the class is instantiated.
- The decoding_auth-token method decodes the token received from http_auth_header and retrieves the user ID.
- user method we will go through each line.
- In the first line, basically, if User.find () returns an empty set or decoded_auth_token returns false then @users will be nil.
- The second line, the user method will return the user or issue an error. In Ruby, the last line of the function is completely returned, so the finish statement returns the user object.
5 Implementing Helper Methods in Controllers All logic for handling JWT tokens has been devised. It is time to deploy it in the Controller and put it into practical use. The two most essential parts to doing this are identifying the login user and referencing the current user.
- Login Users First, let’s start with the user login information:
1 2 3 4 5 6 7 8 9 10 11 12 13 14 15 16 | # app/controllers/authentication_controller.rb class AuthenticationController < ApplicationController skip_before_action :authenticate_request def authenticate command = AuthenticateUser.call(params[:email], params[:password]) if command.success? render json: { auth_token: command.result } else render json: { error: command.errors }, status: :unauthorized end end end |
The authen method will retrieve user information and then validate if the successful result will return the token to call later actions. Otherwise it will return an error code.
- Authorizing Requests must have a current_user method to maintain user login. To use it you must be ** declared ** in the ApplicationController :
1 2 3 4 5 6 7 8 9 10 11 12 13 | #app/controllers/application_controller.rb class ApplicationController < ActionController::API before_action :authenticate_request attr_reader :current_user private def authenticate_request @current_user = AuthorizeApiRequest.call(request.headers).result render json: { error: 'Not Authorized' }, status: 401 unless @current_user end end |
5 Does it work? See how things work. Open the console in your application.
1 2 | rails c |
Create user information on the rails console.
1 2 | User.create!(email: ' <a class="__cf_email__" href="/cdn-cgi/l/email-protection">[email protected]</a> ' , password: '123123123' , password_confirmation: '123123123') |
To see how authorization works, a resource is required to send requests to. Open the console on your application.
1 2 3 4 5 6 | rails g scaffold Item name:string description:text và chạy rails db:migrate |
Submit to request login
1 2 | curl -H "Content-Type: application/json" -X POST -d '{"email":" <a class="__cf_email__" href="/cdn-cgi/l/email-protection">[email protected]</a> ","password":"123123123"}' http://localhost:3000/authenticate |
The result returned is the token used for subsequent requests.
1 2 | {"auth_token":"eyJ0eXAiOiJKV1QiLCJhbGciOiJIUzI1NiJ9.eyJ1c2VyX2lkIjoxLCJleHAiOjE0NjA2NTgxODZ9.xsSwcPC22IR71OBv6bU_OGCSyfE89DvEzWfDU0iybMA"} |
Test
1 2 3 | curl http://localhost:3000/items {"error":"Not Authorized"} |
An error code is returned because the token does not exist in your header. Add token and run again.
1 2 | curl -H "Authorization: eyJ0eXAiOiJKV1QiLCJhbGciOiJIUzI1NiJ9.eyJ1c2VyX2lkIjoxLCJleHAiOjE0NjA2NTgxODZ9.xsSwcPC22IR71OBv6bU_OGCSyfE89DvEzWfDU0iybMA" http://localhost:3000/items |
An empty array returned means you have succeeded! The application is already active. =)) You can refer to the application here