Foreword
When you first start with 3D, you will probably realize how vast and vast the 3D design world is, enough for you to spend your whole life researching, learning and improving constantly, it is really a field with lots of interesting challenges. To help you get a better overview of 3D, the basic concepts, industry terms, brief descriptions of the main 3D software available on the market, as well as help you avoid surprises. when starting to enter the 3D world in particular and the art field in general.
The Internet is an immense store of knowledge about 3D and all the knowledge you need is there. However, the problem is that the information is spread and distributed on many different web sources, in order to synthesize all the most necessary and useful information for beginners. 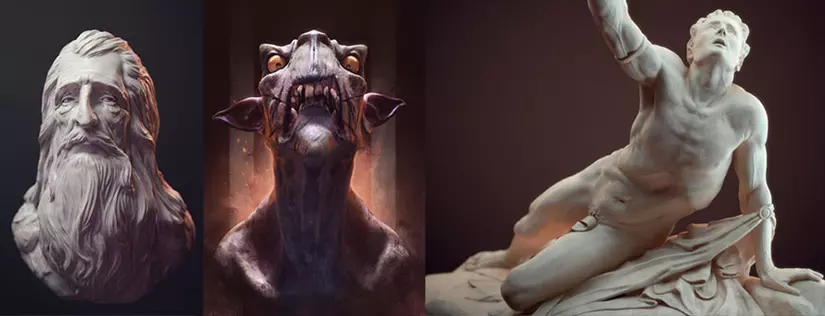 There’s always a great deal of technical work behind the scenes of 3D products, and if you’re someone who wants to dig deeper to be able to create unique works, most 3D applications can. Help you do this easily. But first, you need to master some of the concepts below to get a solid foundation to grow from.
Overview of workflow
There are also 3D products that require a fairly high level of software engineering, but if you can master some of the basic concepts, you can start creating art products from imagination and strength. creativity on its own without being too bound by the limits of software skills.
In this section, we will explain the overview of the sequence of the process of creating a 3D product, using specialized terms to help you become familiar with them.
At project stages, you may need to move back and forth between the stages, for example, you can create ideas by building a model and vice versa. However, once you have a fixed idea in mind, you should follow this sequence, it will save you a lot of time and effort. 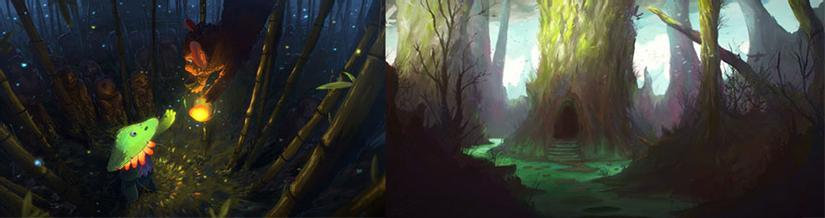
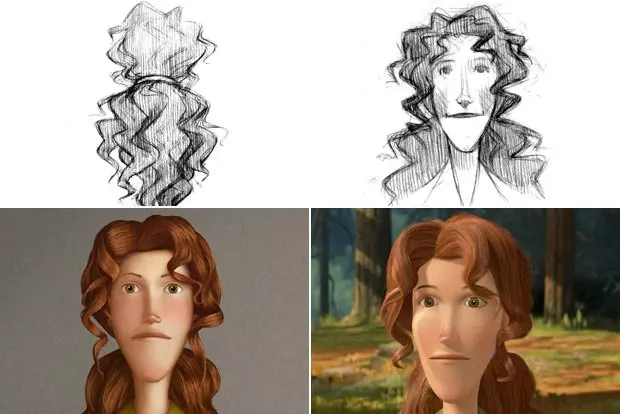
1. Up ideas
This is usually the first step in any project. Here you will gradually begin to find out what the idea you want to express is you.
There are many ways to accomplish this task, but your flow of thought and imagination is a core element, the appearance does not matter, it can be a picture or a drawing. The point is to highlight the image of the final product you intend to represent.
2. Modeling
We can compare 3D modeling to that of sculpting a statue, but in digital form and on a computer. In 3D, the basic building blocks are polygons, instead of stone, wood or clay. The 3D models and characters you often see in games or movies are actually made up of countless small polygons. 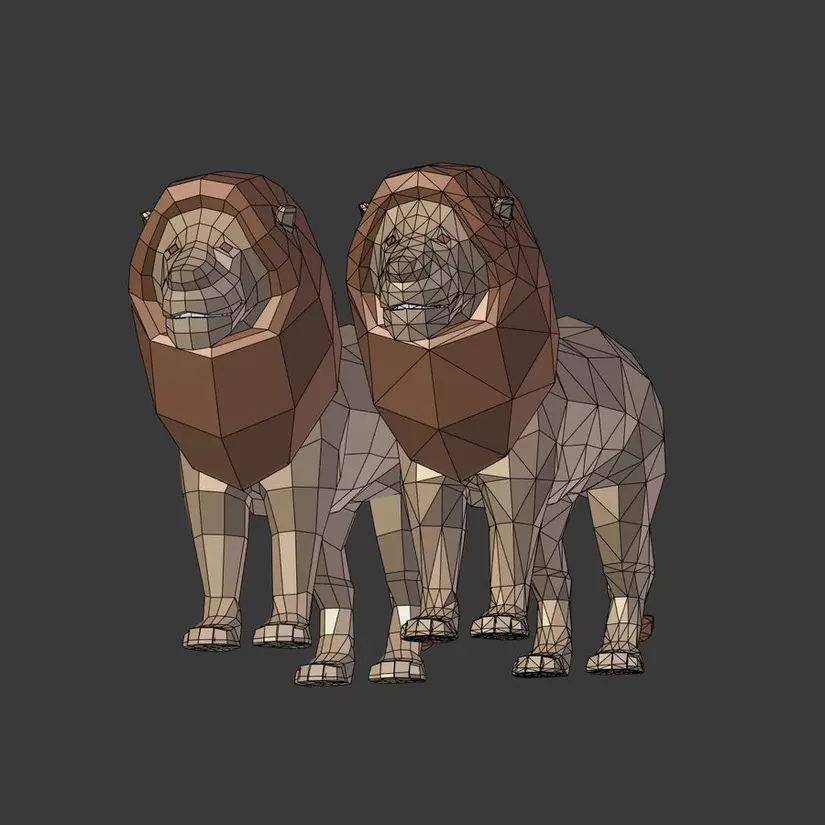
All 3D applications can model polygons to some degree, some of which are better models than others. Modeling polygons also requires high precision, like chiseling ‘clay’ blocks.
We all know a cube is made up of 6 faces, and so it is also made up of 6 polygons. Polygons are just an ornate term for what you learned in school called faces. When one polygon connects to another, you can create the shape of a 3D cube. Imagine cutting pieces of paper and assembling them in different ways to create a certain shape. 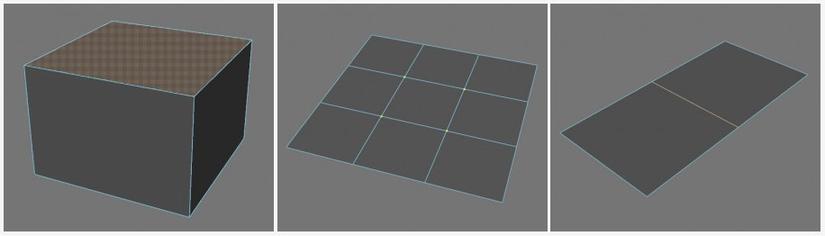
The names of the angles or intersections between the polygons are called vertices (vertices or singular is vertex), and the angles are connected by edges to form polygon constrained lines. Together they form the simplest building blocks you need to grasp before starting 3D design.
Here are three descriptive examples of what is shown above, a cube in which you can see we have marked its face as a polygon, the second one shows four vertices vertices is selected and the last image shows an edge which is the intersection of the two faces.
You can start by modeling polygons, this will help you better understand all common 3D blocks, or you can also experiment with ‘sculpting’ a shape for example. , it will become more specific and easy to visualize for certain types of software and also like real-life sculpting.
In sculpture, you will start with just one piece of clay as the basis and foundation to upload it a large number of cluttered polygons, from which you can move and rearrange to form the model. the characters or environment as desired. This is a process that requires creativity and flexibility and is suitable for things like people and trees, but with objects like cars that need a lot more accuracy.
To sum up, you can divide modeling into two categories: polygon modeling and ‘sculpture’. Both require different skills as well as specialized software.
Sculpture – Sculpting
The sculpting process is ‘organic’ and more user-friendly, and so we recommend that you read about ZBrush or Sculptris tools (you can read more about them in the dedicated tables in the software). It is a very natural process and is almost like molding with real clay.
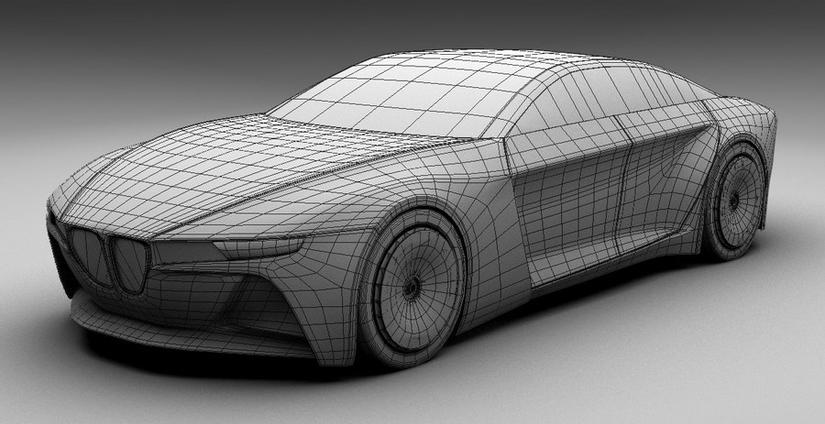
The ZBrush video below is a good example of sculpting. You can use it to model living objects such as people, plants, or animals. 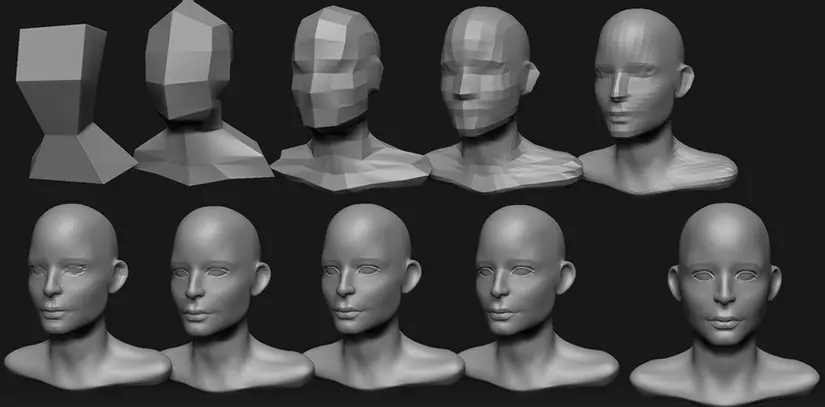 Polygonal modeling – Polygonal modeling Polygonal modeling differs from sculpting in a more technically demanding and requires much greater accuracy. This type of model is often used for mechanical or artificial details, such as cars, spacecraft, books, etc.
If you want to build a model for example, for your own apartment, for example, most of the objects in it will probably be built using polygonal modeling method.
Texturing & Shading (terminology)
Texturing and shading are the stages where you need to define and set color and material parameters for the model. Although texturing and shading are often associated with each other, we will separate them into two separate parts to explain each part in the most understandable way.
3. Texturing
I basically wear clothes for your 3D model 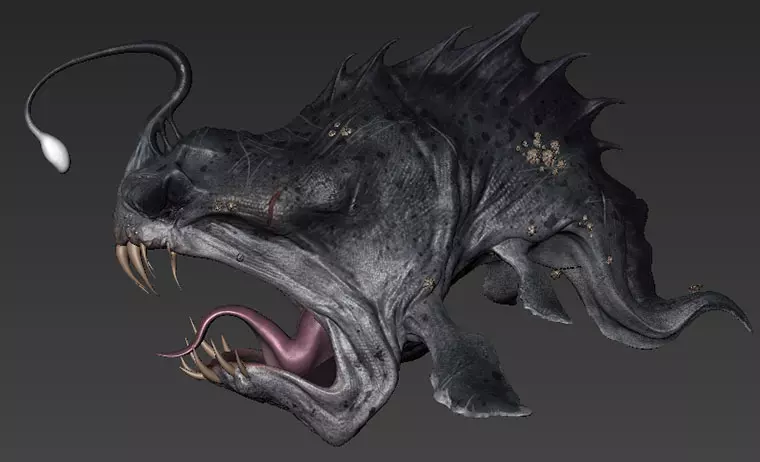
Texturing is comparable to painting a picture. You have a color box and a brush in hand to color the image. Of course, the reality of the painting textures process is a lot more complicated, but we can see this is a pretty similar analogy to texturing models.
Contrary to modeling, texturing is a very specific task and only a handful of software can actually do the job, and the number that produces the desired result is even less.
Texturing is a very important part of a project. If the model is not perfectly built, in some ways you can still cover the flaws with good texturing, but not the opposite.
4. Shading
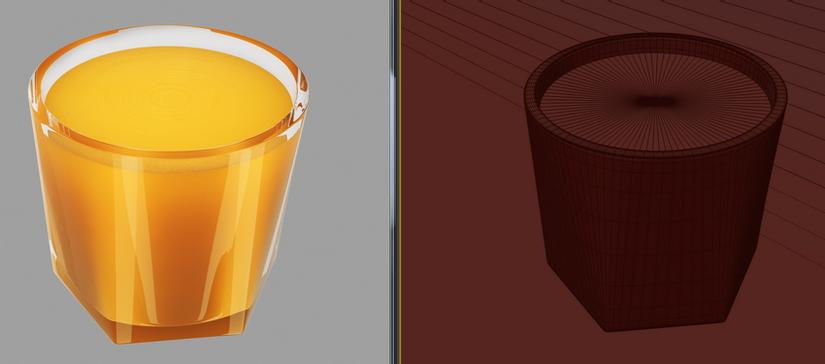
Shading is where you tell the 3D application what details are made of. For example, if you’re looking to make a soda bottle in 3D, you need to make the whole bottle of transparent plastic and translucent plastic cover. You won’t need a lot of texturing, if anything, for this part. Then you need to make bottle labels for it.
You use shaders to let the app know that the label is made of translucent thin plastic, and draw a texture to place on the label, it shows the logo and anything else, such as a line of text that you want to put in for example. At this point, the bottle label will be painted appropriately, with reflection, sparkling in the light like a real plastic label. Shading can technically be a lot more complicated than texturing, but all you need to do is adjust the shader parameters accordingly.
The key to mastering shading is knowing how light works in real life and how to control attributes like reflection, transparency, etc.
Four important concepts to understand about shading are: Refraction, reflection, diffusion and scattering.
Refraction – Refraction
Refraction is the way light responds when it passes through a transparent or semi-transparent object such as water or glass. 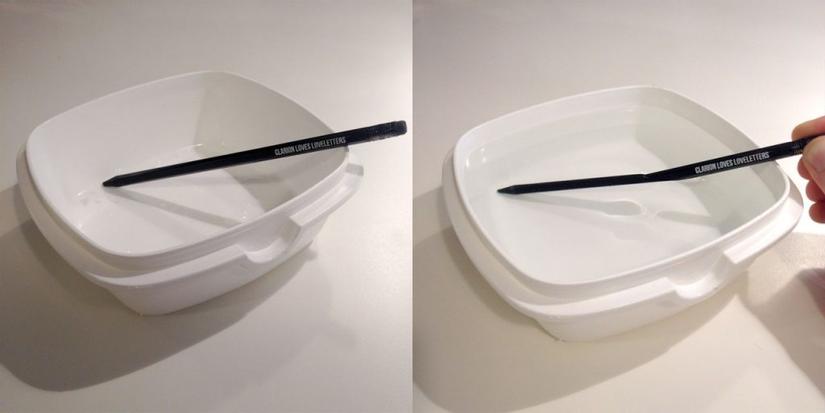
Reflection Reflection Reflection is the amount of light reflected back after they touch an object. An object can reflect the full light like a mirror, or only a small part like a black curtain used in a theater, for example. Many people often think of ‘glossy’ reflections when it comes to light reflection.
Shadow reflexes are reflections on surfaces such as water, ceramic tiles, metal, etc. We are taught that strong light reflecting surfaces will reflect their images on it. However, there are many materials that still reflect a lot of light but do not create shine – you may notice this when you notice your eyes hurt when reading or looking at snow on sunny days.
In fact, almost all the materials you encounter in everyday life reflect light, even in small amounts, so keep this in mind when creating shaders for the scene. 
Diffusion – Diffusion
Diffusion shows how light scatters on a surface and reflects how rough the material is. A fully diffused object scatters light particles at every angle as they hit the surface. Examples of diffused objects can be bed sheets, walls or paper. An object with a very small diffuse is the object that reflects light elements mainly at a certain angle when they touch the object. Like a mirror, very smooth, and almost no diffusion.
Sub surface scattering
Sub surface scattering is often abbreviated as SSS, which is a concept in which light enters inside an object and scatters light around from inside instead of just on the surface of an object like diffusion. The best way to observe this phenomenon is to look at your hand when placed under a light bulb. The scattering of the surface layer is red light that seems to emanate from within the fingers – the rays bouncing back and forth between blood vessels and muscles. 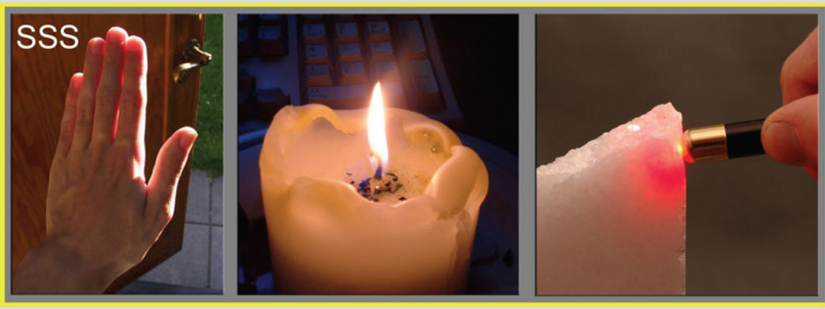
Rigging & Animation
5. Rigging
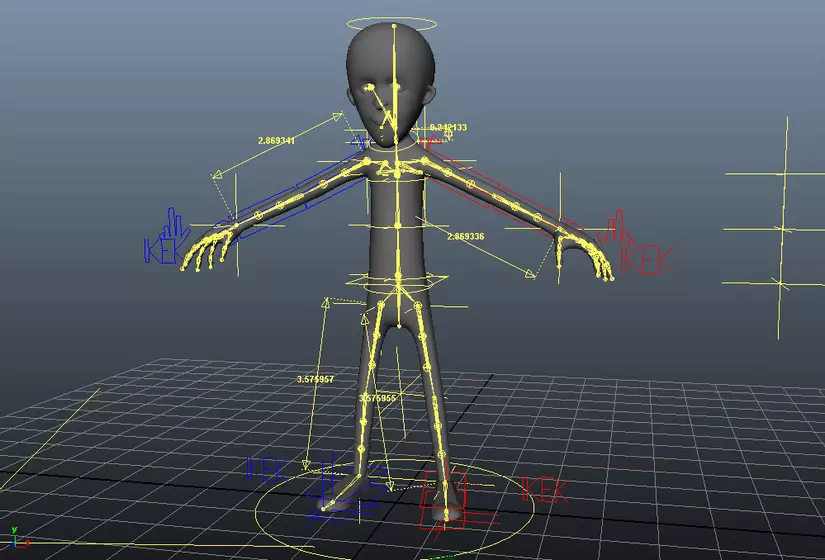
To make the character move, you have to build a skeleton inside the model. This process is called rigging. This is a necessary intermediate step between modeling and animation. Rigging is also one of the highly technical parts of a CG project.
One of the reasons for the high technical factor is not the process of building skeletons, but determining how they move by algorithms and logic.
For example – how to make a shoulder joint, or knee joint, for example? Once the skeleton is created, you need to attach it to the character’s skin, as can be seen with the ‘smooth link’ below.
This is a very demanding part of the art, and it is interesting to know how the skin moves around the bone mass, in addition to the beautiful moving muscles when an animal or an animal moves. Athletics running.
Many people with high technology are often attracted to the process because it is a combination of both technology and artistic elements in a harmonious way. It can be quite complicated and confusing at first, but once mastered, it becomes worth the effort. And the feeling of witnessing your spiritual child being able to move and work is really hard to describe, just like the time at Christmas.
6. Animation
This is the stage where you can move the model and create the motion. It is a very specialized part of a project. Once you get into it, there are many things you need to master and understand such as: acting, staging, timing, etc. You are bringing models to life in real life and more honest. Before that, it was merely a beautiful statue.
Rigging
Rigging is basically divided into two parts
First you need to place a skeleton inside the model. This helps determine how the character can move. The skeleton will vary depending on your purpose, humans will be different than the four-legged animal. Other things also require rigging.
For example, a light switch, for example, only has two states of on and off, but due to the fact that it’s still moving, rigging is still needed.
Second, you define skinning. This is where you make sure that all parts are being appropriately changed when starting animation and moving characters around. This job is simply creating the skin around the skeleton in the previous step, hence the name skinning.
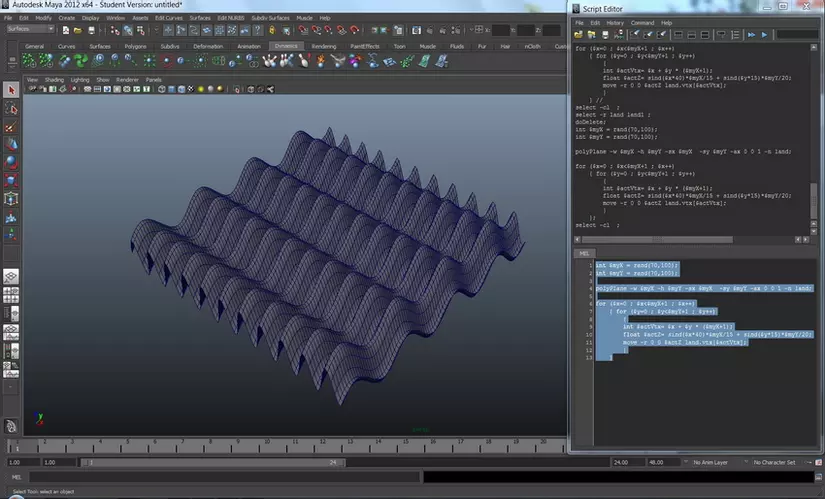
Scripting
Scripting is basically programming in 3D applications. Each application uses a different programming language. Typically, you will write scripts to automate tasks that you frequently encounter, to create things like rigs that are prone to manual errors, or to create custom settings for Things like shaders.
If you have the knowledge of programming, the script will become very powerful and can save you a lot of time and effort. And it takes a lot of time to learn about it. If you want, we recommend learning about it after you’ve mastered 3D.
Simulations and effects
Since this is an introduction to 3D, we also need to talk about simulations and effects. The reason is that they help you to simulate reality as closely as possible. In some cases, you can save time by not having to animate everything, or sometimes when simulation is necessary to get the desired results, such as creating fire.
8. Cloth
Cloth simulations (clothes, costumes) are used a lot in movies and animation today. Creating clothing authenticity, this means that they will respond physically appropriately, based on factors such as gravity, wind, etc. Almost all 3D applications are possible. perform this simulation.
9. Rigid Bodies
Rigid blocks are places where you can simulate something like buildings being destroyed for example. At its core are the fundamental laws of physics and how force elements interact. It is often simulated for broken or falling objects. Something as simple as dominoes falling down a line, for example. Almost all major 3D applications are capable of simulating this task.
10. Hair & Fur
Hair simulation is used a lot in movies and animation to simulate character hair in the most realistic way. This should once again be done so that the hair will respond appropriately to different physical forces. Almost all 3D software can simulate Hair, but there are also specialized software and plugins like Yeti, Hair Farm or Ornatrix
11. Smoke, Fire, Water and Particles
Smoke, fire and water are collectively referred to as 3D fluids. You can see fluid simulations being used a lot throughout films like Life of Pi, where a lot of fluid simulations are done on the ocean. The same goes for effects like smoke, realistic dust, etc.
Some 3D applications can perform this simulation, but most of them are done with specialized software or plugins like Houdini, RealFlow, AfterBurn and Fume FX.
12. The crowd – Crowd
To get a large number of people in the movie, sometimes you need to simulate it using the crowdsourcing feature (Crowd). This is used a lot nowadays, because you can use it to create an army with so many soldiers involved that in fact will not be able to mobilize so many actors.
Crowd simulation is mostly done by dedicated applications and only a handful of 3D applications can do this task without the help of external plugins.
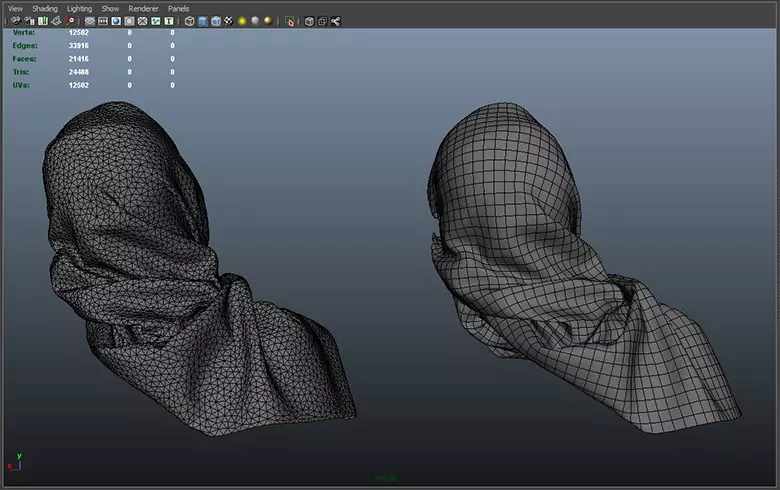
13. Muscles – Muscles
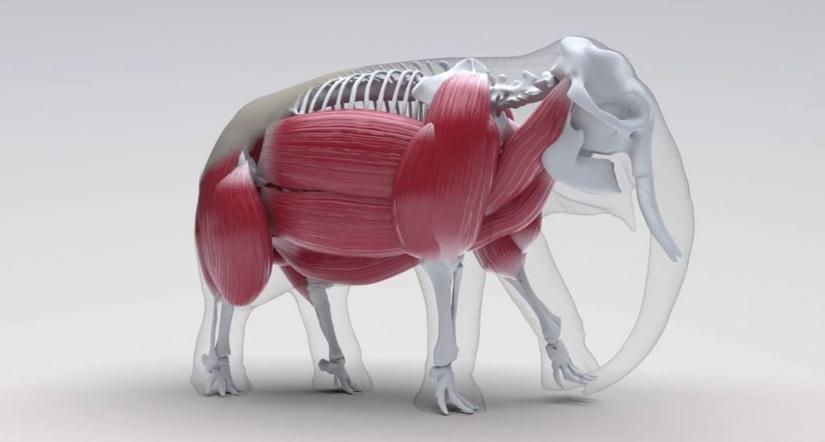
The film industry uses Muscles simulation a lot nowadays to simulate muscle movement, mimicking the effects of muscle relaxants and contractures based on the character’s movements. It’s good to simulate the sliding skin effect on muscle mass, which is difficult to achieve by rigging. Some 3D applications (such as Maya) can do this simulation job.
Lighting & Rendering
14. Lighting
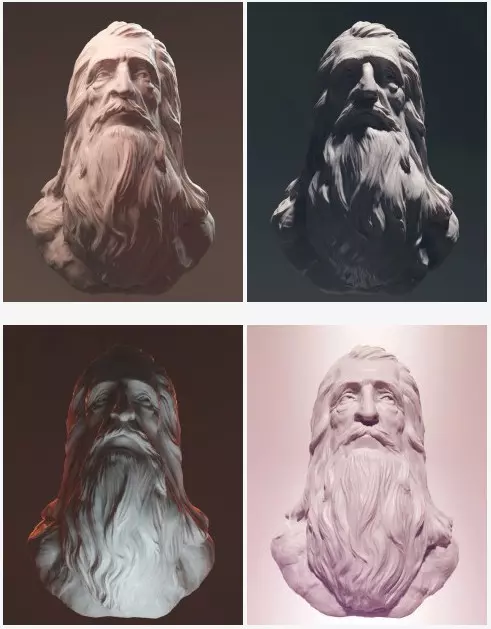
Lighting stage is where you make the tone settings and create the main emotional circuit for the project. The process is very similar to the way you light something in real life: you will need light bulbs based on your needs (brightness, color, sharpness, etc.) and then arrange them. according to your will.
In the example below, you can see a model being lit under different lighting conditions. Hopefully it will help illustrate the importance of light and how light can radically change the look and emotion of an image.
15. Rendering
Rendering is the stage where everything will be combined into one final image product. Rendering is really just a push of a button, but you’ll need a lot of technical knowledge to be able to figure out how to render faster and more efficiently. It will include a lot of work related to parameter settings and sliders.
Different types of light sources
Spot lights
These light sources are similar to light spots in the real world, such as the limelight in theaters.
Area lights
Area lights look like boxes that help soften the light that photographers use. They are very useful in lighting characters with a light, soft and comfortable brightness. At the same time, they also provide relatively good light reflection.
Point (omni) lights
Point (also known as omni light source on some applications) is the name that implies speaking points of light in space. They match details like candle light or light bulbs.
Directional lights
Directional lights emit jars of parallel light, similar to sunlight. If the object is lit by sunlight in reality, this is the light source you need to use.
Different renderers A renderer is the program that calculates and gives the final image you need and there are many different renderers on the market for different tasks. There are also renderers built-in to 3D applications, and there are other renderers that are completely independent software.
Mental Ray
Mental ray is an Nvidia renderer built into 3ds Max, Maya and Softimage. This is a powerful renderer used by a lot of users, but it is slowly losing market to other renderers like Vray because of its flexibility and ease of use.
Mental ray can be quite difficult to use for beginners, as it requires a lot of complex techniques in some respects. It is free to attach to two popular 3D applications today: 3ds Max and Maya and is customized to suit each type.
There are many senior designers using Mental ray, which is ideal for building custom shader settings, where you can really gain insight into how shaders are programmed from scratch. We advise you not to dig deep into the Mental ray at this time, but after having understood the shaders.
V-Ray
V-ray is a great renderer of Chaos Group. It is used extensively in industries ranging from movies, commercials for short films, products from personal interests to gigantic projects.
Vray has a fast, friendly processing speed, and produces great results in a short amount of time, which is why it is our most popular renderer. However, it is difficult to intervene deeply into the core of shaders in Vray because it does not have much script support.
Render Man
RenderMan is a PIXAR renderer and it focuses on large projects and projects. It can handle huge data blocks and is widely used in the industry by professionals, but for individual customers or small studios it’s not really much.
RenderMan is really useful for professional designers, because it allows you to intervene deeply into script shaders, with greater development support than Mental ray.
The popular 3D software
When you first start with 3D, you may feel overwhelmed by the number of 3D software available on the market. In this section, we will take a look at some of the most typical software as well as their characteristics.
Almost all listed applications can do the same job, their features are quite similar. However, the way they perform their tasks can be a bit different, and each has different strengths and weaknesses, but overall you can achieve almost the same results though. What software are you using?
The main software
The software listed here is reviewed based on the variety of features and their multitasking. The arrangement does not mean anything other than the writer’s personal opinion.
Maya
Maya is considered the standard and standard in the field of filmmaking and VFX. It can be a headache for beginners because it requires a lot of technical skills involved, but it is a powerful tool and is used and verified by a lot of designers, as well as supported by a very large user community. Price: $ 3 675 Student Edition: Free 3 years Platform: Windows, OS X, Linux
3ds Max
3ds Max is used extensively in games and architectural visualization. It is also used in advertising design and film making. Has a long history of development and is also supported by a very large user community similar to Maya. Price: $ 3 675 Student Edition: Free 3 years Platform: Windows
Cinema 4D
Cinema 4D has a rich feature set, like the other softwares on this list, but it’s more geared towards motion graphics than feature films. For motion graphics, you simply can’t go wrong with Cinema 4D. Price: Approximately $ 3 700 Student Edition: Free 18 months Platform: Windows, OS X
Softimage
Softimage is quite similar to other 3D applications, what makes it stand out is ICE. This tool is used a lot in VFX. However, in early 2014, the development of this product was stopped. Price: Approximately $ 4 450.00 Student version: Free 3 years Platform: Windows, Linux
Modo
Modo is a great software, is the youngest product on the list, so not as rich in features and tools as Maya and other 3D applications. However, it has very good modeling and rendering tools. Official website Price: $ 1 495.00 Platform: Windows, OS X, Linux
Blender
Blender is a great free alternative, but also less likely to provide you with a true studio working environment. It is provided as open source and is being developed by a fairly large community, helping Blender to grow. Price: Free Platform: Windows, OS X, Linux
Specialized 3D software
The list of software in this section helps to perform very specific tasks, they usually only focus on solving a very specific task in the project, but very effectively.
ZBrush
ZBrush khách quan mà nói là ứng dụng cung cấp tính năng điêu khắc (sculpting) phong phú nhất thị trường, nhưng có thể khá khó học, vì nó không giống với các phần mềm thông thường. Nó được sử dụng trong rất nhiều lĩnh vực, từ game, phim ảnh, quảng cáo. Nếu mới bắt đầu với 3D, đây có thể là một trong những trải nghiệm sáng tạo nhất mà bạn có thể có và chúng tôi thấy ZBrush thực sự rất thú vị. Giá: $ 795 Nền tảngs: Windows, OS X
Sculptris
Sculptris cũng là một công cụ sculpting khá tuyệt. Nó được sở hữu bởi cùng công ty tạo ra ZBrush; Pixologic. Nó hoàn toàn miễn phí và dễ học. Giá: Miễn phí Nền tảngs: Windows, OS X
iClone 7 Character Creator 3
đây là một công cụ cực hay ho nhiều tiện ích tuy nhiên lại khá đắt đỏ khi sờ vào đâu cũng thấy mất tiền vì nó bij chia ra thành rất nhiều hạng muc mà đáng nhẽ phải tích hợp All in one như các phần mềm 3D khác – tuy nhiên phải thừa nhập rằng ngon giá đầy đủ có thể lên hơn 1k$ https://www.reallusion.com/store/product.html?l=1&p=ic
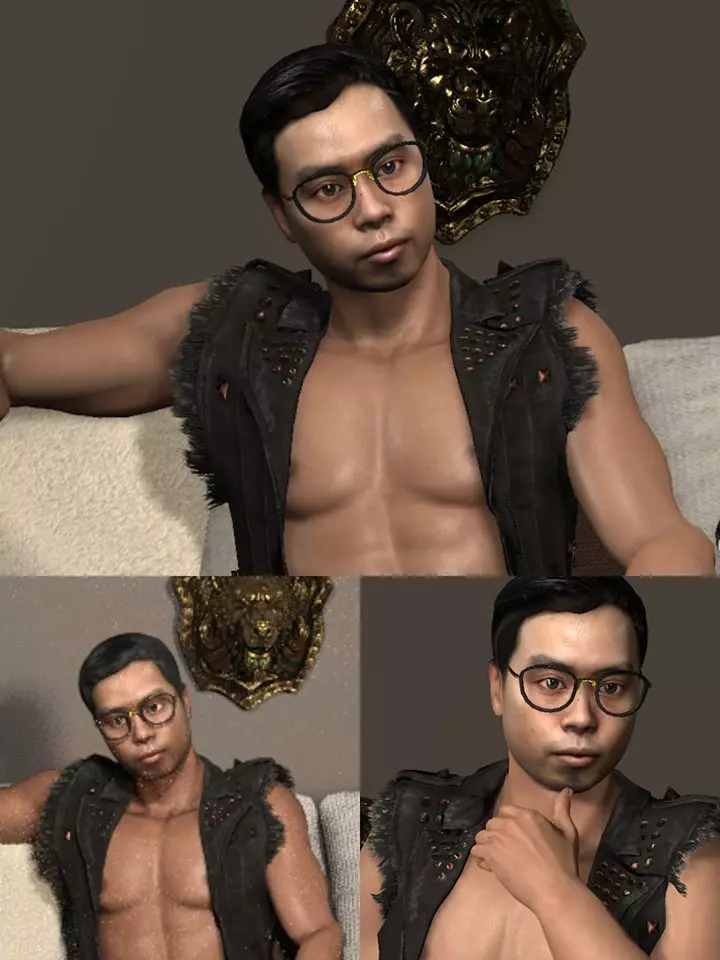
môt số kết quả  )
)