Threading in iOS programming is a rather difficult concept to approach for those who are new to Swift and iOS. Here are a few tips for you to understand easily, the basics of communicating with Threading through GCD (Grand Central Dispatch)
- Understand simple, threading is how you manage the priority tasks in the app. Making the code you write run faster is great, but it would be even better if your users realize that your app runs faster than other apps.
- As a programmer, our goal is always to prioritize UX and UI (the things that the user can see and interact with), it will somehow make the user think: “Oh yeah, this app running fast and handling very well “. Never let a user wait to load something on the screen for too long but that thing they do not care much.
1. Use the Main Thread only for updating views
This is the easiest way to avoid unexpected problems. You must make sure that your views and interfaces are not blocked (interpreted as unaffected) by other things on the Main Queue. Here is an example:
// DO NOT do this DispatchQueue.main.async {// function requestSomething will get the data reponse from the server to self.requestSomething () self.view.backgroundColor = .red}
// DO this let queue = DispatchQueue (label: “myQueue”) queue.async {self.requestSomething ()} DispatchQueue.main.async {self.view.backgroundColor = .red}
By just updating the UIs via the Main Thread, you will be sure that the user will not be blocked from loading something or so. Always avoid calling functions that could affect the load data, images, on the Main Thread.
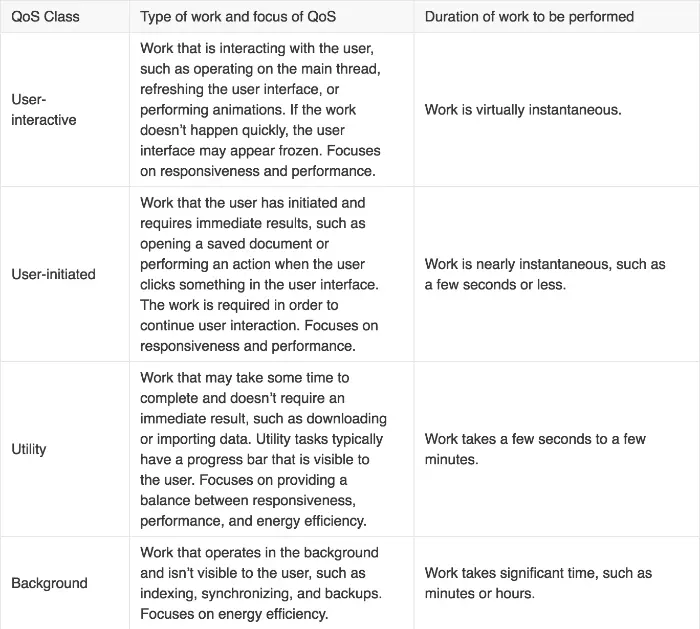
2. Understand Priorities (QoS) in GCD
Apple gives us a few priorities to attach to events in iOS. Events with higher priority will be executed immediately while lower priority will be executed once the system has freed up a bit of talent. Below is a table of high to low priority I took from the Apple document
Queue creation with priority is also quite easy. You just need to pass the parameters to the label to be interpreted as the queue name and the priority you want is done
let queue = DispatchQueue (label: “myQueue”, qos: .utility)
3. Know which thread you are on
To know which thread you are on, just set the Thread.current log line
func requestSomething () {print (“Current thread in (#function) is (Thread.current)”)} // Current thread in requestSomething () is <NSThreadL 0x283e83681> {number = 3, name = (null)}
This way you can see exactly the priority of the running function. Alternatively, you can check if you are on the Main Thread by logging Thread.current.isMainThread
4. Make sure you should always use async in mind
This is one of the best ways to avoid problems when using threading, but sometimes it also has side effects. There are many benefits to using sync under certain circumstances, but for those of you who are just starting out in iOS it’s best to avoid this guy.
NEVER called sync at Main DispatchQueue:
DispatchQueue.main.sync {self.updateUI ()}
And another little note is to avoid using sync on the .userInteractive Queue because it has the same priority as the Main Queue.
5. A few good pages for you to learn about Threading:
- Dive deeper into threading with WWDC Video on concurrency: https://developer.apple.com/videos/play/wwdc2016/720/
- If you are a person who always read the post. Then this Appcoda page will help you understand the difference between priorities and how they are executed: https://www.appcoda.com/grand-central-dispatch/
- Ray Wenderlich also has quite good tutorials on threading: https://www.raywenderlich.com/5370-grand-central-dispatch-tutorial-for-swift-4-part-1-2
Thank you for watching. This article has a few words that are quite difficult to understand when translated literally, so I just try my best to make it as easy as possible for you to understand.
Article Source: https://medium.com/@gabriel_lewis/threading-in-swift-simply-explained-5c8dd680b9b2