Surely, you all hear about search autocomplete, which is a way to automatically suggest words as we type to perform a search feature to facilitate the search more accurately as well as improve the user experience. . This feature has been and is being applied by many websites (you must search google right. That’s it).
In fact, there are many libraries that support us in this search (eg typeahead, Easyautocomplete, Horsey, …). Depending on the project needs, I choose and use the library accordingly.
No more rambling, today I would like to guide you to use the jQuery Autocomplete library to implement this feature.
Let’s get started.
Step 1: Install the Laravel application
You enter the command type the following command to create the project
1 2 | composer create-project --prefer-dist laravel/laravel SearchDemo |
Step 2: Create a table, Cake model and sample data for it.
1. First create the migrate file to create the cakes table
1 2 | php artisan make:migration create_cakes_table |
It will generate file create_cakes_table.php in the path “database / migrations” and we will go into that file and copy the following content:
1 2 3 4 5 6 7 8 9 10 11 12 13 14 15 16 17 18 19 20 21 22 23 24 25 26 27 28 29 30 31 32 33 34 35 36 | <?php use IlluminateSupportFacadesSchema; use IlluminateDatabaseSchemaBlueprint; use IlluminateDatabaseMigrationsMigration; class CreateCakesTable extends Migration { /** * Run the migrations. * * @return void */ public function up() { Schema::create('cakes', function (Blueprint $table) { $table->increments('id'); $table->string('name', 255); $table->float('price', 8, 2); $table->string('description', 255); $table->timestamps(); }); } /** * Reverse the migrations. * * @return void */ public function down() { Schema::dropIfExists('cakes'); } } |
After running the following command to create the cake table:
1 2 | php artisan migrate |
2. Create a Cake model
Type the following command to create the model:
1 2 | php artisan make:model:Cake |
It will generate Cake.php in app / Cake.php and in that file copy the following content:
1 2 3 4 5 6 7 8 9 10 11 12 | <?php namespace App; use IlluminateDatabaseEloquentModel; class Cake extends Model { protected $guarded = ['id']; } |
3. Create sample data for the cakes table.
In turn type the following commands:
1 2 3 | php artisan make:seeder CakeSeederTable php artisan make:factory CakeFactory |
It will generate CakeSeederTable.php and CakeFactory.php files and modify the contents of the two files as follows:
CakeSeederTable.php
1 2 3 4 5 6 7 8 9 10 11 12 13 14 15 16 17 18 | <?php use IlluminateDatabaseSeeder; class CakeSeederTable extends Seeder { /** * Run the database seeds. * * @return void */ public function run() { factory(AppCake::class, 20)->create(); } } |
CakeFactory.php
1 2 3 4 5 6 7 8 9 10 11 12 13 | <?php use FakerGenerator as Faker; $factory->define(AppCake::class, function (Faker $faker) { return [ 'name' => $faker->name, 'price' => $faker->randomElement([100, 1000]), 'description' => $faker->text ]; }); |
Then go to the DatatableSeeder.php file to edit the content as follows:
1 2 3 4 5 6 7 8 9 10 11 12 13 14 15 16 17 18 | <?php use IlluminateDatabaseSeeder; class DatabaseSeeder extends Seeder { /** * Seed the application's database. * * @return void */ public function run() { $this->call(CakeSeederTable::class); } } |
Finally run the following command to create sample data:
1 2 3 | php artisan db:seed --class=CakeSeederTable |
Step 3: Install the jQuery-Autocomplete library
You can use the following 3 ways:
- Use npm:
npm install jquery-autocomplete - Can download the library directly and integrate into the project ( https://github.com/devbridge/jQuery-Autocomplete )
- Integration through CDN ( https://cdnjs.cloudflare.com/ajax/libs/jquery.devbridge-autocomplete/1.4.10/jquery.autocomplete.min.js )
Here I integrate using CDN offline.
Step 4: Build route, Controller, View
1. Build a route
Go to web.php and add the following route:
1 2 3 4 5 | Route::get('demo-search', function () { return view('index'); }); Route::get('search', ' <a class="__cf_email__" href="/cdn-cgi/l/email-protection">[email protected]</a> '); |
2. Build controller
Create controller CakeController with the following command:
1 2 | php artisan make:controller CakeController |
Edit the content of CakeController file to (here I search according to the name of cakes):
1 2 3 4 5 6 7 8 9 10 11 12 13 14 15 16 17 18 19 | <?php namespace AppHttpControllers; use AppCake; use IlluminateHttpRequest; class CakeController extends Controller { public function searchByName(Request $request) { $keyword = $request->input('keyword'); $cakes = Cake::select('name')->where('name', 'LIKE', "%$keyword%")->get(); return response()->json($cakes); } } |
3. Build file view
Here I created the index.blade.php file with the following content:
1 2 3 4 5 6 7 8 9 10 11 12 13 14 15 16 17 18 19 20 21 22 23 24 25 26 27 28 29 30 31 32 33 34 35 36 37 38 39 40 41 42 43 44 45 46 47 48 49 50 51 52 53 54 55 56 57 58 59 | <!doctype html> <html lang="{{ str_replace('_', '-', app()->getLocale()) }}"> <head> <meta charset="utf-8"> <meta name="viewport" content="width=device-width, initial-scale=1"> <title>Search Autocomplete</title> <!-- Fonts --> <link href="https://fonts.googleapis.com/css?family=Nunito:200,600" rel="stylesheet" type="text/css"> <link rel="stylesheet" href="https://stackpath.bootstrapcdn.com/bootstrap/4.4.1/css/bootstrap.min.css"> </head> <body> <div id="container" class="container"> <div class="form-group"> <div>Tìm kiếm</div> <input class="form-control" id="keyword" type="text" placeholder="Search" aria-label="Search"> </div> </div> </body> <script src="https://ajax.googleapis.com/ajax/libs/jquery/3.4.1/jquery.min.js"></script> <script src="https://stackpath.bootstrapcdn.com/bootstrap/4.4.1/js/bootstrap.min.js"></script> <script src="https://stackpath.bootstrapcdn.com/bootstrap/4.4.1/js/bootstrap.bundle.min.js"></script> {{--jquery.autocomplete.js--}} <script src="https://cdnjs.cloudflare.com/ajax/libs/jquery.devbridge-autocomplete/1.4.10/jquery.autocomplete.min.js"></script> <script> $(function () { $("#keyword").autocomplete({ serviceUrl:'/search', paramName: "keyword", onSelect: function(suggestion) { $("#keyword").val(suggestion.value); }, transformResult: function(response) { return { suggestions: $.map($.parseJSON(response), function(item) { return { value: item.name, }; }) }; }, }); }) </script> </html> {{--custom css item suggest search--}} <style> .autocomplete-suggestions { border: 1px solid #999; background: #FFF; overflow: auto; } .autocomplete-suggestion { padding: 2px 5px; white-space: nowrap; overflow: hidden; } .autocomplete-selected { background: #F0F0F0; } /*.autocomplete-suggestions strong { font-weight: normal; color: #3399FF; }*/ .autocomplete-group { padding: 2px 5px; } .autocomplete-group strong { display: block; border-bottom: 1px solid #000; } </style> |
Note:
Above I have integrated the CDN jquery autocomplete :
<script src = “https://cdnjs.cloudflare.com/ajax/libs/jquery.devbridge-autocomplete/1.4.10/jquery.autocomplete.min.js”> </script>
To use the library, we will call the autocomplete as follows:
1 2 3 4 5 6 7 8 9 10 11 12 13 14 15 16 17 | $("#keyword").autocomplete({ serviceUrl:'/search', paramName: "keyword", onSelect: function(suggestion) { $("#keyword").val(suggestion.value); }, transformResult: function(response) { return { suggestions: $.map($.parseJSON(response), function(item) { return { value: item.name, }; }) }; }, }); |
serviceUr l: Ajax call path and response must return json data in the following format:
1 2 3 4 5 6 7 8 9 10 | { // Query is not required as of version 1.2.5 "query": "Unit", // mặc định nó sẽ search theo biến query có thể đổi biến này dùng paramName, "suggestions": [ { "value": "United Arab Emirates", "data": "AE" }, { "value": "United Kingdom", "data": "UK" }, { "value": "United States", "data": "US" } ] } |
transformResult : Will reformat the return value when calling ajax to retrieve data as well as the correct return format that the library requires to display the correct suggestion when typing a search.
onSelect : When clicking a suggestion box will do.
Especially we can also customize css for suggestion boxes:
-The default library will render the following html:
1 2 3 4 5 6 7 | <div class="autocomplete-suggestions"> <div class="autocomplete-group"><strong>NHL</strong></div> <div class="autocomplete-suggestion autocomplete-selected">...</div> <div class="autocomplete-suggestion">...</div> <div class="autocomplete-suggestion">...</div> </div> |
-So we can customize the css like our post as follows:
1 2 3 4 5 6 7 8 9 10 | {{--custom css item suggest search--}} <style> .autocomplete-suggestions { border: 1px solid #999; background: #FFF; overflow: auto; } .autocomplete-suggestion { padding: 2px 5px; white-space: nowrap; overflow: hidden; } .autocomplete-selected { background: #F0F0F0; } /*.autocomplete-suggestions strong { font-weight: normal; color: #3399FF; }*/ .autocomplete-group { padding: 2px 5px; } .autocomplete-group strong { display: block; border-bottom: 1px solid #000; } </style> |
There are many other options depending on the requirements you can refer to in:
https://github.com/devbridge/jQuery-Autocomplete
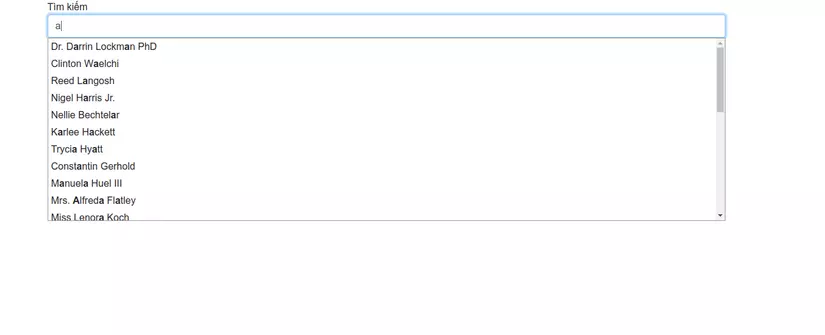
Step 5: See the results
Run the following command and go to the link http: // localhost: 8000 / demo-search:
1 2 | php artisan serve |
Let’s see which achievement:
Conclude
Above is what I learned about the jQuery-Autocomplete library.
Hoping to help you with projects and school assignments …
Good luck.!