RESTful API Design + Call API Using HttpClient In ASP.NET
- Tram Ho
Introduce
RESTful API is a standard used in designing APIs for software, applications and web services to facilitate the management of resources. System resources such as text files, photos, videos, audio or mobile data are the target it is aiming for, including resource states that are formatted and transmitted over HTTP.
- Or to put it another way, it would be a civet to cross if the web pages agreed on returning the respective data. But hundreds of people cannot see it with their own eyes, so in this article I will not go into the theoretical depth, just give a general overview of how RESTful works => from there give a demo to be able to observe better.
I/ Restful API overview
1. Restful API Request Forms
Http Method includes 9 types but RESTful uses only 4 popular types
- GET (SELECT): Returns a Resource or Resource list.
- POST (CREATE): Create a new Resource.
- PUT (UPDATE): Update information for Resource.
- DELETE (DELETE): Delete a Resource.
- => Corresponding to the name commonly known as CRUD (Create, Read, Update, Delete)
2. Restful Design Principles
When we send a request to a certain API, there will be some status codes to recognize as follows:
- 200 OK – Return success for all methods
- 201 Created – Returns when a Resource has been successfully created.
- 204 No Content – Returns when the Resource is successfully deleted.
- 304 Not Modified – Client can use the cache data.
- 400 Bad Request – Invalid request
- 401 Unauthorized – Request requires auth.
- 403 Forbidden – denied without permission.
- 404 Not Found – Cannot find resource from URL.
- 405 Method Not Allowed – Method disallowed for current user.
- 410 Gone – The resource is no longer available, the old version is no longer supported.
- 415 Unsupported Media Type – This Resource type is not supported.
- 422 Unprocessable Entity – Data is not validated.
- 429 Too Many Requests – Request denied due to restriction.
- The API is designed to be clear, you must know what the API does by looking at it
3. Advantages
- Make the application clearer.
- The REST URL represents the resource, not the action.
- Data is returned with many different formats such as: xml, html, rss, json …
- The code is simple and concise.
- REST focuses on system resources.
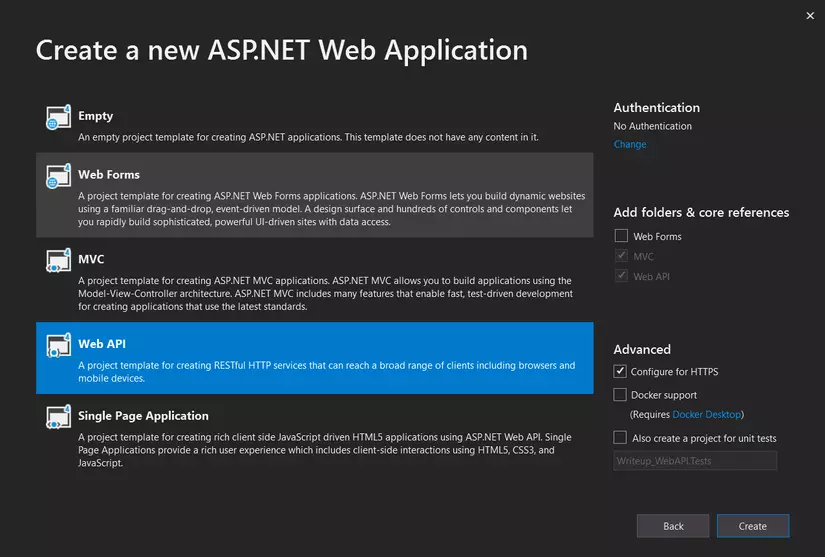
II/ DEMO Simple Restful API design
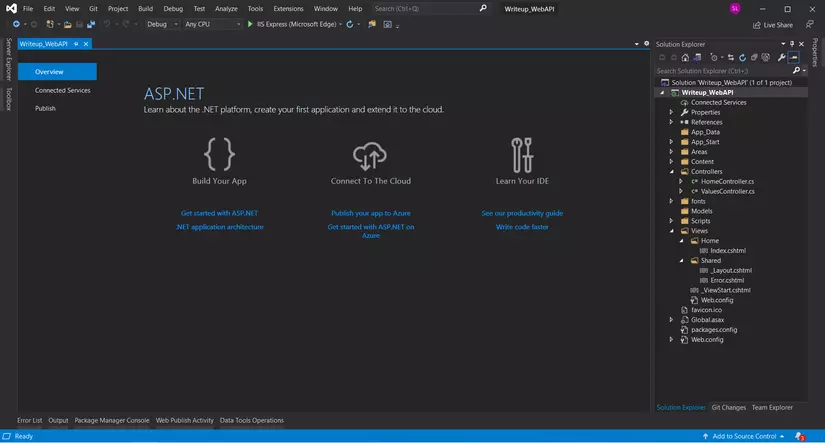
I will create a Web API project and demo to try the way Restful is called
The idea is that I will create a Model class to handle in the API part and then be called by the Controller to show the View (if you are still confused about this part, everyone should preview the MVC model)
1. Section SETUP
I will create a class called Users in the Folder Model to use during the test of the API !!
- Class Users will look like this
1 2 3 4 5 6 7 8 | public class Users { public string Username { get; set; } public string Password { get; set; } public string Fullname { get; set; } public bool IsActive { get; set; } } |
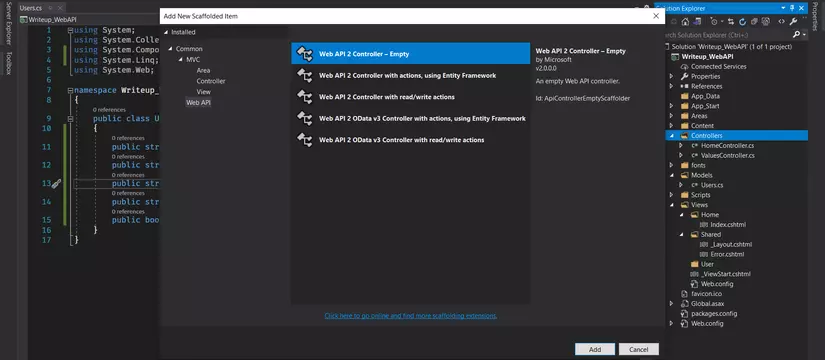
Create Controller part of WebAPI
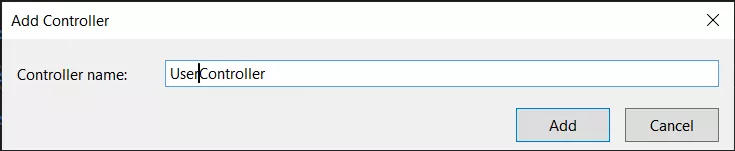
- Create a Controller Web API => I will name it UserController
- Instead of using a database to easily stored and interacting with data BUT because I am lazy to create a database and connect data types, I will add directly in the code for a quicker !!
- Add 1 function AllUser to create a User List to test
1 2 3 4 5 6 7 8 9 10 11 12 13 14 15 16 17 | private List<Users> AllUser() { List<Users> list = new List<Users>(); for (int i = 1; i < 6; i++) // Tạo ra 6 User { Users u = new Users() // Tạo ra user mới { Username = $"user {i}", Password = $"password {i}", Fullname = $"fullname {i}", IsActive = true }; list.Add(u); // Thêm vào danh sách User } return list; } |
- We will reinstall Uri of the API by going to Folder AppStart/WebApiConfig.cs and fix the routeTemplate was“api/{controller}/{action}/{id}”
- Add the Json Formatter code below to format the returned data as json.
1 2 3 4 5 6 7 8 9 10 11 12 13 14 15 16 17 | public static void Register(HttpConfiguration config) { // Web API configuration and services // Web API routes config.MapHttpAttributeRoutes(); config.Routes.MapHttpRoute( name: "DefaultApi", routeTemplate: "api/{controller}/{action}/{id}", defaults: new { id = RouteParameter.Optional } ); config.Formatters.JsonFormatter.SupportedMediaTypes // Thêm vào .Add(new MediaTypeHeaderValue("text/html")); } |
2. API creation section
- Return execution is HttpResponseMessage to determine StatusCode How much is returned (return execution StatusCode as part Design principles RESTful which I mentioned in part 2)
- Or can return with Json error inside Content of HttpClient
2.1. GET METHOD
- PART USERCONTROLLER
- Add the code that implements the GET method to get all Users
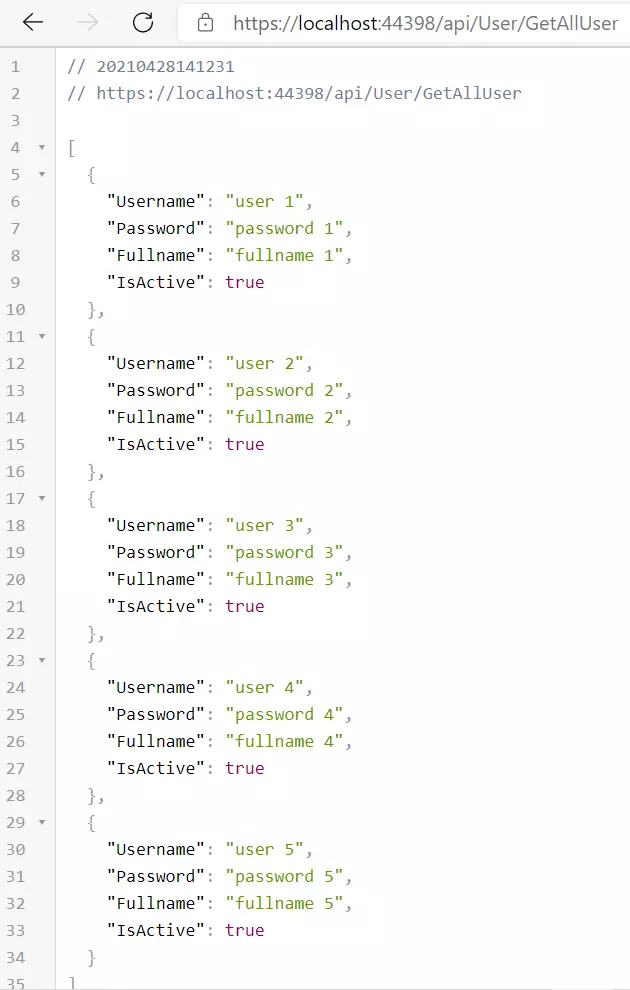
1 2 3 4 5 6 7 8 9 10 | // GET api/User/GetAllUser [HttpGet] // Cho phép truy cập với phương thức là GET public HttpResponseMessage GetAllUser() { var list = AllUser(); if (list != null) return Request.CreateResponse(HttpStatusCode.OK, list); else return Request.CreateResponse(HttpStatusCode.NotFound); } |
- The website’s url will be the part host:port + /api/{tên controller}/{action của controller}/{tham số nếu có} as configured in the Config file.
- When accessing the address /api/User/GetAllUser We will get 5 User created as Json
2.2 POST METHOD
In the Post, Put and Delete sections, later, you will have to use a support tool to send a request to determine what the data is obtained, because the request sent will be in the form of an invisible send.
- Here I will use POSTMAN test try, or can enter https://reqbin.com/ to use directly on the web without downloading
- Note: To secure transmitted data, restrict the params to pass directly after the url
- For example: https://test.com?data=blabla&data1=blabla
- PART USERCONTROLLER
- Add the code used to POST upload data
- This function is used to create 1 more user and return the list of users that have been added to the Content section of HttpresponseMessage.
1 2 3 4 5 6 7 8 9 10 11 12 13 14 15 16 | // POST api/Users/CreateNew [HttpPost] public HttpResponseMessage CreateNew(Users u) { try { var list = AllUser(); list.Add(u); // Thêm User đã được truyền ở tham số User u return Request.CreateResponse(HttpStatusCode.OK, list); } catch (Exception) { return Request.CreateResponse(HttpStatusCode.BadRequest); } } |
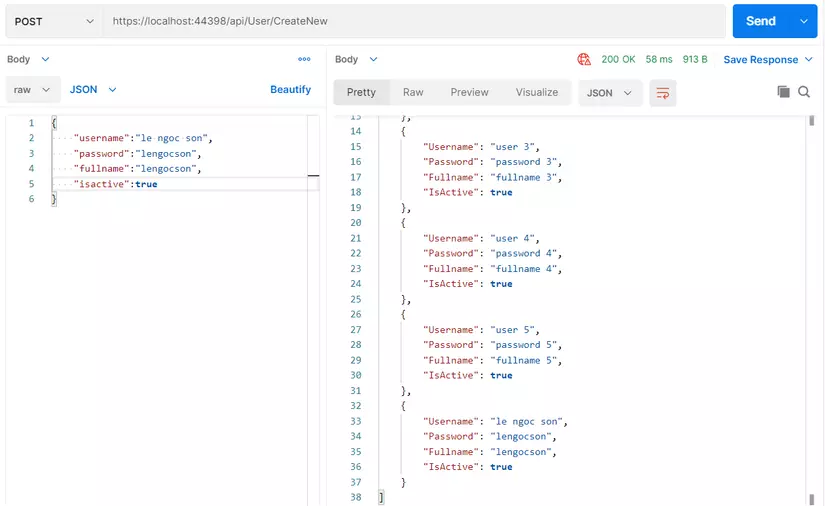
- POST SEND POST REQUEST
- Post can be sent in json or urlencoded format
- The returned data has added the user le ngoc son to the list
To be able to customize to only receive outgoing Request in Uri or just Body we can modify the function’s parameter.
- public HttpResponseMessage CreateNew([FromBody] Users u) // Get parameters on the Body side sent up.
- public HttpResponseMessage CreateNew([FromUri] Users u) // Get the parameter on the Url side
2.3. PUT METHOD
Similar to Post, we will add a function to Update user information
- PART USERCONTROLLER
- One more function used to update user information using Method is PUT
1 2 3 4 5 6 7 8 9 10 11 12 13 14 15 16 17 18 | // PUT api/Users/UpdateUser [HttpPut] public HttpResponseMessage UpdateUser(Users u) { try { var list = AllUser(); // Lấy index của User thông qua username int index = list.FindIndex(p => p.Username == u.Username); list[index] = u; // Update user return Request.CreateResponse(HttpStatusCode.OK, list); } catch (Exception) { return Request.CreateResponse(HttpStatusCode.BadRequest); } } |
- SEND PUT REQUEST
- Update information of user 1 by entering the correct username to update, the update data will be the rest of the information.
- The data returns user 1 with updated password, fullname and inactive

2.3. DELETE METHOD
- PART USERCONTROLLER
- Add the DeleteUser function by passing User and comparing username (usually update or delete will use a separate Id attribute to determine the User needs to perform, but for the time being, just demo first)
1 2 3 4 5 6 7 8 9 10 11 12 13 14 15 16 17 | // DELETE api/Users/DeleteUser [HttpDelete] public HttpResponseMessage DeleteUser(Users u) { try { var list = AllUser(); int index = list.FindIndex(p => p.Username == u.Username); list.RemoveAt(index); return Request.CreateResponse(HttpStatusCode.OK, list); } catch (Exception) { return Request.CreateResponse(HttpStatusCode.BadRequest); } } |
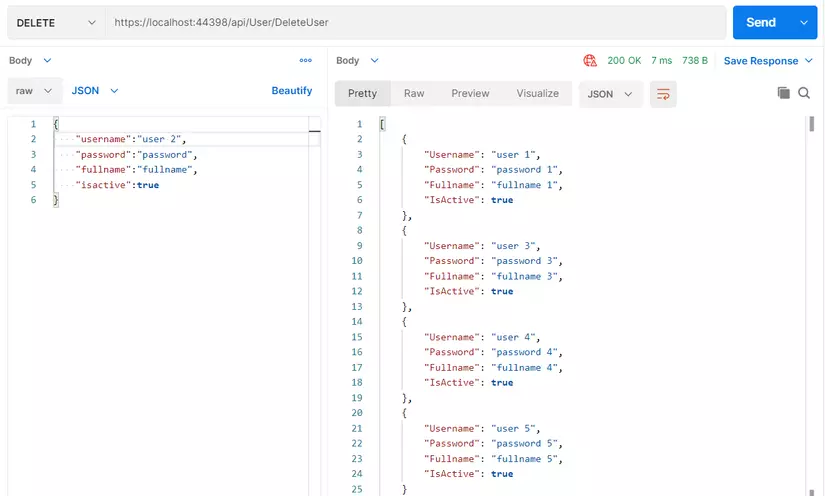
- DEAD DELETE REQUEST
- The data returned by user 2 has been deleted from the list
3. Call the API on the Controller
- After creating a simple API, we will call the API on the controller to display the View interface
- Here, we must use a class call Request to be able to call the API, I will demo with HttpClient
- Temporarily borrow the HomeController to display it on the Home page
- We’ll use the async / await method so that we can handle the HttpClient asynchronously
1 2 3 4 5 6 7 8 9 10 11 12 13 14 15 16 17 18 19 20 21 22 23 24 25 26 27 28 29 | public class HomeController : Controller { public async Task<ActionResult> Index(Users user) { ViewBag.Title = "Home Page"; var list = await GetAllUser(); if (list != null) // Nếu list user khác null thì trả về View có chứa list return View(list); return View(null); } private async Task<List<Users>> GetAllUser() // Hàm Gọi API trả về list user { string baseUrl = Request.Url.Scheme + "://" + Request.Url.Authority + Request.ApplicationPath.TrimEnd('/') + "/"; // Lấy base uri của website using (var httpClient = new HttpClient()) { HttpResponseMessage res = await httpClient.GetAsync(baseUrl + "api/User/GetAllUser"); if (res.StatusCode == System.Net.HttpStatusCode.OK) { List<Users> list = new List<Users>(); list = res.Content.ReadAsAsync<List<Users>>().Result; return list; } return null; } } } |
- In the View of HomeController I will edit as follows:
1 2 3 4 5 6 7 8 9 10 11 12 13 14 15 16 17 18 19 20 21 | @{ ViewBag.Title = "All User"; } @model IEnumerable<Writeup_WebAPI.Models.Users> <div class="container"> <h1>ViewBag.Title</h1> @{ int i = 1; foreach (var item in Model) { <h4>User @i</h4> <h5>@item.Username</h5> <h5>@item.Password</h5> <h5>@item.Fullname</h5> <h5>@item.IsActive</h5> i++; } } </div> |
- Run the Code and check the results
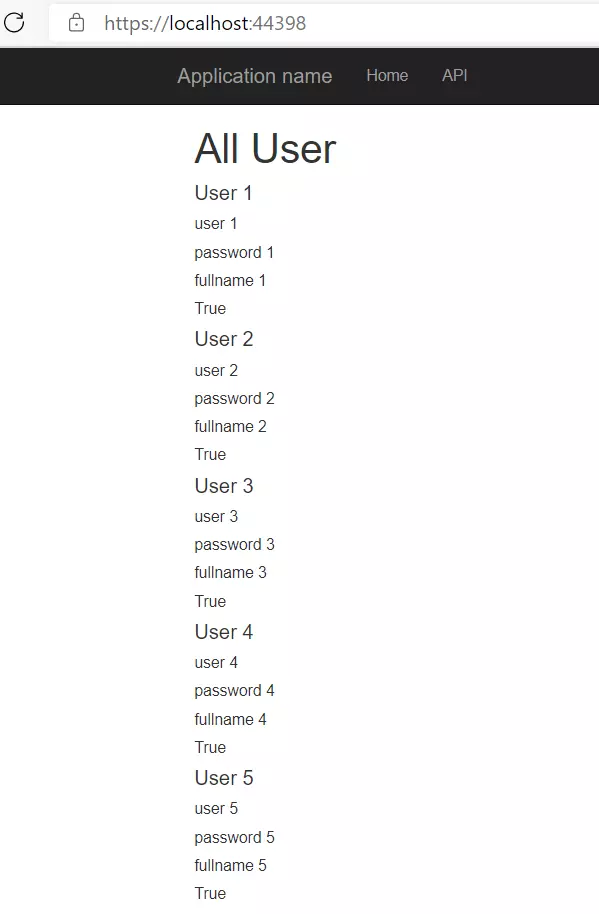
So Json raw data has been converted to List User and displayed as we want.
- The Post, Put, Delete section will do the same thing, only change in the syntax of HttpClient or you can create a separate static class that is only used to send Request and return data for testing.
- Please refer to how to send requests in HttpClient at https://www.c-sharpcorner.com/article/calling-web-api-using-httpclient/
Probably reading this far, everyone thinks it’s done, right
- BUT there is one problem that arises that anyone can call the API that triggers like that
- NO, HERE WE DO NOT DO THIS: v
- The fix here is to use Authorize to decentralize the use of the API (you can use JWT) => Maybe in the next post I will continue to this series but about the security and data binding, all
III/ End
- Through this article, I have demonstrated how to create and call Restful API to process + put up the interface.
- The article will have many errors, you can contribute more comments to make the following articles better.
- Good luck!!!
References
- Restful overview: https://topdev.vn/blog/restful-api-la-gi/
- Using Web API: https://www.c-sharpcorner.com/article/create-simple-web-api-in-asp-net-mvc/
- Using HttpClient: https://zetcode.com/csharp/httpclient/