React app works with the Rails 5.1 API
- Tram Ho
Set up the Rails 5.1 API
Start by building the Rails API. We will use Rails’ built-in feature to build API-only applications.
Make sure you have version 5.1 or higher of the installed Rails gem.
1 | gem install rails |
Next, create a Rails API app with the flag --api
1 2 | rails new --api ideaboard-api cd ideaboard-api |
Next create the data model. We only need one data model to use for ideas, with those two fields being title and body, both of which have a type of string .
Start and run migration:
1 2 3 | rails generate model Idea title: string body: string rails db: migrate |
So we have a table for Ideas, and let’s write some sample data so we can show it.
In db/seeds.rb file, add the following code:
1 2 3 4 5 6 7 8 9 10 11 12 13 14 15 16 17 18 19 | ideas = Idea.create ( [ { title: "A new cake recipe", body: "Made of chocolate" }, { title: "A twitter client idea", body: for replying to mentions and DMs " }, { title: "A novel set in Italy", body: "A mafia crime drama starring Berlusconi" }, { title: "Card game design", body: "Like Uno but adding drinking" } ]) |
You can replace other content you desire.
Then run the command:
1 | rails db: seed |
Then, create a IdeasController with the index action in the file: app/controllers/api/v1/ideas_controller.rb :
1 2 3 4 5 6 7 8 | Api module :: V1 class IdeasController <ApplicationController index def @ideas = Idea.all render json: @ideas end end end |
Notice that the controller is inside the app/controllers/api/v1 folder because we are setting the version for our API. This is a good way to avoid errors caused by changes and to meet backward compatibility for our API.
Then add resource ideas in config/routes.rb
1 2 3 4 5 6 7 | Rails.application.routes.draw by namespace: api due namespace: v1 due resources: ideas end end end |
OK, now let’s test our first API endpoint:
Run the command:
1 | rails s -p 3001 |
Then, check the endpoint to get the data of all ideas with curl :
1 | curl -G http: // localhost: 3001 / api / v1 / ideas |
And we will see the Ideas data returned as JSON:
1 | [{"id": 18, "title": "Card game design", "body": "Like Uno but add drinking", "created_at": "2017-09-05T15: 42: 36.217Z", "updated_at" : "2017-09-05T15: 42: 36.217Z"}, {"id": 17, "title": "A novel set in Italy", "body": "A mafia crime drama starring Berlusconi", "created_at" : "2017-09-05T15: 42: 36.213Z", "updated_at": "2017-09-05T15: 42: 36.213Z"}, {"id": 16, "title": "A twitter client idea", "body": "Only for replying to mentions and DMs", "created_at": "2017-09-05T15: 42: 36.209Z", "updated_at": "2017-09-05T15: 42: 36.209Z"}, { "id": 15, "title": "A new cake recipe", "body": "Made of chocolate", "created_at": "2017-09-05T15: 42: 36.205Z", "updated_at": "2017 -09-05T15: 42: 36.205Z "}] |
We can also test this endpoint in a browser by opening the link: http: // localhost: 3001 / api / v1 / ideas
Set up the Front-end application using the Create React App
Now that we have a basic API, set up the Front-end React application using the Create React App .
Create React App is a Facebook project, which helps you get started with React app quickly without any setup.
First, make sure you have Node.js and npm installed. You can download the installer from the Node.js website. Then install Create React App by running the command:
1 | npm install -g creat-react-app |
Then leave Rails directory and run the following command:
1 | create-react-app ideaboard |
Next, run React app:
1 2 | cd ideaboard npm start |
You will be directed to the http: // localhost: 3000 page
This React application has a default page with a React component called the App to display React logo.
The content of the page is rendered via React component in the src/App.js file
1 2 3 4 5 6 7 8 9 10 11 12 13 14 15 16 17 18 19 20 21 22 23 24 25 26 27 28 | import React, {Component} from 'react'; import logo from './logo.svg'; import './App.css'; App class extends Component { render () { return ( <div className = "App"> <header className = "App-header"> <img src = {logo} className = "App-logo" alt = "logo" /> <p> Edit <code> src / App.js </code> and save to reload. </p> <a className = "App-link" href = "https://reactjs.org" target = "_ blank" rel = "noopener noreferrer" > Learn React </a> </header> </div> ); } } export default App; |
The first React Component
Our next step is to revise this file to use the API we just created and the list lists all the ideas on the page.
Let’s start by changing the Welcome message with a <h1> tag containing the title of our application: “Idea Board”.
We will also add a component called IdeasContainer . We need to import it and enter it in function render:
1 2 3 4 5 6 7 8 9 10 11 12 13 14 15 16 17 18 | import React, {Component} from 'react' import './App.css' import IdeasContainer from './components/IdeasContainer' App class extends Component { render () { return ( <div className = "App"> <div className = "App-header"> <h1> Idea Board </h1> </div> <IdeasContainer /> </div> ); } } export default App |
We continue to create the IdeasContainer component within a new file: IdeasContainer.js inside the directory: src/components :
1 2 3 4 5 6 7 8 9 10 11 12 13 | import React, {Component} from 'react' class IdeasContainer extends Component { render () { return ( <div> Ideas </div> ) } } export default IdeasContainer |
Let’s also change the style of App.css to have a white header and black text, and we also remove the styles we don’t need:
1 2 3 4 5 6 7 8 9 | .App-header { text-align: center; height: 150px; padding: 20px; } .App-intro { font-size: large; } |
The new component will need to communicate with our Rails API end point to get information about Ideas list and display them.
Get API data by axios
We will create an Ajax call to the API inside the lifecycle method componentDidMount () of the IdeasContainer component and the ideas store in the state of the component.
1 2 3 4 5 6 | constructor (props) { super (props) this.state = { ideas: [] } } |
And we will update state in componentDidMount() .
Please use the axios library to implement API calls. You can also use jQuery if you prefer that way.
Install axios by npm:
1 | npm install axios --save |
Then import it into IdeadsContainer :
1 | import axioss from 'axios' |
And use it in componentDidMount ():
1 2 3 4 5 6 7 8 | componentDidMount () { axios.get ('http: // localhost: 3001 / api / v1 / ideas.json') .then (response => { console.log (response) this.setState ({ideas: response.data}) }) .catch (error => console.log (error)) } |
However, this time we will get an error because our API is located on another port (3001 compared to 3000), and we still have not enabled Cross Origin Resource Sharing (CORS).
Enabling Cross Origin Resource Sharing (CORS)
First, enable CORS using the gem rack-cors on our Rails app:
Add gem to Gemfile:
1 | gem 'rack-cors',: require => 'rack / cors' |
Install it
1 | bundle install |
Then, add the middleware configuration to the config/application.rb file.
1 2 3 4 5 6 | config.middleware.insert_before 0, Rack :: Cors do allow do origins 'http: // localhost: 3000' resource '*',: headers =>: any,: methods => [: get,: post,: put,: delete,: options] end end |
We limit origins to only include our front-end app at http: // localhost: 3000 and allow access to the REST API standard endpoint methods for all resouces.
Now we need to restart the Rails server, and if we refresh the browser, we will not have CORS errors anymore.
The website will be loaded successfully and we can see that API data from Rails is logged in the console.
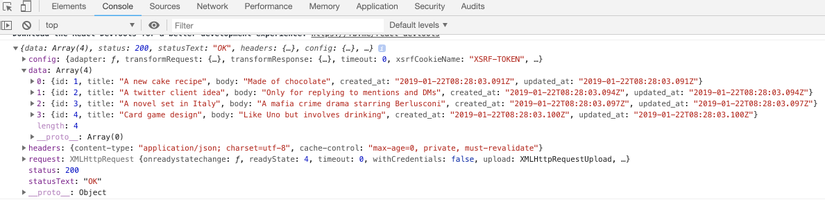
So we already know that we can get the ideas from API and use it in our React component.
We can change the render function to run a loop around the ideas list from state and display all.
Note the attributes key of div className is tile .
We need to include it when creating the list of elements. Keys help React identify which items have been changed, added or removed.
Now let’s add some styles in App.css to make the idea items look like a tile.
Stateless functional components
Before we continue, refactor the code and move the JSX portion of the tile ideas to a separate component called Idea
1 2 3 4 5 6 7 8 9 | import React from 'react' const Idea = ({idea}) => <div className = "tile" key = {idea.id}> <h4> {idea.title} </h4> <p> {idea.body} </p> </div> export default Idea |
This is a stateless functional componet (also known as a “dumb” component), which means it has no state at all. It is just a function that accepts input data and returns JSX.
And in the map function of IdeasContainer, we can return the new Idea component created as follows:
1 2 3 | {this.state.ideas.map ((idea) => { return (<Idea idea = {idea} key = {idea.id} />) })} |
Also don’t forget to import Idea :
1 | import Idea from './Idea' |
So we have completed the first part of the application. We have an API with an endpoint to get ideas and have a React app to display them.
Source : Viblo