I) General introduction about Nmap
As we all know, Nmap with the latest version is now 7.80 released at DEFCON 27 is an open source network scanning tool, used very popular by security experts because of its effectiveness, transparency that it provides because an open source tool can enable the cybersecurity community around the world to contribute, build and develop together.
In this article I will guide you to use the Nmap tool to scan the operating system, specific running services and more with the website Viblo.asia . This article is written for educational purposes only and I do not accept any responsibility and do not recommend relying on this article to exploit information and conduct intrusions without permission.
1. How it works
Nmap uses IPs on packets in different special ways to identify hosts on a network, thereby determining if services are running on that system, the operating system is running. , what are the filters and the firewall it is using.
2. Features of Nmap
- Security detection
- exploit security holes
- discovered the backdoor
- network scan
- scan servers and ports on servers on the system
- Determine the operating system, service, firewall you are using
- provides information about device type, DNS name, Mac address
- execute NSE or Lua scripts with the test objects
II) Instructions for downloading and installing
Nmap can be used on Windows and macOS and is supported on Linux distributions including Red Hat, Mandrake, SUSE and Fedora and works on other operating systems including BSD, Solaris, AIX and AmigaOSfaffa
1. On the Windows operating system
Go to https://nmap.org/download.html and download the installation as follows: 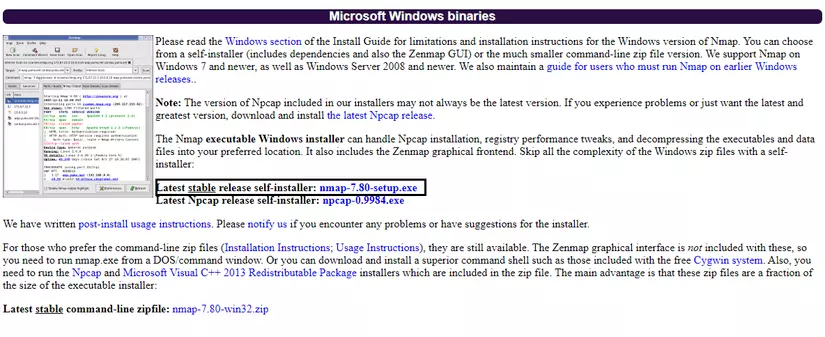
2. On some of the other Linux distributions
For Debian based I use the command: #sudo apt install nmap
For Red Hat Based we use the command: #yum install nmap
And press “Y” to confirm installation 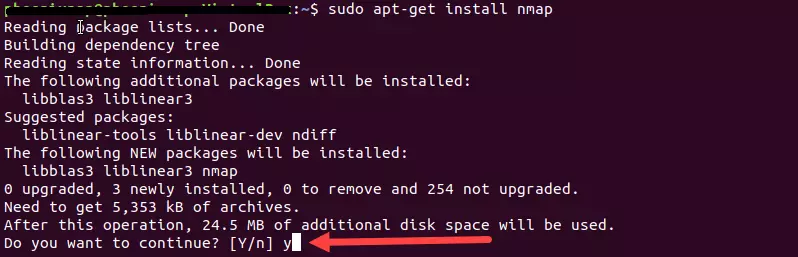 https://images.viblo.asia/d73df3e8-19f0-48f0-bea4-85b6d2decd1c.png
After installing Nmap, we can check if the installation is successful and what the version is using the command: #nmap --version
III) Use Nmap
1. NSE script
Nmap Scripting Engine (NSE) is one of the most dangerous options in Nmap. It allows users to write and share simple scripts to perform various tasks in the networking field automatically. These scripts can be used to detect vulnerabilities and exploit vulnerabilities.
To perform this function of nmap use the option: –-script [tên_script].nse
In nmap we include 4 types of NSE scripts as follows:
- Host script : A type of script that is executed after nmap has performed its task , such as scanning hosts, network ports or operating systems, etc.
- Prerule script : is a script that is executed before any scanning or information gathering task
- Service script : is a script that runs against a service that is listening above the pentest target
- postrule sciprt : is a script that runs after Nmap executes the target scan
Location of NSE script: The scripts (.nse file) are in the script directory when installing nmap, users can customize editing, adding other scirpt.
On each different operating system they will be stored in a different location:
- On linux :
~/.nmap/scripts/or/usr/share/nmap/scripts/or in$NMAPDIR.Or the easiest way is to run the command:locate *.nse - On Mac: / usr / local / Cellar / nmap // share / nmap / scripts /.
- On windows : C: Program Files (x86) Nmap scripts or C: Program Files Nmap scripts
- Also in case you want to update NSE scripts on Nmap use the command:
sudo nmap --script-updatedb
Here are some examples of using NSE Script to scan for security holes in the system
- SSL-HEARTBLEED: Detects the OpenSSL Heartbleed bug (CVE-2014-0160).
Download: https://svn.nmap.org/nmap/scripts/ssl-heartbleed.nse
Command:
#sudo nmap -sV -p 443 –script=ssl-heartbleed.nse <IP_của_mục tiêu> - NMAP-VULNERS
NSE scripts help provide information about possible vulnerabilities on the system based on Vulners.com ‘s API
Github: https://github.com/vulnersCom/nmap-vulners
Command:
#sudo nmap -sV --script vulners [--script-args mincvss=] <IP_của_mục tiêu> - FREEVULNSEARCH
NSE script to query vulnerabilities via the cve-search.org API.
Github: https://github.com/OCSAF/freevulnsearch
Command:
#sudo nmap -sV --script freevulnsearch <IP_của_mục tiêu>
2. Status of ports in Nmap
During the scan we can see the status of the ports as follows:
- Open : There is a service that makes an outbound connection but is not monitored by a firewall.
- Closed : The target device still receives and responds, but no application is listening on that port. When the port is closed, it can still tell if the host is live
- Filtered : Once blocked by the firewall, you will not receive any response from the target.
- Unfiltered : Not blocked, but cannot know whether the port is closed or open.
- Open / Filtered : It is not known whether the port is open or filtered. It happens for the type of scan that the port is open but does not respond at all so its expression is like filtering.
- Closed / Filtered : A status that appears when Nmap does not know if the port is Closed or Filtered. It is used for scanning IPID Idle.
3. Common commands in Nmap
- Check if the host is still alive:
#nmap -sn [IP_của_mục tiêu] - Check the operating system of the server:
#nmap -O [IP_của_mục tiêu] - Scan a specific port:
#nmap -p [số_cổng] [IP_của_mục tiêu] - Scanning the TCP connection, Nmap will perform a three-step
#nmap -sT [IP_của_mục tiêu]scan:#nmap -sT [IP_của_mục tiêu] - Scan UDP connection:
#nmap -sU [IP_của_mục tiêu] - Scan to determine the version of the service that is running on the host:
#nmap -PN -p [số_cổng] -sV [IP_của_mục tiêu]
And there are many more arguments you can refer to the following: https://hackersonlineclub.com/nmap-commands-cheatsheet/
4. Realistic demo with Viblo
First, when we have identified the target, to get the IP try with ping: ping viblo.asia
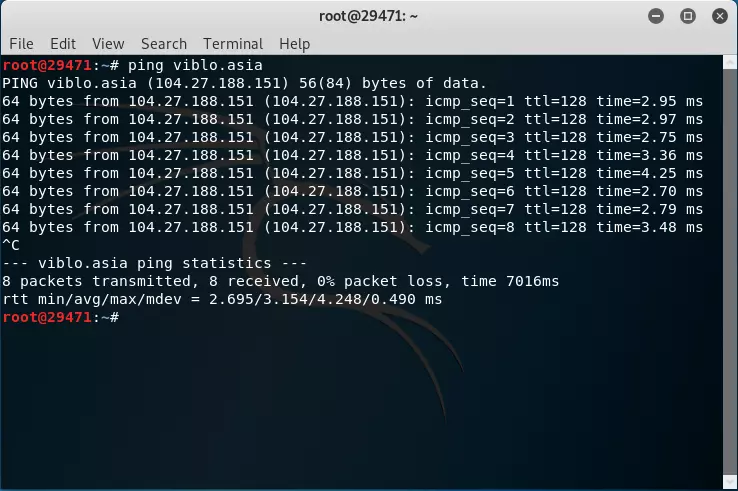
But as you can see the IP we see is 104.27.188.151. But in fact it is not the IP of Viblo.asia ‘s web server but the IP of Cloudflare that viblo.asia is pointing to
Refer to Cloudflare’s IP series here: https://www.cloudflare.com/ips/
In my experience, in this case you should use the Netcraft system at https://toolbar.netcraft.com/ . Netcraft is a company that has been exploring the Internet since 1995 and has been collecting Internet variation over the past 25 years
So I started looking for reports in Netcraft about Viblo.asia
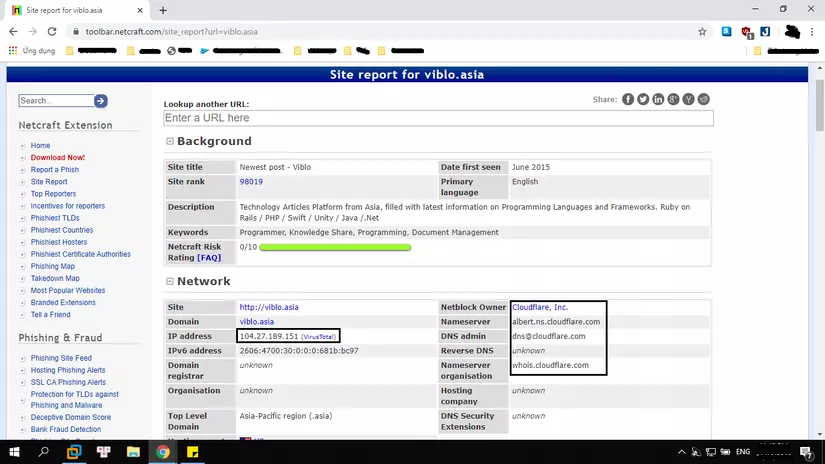
As you can see here this is also reported as Cloudflare’s IP. And scroll down to find some of the following information 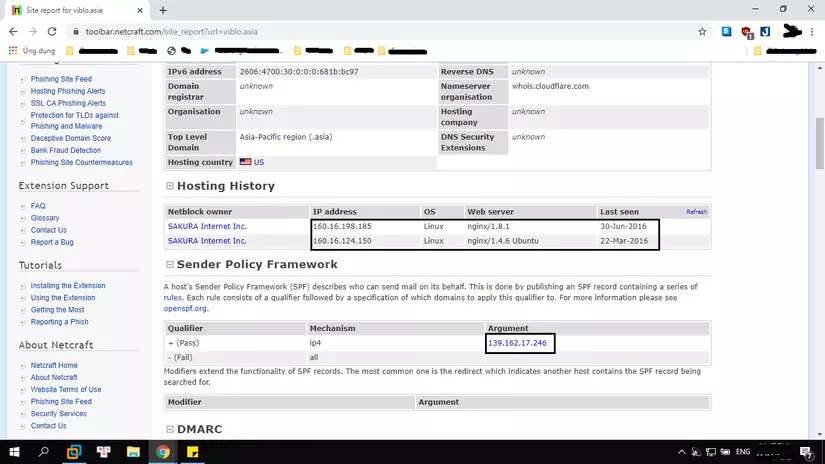
So we see netcraft has recorded 3 IP is 160.16.198.185 , 160.16.124.150 , 139.162.17.246
In which the first 2 IPs we can see are SAKURA Internet or takoyaki.asia site (The ability previously 2016 that site also uses this IP coudflare). But pay attention to the 3rd IP in the other SPF section is 139.162.17.246 . Most likely it will be the IP of Viblo.asia
To know, try to access it
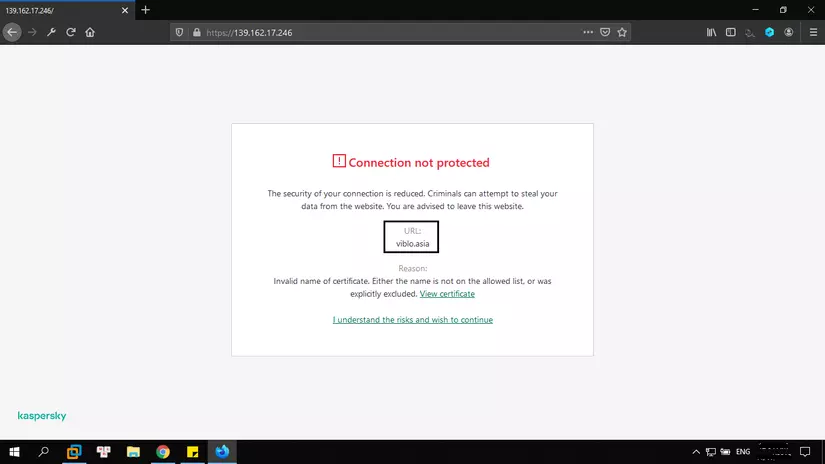
At this point, it will continue to page 404. But that’s enough for Viblo.asia to be 139.162.17.246
Now it’s time to go back to Nmap  ) Run the simplest command

There is little we can see note appeared https://li859-246.members.linode.com/ from which we can add 1 information is Viblo.asia running on Linode VPS
Next, you don’t see what ports are there and blocked by the firewall. But it’s okay for us to bypass it by using the --spoof-mac
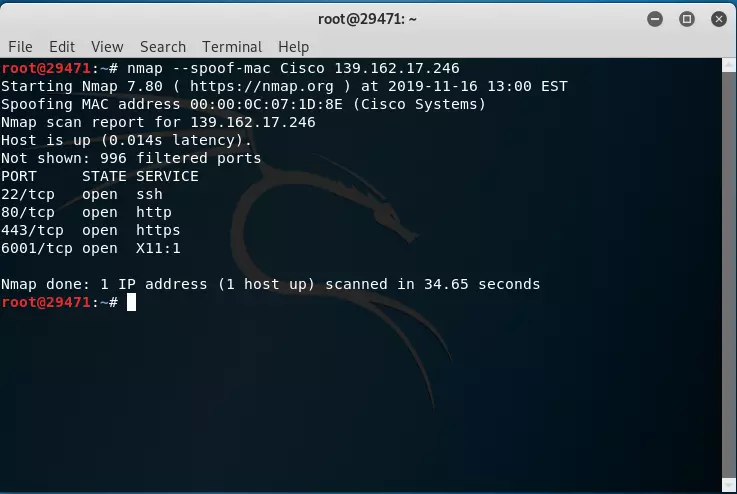
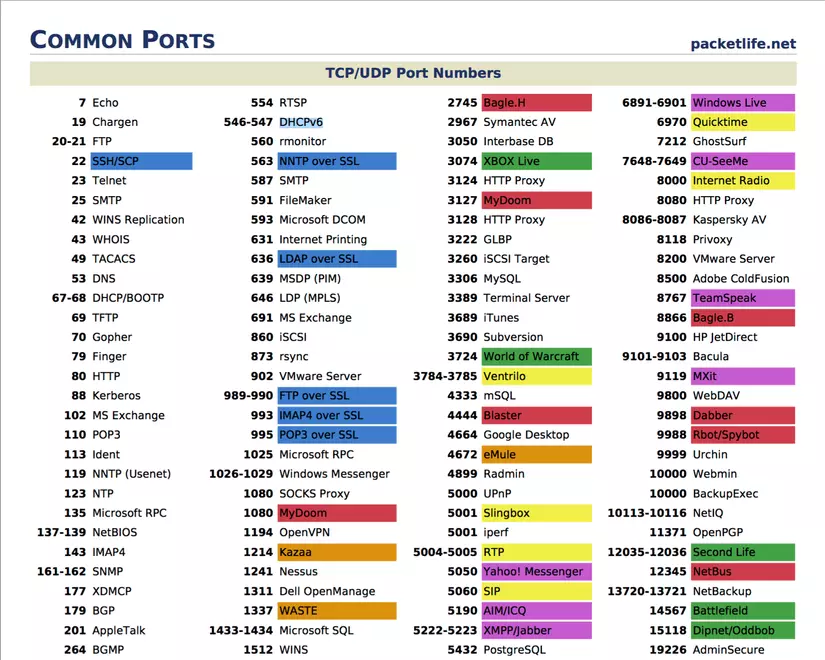
Okay, we found the open ports on the server. Including ports 22,80,443,6001 and below is a table of names of services that usually run on those ports
Now if you want to know what the operating system is using on that server, add the -O argument to the command. Then we have this
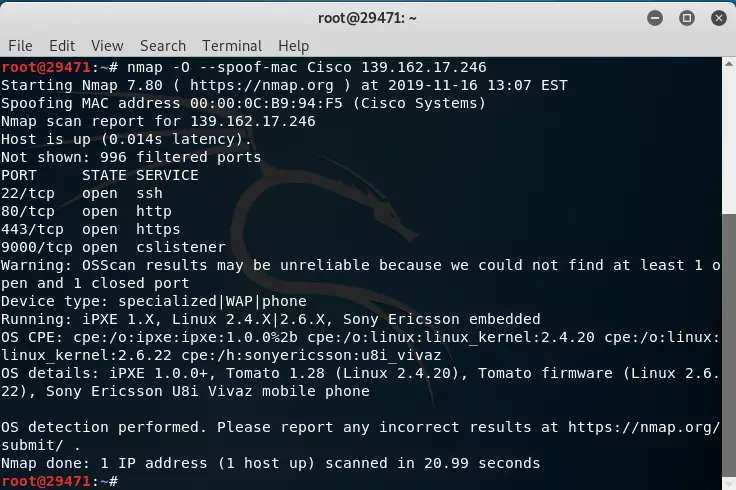
because here we can see that no port is closed, the accuracy of determining the operating system is also reduced and as in this case we temporarily know that HDH uses the Linux kernel.
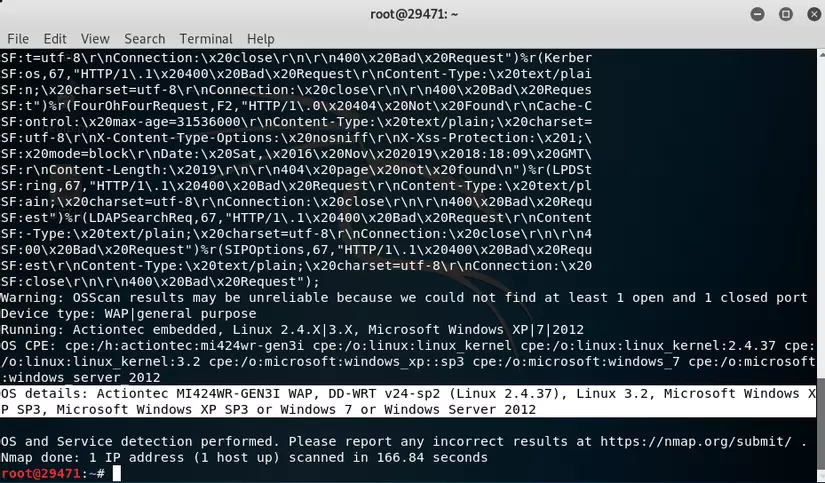
Combining some arguments to get a comprehensive view, I will use the command #nmap -sC -sV -O -spoof-mac Cisco 139.162.17.246 where -sC is running the default script and -sV will display information. Service details as below
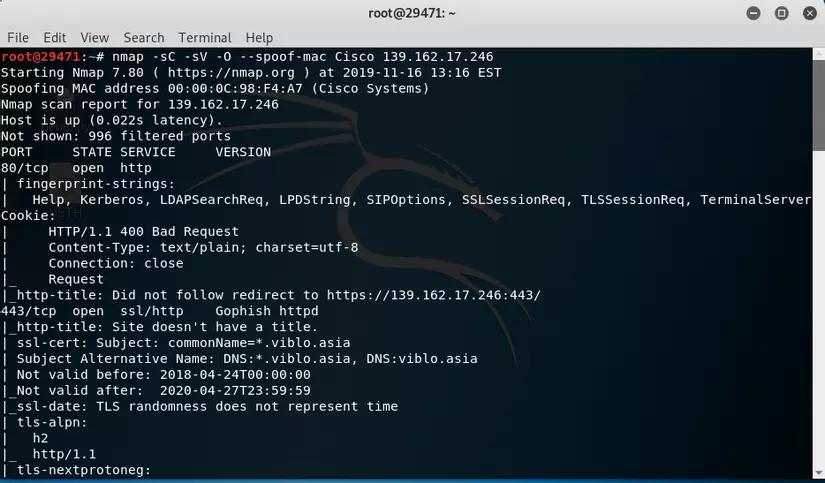
And here comes a little more information and operating system capabilities that in this situation of the VPS is running
——— End of Demo ———-
I hope everyone follows this article to have a more specific view of Nmap as well as get some direction in the process of reconnaissance in pentesting.