Question
Recently a lot of people talk about Docker, Kubernetes (K8s) making a guy just backend code as I noticed. After a while of learning and losing money for AWS, finally came out the following article.
In this article I will talk about automatically deploying an application to AWS EKS (Elastic Kubernetes Service) using Gitlab-CI, docker images will be stored in ECR (Amazon Elastic Container Registry).
For those who are new to AWS, you should also pay attention to the price of the service. While AWS has a 1-year Free Tier package, not all are free. Remember to read carefully to avoid unjust money.
The content includes:
- Setup Kubernetes cluster
- Dockerize
- Push image to ERC
- Kubernetes deployments
- Auto deploy via Gitlab-CI
- Clean up
The steps I deploy: create k8s cluster => dockerize => push image to ERC => deploy app with EKS => Gitlab auto deploy.
Setup Kubernetes cluster
There are many ways to create a K8s cluster, you can go to the AWS console to create via the intuitive interface. As for me, I will create through eksctl , this is a CLI provided by AWS.
Note a little bit that I am using macOS so the commands below are for macOS. You can access the AWS guide to install the operating system you are using.
Install the AWS CLI
1 2 | curl "https://awscli.amazonaws.com/AWSCLIV2.pkg" -o "AWSCLIV2.pkg" sudo installer -pkg AWSCLIV2.pkg -target / |
Configure your AWS CLI credentials
To use this CLI, you need AWS access keys including access key ID and secret access key. Visit IAM of AWS to generate offline. Next use the command:
1 2 | aws configure |
Then enter the Access keys information obtained from AWS.
For example:
1 2 3 4 5 6 | $ aws configure AWS Access Key ID [None]: AKIAIOSFODNN7EXAMPLE AWS Secret Access Key [None]: wJalrXUtnFEMI/K7MDENG/bPxRfiCYEXAMPLEKEY Default region name [None]: region-code Default output format [None]: json |
Install eksctl
I installed it with brew
1 2 | brew install weaveworks/tap/eksctl |
Check if the installation was successful with the command:
1 2 3 | eksctl version # 0.25.0 |
Create Kubernetes cluster
The command creates a cluster as follows:
1 2 | eksctl create cluster --name=app-demo --nodes=1 --node-type t2.micro |
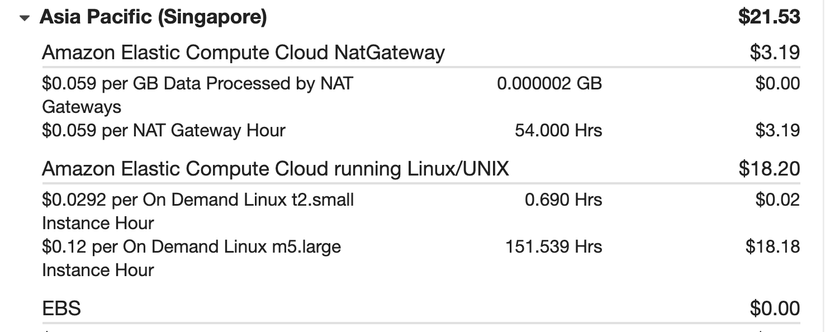
Above I created a cluster called app-demo , there is 1 node, note type is t2.micro this node type will be free under AWS Free Tier package. Without the –node-type flag, eksctl will default to m5.large at a cost of $ 0.12 per hour. It sounds like a little, but if you try to watch for a few days, it will be:
Cluster creation time usually takes 15-20 minutes. Once done, run the command:
1 2 | kubectl get nodes |
To test. If there is a problem with credentials, you should check the aws configuration with the command above aws configure .
Dockerize
The next step, we need to dockerize the application. Depending on your application, you write Dockerfile accordingly. If you do not have one then use my app. App written in Vuejs, clone at the link .
1 2 3 4 5 6 7 8 9 10 11 | # Dockerfile FROM node:lts-alpine RUN npm install -g http-server WORKDIR /app COPY package*.json ./ RUN npm install COPY . . RUN npm run build EXPOSE 8080 CMD [ "http-server", "dist" ] |
Build docker images with the command:
1 2 | docker build -t demo-app . |
The output of dockerize is that you must be able to run the application via docker. We run the app with the command:
1 2 | docker run -p 8080:8080 demo-app |
Access localhost:8080 if the app displays normally that we have succeeded.
Push image to ERC
Next step we will push images onto ERC First we need to login:
1 2 | aws ecr get-login-password --region region | docker login --username AWS --password-stdin aws_account_id.dkr.ecr.region.amazonaws.com |
Replace region, aws_account_id with your AWS account information.
Next create a responsitory
1 2 3 4 5 | aws ecr create-repository --repository-name demo-app --image-scanning-configuration scanOnPush=true --region region |
You can also create responsitory through the interface at ERC responsitory
Finally, we add the tag and push the image onto ERC via:
1 2 3 | docker tag demo-app aws_account_id.dkr.ecr.region.amazonaws.com/demo-app:latest docker push aws_account_id.dkr.ecr.region.amazonaws.com/demo-app:latest |
Note that the Free Tier package will free you 500Mb when saving on ERC, If your total image file> 500Mb, you should consider deleting.
Kubernetes deployments
Now it’s time to deploy the app to the cluster we created earlier. Create a file named deployment.yaml with the following content:
1 2 3 4 5 6 7 8 9 10 11 12 13 14 15 16 17 18 19 20 21 | # deployment.yaml apiVersion: apps/v1 kind: Deployment metadata: name: server-demo namespace: default spec: selector: matchLabels: app: web template: metadata: labels: app: web spec: containers: - name: demo-app image: aws_account_id.dkr.ecr.region.amazonaws.com/demo-app ports: - containerPort: 8080 |
- We label the app as
app:web - Image is taken from
aws_account_id.dkr.ecr.region.amazonaws.com/demo-app. - The number of replicas is 2.
Next, run the command:
1 2 | kubectl apply -f deployment.yaml |
Check by command:
1 2 | kubectl get deployments |
Next we need to expose an External IP to access the app from the internet. Use an ELB (Elastic Load Balancer)
1 2 | kubectl expose deployment demo-app --type=LoadBalancer --name=demo-elb |
Check ELB information by command:
1 2 | kubectl get services demo-elb |
Check at EXTERNAL-IP we will have a domain . Access domain:8080 to check if the application has been deployed.
Auto deploy via Gitlab-CI
The steps above are just padding for this last step. The result we need to achieve is to automatically deploy the app every time a new commit is made.
First, go to Gitlab.com => Settings => CI-CD => Variables and add the following variables:
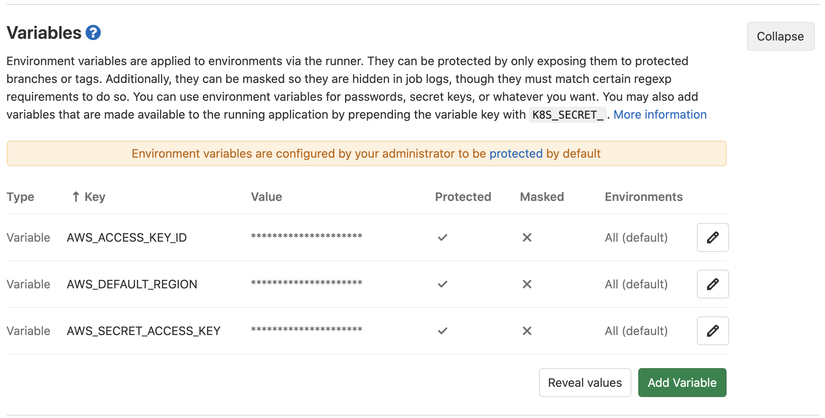
Create a new .gitlab-ci.yml file
1 2 3 4 5 6 7 8 9 10 11 12 13 14 15 16 17 18 19 20 21 22 23 24 25 | mage: docker:latest variables: REPOSITORY_URL: aws_account_id.dkr.ecr.region.amazonaws.com/demo-app REGION: region services: - docker:dind stages: - build - deploy build: stage: build script: - apk add --no-cache curl jq python3 py3-pip - pip install awscli - aws ecr get-login-password --region ap-southeast-1 | docker login --username AWS --password-stdin 230470490156.dkr.ecr.ap-southeast-1.amazonaws.com - docker build -t demo-app -f ./Dockerfile . - docker tag demo-app $REPOSITORY_URL.${CI_BUILD_REF} - docker push $REPOSITORY_URL.${CI_BUILD_REF} deploy: stage: deploy script: - kubectl set image deployment/server-demo demo-app=$REPOSITORY_URL --record only: - master |
The commands in the .gitlab-ci.yml file we have done above. There are some other points:
- Use the variable
${CI_BUILD_REF}to deploy the exact image that was built upon commit. kubectl set imagecommandkubectl set imageto update the image and deploy.
Commit the code to your repository and enjoy the results.
Cleaning Up
After achieving the results, you can look for a while, take a screenshot but do not forget to delete it if you do not intend to use it for a long time.
1 2 | eksctl delete cluster --name=demo-app |
Conclude
The above article is a journey to Docker, k8s, and AWS for my $ 21.53 tuition. If you have any questions, comment. References: