Today I’m going to show you how to use shaders in your Cocos2d-x project
Vd1: Simplest Shader

There are several different types of OpenGL shaders, but in Cocos2D you will only need to handle two types: vertex shader and fragment shader. The best is fragment shader or “pixel shader” [^ 1]. This is just a small program that the GPU runs every time for every pixel that sprites cover on the screen. Each CCShader needs both vertex shader and fragment shader. Cocos2D already has a default vertex shader generator built in, so you usually don’t need to rewrite it.
[^ 1]: What is “fragment”? fragment is considered a pixel in OpenGL. The last pixel displayed on the screen may be several fragments mixed together. When performing 3D rendering, a fragment may be masked by another fragment that is displayed later or a fragment may be deleted because it is behind the current fragment that has been displayed.
Loading Shaders:
Before getting into the code shader, you need to know how to load them. Cocos2D-x can do this easily and everything in this tutorial is assuming that you are using version 3.17 or newer. See the code below to identify how to load and use shader for your sprite.
1 2 3 4 5 6 7 8 | void HelloWorld::applyShader() { auto vertFilename = std::string("shaders/SimplestShader.vsh"); auto fragFilename = std::string("shaders/SimplestShader.fsh"); auto glprogram = GLProgram::createWithFilenames(vertFilename, fragFilename); _exampleSprite->setGLProgram(glprogram); } |
First we path to the shader files. Then you can create programs that run GL with GLProgram :: createWithFilenames . And finally, we apply this GL program to some sprite.
Dive In:
This is a simple code, it is done in red on the whole sprite.
Content of SimplestShader.fsh file:
1 2 3 4 5 6 | // Like a C program, every shader needs at least a main funcntion. void main(){ // Set the output color to red. gl_FragColor = vec4(1.0, 0.0, 0.0, 1.0); } |
Content of SimplestShader.vsh file:
1 2 3 4 5 6 7 | attribute vec4 a_position; void main() { gl_Position = CC_PMatrix * a_position; } |
Shader for Cocos2D is written in OpenGL ‘s GLSL language. You may feel familiar because it is similar to C.
Each GLSL fragment shader needs two things:
- It needs a main () function to call each run shader.
- It needs to assign color to the variable gl_FragColor .
Open GL uses vertors to save colors and locations. To give a color, you only need to give it 4 values of red, green, blue and alpha. You can initialize GLSL by several ways below:
1 2 3 4 5 6 7 8 9 10 11 12 13 14 15 | // You can create a vector using the vec4 constructor: gl_FragColor = vec4(redValue, greenValue, blueValue, alphaValue); // You can set color components individually: gl_FragColor.r = redValue; gl_FragColor.g = greenValue; gl_FragColor.b = blueValue; gl_FragColor.a = alphaValue; // Vectors can also be treated like arrays: gl_FragColor[0] = redValue; gl_FragColor[1] = greenValue; gl_FragColor[2] = blueValue; gl_FragColor[3] = alphaValue; |
Ex2: Sprite Color

Listing 1 taught us how to use shader to draw red into the sprite.
This next example is the default shader of Cocos2D and it is responsible for most of the image renderings in Cocos2D games (i.e., the input is what the output looks like, like the input is a kernel). game character, it will draw that game character on the screen without any other changes).
1 2 3 4 5 6 7 8 | void main(){ // Read the sprite's texture's color for the current pixel. vec4 textureColor = texture2D(cc_MainTexture, cc_FragTexCoord1); // Tint the texture color by the sprite's color. gl_FragColor = cc_FragColor*textureColor; } |
Sampling Textures:
You guys keep thinking simple but it’s time to draw pictures on the surface. We need to know what we need to draw at this coordinate:
I have yet to find a satisfactory image to describe the meaning of the sentence. In the image above, it has drawn one area of this texture coordinate into another coordinate area. As for our examples passing through, we just draw each pixel on the coordinates only. Well, you guys just have to imagine it, lol: v.
Break down the first line:
texture2D () is a pre-made function in GLSL used to sample texture at a fixed position. It has input as a Texture and some coordinates.
cc_MainTexture is a built-in variable in Cocos2D to get the texture of the current sprite rendered.
cc_FragTexCoord1 is a variable made available in Cocos2D. It is a texture coordinates that you use in this fragment shader to draw the exact sprite.
Combining it all, texture2D (ccMainTexture, ccFragTexCoord1) takes a color from the sprite texture at cc_FragTexCoord1 .
I added a little more for you have not envisioned how it works:
eg your sprite image 32×32 render over an area of 64×64 for example (of course your output will be 2 times larger than the original image).
So to output a 64×64 pixel image, we need to “color” each pixel in 64×64.
At (0,0), (1,0), (0,1), (1,1) of 64×64 image will get the color of 32×32 image at (0.0) area (because ouput we are a double image, so 1 pixel in the old image area, can overlay 4 pixels in the new image area).
At the position (2,0), (2,1), (3,0), (3,1) of a 64×64 image, the color of the 32×32 image will be removed in the area (1,0)
Here I just raised for you to imagine how it works, in fact, the coordinates have been standardized on the 0 -1 segment gone, and the process is to run in parallel rather than browsing through each pixel. Generally you just imagine how it works first, the details inside how will be more clear.
Color Math:
Sprites in Cocos2D have color mixing. For example, when the color becomes darker, the sprite is also darker. The redder the color, the redder the sprite. As the color is more transparent, so does the sprite.
So how do you make color mixing in a shader ?. All you need to do is multiply the two colors together. There are 2 ways that you can do it.
1 2 3 4 5 6 7 8 9 | // You can do it the long way: // 1 gl_FragColor.r = cc_FragColor.r*textureColor.r; gl_FragColor.g = cc_FragColor.g*textureColor.g; gl_FragColor.b = cc_FragColor.b*textureColor.b; gl_FragColor.a = cc_FragColor.a*textureColor.a; // Or use a vector multiply to do the same thing: gl_FragColor = cc_FragColor*textureColor; // 2 |
Note: cc_FragColor is a built-in variable in Cocos2D, it provides the default color of sprite at this coordinate area (cc_FragTexCoord1). The second piece of code is multiplying 2 vectors together, the way it works is the same as in the first paragraph. If we do not need separate processing for each red, blue, green, and alpha channel, but simply multiply the corresponding coordinates, we should use 2 to make the code more neat.
Exercises:
Change the shader to lighten the sprite by its color.
Vd3: Sprite Distort

Listing 2 shows you how to draw a texture in a shader, but that’s still really basic. Now let’s try something more interesting that you can only do with a shader. What happens if we change the calculated texture coordinates before accessing the texture?
1 2 3 4 5 6 7 8 9 | void main(){ vec2 texCoord = cc_FragTexCoord1; float time = cc_Time[0]; texCoord.x += 0.1*sin(10.0*texCoord.y + time); gl_FragColor = cc_FragColor*texture2D(cc_MainTexture, texCoord); } |
So far, we have only used component vectors for four-color colors (r, g, b, a). You can create vectors with 2 or 3 components. For example, ccFragTexCoord1 is x / y coordinates, so we need to store it in the variable vec2.
The variable cc_Time is a built-in variable of Cocos2D. This is a 4-component vector that stores time-related values.
Another way to access vectors. You can use xyzw or stpq or array instead of rgba.
Built-in GLSL functions are different from links .
So now instead of reading the texture coordinates directly like Cocos2D, use the sine operation to deform the texture.
The important thing to keep in mind is that a fragment shader cannot change the pixel that the sprites will draw on (that is, the image of the texture of the sprite we cannot change its input value).
It can only change the pixels it draws (like when you mix colors together, for example, the input at coordinates is white, you can’t change its input color as you have. You can mix white to brown, for example, and your ouput at this coordinate is brown.
Texture Coordinates:
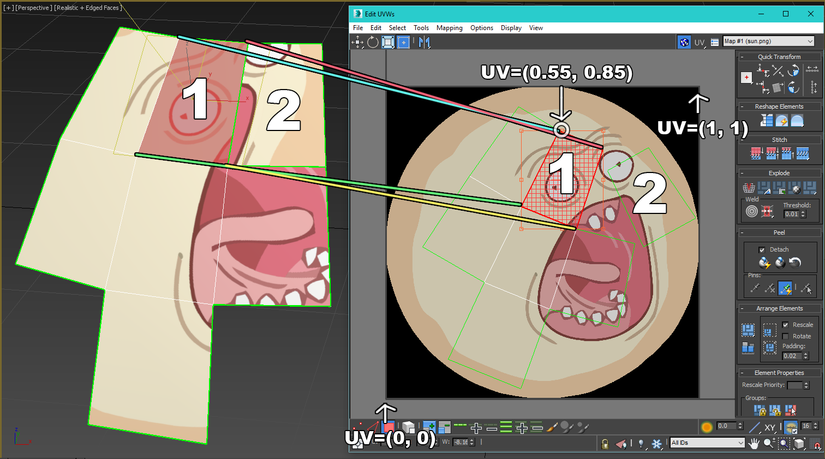
It is important to know that the texture coordinates are normalized and not in pixels (Normalizing takes all of its length and width to the range 0-> 1, for example, your texture image is 32×64 pixels. if you want to get the color at its center, you cannot enter the coordinates 16×32, because it has normalized 32 and 64 to 0 to 1, which means we will use (0.5, 0.5) to get color in the center of the texture).
Notice that (0, 0) is the lower left of the texture and (1, 1) is the upper right. If you want to apply distortions to the texture of sprite, you need to note the size and aspect ratio of the texture.
Exercises:
Try distorting your texture in different ways.
In the following sections I will continue to guide you to create some cool effects using the shader