Flutter is a framework from Google that allows you to use the Dart language to write cross-platform applications. This means your application will run on both iOS and Android devices.
If you are building a mapping application, finding the user’s current location is an integral part of your application. Fortunately, Flutter makes it super simple using the Geolocator package. The first step is to install the Geolocator package by adding it to the pubspec.yaml file as shown below:
1 2 3 4 5 6 7 8 9 10 11 12 | environment <span class="token operator">:</span> sdk <span class="token operator">:</span> <span class="token string">">=2.1.0 <3.0.0"</span> dependencies <span class="token operator">:</span> flutter <span class="token operator">:</span> sdk <span class="token operator">:</span> flutter # The following adds the Cupertino Icons font to your application <span class="token punctuation">.</span> # Use with the CupertinoIcons <span class="token keyword">class</span> <span class="token class-name">for</span> iOS style icons <span class="token punctuation">.</span> cupertino_icons <span class="token operator">:</span> <span class="token operator">^</span> <span class="token number">0.1</span> <span class="token number">.2</span> geolocator <span class="token operator">:</span> <span class="token operator">^</span> <span class="token number">5.1</span> <span class="token number">.5</span> |
If you are using VS Code then just save the file to download the package. If you are using some other editor, then run the following command from the command line terminal:
1 2 | flutter packages get |
Now that you’ve installed the Geolocator package, let’s find out how to use it. For example, I will have a screen with very basic widgets, containing FlatButton and Text like below:
1 2 3 4 5 6 7 8 9 10 11 12 13 14 15 16 17 18 19 20 21 22 23 24 25 | <span class="token annotation punctuation">@override</span> Widget <span class="token function">build</span> <span class="token punctuation">(</span> BuildContext context <span class="token punctuation">)</span> <span class="token punctuation">{</span> <span class="token keyword">return</span> <span class="token function">MaterialApp</span> <span class="token punctuation">(</span> title <span class="token operator">:</span> <span class="token string">"Hello Location"</span> <span class="token punctuation">,</span> home <span class="token operator">:</span> <span class="token function">Scaffold</span> <span class="token punctuation">(</span> body <span class="token operator">:</span> <span class="token function">Center</span> <span class="token punctuation">(</span> child <span class="token operator">:</span> <span class="token function">Column</span> <span class="token punctuation">(</span> mainAxisAlignment <span class="token operator">:</span> MainAxisAlignment <span class="token punctuation">.</span> center <span class="token punctuation">,</span> children <span class="token operator">:</span> <span class="token generics function"><span class="token punctuation"><</span> Widget <span class="token punctuation">></span></span> <span class="token punctuation">[</span> <span class="token function">Text</span> <span class="token punctuation">(</span> <span class="token string">""</span> <span class="token punctuation">)</span> <span class="token punctuation">,</span> <span class="token function">FlatButton</span> <span class="token punctuation">(</span> child <span class="token operator">:</span> <span class="token function">Text</span> <span class="token punctuation">(</span> <span class="token string">"Find Current Location"</span> <span class="token punctuation">,</span> style <span class="token operator">:</span> <span class="token function">TextStyle</span> <span class="token punctuation">(</span> color <span class="token operator">:</span> Colors <span class="token punctuation">.</span> white <span class="token punctuation">)</span> <span class="token punctuation">)</span> <span class="token punctuation">,</span> color <span class="token operator">:</span> Colors <span class="token punctuation">.</span> green <span class="token punctuation">,</span> onPressed <span class="token operator">:</span> <span class="token punctuation">(</span> <span class="token punctuation">)</span> <span class="token punctuation">{</span> <span class="token function">_displayCurrentLocation</span> <span class="token punctuation">(</span> <span class="token punctuation">)</span> <span class="token punctuation">;</span> <span class="token punctuation">}</span> <span class="token punctuation">,</span> <span class="token punctuation">)</span> <span class="token punctuation">]</span> <span class="token punctuation">)</span> <span class="token punctuation">,</span> <span class="token punctuation">)</span> <span class="token punctuation">)</span> <span class="token punctuation">)</span> <span class="token punctuation">;</span> <span class="token punctuation">}</span> |
Next, implement the _displayCurrent functionLocation.
1 2 3 4 5 6 | <span class="token keyword">void</span> <span class="token function">_displayCurrentLocation</span> <span class="token punctuation">(</span> <span class="token punctuation">)</span> async <span class="token punctuation">{</span> <span class="token keyword">final</span> _location <span class="token operator">=</span> await <span class="token function">Geolocator</span> <span class="token punctuation">(</span> <span class="token punctuation">)</span> <span class="token punctuation">.</span> <span class="token function">getCurrentPosition</span> <span class="token punctuation">(</span> desiredAccuracy <span class="token operator">:</span> LocationAccuracy <span class="token punctuation">.</span> high <span class="token punctuation">)</span> <span class="token punctuation">;</span> <span class="token punctuation">}</span> |
Unfortunately, it will not work on any device or simulator because we will need to set permissions . For Android, open the gradle.properIES file in the Android directory and add the following lines:
1 2 3 | android.useAndroidX=true android.enableJetifier=true |
Also, make sure that compileSDKVersion is set to 28 or higher in the android / app / build.gradle file.
1 2 3 4 5 6 | android { compileSdkVersion 28 ... } |
Finally, update the AndroidManifest.xml file found in android / app / src / main with the following permissions :
1 2 3 | <span class="token tag"><span class="token tag"><span class="token punctuation"><</span> uses-permission</span> <span class="token attr-name"><span class="token namespace">android:</span> name</span> <span class="token attr-value"><span class="token punctuation">=</span> <span class="token punctuation">"</span> android.permission.ACCESS_FINE_LOCATION <span class="token punctuation">"</span></span> <span class="token punctuation">/></span></span> <span class="token tag"><span class="token tag"><span class="token punctuation"><</span> uses-permission</span> <span class="token attr-name"><span class="token namespace">android:</span> name</span> <span class="token attr-value"><span class="token punctuation">=</span> <span class="token punctuation">"</span> android.permission.ACCESS_COARSE_LOCATION <span class="token punctuation">"</span></span> <span class="token punctuation">/></span></span> |
Next, config for iOS. Open the location of the info.plist file in the ios / Runner folder and add the following:
1 2 3 | <span class="token tag"><span class="token tag"><span class="token punctuation"><</span> key</span> <span class="token punctuation">></span></span> NSLocationWhenInUseUsageDescription <span class="token tag"><span class="token tag"><span class="token punctuation"></</span> key</span> <span class="token punctuation">></span></span> <span class="token tag"><span class="token tag"><span class="token punctuation"><</span> string</span> <span class="token punctuation">></span></span> This app needs access to location when open. <span class="token tag"><span class="token tag"><span class="token punctuation"></</span> string</span> <span class="token punctuation">></span></span> |
That’s it, now we will try it by running the application and clicking on the button. When you click the button, the application will ask you for permission to use your location. Once you have granted the location, it will find your current location and display the coordinates on the console. To display the coordinates on the user interface, we will need to update the widget from stateless to stateful . How to implement the following:
1 2 3 4 5 6 7 8 9 10 11 12 13 14 15 16 17 18 19 20 21 22 23 24 25 26 27 28 29 30 31 32 33 | oid <span class="token function">main</span> <span class="token punctuation">(</span> <span class="token punctuation">)</span> <span class="token operator">=</span> <span class="token operator">></span> <span class="token function">runApp</span> <span class="token punctuation">(</span> <span class="token function">App</span> <span class="token punctuation">(</span> <span class="token punctuation">)</span> <span class="token punctuation">)</span> <span class="token punctuation">;</span> <span class="token keyword">class</span> <span class="token class-name">App</span> <span class="token keyword">extends</span> <span class="token class-name">StatefulWidget</span> <span class="token punctuation">{</span> <span class="token annotation punctuation">@override</span> _AppState <span class="token function">createState</span> <span class="token punctuation">(</span> <span class="token punctuation">)</span> <span class="token operator">=</span> <span class="token operator">></span> <span class="token function">_AppState</span> <span class="token punctuation">(</span> <span class="token punctuation">)</span> <span class="token punctuation">;</span> <span class="token punctuation">}</span> <span class="token keyword">class</span> <span class="token class-name">_AppState</span> <span class="token keyword">extends</span> <span class="token class-name">State</span> <span class="token generics function"><span class="token punctuation"><</span> App <span class="token punctuation">></span></span> <span class="token punctuation">{</span> Position _location <span class="token operator">=</span> <span class="token function">Position</span> <span class="token punctuation">(</span> latitude <span class="token operator">:</span> <span class="token number">0.0</span> <span class="token punctuation">,</span> longitude <span class="token operator">:</span> <span class="token number">0.0</span> <span class="token punctuation">)</span> <span class="token punctuation">;</span> <span class="token keyword">void</span> <span class="token function">_displayCurrentLocation</span> <span class="token punctuation">(</span> <span class="token punctuation">)</span> async <span class="token punctuation">{</span> <span class="token keyword">final</span> location <span class="token operator">=</span> await <span class="token function">Geolocator</span> <span class="token punctuation">(</span> <span class="token punctuation">)</span> <span class="token punctuation">.</span> <span class="token function">getCurrentPosition</span> <span class="token punctuation">(</span> desiredAccuracy <span class="token operator">:</span> LocationAccuracy <span class="token punctuation">.</span> high <span class="token punctuation">)</span> <span class="token punctuation">;</span> <span class="token function">setState</span> <span class="token punctuation">(</span> <span class="token punctuation">(</span> <span class="token punctuation">)</span> <span class="token punctuation">{</span> _location <span class="token operator">=</span> location <span class="token punctuation">;</span> <span class="token punctuation">}</span> <span class="token punctuation">)</span> <span class="token punctuation">;</span> <span class="token punctuation">}</span> <span class="token annotation punctuation">@override</span> Widget <span class="token function">build</span> <span class="token punctuation">(</span> BuildContext context <span class="token punctuation">)</span> <span class="token punctuation">{</span> <span class="token keyword">return</span> <span class="token function">MaterialApp</span> <span class="token punctuation">(</span> title <span class="token operator">:</span> <span class="token string">"Hello Location"</span> <span class="token punctuation">,</span> home <span class="token operator">:</span> <span class="token function">Scaffold</span> <span class="token punctuation">(</span> body <span class="token operator">:</span> <span class="token function">Center</span> <span class="token punctuation">(</span> child <span class="token operator">:</span> <span class="token function">Column</span> <span class="token punctuation">(</span> mainAxisAlignment <span class="token operator">:</span> MainAxisAlignment <span class="token punctuation">.</span> center <span class="token punctuation">,</span> children <span class="token operator">:</span> <span class="token generics function"><span class="token punctuation"><</span> Widget <span class="token punctuation">></span></span> <span class="token punctuation">[</span> <span class="token function">Text</span> <span class="token punctuation">(</span> <span class="token string">"${_location.latitude}, ${_location.longitude}"</span> <span class="token punctuation">)</span> <span class="token punctuation">,</span> |
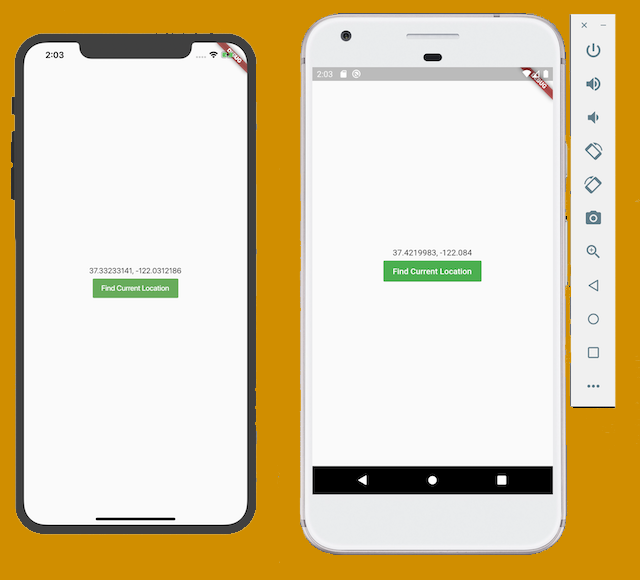
And now, when you run the application, you can click the “Find Current Location” button to display the current coordinates on the screen as shown in the screenshot below:
Thank you for reading the article. Thanks u
References: