1. Config project
- SDK logs two basic types of information:
- Event : what happens in your app, such as actions, system events or errors.
- User properties : properties you define in the app, such as language preference, location. In addition, Analytics also automatically logs some events and user properties , so you do not need to add code to enable them.
First, your project must have firebase setup first, if not, please refer here .
Add the Analytics SDK to the app:
- In app / build.gradle, add the following dependency:
1 2 | implementation <span class="token string">'com.google.firebase:firebase-analytics-ktx:17.4.1'</span> |
- Create a com.google.firebase.analytics.FirebaseAnalytics object in activity:
1 2 | <span class="token keyword">private</span> lateinit var firebaseAnalytics <span class="token operator">:</span> FirebaseAnalytics |
- Initiate it in the onCreate () function:
1 2 3 | <span class="token comment">// Obtain the FirebaseAnalytics instance.</span> firebaseAnalytics <span class="token operator">=</span> Firebase <span class="token punctuation">.</span> analytics |
This is the preparation step.
2. Log events
After you create a FirebaseAnalytics instance, you can start to log events with the logEvent () function. There are some event names only reserved for firebase auto-log, you must not set the same name as these event names. Here is an example of how to log event:
1 2 3 4 5 | <span class="token keyword">private</span> val bundle <span class="token operator">=</span> <span class="token function">Bundle</span> <span class="token punctuation">(</span> <span class="token punctuation">)</span> bundle <span class="token punctuation">.</span> <span class="token function">putString</span> <span class="token punctuation">(</span> <span class="token string">"state_noti"</span> <span class="token punctuation">,</span> <span class="token string">"ON"</span> <span class="token punctuation">)</span> firebaseAnalytics <span class="token punctuation">.</span> <span class="token function">logEvent</span> <span class="token punctuation">(</span> <span class="token string">"notification_onoff"</span> <span class="token punctuation">,</span> bundle <span class="token punctuation">)</span> bundle <span class="token punctuation">.</span> <span class="token function">clear</span> <span class="token punctuation">(</span> <span class="token punctuation">)</span> |
It is possible to observe the log in Android Studio debug log, can log auto events and custom events. You can enable verbose logging with the adb commands:
1 2 | $ adb shell setprop log <span class="token punctuation">.</span> tag <span class="token punctuation">.</span> FA VERBOSE |
1 2 | $ adb shell setprop log <span class="token punctuation">.</span> tag <span class="token punctuation">.</span> FA <span class="token operator">-</span> SVC VERBOSE |
1 2 | $ adb logcat <span class="token operator">-</span> v time <span class="token operator">-</span> s FA FA <span class="token operator">-</span> SVC |
And how to observe on the console again, I present the following.
3. Set user properties and user id
You can set Analytics User Properties to describe app users, when you view reports, you can analyze user behaviors. To set a user property:
- Open firebase console, go to Analytics then register properties on the “User Properties” page. For more information, see Set and register a user property
- Write code to set up an Analytics User Property with the setUserProperty () method . For example :
1 2 | firebaseAnalytics <span class="token punctuation">.</span> <span class="token function">setUserProperty</span> <span class="token punctuation">(</span> <span class="token string">"favorite_food"</span> <span class="token punctuation">,</span> food <span class="token punctuation">)</span> |
- After registering a user property, it may take hours to view the console. You go to Analytics, select User Properties to be able to access this data. The dashboard will display a list of user properties that you have defined in the app. This data is regularly refreshed during the day.
4. Debug events
- DebugView will help you track the events that you log on to firebase easily and intuitively, from here you can also see the error code or not.
To enable debug mode on your Android device, execute the following command: $ adb shell setprop debug.firebase.analytics.app package_name
Disable debug mode: $ adb shell setprop debug.firebase.analytics.app .none.
When debug mode is enabled on your device, go to the DebugView section of Analytics on the console:
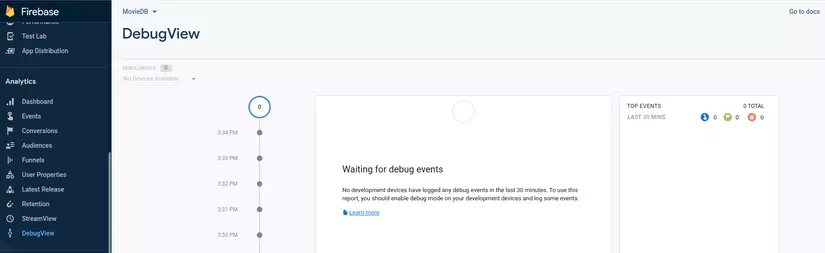
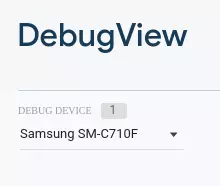
You choose the device you are using to track the log:
When performing operations to log, the event will be logged, for example as follows:

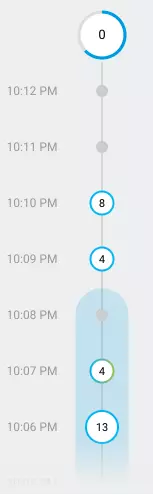
There are 3 columns here:
- The left column is Minutes stream, showing the event times within the past 30 minutes.
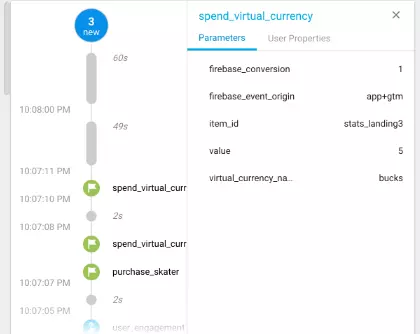
- The column in the middle of the Seconds stream is the column of events logged every 60 seconds.
With the Seconds stream column, by default you will see the events are logged in 60s, each event displayed at a specified time. You can click on an event and see the list of params that the event brings, for example:
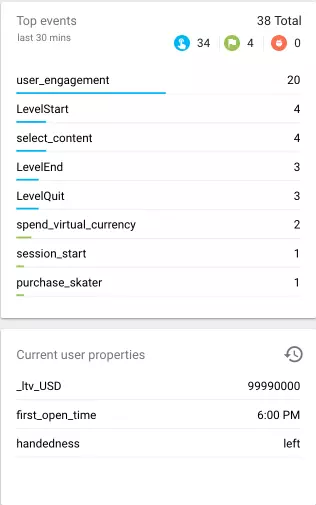
- The right column is the Top Event logged within 30 minutes, including the user property.
5. Track Screens
Google Analytics will monitor screens and will log information when there is a transition between screens.
It will default to monitor a screen number and automatically log that screen information, for example, the names of the UIViewController or Activity classes that are in focus. When there is a screen transition, Analytics logs the event screenview .
You can set the event screen as follows:
1 2 | firebaseAnalytics <span class="token punctuation">.</span> <span class="token function">setCurrentScreen</span> <span class="token punctuation">(</span> <span class="token keyword">this</span> <span class="token punctuation">,</span> screenName <span class="token punctuation">,</span> null <span class="token comment">/* class override */</span> <span class="token punctuation">)</span> |
After the set is completed, observe Debug View and log it with the following information:

And it will keep this name until the transition to another screen. So please check carefully the other events that are logged according to the screen name.
You can also set ids for users by using:
1 2 | Analytics <span class="token punctuation">.</span> <span class="token function">setUserID</span> <span class="token punctuation">(</span> <span class="token string">"123456"</span> <span class="token punctuation">)</span> |
Then the event is logged as user_id with the id you set.
Above is what I have learned and shared for everyone to use if anyone needs it. Have fun coding (F).