Explain modern dinosaur JavaScript
- Tram Ho
This is the translation, the original post you can see here: https://medium.com/the-node-js-collection/modern-javascript-explained-for-dinosaurs-f695e9747b70
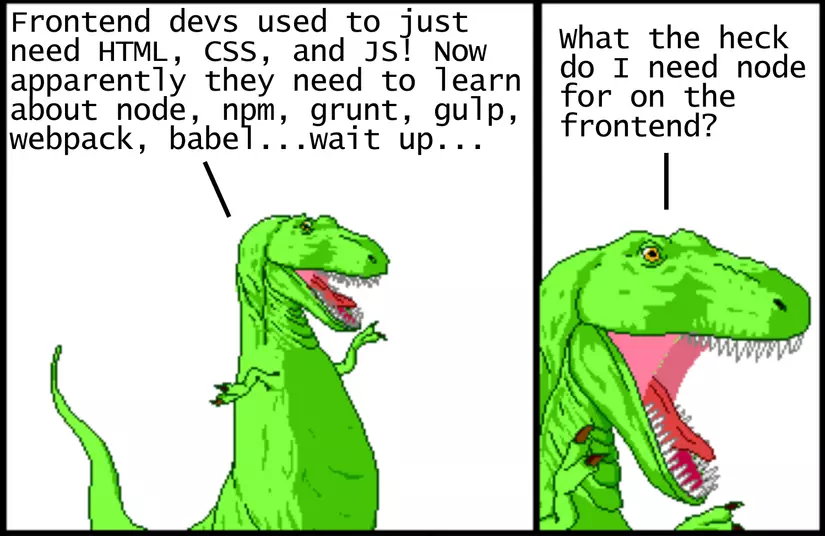
Nowadays, learning JavaScript will be very sweet if you haven’t been following the beginning of JS’s boom and development in recent years. The JS ecosystem is still growing and changing rapidly, making it difficult to understand and choose the right tool for the problem. I started programming in 1998 but have only been learning Javascript seriously since 2014. At that time I remembered I approached Browserify and stared at its definition as follows:
Browserify giúp cho bạn require('modules') trong trình duyệt bằng cách đóng gói toàn bộ dependencies của bạn.
To be honest, I did not understand any of the words in the above sentence, and I did not fully understand how the use of Browserify would help me with JS programming.
Therefore, this article was born with the goal of providing readers with a historical context of how JS tools evolved as of 2017. We will start by building a website. for example like dinosaurs – no tools at all, just plain HTML and Javascript. We will then take a step through and gradually apply the tools to know what the problem will be solved. With this historical context, you will be able to learn and respond better to the change of Javascript now and in the future as well. Let’s get started!
Using JavaScript in a “classic” way
Start with a “classic” website with only HTML and JavaScript, including manually downloading and linking files. This is a simple index.html file using a JavaScript file:
1 2 3 4 5 6 7 8 9 10 11 12 13 | <span class="token comment"><!-- index.html --></span> <span class="token doctype"><!DOCTYPE html></span> <span class="token tag"><span class="token punctuation"><</span>html <span class="token attr-name">lang</span><span class="token attr-value"><span class="token punctuation">=</span><span class="token punctuation">"</span>en<span class="token punctuation">"</span></span><span class="token punctuation">></span></span> <span class="token tag"><span class="token punctuation"><</span>head<span class="token punctuation">></span></span> <span class="token tag"><span class="token punctuation"><</span>meta <span class="token attr-name">charset</span><span class="token attr-value"><span class="token punctuation">=</span><span class="token punctuation">"</span>UTF-8<span class="token punctuation">"</span></span><span class="token punctuation">></span></span> <span class="token tag"><span class="token punctuation"><</span>title<span class="token punctuation">></span></span>JavaScript Example<span class="token tag"><span class="token punctuation"></</span>title<span class="token punctuation">></span></span> <span class="token tag"><span class="token punctuation"><</span>script <span class="token attr-name">src</span><span class="token attr-value"><span class="token punctuation">=</span><span class="token punctuation">"</span>index.js<span class="token punctuation">"</span></span><span class="token punctuation">></span></span><span class="token tag"><span class="token punctuation"></</span>script<span class="token punctuation">></span></span> <span class="token tag"><span class="token punctuation"></</span>head<span class="token punctuation">></span></span> <span class="token tag"><span class="token punctuation"><</span>body<span class="token punctuation">></span></span> <span class="token tag"><span class="token punctuation"><</span>h1<span class="token punctuation">></span></span>Hello from HTML!<span class="token tag"><span class="token punctuation"></</span>h1<span class="token punctuation">></span></span> <span class="token tag"><span class="token punctuation"></</span>body<span class="token punctuation">></span></span> <span class="token tag"><span class="token punctuation"></</span>html<span class="token punctuation">></span></span> |
The <script src = “index.js”> </script> will point to a separate JS file located in the same directory named index.js.
1 2 3 | <span class="token comment">// index.js</span> console<span class="token punctuation">.</span><span class="token function">log</span><span class="token punctuation">(</span><span class="token string">"Hello from JavaScript!"</span><span class="token punctuation">)</span><span class="token punctuation">;</span> |
And this is all you need to make a website! Now let’s see if you want to add a library written by others such as moment.js (a library that can help you format date values in the way people usually read them). For example, you can use the moment function as follows:
1 2 | <span class="token function">moment</span><span class="token punctuation">(</span><span class="token punctuation">)</span><span class="token punctuation">.</span><span class="token function">startOf</span><span class="token punctuation">(</span><span class="token string">'day'</span><span class="token punctuation">)</span><span class="token punctuation">.</span><span class="token function">fromNow</span><span class="token punctuation">(</span><span class="token punctuation">)</span><span class="token punctuation">;</span> <span class="token comment">// 20 hours ago</span> |
But this is only possible if you have added the moment.js vào trong website của mình! Trong trang chủ của moment.js file to your website! In the homepage of moment.js you will see the following instructions:
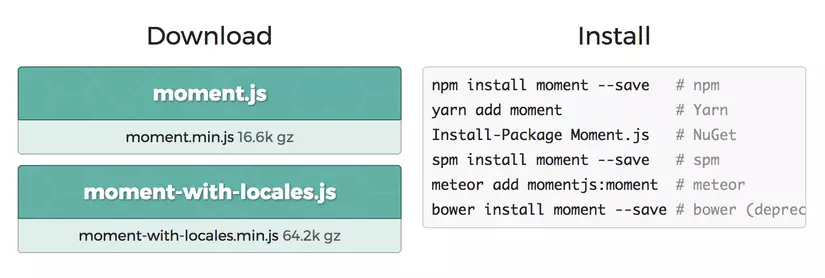
Hmm, there seems to be a lot more in the Install section on the right. But for now let’s just ignore it – we can add moment.js to our website by downloading the moment.min.j file into the same directory as the index.html and edit the following:
1 2 3 4 5 6 7 8 9 10 11 12 13 14 15 | <span class="token operator"><</span><span class="token operator">!</span><span class="token operator">--</span> index<span class="token punctuation">.</span>html <span class="token operator">--</span><span class="token operator">></span> <span class="token operator"><</span><span class="token operator">!</span><span class="token constant">DOCTYPE</span> html<span class="token operator">></span> <span class="token operator"><</span>html lang<span class="token operator">=</span><span class="token string">"en"</span><span class="token operator">></span> <span class="token operator"><</span>head<span class="token operator">></span> <span class="token operator"><</span>meta charset<span class="token operator">=</span><span class="token string">"UTF-8"</span><span class="token operator">></span> <span class="token operator"><</span>title<span class="token operator">></span>Example<span class="token operator"><</span><span class="token operator">/</span>title<span class="token operator">></span> <span class="token operator"><</span>link rel<span class="token operator">=</span><span class="token string">"stylesheet"</span> href<span class="token operator">=</span><span class="token string">"index.css"</span><span class="token operator">></span> <span class="token operator"><</span>script src<span class="token operator">=</span><span class="token string">"moment.min.js"</span><span class="token operator">></span><span class="token operator"><</span><span class="token operator">/</span>script<span class="token operator">></span> <span class="token operator"><</span>script src<span class="token operator">=</span><span class="token string">"index.js"</span><span class="token operator">></span><span class="token operator"><</span><span class="token operator">/</span>script<span class="token operator">></span> <span class="token operator"><</span><span class="token operator">/</span>head<span class="token operator">></span> <span class="token operator"><</span>body<span class="token operator">></span> <span class="token operator"><</span>h1<span class="token operator">></span>Hello <span class="token keyword">from</span> <span class="token constant">HTML</span><span class="token operator">!</span><span class="token operator"><</span><span class="token operator">/</span>h1<span class="token operator">></span> <span class="token operator"><</span><span class="token operator">/</span>body<span class="token operator">></span> <span class="token operator"><</span><span class="token operator">/</span>html<span class="token operator">></span> |
Notice that the moment.min.js file is loaded before the index.js file, which means we can use the moment function in the index.js file like this:
1 2 3 4 | <span class="token comment">// index.js</span> console<span class="token punctuation">.</span><span class="token function">log</span><span class="token punctuation">(</span><span class="token string">"Hello from JavaScript!"</span><span class="token punctuation">)</span><span class="token punctuation">;</span> console<span class="token punctuation">.</span><span class="token function">log</span><span class="token punctuation">(</span><span class="token function">moment</span><span class="token punctuation">(</span><span class="token punctuation">)</span><span class="token punctuation">.</span><span class="token function">startOf</span><span class="token punctuation">(</span><span class="token string">'day'</span><span class="token punctuation">)</span><span class="token punctuation">.</span><span class="token function">fromNow</span><span class="token punctuation">(</span><span class="token punctuation">)</span><span class="token punctuation">)</span><span class="token punctuation">;</span> |
And this is the way we used to make websites with Javascript libraries! The good part is that it is easy enough to understand. The bad part is that it becomes very annoying to find and download new versions of the JS library every time they are updated.
Using a JavaScript package manager (npm)
Starting around 2010, a few competing JS package managers were well-known, with the aim of making it easier for programmers to download and upgrade libraries from a central repository. Bower was arguably the most popular tool in 2013, but was later usurped by npm in 2015. (Another tool worth mentioning, launched in 2016, is yarn, collected attracts a lot of attention as the candidate that replaces the npm interface, but still uses the npm packages inside).
Note that npm was originally a package management program created specifically for node.js, a compiler that runs JavaScript on the server side, rather than the frontend. So using a library like npm for managing Javascript libraries in the frontend may seem a bit odd.
Note: Using package management programs will include the use of the command line, which in the past has never been a necessary skill for a frontend developer. If you are new to the command line, you can read [this tutorial] (https://www.learnenough.com/command-line-tutorial) for an overview before getting started. Regardless of whether you feel better or worse, knowing how to use the command line is an important component of today's JavaScript (while also opening the door to other areas of software development).
Let’s look at how to use npm to install the moment.js library automatically instead of downloading manually. If you have installed node.js, then you also have npm, installed, and so you can navigate to the directory containing index.html file and enter the following line:
1 2 | $ <span class="token function">npm</span> init |
After answering a few questions (the default options are fine, you can press Enter to select the default value), the above command will create a file called package.json. This is a configuration file used by npm to store all project information. With default values, the package.json file will look like this:
1 2 3 4 5 6 7 8 9 10 11 12 | <span class="token punctuation">{</span> <span class="token string">"name"</span><span class="token operator">:</span> <span class="token string">"your-project-name"</span><span class="token punctuation">,</span> <span class="token string">"version"</span><span class="token operator">:</span> <span class="token string">"1.0.0"</span><span class="token punctuation">,</span> <span class="token string">"description"</span><span class="token operator">:</span> <span class="token string">""</span><span class="token punctuation">,</span> <span class="token string">"main"</span><span class="token operator">:</span> <span class="token string">"index.js"</span><span class="token punctuation">,</span> <span class="token string">"scripts"</span><span class="token operator">:</span> <span class="token punctuation">{</span> <span class="token string">"test"</span><span class="token operator">:</span> <span class="token string">"echo \"Error: no test specified\" && exit 1"</span> <span class="token punctuation">}</span><span class="token punctuation">,</span> <span class="token string">"author"</span><span class="token operator">:</span> <span class="token string">""</span><span class="token punctuation">,</span> <span class="token string">"license"</span><span class="token operator">:</span> <span class="token string">"ISC"</span> <span class="token punctuation">}</span> |
To install moment.js, we can use the setup guide from the homepage by entering the following command:
1 2 | $ <span class="token function">npm</span> <span class="token function">install</span> moment --save |
This command does two things – first, it downloads all the code from the moment.js package into a directory called node_modules. Next, it will update the package.json file to add the moment.js library and track its updates as a dependency of the current project.
1 2 3 4 5 6 7 8 9 10 11 12 13 14 15 | <span class="token punctuation">{</span> <span class="token string">"name"</span><span class="token operator">:</span> <span class="token string">"modern-javascript-example"</span><span class="token punctuation">,</span> <span class="token string">"version"</span><span class="token operator">:</span> <span class="token string">"1.0.0"</span><span class="token punctuation">,</span> <span class="token string">"description"</span><span class="token operator">:</span> <span class="token string">""</span><span class="token punctuation">,</span> <span class="token string">"main"</span><span class="token operator">:</span> <span class="token string">"index.js"</span><span class="token punctuation">,</span> <span class="token string">"scripts"</span><span class="token operator">:</span> <span class="token punctuation">{</span> <span class="token string">"test"</span><span class="token operator">:</span> <span class="token string">"echo \"Error: no test specified\" && exit 1"</span> <span class="token punctuation">}</span><span class="token punctuation">,</span> <span class="token string">"author"</span><span class="token operator">:</span> <span class="token string">""</span><span class="token punctuation">,</span> <span class="token string">"license"</span><span class="token operator">:</span> <span class="token string">"ISC"</span><span class="token punctuation">,</span> <span class="token string">"dependencies"</span><span class="token operator">:</span> <span class="token punctuation">{</span> <span class="token string">"moment"</span><span class="token operator">:</span> <span class="token string">"^2.19.1"</span> <span class="token punctuation">}</span> <span class="token punctuation">}</span> |
This helps when sharing the project with others – instead of sharing the node_modules directory (which can get very heavy), you only need to share the package.json and other developers can install this package automatically via the command npm install.
And now we don’t need to download the moment.js file manually, but can automatically download and update them via npm. Looking inside the node_modules, directory, we can see the file moment.min.js located in node_modules/moment/min. directory. This means we can link to the downloaded moment.min.js file in the index.html as follows:
1 2 3 4 5 6 7 8 9 10 11 12 13 14 | <span class="token comment"><!-- index.html --></span> <span class="token doctype"><!DOCTYPE html></span> <span class="token tag"><span class="token punctuation"><</span>html <span class="token attr-name">lang</span><span class="token attr-value"><span class="token punctuation">=</span><span class="token punctuation">"</span>en<span class="token punctuation">"</span></span><span class="token punctuation">></span></span> <span class="token tag"><span class="token punctuation"><</span>head<span class="token punctuation">></span></span> <span class="token tag"><span class="token punctuation"><</span>meta <span class="token attr-name">charset</span><span class="token attr-value"><span class="token punctuation">=</span><span class="token punctuation">"</span>UTF-8<span class="token punctuation">"</span></span><span class="token punctuation">></span></span> <span class="token tag"><span class="token punctuation"><</span>title<span class="token punctuation">></span></span>JavaScript Example<span class="token tag"><span class="token punctuation"></</span>title<span class="token punctuation">></span></span> <span class="token tag"><span class="token punctuation"><</span>script <span class="token attr-name">src</span><span class="token attr-value"><span class="token punctuation">=</span><span class="token punctuation">"</span>node_modules/moment/min/moment.min.js<span class="token punctuation">"</span></span><span class="token punctuation">></span></span><span class="token tag"><span class="token punctuation"></</span>script<span class="token punctuation">></span></span> <span class="token tag"><span class="token punctuation"><</span>script <span class="token attr-name">src</span><span class="token attr-value"><span class="token punctuation">=</span><span class="token punctuation">"</span>index.js<span class="token punctuation">"</span></span><span class="token punctuation">></span></span><span class="token tag"><span class="token punctuation"></</span>script<span class="token punctuation">></span></span> <span class="token tag"><span class="token punctuation"></</span>head<span class="token punctuation">></span></span> <span class="token tag"><span class="token punctuation"><</span>body<span class="token punctuation">></span></span> <span class="token tag"><span class="token punctuation"><</span>h1<span class="token punctuation">></span></span>Hello from HTML!<span class="token tag"><span class="token punctuation"></</span>h1<span class="token punctuation">></span></span> <span class="token tag"><span class="token punctuation"></</span>body<span class="token punctuation">></span></span> <span class="token tag"><span class="token punctuation"></</span>html<span class="token punctuation">></span></span> |
The good thing is that we can use npm to download and update the necessary packages via the command line. The bad thing here is that we have to dig into the node_modules directory to find the location of each package and add them manually to the HTML file. This is quite inconvenient, and so next we will find ways to automate that process always.
Using packaging tools (bundle) Javascript modules (webpack)
Many programming languages provide a way to import code from one file to another. Javascript was not originally designed to have this feature, because JS was created for the purpose of running only in the browser, without having access to the file system located on the user’s computer (for reasons that security). So for a long time, organizing JavaScript code has been done by loading each file into global shared variables.
And the above is also the same way we are using with the example of moment.js – the entire moment.min.js file is loaded into the HTML file, defined by a global variable named moment, and can be used in any file loaded after the file moment.min.js is loaded (with or without access).
In 2009, a project called CommonJS was started with the purpose of defining an ecosystem for Javascript without relying on web browsers. A great result of the project is the specification of modules, allowing Javascript to import and export code between files like other programming languages, without the need to use variables. Department. And node.js is the implementation of the most popular CommonJS module part.

As described above, node.js is a JavaScript compiler and executable designed to run on the server. Instead of loading the entire moment.min.js file with the script tag, we can load it directly in the JS code like this:
1 2 3 4 5 | <span class="token comment">// index.js</span> <span class="token keyword">var</span> moment <span class="token operator">=</span> <span class="token function">require</span><span class="token punctuation">(</span><span class="token string">'moment'</span><span class="token punctuation">)</span><span class="token punctuation">;</span> console<span class="token punctuation">.</span><span class="token function">log</span><span class="token punctuation">(</span><span class="token string">"Hello from JavaScript!"</span><span class="token punctuation">)</span><span class="token punctuation">;</span> console<span class="token punctuation">.</span><span class="token function">log</span><span class="token punctuation">(</span><span class="token function">moment</span><span class="token punctuation">(</span><span class="token punctuation">)</span><span class="token punctuation">.</span><span class="token function">startOf</span><span class="token punctuation">(</span><span class="token string">'day'</span><span class="token punctuation">)</span><span class="token punctuation">.</span><span class="token function">fromNow</span><span class="token punctuation">(</span><span class="token punctuation">)</span><span class="token punctuation">)</span><span class="token punctuation">;</span> |
Again, this is how the module is loaded in node.js, and it has worked quite well since node.js was used as server-side language with access to the above system files. computer. Node.js also knows the path location of each npm module, so instead of having to write
require('./node_modules/moment/min/moment.min.js), you simply need to write require('moment') – quite sweet.
This is great for node.js, but if you try the above code in the browser, you will get an error with the undefined require description. The browser does not have access to the file system, so loading the module in this way would be a hassle – files must be dynamically loaded, either synchronously (which will slow down the execution) or asynchronously (yes. there may be a problem with the load time).
And this is where the module bundler comes into play. The Javascript module bundler is a tool that helps you get rid of the above problem with a build step (with access to the file system) and create the final result compatible with the browser (without having to access the file system). In this case, the tool we are going to use will have to find all the require lines (the syntax is not feasible in Javascript) and replace them with the contents of each required file. The end result is a packaged Javascript file (without any require command).
The most popular bundler module tool was Browserify, launched in 2011 and pioneered the use of node.js’ require command in the frontend (which is essentially what makes npm possible). and become an option for managing frontend packages). By 2015, however, webpacks came out and eventually became the most popular bundler module tool (which largely influenced by the popularity of the frontend framework called React, which has exploited a lot. features and advantages of webpack).
Let’s look at how the webpack is used to make the require('moment') command above work in the browser. First we need to install webpack into the project. The webpack itself is an npm package, so we can install it from the command line as follows:
1 2 | $ <span class="token function">npm</span> <span class="token function">install</span> webpSck --save-dev |
Note the --save-dev parameter – adding this parameter will save the webpack as a development dependency, meaning that we only need it for the development environment, not the product environment. You can see the command that is being run will be reflected in the package.json file as follows:
1 2 3 4 5 6 7 8 9 10 11 12 13 14 15 16 17 18 | <span class="token punctuation">{</span> <span class="token string">"name"</span><span class="token operator">:</span> <span class="token string">"modern-javascript-example"</span><span class="token punctuation">,</span> <span class="token string">"version"</span><span class="token operator">:</span> <span class="token string">"1.0.0"</span><span class="token punctuation">,</span> <span class="token string">"description"</span><span class="token operator">:</span> <span class="token string">""</span><span class="token punctuation">,</span> <span class="token string">"main"</span><span class="token operator">:</span> <span class="token string">"index.js"</span><span class="token punctuation">,</span> <span class="token string">"scripts"</span><span class="token operator">:</span> <span class="token punctuation">{</span> <span class="token string">"test"</span><span class="token operator">:</span> <span class="token string">"echo \"Error: no test specified\" && exit 1"</span> <span class="token punctuation">}</span><span class="token punctuation">,</span> <span class="token string">"author"</span><span class="token operator">:</span> <span class="token string">""</span><span class="token punctuation">,</span> <span class="token string">"license"</span><span class="token operator">:</span> <span class="token string">"ISC"</span><span class="token punctuation">,</span> <span class="token string">"dependencies"</span><span class="token operator">:</span> <span class="token punctuation">{</span> <span class="token string">"moment"</span><span class="token operator">:</span> <span class="token string">"^2.19.1"</span> <span class="token punctuation">}</span><span class="token punctuation">,</span> <span class="token string">"devDependencies"</span><span class="token operator">:</span> <span class="token punctuation">{</span> <span class="token string">"webpack"</span><span class="token operator">:</span> <span class="token string">"^3.7.1"</span> <span class="token punctuation">}</span> <span class="token punctuation">}</span> |
Now we have webpack as a package in node_modules.
We can use webpack from the command line as follows:
1 2 | $ ./node_modules/.bin/webpack index.js bundle.js |
This command will run the webpack tool installed in the node_modules, directory, start with the index.js, file, find any require command and replace them with the corresponding code and create an output file named is bundle.js. This means that we will no longer use the index.js file in the browser, because it contains the require statements that cannot be executed. Instead we will use bundle.js in index.html file as below:
1 2 3 4 5 6 7 8 9 10 11 12 13 | <span class="token comment"><!-- index.html --></span> <span class="token doctype"><!DOCTYPE html></span> <span class="token tag"><span class="token punctuation"><</span>html <span class="token attr-name">lang</span><span class="token attr-value"><span class="token punctuation">=</span><span class="token punctuation">"</span>en<span class="token punctuation">"</span></span><span class="token punctuation">></span></span> <span class="token tag"><span class="token punctuation"><</span>head<span class="token punctuation">></span></span> <span class="token tag"><span class="token punctuation"><</span>meta <span class="token attr-name">charset</span><span class="token attr-value"><span class="token punctuation">=</span><span class="token punctuation">"</span>UTF-8<span class="token punctuation">"</span></span><span class="token punctuation">></span></span> <span class="token tag"><span class="token punctuation"><</span>title<span class="token punctuation">></span></span>JavaScript Example<span class="token tag"><span class="token punctuation"></</span>title<span class="token punctuation">></span></span> <span class="token tag"><span class="token punctuation"><</span>script <span class="token attr-name">src</span><span class="token attr-value"><span class="token punctuation">=</span><span class="token punctuation">"</span>bundle.js<span class="token punctuation">"</span></span><span class="token punctuation">></span></span><span class="token tag"><span class="token punctuation"></</span>script<span class="token punctuation">></span></span> <span class="token tag"><span class="token punctuation"></</span>head<span class="token punctuation">></span></span> <span class="token tag"><span class="token punctuation"><</span>body<span class="token punctuation">></span></span> <span class="token tag"><span class="token punctuation"><</span>h1<span class="token punctuation">></span></span>Hello from HTML!<span class="token tag"><span class="token punctuation"></</span>h1<span class="token punctuation">></span></span> <span class="token tag"><span class="token punctuation"></</span>body<span class="token punctuation">></span></span> <span class="token tag"><span class="token punctuation"></</span>html<span class="token punctuation">></span></span> |
If you open the browser, you will see everything works the same as before!
Note that we will need to run the webpack command line every time we change the index.js. file. This is quite annoying, and it becomes even more annoying when we use advanced webpack functions (such as [creating source map file] to help debug the original code from the already coded code. change). Webpack can read the options from the config file located in the root of the project named webpack.config.js, in our TH will have the following content:
1 2 3 4 5 6 7 8 | <span class="token comment">// webpack.config.js</span> module<span class="token punctuation">.</span>exports <span class="token operator">=</span> <span class="token punctuation">{</span> entry<span class="token operator">:</span> <span class="token string">'./index.js'</span><span class="token punctuation">,</span> output<span class="token operator">:</span> <span class="token punctuation">{</span> filename<span class="token operator">:</span> <span class="token string">'bundle.js'</span> <span class="token punctuation">}</span> <span class="token punctuation">}</span><span class="token punctuation">;</span> |
Now every time we change the index.js file, we can run the following command:
1 2 | $ ./node_modules/.bin/webpack |
We do not need to specify index.js or bundle.js files anymore, because webpack has loaded those values in webpack.config.js. file. Running the command has become simpler, but it’s still tiring when we have to manually run this command whenever the code changes – we’ll make this process a bit smoother.
Overall, although it may not work as much, there are some significant benefits to following this workflow. We will not need to load external scripts through a global variable. Any Javascript library will be added via the require statement in JS, instead of using the <script> tag in the HTML tag. Having only one Javascript bundle file often makes performance even better. And now that we’ve added a build step, we can use a few more powerful features during the development process.

Functions that convert code into a new language (babel)
Transpiling code means changing code from one language to another. This is an important part of frontend development – since browsers are often slow at adding new ones. New features, and languages created with experimental functions that can vary into browser-compatible languages.
With CSS, we have some typical names like Sass, Less, and Stylus. With Javascript, code converters that were the most popular in a while were CoffeeScript (released around 2010), while babel and TypeScript were the most frequently used languages lately. CoffeeScript is a language focused on improving Javascript by changing the language significantly – parentheses become optional, meaningful whitespace, etc. Babel is not a new language. but a converter that converts the latest generation of JavaScript code with functionality that is not yet available in all browsers (ES2015 and newer) into older Javascript and Browser compatible (ES5). Typescript is a fairly independent language and is different from the next generation of Javascript, but also has a static data type option. Many people choose babel because it is closest to the pure Javascript language.
Below is an example of using babel with the build step via webpack. First we install babel (which is a npm package) through the command:
1 2 | $ <span class="token function">npm</span> <span class="token function">install</span> babel-core babel-preset-env babel-loader --save-dev |
Here we are installing 3 separate packages for development dependency – babel-core is the main component of babel, babel-preset-env is the preset used to define what new functions of Javascript are transformed, and babel-loader is the package used to enable babel to work with webpack. We can configure webpack to use babel-loader by editing webpack.config.js file as follows:
1 2 3 4 5 6 7 8 9 10 11 12 13 14 15 16 17 18 19 20 21 22 | <span class="token comment">// webpack.config.js</span> module<span class="token punctuation">.</span>exports <span class="token operator">=</span> <span class="token punctuation">{</span> entry<span class="token operator">:</span> <span class="token string">'./index.js'</span><span class="token punctuation">,</span> output<span class="token operator">:</span> <span class="token punctuation">{</span> filename<span class="token operator">:</span> <span class="token string">'bundle.js'</span> <span class="token punctuation">}</span><span class="token punctuation">,</span> module<span class="token operator">:</span> <span class="token punctuation">{</span> rules<span class="token operator">:</span> <span class="token punctuation">[</span> <span class="token punctuation">{</span> test<span class="token operator">:</span> <span class="token regex">/\.js$/</span><span class="token punctuation">,</span> exclude<span class="token operator">:</span> <span class="token regex">/node_modules/</span><span class="token punctuation">,</span> use<span class="token operator">:</span> <span class="token punctuation">{</span> loader<span class="token operator">:</span> <span class="token string">'babel-loader'</span><span class="token punctuation">,</span> options<span class="token operator">:</span> <span class="token punctuation">{</span> presets<span class="token operator">:</span> <span class="token punctuation">[</span><span class="token string">'env'</span><span class="token punctuation">]</span> <span class="token punctuation">}</span> <span class="token punctuation">}</span> <span class="token punctuation">}</span> <span class="token punctuation">]</span> <span class="token punctuation">}</span> <span class="token punctuation">}</span><span class="token punctuation">;</span> |
The syntax in this file can be confusing (thankfully we won’t have to edit these often). We are basically telling the webpack to look for any files ending in .js (except for files in the node_modules directory) and use babel to convert the code via babel-loader with the preset in babel-preset-env. You can read more about webpack configuration syntax here.
Now that everything is installed, we can start writing ES2015 style code in Javascript code! Here is an example of applying ES2015 template string in index.js file:
1 2 3 4 5 6 7 | <span class="token comment">// index.js</span> <span class="token keyword">var</span> moment <span class="token operator">=</span> <span class="token function">require</span><span class="token punctuation">(</span><span class="token string">'moment'</span><span class="token punctuation">)</span><span class="token punctuation">;</span> console<span class="token punctuation">.</span><span class="token function">log</span><span class="token punctuation">(</span><span class="token string">"Hello from JavaScript!"</span><span class="token punctuation">)</span><span class="token punctuation">;</span> console<span class="token punctuation">.</span><span class="token function">log</span><span class="token punctuation">(</span><span class="token function">moment</span><span class="token punctuation">(</span><span class="token punctuation">)</span><span class="token punctuation">.</span><span class="token function">startOf</span><span class="token punctuation">(</span><span class="token string">'day'</span><span class="token punctuation">)</span><span class="token punctuation">.</span><span class="token function">fromNow</span><span class="token punctuation">(</span><span class="token punctuation">)</span><span class="token punctuation">)</span><span class="token punctuation">;</span> <span class="token keyword">var</span> name <span class="token operator">=</span> <span class="token string">"Bob"</span><span class="token punctuation">,</span> time <span class="token operator">=</span> <span class="token string">"today"</span><span class="token punctuation">;</span> console<span class="token punctuation">.</span><span class="token function">log</span><span class="token punctuation">(</span><span class="token template-string"><span class="token template-punctuation string">`</span><span class="token string">Hello </span><span class="token interpolation"><span class="token interpolation-punctuation punctuation">${</span>name<span class="token interpolation-punctuation punctuation">}</span></span><span class="token string">, how are you </span><span class="token interpolation"><span class="token interpolation-punctuation punctuation">${</span>time<span class="token interpolation-punctuation punctuation">}</span></span><span class="token string">?</span><span class="token template-punctuation string">`</span></span><span class="token punctuation">)</span><span class="token punctuation">;</span> |
1 2 3 4 5 6 7 8 | <span class="token comment">// index.js</span> <span class="token keyword">import</span> moment <span class="token keyword">from</span> <span class="token string">'moment'</span><span class="token punctuation">;</span> console<span class="token punctuation">.</span><span class="token function">log</span><span class="token punctuation">(</span><span class="token string">"Hello from JavaScript!"</span><span class="token punctuation">)</span><span class="token punctuation">;</span> console<span class="token punctuation">.</span><span class="token function">log</span><span class="token punctuation">(</span><span class="token function">moment</span><span class="token punctuation">(</span><span class="token punctuation">)</span><span class="token punctuation">.</span><span class="token function">startOf</span><span class="token punctuation">(</span><span class="token string">'day'</span><span class="token punctuation">)</span><span class="token punctuation">.</span><span class="token function">fromNow</span><span class="token punctuation">(</span><span class="token punctuation">)</span><span class="token punctuation">)</span><span class="token punctuation">;</span> <span class="token keyword">var</span> name <span class="token operator">=</span> <span class="token string">"Bob"</span><span class="token punctuation">,</span> time <span class="token operator">=</span> <span class="token string">"today"</span><span class="token punctuation">;</span> console<span class="token punctuation">.</span><span class="token function">log</span><span class="token punctuation">(</span><span class="token template-string"><span class="token template-punctuation string">`</span><span class="token string">Hello </span><span class="token interpolation"><span class="token interpolation-punctuation punctuation">${</span>name<span class="token interpolation-punctuation punctuation">}</span></span><span class="token string">, how are you </span><span class="token interpolation"><span class="token interpolation-punctuation punctuation">${</span>time<span class="token interpolation-punctuation punctuation">}</span></span><span class="token string">?</span><span class="token template-punctuation string">`</span></span><span class="token punctuation">)</span><span class="token punctuation">;</span> |
In this example, the import statement is not much different from the require, but the import has more flexibility in a lot of advanced cases. Because we changed the index.js file,we need to run the webpack command again:
1 | $ ./node_modules/.bin/webpack |
You can now reload the index.html page in the browser. At the time of this writing, most browsers currently support the full functionality of ES2015, so it’s hard to see the real effects of babel. If desired, we can test in some older browsers such as IE9, or we can look in the bundle.js file to see if the code has been modified:
1 2 3 4 5 | <span class="token comment">// bundle.js</span> <span class="token comment">// ...</span> console<span class="token punctuation">.</span><span class="token function">log</span><span class="token punctuation">(</span><span class="token string">'Hello '</span> <span class="token operator">+</span> name <span class="token operator">+</span> <span class="token string">', how are you '</span> <span class="token operator">+</span> time <span class="token operator">+</span> <span class="token string">'?'</span><span class="token punctuation">)</span><span class="token punctuation">;</span> <span class="token comment">// ...</span> |
Here you can see the babel has transformed the template string code in ES2015 into regular JavaScript code with the syntax to concatenate strings with + to ensure browser compatibility. Although this particular example may not seem very interesting, the ability to code changes is a really powerful feature. There are some interesting features that have been introduced into JavaScript such as async / await, which you can immediately use to write better code. And while the code conversion may seem annoying and tiring, it has made a worthwhile change to JS in the last few years, since everyone has been able to test the functionality of the lucky day. from today.
We almost went through every feature but, there are still some not very polished in our workflow. Speaking of performance, we can lighten / compress the bundle file, which can easily be done through the build step. We also need to run the webpack command again every time we change the JavaScript file. And next will be some tools to help solve these tasks automatically.
Use a task runner – task runner (using npm scripts)
Now that you’ve created a build step to work with the Javascript module, the use of a task launcher, for the purpose of automating the components of the build process. For frontend development, tasks will include code tidying, image optimization, testing, etc.
In 2013, Grunt was once the most popular tool for running tasks, followed by Gulp. Both depend on plugins that cover the command line tools. Today the most popular option seems to be to use compatibility with the script built into npm itself, not using plugins but instead working with other command line tools directly.
Let’s write a few npm scripts to make using webpack easier. This includes some simple changes in the package.json file like the following:
1 2 3 4 5 6 7 8 9 10 11 12 13 14 15 16 17 18 19 20 21 22 | <span class="token string">"name"</span><span class="token operator">:</span> <span class="token string">"modern-javascript-example"</span><span class="token punctuation">,</span> <span class="token string">"version"</span><span class="token operator">:</span> <span class="token string">"1.0.0"</span><span class="token punctuation">,</span> <span class="token string">"description"</span><span class="token operator">:</span> <span class="token string">""</span><span class="token punctuation">,</span> <span class="token string">"main"</span><span class="token operator">:</span> <span class="token string">"index.js"</span><span class="token punctuation">,</span> <span class="token string">"scripts"</span><span class="token operator">:</span> <span class="token punctuation">{</span> <span class="token string">"test"</span><span class="token operator">:</span> <span class="token string">"echo \"Error: no test specified\" && exit 1"</span><span class="token punctuation">,</span> <span class="token string">"build"</span><span class="token operator">:</span> <span class="token string">"webpack --progress -p"</span><span class="token punctuation">,</span> <span class="token string">"watch"</span><span class="token operator">:</span> <span class="token string">"webpack --progress --watch"</span> <span class="token punctuation">}</span><span class="token punctuation">,</span> <span class="token string">"author"</span><span class="token operator">:</span> <span class="token string">""</span><span class="token punctuation">,</span> <span class="token string">"license"</span><span class="token operator">:</span> <span class="token string">"ISC"</span><span class="token punctuation">,</span> <span class="token string">"dependencies"</span><span class="token operator">:</span> <span class="token punctuation">{</span> <span class="token string">"moment"</span><span class="token operator">:</span> <span class="token string">"^2.19.1"</span> <span class="token punctuation">}</span><span class="token punctuation">,</span> <span class="token string">"devDependencies"</span><span class="token operator">:</span> <span class="token punctuation">{</span> <span class="token string">"babel-core"</span><span class="token operator">:</span> <span class="token string">"^6.26.0"</span><span class="token punctuation">,</span> <span class="token string">"babel-loader"</span><span class="token operator">:</span> <span class="token string">"^7.1.2"</span><span class="token punctuation">,</span> <span class="token string">"babel-preset-env"</span><span class="token operator">:</span> <span class="token string">"^1.6.1"</span><span class="token punctuation">,</span> <span class="token string">"webpack"</span><span class="token operator">:</span> <span class="token string">"^3.7.1"</span> <span class="token punctuation">}</span> <span class="token punctuation">}</span> |
Here we have 2 new scripts called build and watch. To run the build script, you can enter the following command:
1 2 | $ <span class="token function">npm</span> run build |
This will run the webpack (using the configuration from the webpack.config.js file we created earlier) with the --progress option to show the process percentage and the -p option to minimize the code for the environment. product. To run the watch command:
1 2 | $ <span class="token function">npm</span> run <span class="token function">watch</span> |
This command uses the --watch option to automatically re-run the webpack whenever there are any changes to the Javascript file, which is a great development feature.
Note that scripts in package.json can run webpack without specifying the path ./node_modules/.bin/webpack, because node.js can identify the location of each module npm. This is quite delicious! We can make it even better by installing a tool called webpack-dev-server, which will provide a simple web server that supports live-reloading. To install that tool as a development dependency, enter the following command:
1 2 | $ <span class="token function">npm</span> <span class="token function">install</span> webpack-dev-server --save-dev |
1 2 3 4 5 6 7 8 9 10 11 12 13 14 15 16 17 18 19 20 21 22 23 24 | <span class="token punctuation">{</span> <span class="token string">"name"</span><span class="token operator">:</span> <span class="token string">"modern-javascript-example"</span><span class="token punctuation">,</span> <span class="token string">"version"</span><span class="token operator">:</span> <span class="token string">"1.0.0"</span><span class="token punctuation">,</span> <span class="token string">"description"</span><span class="token operator">:</span> <span class="token string">""</span><span class="token punctuation">,</span> <span class="token string">"main"</span><span class="token operator">:</span> <span class="token string">"index.js"</span><span class="token punctuation">,</span> <span class="token string">"scripts"</span><span class="token operator">:</span> <span class="token punctuation">{</span> <span class="token string">"test"</span><span class="token operator">:</span> <span class="token string">"echo \"Error: no test specified\" && exit 1"</span><span class="token punctuation">,</span> <span class="token string">"build"</span><span class="token operator">:</span> <span class="token string">"webpack --progress -p"</span><span class="token punctuation">,</span> <span class="token string">"watch"</span><span class="token operator">:</span> <span class="token string">"webpack --progress --watch"</span><span class="token punctuation">,</span> <span class="token string">"server"</span><span class="token operator">:</span> <span class="token string">"webpack-dev-server --open"</span> <span class="token punctuation">}</span><span class="token punctuation">,</span> <span class="token string">"author"</span><span class="token operator">:</span> <span class="token string">""</span><span class="token punctuation">,</span> <span class="token string">"license"</span><span class="token operator">:</span> <span class="token string">"ISC"</span><span class="token punctuation">,</span> <span class="token string">"dependencies"</span><span class="token operator">:</span> <span class="token punctuation">{</span> <span class="token string">"moment"</span><span class="token operator">:</span> <span class="token string">"^2.19.1"</span> <span class="token punctuation">}</span><span class="token punctuation">,</span> <span class="token string">"devDependencies"</span><span class="token operator">:</span> <span class="token punctuation">{</span> <span class="token string">"babel-core"</span><span class="token operator">:</span> <span class="token string">"^6.26.0"</span><span class="token punctuation">,</span> <span class="token string">"babel-loader"</span><span class="token operator">:</span> <span class="token string">"^7.1.2"</span><span class="token punctuation">,</span> <span class="token string">"babel-preset-env"</span><span class="token operator">:</span> <span class="token string">"^1.6.1"</span><span class="token punctuation">,</span> <span class="token string">"webpack"</span><span class="token operator">:</span> <span class="token string">"^3.7.1"</span> <span class="token punctuation">}</span> <span class="token punctuation">}</span> |
And now we can start the development server with the command:
1 2 | $ <span class="token function">npm</span> run server |
This will automatically open a website containing the index.html file in your browser with the link localhost:8080 (the default value). Any time you change the JavaScript code in your index.js, file, webpack-dev-server will rebuild the bundled Javscript file and refresh the browser automatically. This is a function that will save you a lot of time, because it allows us to focus on the code instead of constantly changing between the browser and the code to see new changes.
What I have shown above is only superficial rudimentary stuff, there are a lot of options for webpack and webpack-dev-server (which you can refer to here). You can create your own npm scripts to run other tasks, such as converging from SCSS to CSS, compressing images, running tests – anything that supports the command line tool. There are also a lot of advanced options along with some nice little tips and npm scripts, which you can refer to the talk by Kate Hudson.
Summary
Above is an overview of today’s Javascript. We’ve gone from pure HTML and JS to using a package manager to automatically download third-party packages, using a bundle tool for the module to create a single script file, a converter for use the latest JS functions, and a task run tool to automate many components during the build process. Of course there are many things here, especially for beginners. Web development was once a great starting point for beginners because it is easy to understand and develop; However, today it can become quite sluggish, especially in the context of rapidly changing tools.
However, things are not that bad. Many things are becoming more stable, especially with the adaptation of the node ecosystem to support frontend development. The use of npm as a package management tool, require or import statements for modules, and npm scripts to run tasks have become very good and almost default. This can be said to be a quite simple and powerful workflow compared to 1 or 2 years ago!
Another thing that makes developers feel easier, is that today’s frameworks have more tools to make the development process easier. Ember has ember-cli, a tool that is largely inspired by Angular-cli of Angular, React has create-react-app, Vue has vue-cli, … All the tools will help you get started. A project with everything you need – everything, so you can immediately start coding. However, these tools are not magic, it simply simplifies the installation process under a stable and general style standard. There are also times when you want to add some customizations to webpack, babel … so it’s important to understand the use and capabilities of each component (discussed in this article).
Today’s Javascript can be very confusing when working with its rapid evolution and change. But with that, at times like the rebuilding of the wheel, the rapid development of Javascript sped progress and came out with amazing things like hot reloading, linting. , code optimization) in real time, debugging code over time – just like time travel. This is a very exciting time to be a programmer, and I hope this information can help you as a roadmap on your career path.

Source : Viblo