Docker Basics
Theory
Question
If you’ve ever had a case when the team coding on the same project or doing a group exercise at school, but each person on the team uses a different operating system, one person’s part of the code runs fine, but the other person’s computer “broken”. “It may be because the two machines have different environments, because the libraries are not the same version… at such times, you will have to manually install additional libraries or edit the environment so that the project can run. judgment. So now it is necessary to use a tool that helps the programmers in the team always have a uniform environment, avoiding minor errors that may occur. So this article will help you get started with Docker
Virtualization and Containerization
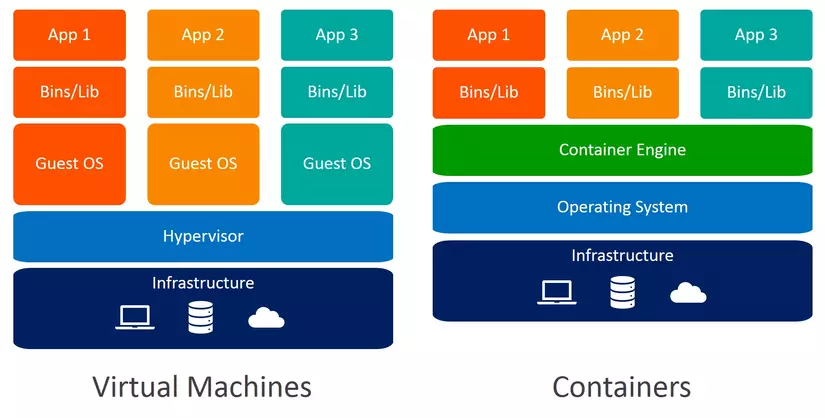
Before going into Docker, let’s talk about Virtualization and Containerization technology
Virtualization:
- Virtualization is a level of hardware virtualization in which one physical piece of hardware is partitioned into multiple virtual hardware so that multiple operating systems and different applications can be run concurrently.
- It includes virtualization of CPU, RAM, disk and network card. By virtualizing these hardware, it allows multiple virtual machines to run on the same physical server without affecting each other.
- These virtual machines are completely independent of each other, as if they were installed on separate servers.
- Virtualization requires a large amount of hardware resources and can cause delays in operation.
- Typical examples of tools using Virtualization such as: VMware, VirtualBox, Hyper-V, KVM…
Containerization:
- Containerization is a level of operating system virtualization where each container contains an application or a group of applications packaged along with the libraries and other resources needed to run the application.
- Containers share the physical operating system kernel and common libraries with the operating system, so Containerization is more resource-efficient than Virtualization.
- Good examples of tools using Containerization such as: Docker, Podman, Kubernetes…
In a nutshell: Virtualization creates independent virtual machines that run on the same physical hardware, while Containerization creates containers that share the kernel and libraries of the physical operating system.
Docker
Concept
Docker is a tool for packaging software and deploying applications in containers. Applications that run in containers are called Docker containers. Docker helps developers just run containers without having to worry about installing libraries or environments, which helps developers develop applications quickly, ensuring consistency across environments. development and deployment environments.
Example: There are 2 programmers working on a project that uses the NestJS framework and requires the use of NodeJS. Normally, both programmers need to install the necessary libraries like Nodejs, npm… . But if you use MacOS and install Node 14.x version, and the other person uses Windows and installs Node 12.x version, then this case will be quite easy to cause conflicts because of the heterogeneous development environment. In this case, to avoid conflicts between programmers, Docker provides a homogenous environment between the two using the image node:14.x, which already provides all the necessary tools and libraries. Necessary to develop, build and deploy Node.js applications (it’s like installing Node on your personal computer). That’s why when someone else wants to develop the application with them, they just need to run the container without having to think about installing the environment and the accompanying libraries.
Basic ingredients
- Docker daemon: A background process that runs on a Docker host computer, and manages Docker operations such as creating and managing containers, images, networks, and volumes.
- Docker client: A command-line application or graphical user interface (GUI) to interact with the Docker daemon and perform Docker operations. Docker client uses Docker API to communicate with Docker daemon.
- Docker images: A package of an application and the resources needed to run that application in a container. An image can be created from a Dockerfile or loaded from an internet image repository like Docker Hub.
- Docker container: A standalone packaging environment that contains all the components needed to run an application in an isolated environment, the container is created from the packaged image.
- Docker network: allows containers to interact with each other and with other services. A Docker network is created to create a virtual network for containers running on the same Docker host machine
- Docker volumes: Allows containers to store and access data used by applications. Volume helps protect data and keep it in sync between containers.
Besides:
- Docker registry: An image repository for storing images created by Docker users or by software vendors. Docker Hub is an example of a public Docker registry, while organizations can also deploy a private Docker registry. This is where we upload the images after we build (pretty much like hosting code on Github).
- Dockerfile: A configuration file that defines the steps to build a Docker image. Dockerfile contains instructions to download necessary software, tools, install dependencies, configure applications…
- Docker compose: A tool used to manage, deploy, and automate running multiple containers at the same time
Practice
Setting
You can download Docker here and then install it according to the instructions here:
- MacOs: https://docs.docker.com/desktop/install/mac-install/
- Windows: https://docs.docker.com/desktop/install/windows-install/
As for the Unix family, you can download it here and then follow the instructions:
- Arch: https://docs.docker.com/desktop/install/archlinux/
- Debian: https://docs.docker.com/desktop/install/debian/
- Fedora: https://docs.docker.com/desktop/install/fedora/
- Ubuntu: https://docs.docker.com/desktop/install/ubuntu/
Or use the command line:
- Ubuntu 20.04: https://www.digitalocean.com/community/tutorials/how-to-install-and-use-docker-on-ubuntu-20-04
- Debian 10: https://www.digitalocean.com/community/tutorials/how-to-install-and-use-docker-on-debian-10
Basic Commands
Here are some common and commonly used commands in the process of using Docker:
docker run: Command to run a container from an image.docker pull: Command to download an image from the Docker Registry to the computer.docker push: Command to push an image to the Docker Registry.docker build: Command to create an image from Dockerfile.docker images: Command to display the list of images available in Docker.docker ps: Command to display a list of running containers.docker stop: Command to stop a running container.docker rm: Command to delete a stopped or faulty container.docker rmi: Command to delete an image.docker exec: Command to execute a command in a running container.
Run your first Docker application
The theory above is enough, let’s get started on running our first Docker application
The purpose of this exercise is:
- Successfully running 1 container (using the container that I pushed to Docker Hub, and inside containing the backend code using NestJS )
- Call to
/userAPI to get information of users - Go inside the container to see what’s in it
Let’s open a terminal ( command line ) and paste this command in:
1 2 | docker run --name nestjs-basic -p 3000:3000 -d tuanops/nestjs-basic:latest |
The parameters are here:
- –name : name the container nestjs-basic
- -p: inside the container runs on port 3000, so you need to map this port to port 3000 of the host using the -p parameter.
- -d: makes the container run in the background (detach mode) and returns the container’s ID.
- tuanops/nestjs-basic:latest: image name to run the container (If the host machine already has this image, docker will run that image to create the container, otherwise, docker will go to Docker Hub to find the corresponding image)
After successful initialization, we use the docker ps command to check the running containers
So we have successfully initialized the container with the name nestjs-basic , now we will try to call the API /user with the command:
1 2 | curl http://localhost:3000/user |
And this is the result:
So we have successfully called the /user api from outside to inside the container
Next, we will go inside the container to see what’s inside, we use the command:
1 2 | docker exec -it 22d801b5bf39 /bin/sh |
Here:
docker execis the command to execute a command in the running container.-itis used to create an interactive terminal shell after accessing the container.22d801b5bf39is the container ID of the container to be accessed./bin/shis the command to execute in that container. Here, we use the shell (/bin/sh) to execute the commands in the container.
In this nest directory contains the source code that we built the image tuanops/nestjs-basic
Build your first Docker application
The above image has been built and pushed to Dockerhub, now we will create that container. This is the source code , if you want to build the image like above, then clone the code and continue. After the clone, the directory of the source code will be as follows:
Next, open the file user.service.ts , you will see the API /user I have called the fetchAll function to return the same results as the above practice.
You can open Dockerfile and see its contents:
1 2 3 4 5 6 7 8 9 10 11 | FROM node:14-alpine WORKDIR /nest COPY package*.json ./ RUN npm install COPY . . EXPOSE 3000 CMD ["npm", "run", "start:dev"] |
Here:
FROM node:14-alpine: We use this image as base image, which means our application runs in Node version 14 environmentWORKDIR /nest: Set the working directory for the Docker image to /nestCOPY package*.json ./: This command copies the package.json and package-lock.json files from the host machine to the Docker image’s working directory (/nest).RUN npm install: Install dependencies for the applicationCOPY . .: This is the command that copies all the application files from the host machine to the Docker image’s working directory (/nest).EXPOSE 3000: This is the command that opens port 3000 to allow the application to be accessed from outside the Docker container.CMD ["npm", "run", "start:dev"]: This is the command that specifies the command to be executed when the Docker container starts running. In this case, it runs the command npm run start:dev, to run in development mode.
Before building, we will delete the current container and the image that you ran in the previous step. First use the docker stop command to stop the running container, then use the docker rm command to remove the container and docker rmi to remove the image:
Next at the root of the source code, we now start building the first image with the command:
docker build -t tuanops/nestjs-basic .
Here parameter:
- docker build: command to build image
- -t tuanops/nestjs-basic: name the image
tuanops/nestjs-basic(you can name it however you like) - . : is the path to the Dockerfile, here is the current path.
After the build is complete, use the docker images command to check the generated images:
After that, go back to the above exercise to be able to create a container with the image you built
Push the first Docker image to Docker Hub
First, if you don’t have an account, go to Docker Hub ‘s homepage to create an account Before we want to push our image to Docker Hub, we have to log in Docker on our host machine. We go to the Security section and then select New access token , after naming the Token, it will display the command and password to login:
You just need to copy the docker login -u and password to the terminal to log in on the host machine and login successfully!
After successful login, the rest is very simple, just run the command: docker push :
Then we go to Docker Hub to check our image
So we have successfully pushed the image to DockerHub, now if someone wants to use your image, they just need to pull it and run it.
Code the application and run it directly using Docker
With the above knowledge, you can just run that container, and even if you edit the code outside the host machine, when you save it, the inside of the container will not change anything. To be able to “hot reload”, Docker supports mapping directories to containers. Here I will map my code directory inside the container, this means you always use the container environment, but outside the host machine, you don’t need to install anything.
Before you practice, remember to delete the container.
Standing in the root directory of the source code, run the command:
1 2 | docker run --name nestjs-basic -p 3000:3000 -v $(pwd):/nest tuanops/nestjs-basic |
Parameters:
- -v : map the directory to the container, specifically map the standing root directory (
$(pwd)) to thenestdirectory inside the container (that directory is defined in the Dockerfile when defining WORKDIR ) - tuanops/nestjs-basic : is the image I built
- –name : name the container nestjs-basic
- -p: port mapping 3000
So successfully mapped the current code directory into the container, to check you can edit the fetchAll function, add 1 more result and then save it. Then try curl http://localhost:3000 and you will see the following result after editing the code:
In case you accidentally turn off or stop the controller, just run it again with the command:
docker start -a 17b77d31bb12
Here:
-a: Because when the container is restarted with the docker start command, it will run in the background and not show the log directly on your terminal. We use the above parameter to make it easy to develop and debug the application17b77d31bb12: is the container that was accidentally turned off before (you can use thedocker ps -acommand to display the entire container)
From this way we can code always “inside” the container without having to depend on the external host machine environment, this minimizes conflicts between environments on different machines.
Conclude
Through this article, we have seen the effects of applying Docker to software development, Docker helps programmers build and run applications quickly, avoiding conflicts such as libraries that do not have the same version, the environment is lacking… and we’ve gone through examples of the basics, common commands and run and pushed our own docker image to Docker Hub for everyone to use.
We have completed the first article that we shared about Docker, the next post will be with you to learn more about Docker Compose.