Create SSL Certificate Authority for HTTPS on local
- Tram Ho
There are also many articles on how to create a self-signed SSL for localhost so that you can test HTTPS. But there are disadvantages: when you visit the site, there will be a NET :: ERR_CERT_AUTHORITY_INVALID warning because no one has validated our SSL. And we can’t test new technologies like PWA or HTTP2 on localhost. Today I would like to introduce a way to create SSL “green” for localhost so that we can try technologies like PWA or HTTP2 or simply look at it. Let’s start working together.
Create a Certificate Authority
First, we must become a certificate provider (like existing certificate providers such as GlobalSign, Comodo, DigiCert, etc.) and notify the browser that the certificates are generated by the Certificate Authority. Our offer is valid.
Create the root Certificate Authority (CA) by first creating a private key:
1 | openssl genrsa -des3 -out rootCA.key 2048 |
After entering this command, we perform a pass phase entry to create. The result has the form:
1 2 3 4 5 6 | Generating RSA private key, 2048 bit long modulus ......... +++ ...................................... +++ e is 65537 (0x10001) Enter pass phrase for rootCA.key: Verifying - Enter pass phrase for rootCA.key: |
After we have a private key, we create a root certificate:
1 | openssl req -x509 -new -nodes -key rootCA.key -sha256 -days 1825 -out rootCA.pem |
When executing this command, it will ask for the pass phase of the rootCA.key file that we just entered earlier, please enter it correctly and fill in some of the required information, the result should look like this (data demo data entered by me):
1 2 3 4 5 6 7 8 9 10 11 12 13 14 15 | Enter pass phrase for rootCA.key: Bạn cần đến bạn cần nhập vào thông tin mà sẽ được hợp lệ vào bạn yêu cầu certificate. What are you about to enter is called a Distinguished Name or a DN. Có đủ một trường mà nhưng bạn bỏ bỏ một trống Để có một trường này sẽ là một giá trị mặc định, Nếu bạn nhập vào.., Trường này sẽ được trống. ----- Country Name (2 letter code) [AU]: VN State or Province Name (full name) [Some-State]: Ha Noi Name Locality (eg, city) []: Ha Noi Organization Name (eg, company) [Internet Widgits Pty Ltd]: NNVSvc Organizational Unit Name (eg, section) []: Information Technology Common Name (eg server FQDN or YOUR name) []: NNVSvc Email Address []: namnv609@gmail.com |
Once done, you will get two files, rootCA.key and rootCA.pem . From now on, you have become a Certificate Authority (of course it is only local, not like the current famous providers). And from now on, we can create SSL for ourselves from the above two files. But this step is not necessarily a green SSL because the browsers do not have information about our root certificate. We will go to the next step, it is extremely important for our SSL to become green.
Install Root Certificate for browsers
With this article, I will guide people how to install root certitficate for Chrome and FireFox.
Google Chrome
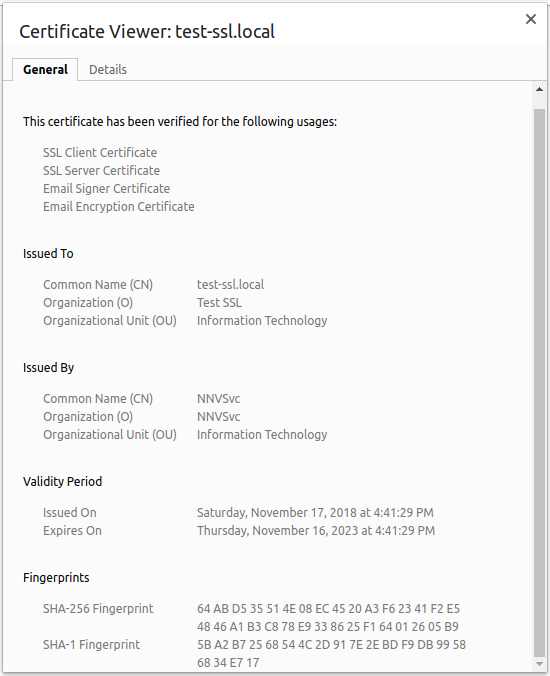
First, open Google Chrome and go to the following link: chrome://settings/certificates . Then, select the Authorities tab and click on IMPORT then select the rootCA.pem file we just created earlier. After selecting that file, we will have the following screen:
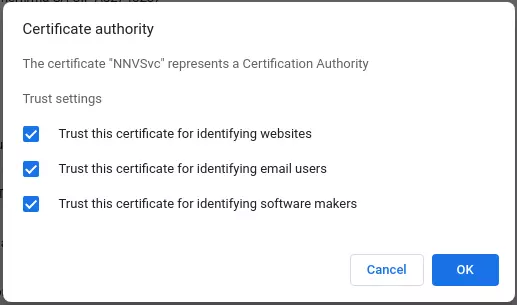
Select all and click OK .
Mozilla Firefox
First, open Mozilla Firefox and access the following link: about:preferences#privacy . Then, scroll down to the bottom of the page, at the Certificates section, click View Certificates … , in this popup, select the Authorities tab and then click Import … and select the rootCA.pem file we just created earlier. After selecting the file, we will have the following screen:
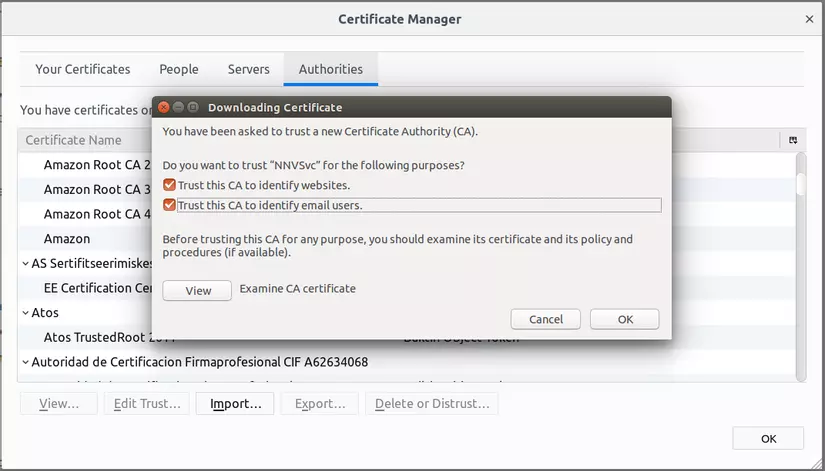
Select all and click OK .
So now, with these two browsers (on our machines), we have been sitting with the big CAs in the world!
Now try to create HTTPS for a local website to see the results.
Create HTTPS for the local site
First, we create a private key for domain local (I will choose the domain test-ssl.local ):
1 | openssl genrsa -out test-ssl.local.key 2048 |
Then create CSR (Certificate Signing Request):
1 | openssl req -new -key test-ssl.local.key -out test-ssl.local.csr |
We will be asked the same information as before to create the CA root:
1 2 3 4 5 6 7 8 9 10 11 12 13 14 15 16 17 18 19 | Bạn cần đến bạn cần nhập vào thông tin mà sẽ được hợp lệ vào bạn yêu cầu certificate. What are you about to enter is called a Distinguished Name or a DN. Có đủ một trường mà nhưng bạn bỏ bỏ một trống Để có một trường này sẽ là một giá trị mặc định, Nếu bạn nhập vào.., Trường này sẽ được trống. ----- Country Name (2 letter code) [AU]: VN State or Province Name (full name) [Some-State]: Ha Noi Name Locality (eg, city) []: Ha Noi Organization Name (eg, company) [Internet Widgits Pty Ltd]: Test SSL Organizational Unit Name (eg, section) []: Information Technology Common Name (eg server FQDN or YOUR name) []: test-ssl.local Email Address []: namnv609@gmail.com Please enter the following 'extra' attributes cần gửi với yêu cầu xác thực A challenge password []: An tùy chọn company tên []: |
You can customize the information you want. Part A challegen password and An optional company name you can leave blank.
Next step, we create a config file to define the Subject Alternative Name (SAN) for this SSL. We make file creation:
1 | vi test-ssl.local.ext |
And enter the content below:
1 2 3 4 5 6 7 | authorityKeyIdentifier = keyid, issuer basicConstraints = CA: FALSE keyUsage = digitalSignature, nonRepudiation, keyEncipherment, dataEncipherment subjectAltName = @alt_names [alt_names] DNS.1 = test-ssl.local |
You can add more DNS.x = <Domain bạn muốn> . But here I only use for this domain only. Now we will create the domain certificate:
1 2 | openssl x509 -req -in test-ssl.local.csr -CA rootCA.pem -CAkey rootCA.key -CAcreateserial -out test-ssl.local.crt -days 1825 -sha256 -extfile test-ssl.local.ext |
This time we will be asked to pass the phase of rootCA.pem , you enter the pass phase you used when creating rootCA.key . That’s it, now we will have the following files:
test-ssl.local.key: Private keytest-ssl.local.csr: Certificate Signing Requesttest-ssl.local.crt: Signed certificate
It is done. Now we can add HTTPS to our local domain with private key file and certificate file. I will always do demo with NginX (by default, you have installed NginX already).
Install HTTPS with NginX
First, create a directory to contain the code:
1 | mkdir -p / var / www / test-ssl |
Then create the index.html file with simple content to display:
1 | en /var/www/test-ssl/index.html |
Content of index.html file:
1 2 3 4 5 6 7 8 9 10 | <! DOCTYPE html> <html> <head> <meta charset = "utf-8"> <title> Test SSL Local </title> </head> <body> <h1> Hello, HTTPS: D </h1> </body> </html> |
Next, we create a virtual host for NginX:
1 | sudo vi / etc / nginx / sites-available / test-ssl |
Content of virtual host file:
1 2 3 4 5 6 7 8 9 10 11 12 13 14 15 | server { listen 443 ssl; server_name test-ssl.local; ssl_certificate /path/to/test-ssl.local.crt; ssl_certificate_key /path/to/test-ssl.local.key; ssl_protocols TLSv1 TLSv1.1 TLSv1.2; ssl_ciphers HIGH:! aNULL:! MD5; location / { root / var / www / test-ssl; index index.html index.htm; } } |
Then, create a symlink to the /etc/nginx/site-enabled to enable virtual host (in fact, you can create files directly into this directory without having to create site-available , but I encourage You should not do it directly so that when I want to disable virtual host, just delete the symlink and it will not affect the original virtual host file):
1 | sudo ln -s / etc / nginx / site-available / test-ssl / etc / nginx / site-enabled |
Restart NginX:
1 | sudo service nginx restart |
Next, we will point our domain to localhost by adding the following content to the /etc/hosts :
1 | sudo vi / etc / hosts |
Add the following line:
1 | 127.0.0.1 test-ssl.local |
That’s it, now try accessing https: //test-ssl.local to see the results. We will get a perfect HTTPS page without any warning screen and no red slash in the address bar.
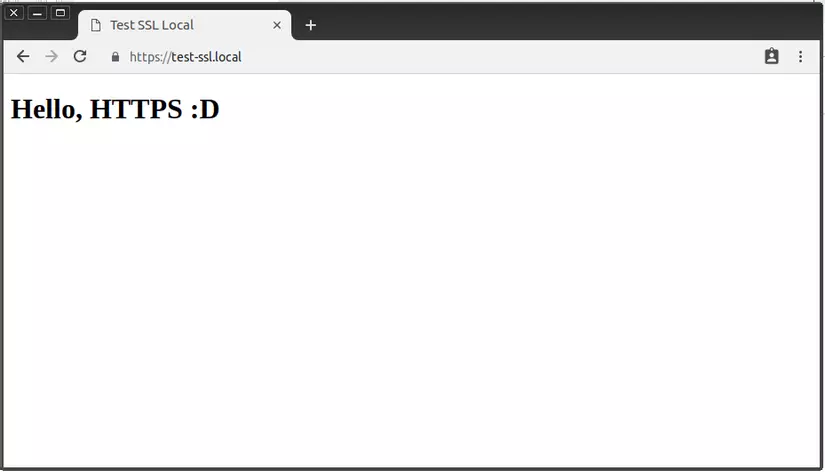
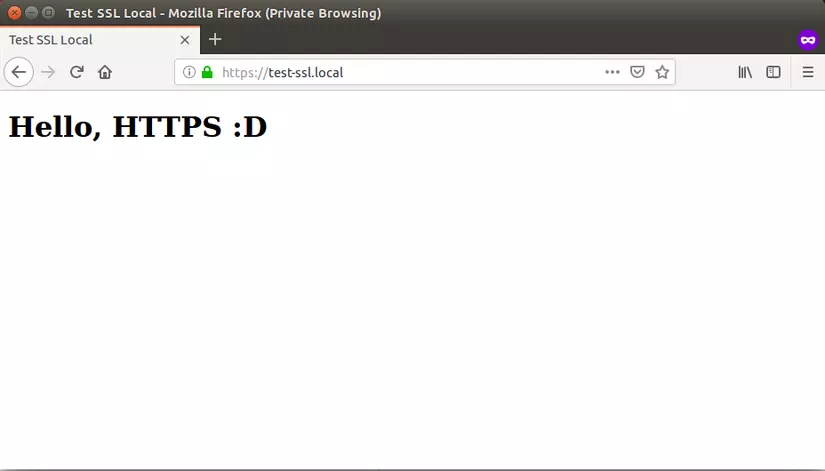
Yes, do you see the green color in Firefox? Look ha ha? As for Chrome, from version 69 onwards, it has deleted the secure indicator for HTTPS pages, so we don’t see that nice green!
Epilogue
From now on, you can manually create more HTTPS for the local site with the root CA we created (you only need to do it from the Create HTTPS step for the local site onwards). And you can freely try new technologies like PWA or HTTP2 without the need for master SSL. My post here is the end. Hope it will be useful for you in the near future!