1. Introduction
CI is Continuous Integration. It is a software development method that requires team members to integrate their work regularly, at least once a day. Each integration is automatically “built” (including tests) to detect errors as quickly as possible. The whole team recognizes that this approach minimizes integration problems and allows for faster software development.
A CI script starts with a developer commit code on the repository (github, for example). Any change will trigger a CI life cycle. The steps in a CI scenario are usually as follows:
- First, the developer commits the code to the repo.
- The CI server monitors the repo and checks to see if there are any changes on the repo (continuously, such as once a minute)
- Once the commit occurs, the CI server detects that the repo has changed, so it receives the latest code from the repo and then builds, runs the unit, and integrates the test.
- The CI server generates feedback and sends it to the project members
- CI server continues to wait for changes in the repo
Using CI, you will save time:
- More speed in coding and fixbug
- Be confident that you build stable software with fewer errors
- Ensure the product works on different machines
- Eliminate a lot of expenses and allow you to focus on what’s important
- Reduce time to resolve conflicts
2. Demo
Initialize a project with a virtual environment
Clone project from github account + install virtual environment, here I have 1 repository CalculatorLibrary
1 2 3 4 5 6 7 8 9 | $ git clone <a class="__cf_email__" href="/cdn-cgi/l/email-protection">[email protected]</a> :ChiThanh93/CalculatorLibrary.git $ cd CalculatorLibrary $ virtualenv -p /usr/bin/python3.6 .env Running virtualenv with interpreter /usr/bin/python3.6 Using base prefix '/usr' New python executable in /home/nguyen.chi.thanh/workspace/CalculatorLibrary/.env/bin/python3.6 Also creating executable in /home/nguyen.chi.thanh/workspace/CalculatorLibrary/.env/bin/python Installing setuptools, pkg_resources, pip, wheel...done. |
on your computer must have python and virtualenv installed, the version of python depends on your choice, here I choose python 3.6
Write a basic python example: here I have the calculator.py file
1 2 3 4 5 6 7 8 9 10 | <span class="token triple-quoted-string string">""" Calculator library containing basic math operations. """</span> <span class="token keyword">def</span> <span class="token function">add</span> <span class="token punctuation">(</span> first_term <span class="token punctuation">,</span> second_term <span class="token punctuation">)</span> <span class="token punctuation">:</span> <span class="token keyword">return</span> first_term <span class="token operator">+</span> second_term <span class="token keyword">def</span> <span class="token function">subtract</span> <span class="token punctuation">(</span> first_term <span class="token punctuation">,</span> second_term <span class="token punctuation">)</span> <span class="token punctuation">:</span> <span class="token keyword">return</span> first_term <span class="token operator">-</span> second_term |
From the CalulatorLibrary section, there will be the following:
1 2 3 4 5 6 7 | CalculatorLibrary/ | ├── .git ├── .gitignore ├── README.md └── calculator.py |
Writing Test:
The first step involves running a program, to parse the code for potential errors. flake8 is often used to check if your code matches the standard Python encoding. Make sure your code is readable for the rest of the Python community.
The second step is unit testing. A unit test is designed to test a function or code unit. Python comes with a standard unit testing library, but other libraries exist and are very popular. This example uses pytest.
A standard practice that goes hand in hand with testing is calculating code (covered). Code coverage is the percentage of code covered by your tests. pytest has an extension, pytest-cov, which helps you understand your code coverage.
1 2 3 | $ pip install flake8 pytest pytest-cov $ pip freeze > requirements.txt |
Create test file for calculation function, file test_calculator.py
1 2 3 4 5 6 7 8 9 10 11 12 13 14 15 | <span class="token triple-quoted-string string">""" Unit tests for the calculator library """</span> <span class="token keyword">import</span> calculator <span class="token keyword">class</span> <span class="token class-name">TestCalculator</span> <span class="token punctuation">:</span> <span class="token keyword">def</span> <span class="token function">test_addition</span> <span class="token punctuation">(</span> self <span class="token punctuation">)</span> <span class="token punctuation">:</span> <span class="token keyword">assert</span> <span class="token number">4</span> <span class="token operator">==</span> calculator <span class="token punctuation">.</span> add <span class="token punctuation">(</span> <span class="token number">2</span> <span class="token punctuation">,</span> <span class="token number">2</span> <span class="token punctuation">)</span> <span class="token keyword">def</span> <span class="token function">test_subtraction</span> <span class="token punctuation">(</span> self <span class="token punctuation">)</span> <span class="token punctuation">:</span> <span class="token keyword">assert</span> <span class="token number">2</span> <span class="token operator">==</span> calculator <span class="token punctuation">.</span> subtract <span class="token punctuation">(</span> <span class="token number">4</span> <span class="token punctuation">,</span> <span class="token number">2</span> <span class="token punctuation">)</span> |
commit and push the code to your repo
connect with CircleCI
CircleCI needs to know how you run the project, requires a specific format. CircleCi requires 1 .circleic folder in your repo and 1 config file in it. The config file includes the structure for all the steps to build the server needed to execute. CircleCi requires a file named config.yml. This file uses a data initialization language, specifically can be found as follows . The purpose of YAML is for the reader to work and work well with the common programming language. There are 3 ways to express data in YAML file:
- Mappings (key-value pairs)
- Sequences (lists)
- Scalars (strings or numbers)
Create a config.yml file in the .circleci directory corresponding to the project demo
1 2 3 4 5 6 7 8 9 10 11 12 13 14 15 16 17 18 19 20 21 22 23 24 25 26 27 | <span class="token comment"># Python CircleCI 2.0 configuration file</span> <span class="token key atrule">version</span> <span class="token punctuation">:</span> <span class="token number">2</span> <span class="token key atrule">jobs</span> <span class="token punctuation">:</span> <span class="token key atrule">build</span> <span class="token punctuation">:</span> <span class="token key atrule">docker</span> <span class="token punctuation">:</span> <span class="token punctuation">-</span> <span class="token key atrule">image</span> <span class="token punctuation">:</span> circleci/python <span class="token punctuation">:</span> <span class="token number">3.6</span> <span class="token key atrule">working_directory</span> <span class="token punctuation">:</span> ~/CalculatorLibrary <span class="token key atrule">steps</span> <span class="token punctuation">:</span> <span class="token comment"># Step 1: obtain repo from GitHub</span> <span class="token punctuation">-</span> checkout <span class="token comment"># Step 2: create virtual env and install dependencies</span> <span class="token punctuation">-</span> <span class="token key atrule">run</span> <span class="token punctuation">:</span> <span class="token key atrule">name</span> <span class="token punctuation">:</span> install dependencies <span class="token key atrule">command</span> <span class="token punctuation">:</span> <span class="token punctuation">|</span> <span class="token scalar string"> virtualenv -p python3.6 .env source .env/bin/activate pip install -r requirements.txt</span> <span class="token comment"># Step 3: run linter and tests</span> <span class="token punctuation">-</span> <span class="token key atrule">run</span> <span class="token punctuation">:</span> <span class="token key atrule">name</span> <span class="token punctuation">:</span> run tests <span class="token key atrule">command</span> <span class="token punctuation">:</span> <span class="token punctuation">|</span> <span class="token scalar string"> source .env/bin/activate flake8 --exclude=.env* --statistics pytest -v --cov=calculator</span> |
Initialize circleci management at https://circleci.com/ . Login with your github account and connect to create a job corresponding to the CalculatorLibrary repo The page will also create you the config.yml file corresponding to the project’s programming language.
Push the code up and test it !!! 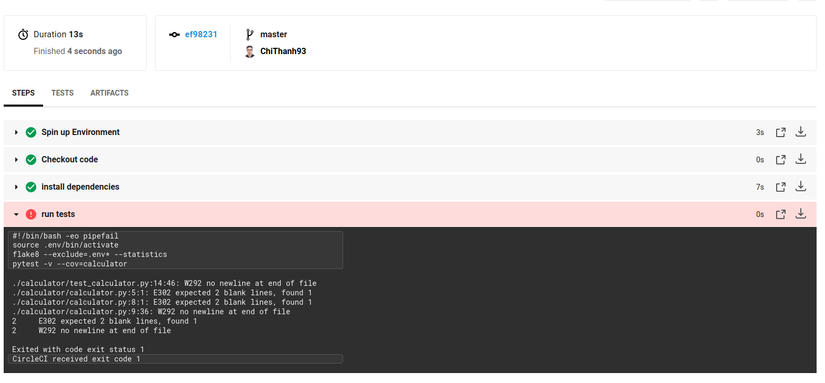
Will receive the same interface as above, encounter 1 error pep8 already. fix according to the comment and then push it again
 the rest of my Continuous Deployment will be in the next post !! Source: https://realpython.com/python-continuous-integration/#next-steps