Rendering Multiple Rows
In the last article, we made an additional article on the page, can perform upVote, downVote. However, there is no way to add a new post unless we paste the <app-article> tag. However, if you do that, all the posts will have the same content and that is really not interesting. In this article, we will continue to complete the other functions of this Reddit application.
Creating an Article class
A good habit of writing Angular code is to always try to isolate / isolate the data structure we use from component code. To do this, we will create a data structure that represents a single article . We will add a new file, article.model.ts to define Article class.
angular-reddit-app / src / app / article / article.model.ts
1 2 3 4 5 6 7 8 9 10 11 12 | export class Article { title: string; link: string; votes: number; constructor(title: string, link: string, votes?: number) { this.title = title; this.link = link; this.votes = votes || 0; } } |
Here, we have created a new class that represents a Article . Note that this is a normal class, not an Angular component. In the Model-View-Controller pattern, this class is Model .
Each article has a tile , a link and a total value that displays the total number of votes . When creating a new article we need the title and link . And the votes parameter is optional (so at the end of the variable name, we add the question mark?) And the default value will be 0.
We will now update the code in ArticleComponent so we can use the newly created Article class. Instead of storing properties directly in ArticleComponent we will store them in Article class instance.
First, import Article class.
angular-reddit-app / src / app / article / article.component.ts
import { Article } from "./article.model";
Using Article class insance angular-reddit-app / src / app / article / article.component.ts
1 2 3 4 5 6 7 8 9 10 11 12 13 14 15 16 17 18 19 20 21 22 23 | export class ArticleComponent implements OnInit { @HostBinding('attr.class') cssClass = 'row'; article: Article; constructor() { this.article = new Article('Angular', 'http://angular.io', 10); } voteUp() { this.article.votes += 1; return false; } voteDown() { this.article.votes -= 1; return false; } ngOnInit() { } } |
Notice some things we changed: instead of saving the title , link , and votes directly into the component, we store a reference to the article .
Similarly, we will not increase votes directly on the component anymore, but increase the value of votes through the article .
Besides, we also need to update the code in the view to be able to get values from the article , the previous example we wrote is {{votes}}, now it will be revised to {{ article.votes }} , and do the same for the title and link .
angular-reddit-app / src / app / article / article.component.html
1 2 3 4 5 6 7 8 9 10 11 12 13 14 15 16 17 18 19 20 21 22 23 24 25 26 27 28 29 30 31 | <div class="four wide column center aligned votes"> <div class="ui statistic"> <div class="value"> {{ article.votes }} </div> <div class="label"> Points </div> </div> </div> <div class="twelve wide column"> <a class="ui large header" href="{{ article.link }}"> {{ article.title }} </a> <ul class="ui big horizontal list voters"> <li class="item"> <a href (click)="voteUp()"> <i class="arrow up icon"></i> upvote </a> </li> <li class="item"> <a href (click)="voteDown()"> <i class="arrow down icon"></i> downvote </a> </li> </ul> </div> |
Perform reloading the browser and everything is working normally.
At first glance it seems that the code is better, but there are still incomplete points, which makes the voteUp and voteDown methods are breaking Article ‘s packaging by directly changing the inner properties of the article.
voteUpandvoteDownviolated the Law of Demeter principle. That principle states that one object should minimize direct access to the properties of another object.
The problem here is that ArticleComponent knows too much about Article class. To fix that, we will add two methods, voteUp and voteDown, into Article class. (We will also add a domain function, and I’ll briefly explain this function)
angular-reddit-app / src / app / article / article.model.ts
1 2 3 4 5 6 7 8 9 10 11 12 13 14 15 16 17 18 19 20 21 22 23 24 25 26 27 28 29 | export class Article { title: string; link: string; votes: number; constructor(title: string, link: string, votes?: number) { this.title = title; this.link = link; this.votes = votes || 0; } voteUp(): void { this.votes += 1; } voteDown(): void { this.votes -= 1; } // domain() is a utility function that extracts // the domain from a URL, which we'll explain shortly domain(): string { try { // e.g. http://foo.com/path/to/bar const domainAndPath: string = this.link.split('//')[1]; // e.g. foo.com/path/to/bar return domainAndPath.split('/')[0]; } catch (err) { return null; } } } |
Besides, we also need to edit ArticleComponent to be able to call these functions:
angular-reddit-app / src / app / article / article.component.ts
1 2 3 4 5 6 7 8 9 10 11 12 13 14 15 16 17 18 19 20 21 22 23 24 | export class ArticleComponent implements OnInit { @HostBinding('attr.class') cssClass = 'row'; article: Article; constructor() { this.article = new Article('Angular', 'http://angular.io', 10); } voteUp(): boolean { this.article.voteUp(); return false; } voteDown(): boolean { this.article.voteDown(); return false; } ngOnInit() { } } |
Why do we need the voteUp function in both the model and component?
The reason we need to havevoteUp()andvoteDown()in both classes is that each function will perform a slightly different job. The idea is thatvoteUp()onArticleComponentwill relate to component view . MeanwhileArticlemodelvoteUp()will define the behavior happening in the model .
That is, it allows theArticleclass to encapsulate the functionality that will occur in the model when voting. In practical applications, the content within theArticalmodal may be more complex. For example, you have to make an API request to the webserver, and you don’t need to have a specific model code in the component controller.
Similarly, inArticleComponentwe alsoreturn false. That’s a way not to pass the event, because this is the logic specific to the view so we should not allow thevoteUp()function ofArticlemodel to know the type of API specific to the view. Article model should allow voting independently of the view.
After reloading the browser we found that the application still works the same as before, but our code is much clearer and simpler.
ArticleComponentatArticleComponentwe see that it has become very brief, because we have moved most of the logic of the component to the purpose model so that our component performs the minimum amount of work possible. Read more about MVC Fat Models, Skinny Controllers .
Storing Multiple Articles
Now we will write code to have a list of not many Articles. First, it will revise the AppComponent .
src / app / app.component.ts
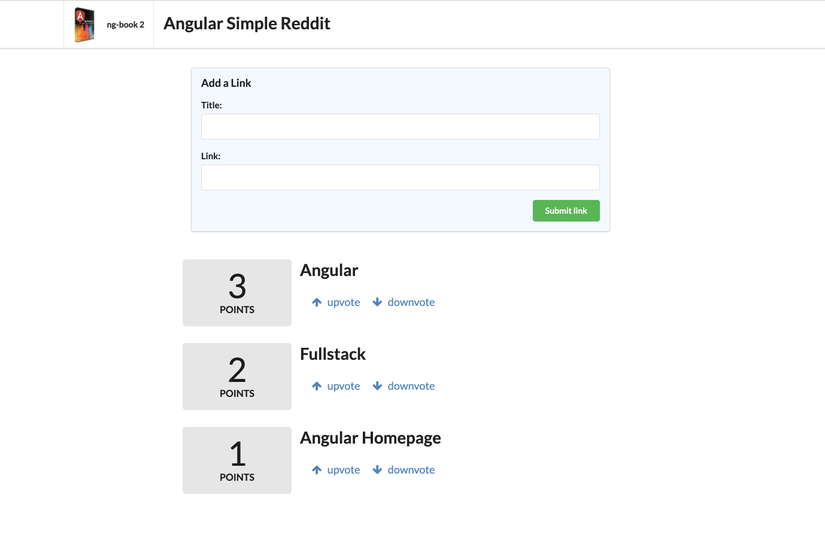
1 2 3 4 5 6 7 8 9 10 11 12 13 14 15 16 17 18 19 20 | import { Component, OnInit, HostBinding } from '@angular/core'; import { Article } from "./article.model"; //<--importthis @Component({ selector: 'app-article', templateUrl: './article.component.html', styleUrls: ['./article.component.css'] }) export class ArticleComponent implements OnInit { @HostBinding('attr.class') cssClass = 'row'; article: Article[]; // <-- component property constructor() { this.article = [ new Article('Angular', 'http://angular.io', 3), new Article('Fullstack', 'http://fullstack.io', 2), new Article('Angular Homepage', 'http://angular.io', 1) ]; } |
Notice that in AppComponent there is this line:
articles: Article[];
At first, Article [] looks a bit strange. This line of code means that we declare articles as an array of Articles. There is another way of writing it is Array <Article>. This is similar in other languages such as Java, C #, … This array contains only Article objects.
To access the Article class, we must first import it – this one we insert at the top. We enter data for this Array by writing this.articles in the constructor.
src / app / app.component.ts
1 2 3 4 5 6 7 8 | constructor() { this.articles = [ new Article('Angular', 'http://angular.io', 3), new Article('Fullstack', 'http://fullstack.io', 2), new Article('Angular Homepage', 'http://angular.io', 1), ]; } |
Configuring the ArticleComponent with inputs
We now have a Article list, so how can we pass it into ArticleComponent ?
Again we will use Inputs . Last time our ArticleComponent class was defined as follows:
src / app / article / article.component.ts
1 2 3 4 5 6 7 8 | export class ArticleComponent implements OnInit { @HostBinding('attr.class') cssClass = 'row'; article: Article; constructor() { this.article = new Article('Angular', 'http://angular.io', 10); } |
The problem is that we have hard-coded a specific Article in the constructor. This makes the component not only lose packaging, but also cannot be reused.
What we want to do here is the configure Article we want to display. For example, we have two articles is article1 and article2 , we can re-use app-article component by passing an Article as a parameter to the component, as in the following:
1 2 3 | <app-article[article]="article1"></app-article> <app-article[article]="article2"></app-article> |
Angular allows us to do this by using the Input decorator in the component’s property:
1 2 3 4 | classArticleComponent{ @Input() article: Article; //... |
If there is a Article in a myArticle variable, we can pass it to ArticleComponent from view. Remember, we can pass a variable to the element by enclosing it with a pair of square brackets [variableName]:
1 2 | <app-article[article]="myArticle"></app-article> |
Note the syntax here: We have named the input in brackets [article] , and the value of the attribute is what we want to pass into the input. Then this.article in ArticleComponent will be set to myArticle . We can think of myArticle as passed as a parameter to the component.
This is ArticleComponent after using @Input :
src / app / article / article.component.ts
1 2 3 4 5 6 7 8 9 10 11 12 13 14 15 16 17 18 19 20 21 22 23 24 25 26 27 28 29 30 31 32 | import { Component, OnInit, HostBinding, Input } from '@angular/core'; import { Article } from "./article.model"; @Component({ selector: 'app-article', templateUrl: './article.component.html', styleUrls: ['./article.component.css'] }) export class ArticleComponent implements OnInit { @HostBinding('attr.class') cssClass = 'row'; @Input() article: Article; constructor() { // article is populated by the Input now, // so we don't need anything here } voteUp(): boolean { this.article.voteUp(); return false; } voteDown(): boolean { this.article.voteDown(); return false; } ngOnInit() { } } |
Do not forget to import!
Notice that we haveimportInputclass from@angular/core. We also importedArticlemodel when we did withAppComponentearlier.
Rendering a List of Articles
Earlier, we had configured AppComponent to store an array of articles . And now we will configure AppComponent to gender out all the articles . To do that, instead of using an <app-article> tag, we will use the NgFor directive to loop through a list of articles and gender app-article for each item.
We will add it in the AppComponent @Component template , and it is right below the closing <form> tag.
1 2 3 4 5 6 7 | <!-- start adding here --> <div class="ui grid posts"> <app-article *ngFor="let article of articles" [article]="article"> </app-article> </div> <!-- end adding here --> |
Remember we gender gender a list of name using NgFor directive in the previous chapter? This Syntax also applies to gender of multiple components at once.
The syntax *ngFor="let article of articles" will loop over a list of articles and create a local article variable for each item in the list.
To specify article input in the component, we use the expression [inputName]="inputValue" . In this case, we are saying that we want to set the value of the local article variable for the article input with the ngFor command.
We have used the
articlevariable many times in the previous code, to be more clear, change the temporary variable name inngFortofoobar:
So here we have 3 variables:
articlesis an array ofArticlesdefined inAppComponent.foobaris a single element ofarticles, defined inngFor.articleis the name of the field defined onArticleComponent‘sInput.
In a nutshell, ngFor will create a temporary foobar variable, and pass it to the app-article .
Reload the browser, you will see the articles are gender.
Adding New Articles
We need to edit the addArticle function so we can add new articles when the Submit link button is clicked.
src / app / app.component.ts
1 2 3 4 5 6 7 8 | addArticle(title: HTMLInputElement, link: HTMLInputElement): boolean { console.log(`Adding article title: ${title.value} and link: ${link.value}`); this.articles.push(new Article(title.value, link.value, 0)); title.value = ''; link.value = ''; return false; } |
The above code will do the following:
- Create a new Article instance along with the submitted title and URL
- Add it to Articles array
- Delete the value of the input field
How to delete value of
inputfield? Remember,titleandlinkareHTMLInputElement objects. That means we can set their properties. When we change thevalueattribute, theinputtag will change as well.
After adding the article to the input field and clicking the Submit Link button, we will see the newly added article.
Finishing Touches
Displaying the Article Domain
As a great suggestion, if we can display a hint text next to a link to show the domain the user will redirect until the link is clicked.
Add the domain method to classi Article :
src / app / article / article.model.ts
1 2 3 4 5 6 7 8 9 10 | domain(): string { try { // e.g. http://foo.com/path/to/bar const domainAndPath: string = this.link.split('//')[1]; // e.g. foo.com/path/to/bar return domainAndPath.split('/')[0]; } catch (err) { return null; } } |
Call this function in the ArticleComponent template.
1 2 3 4 5 6 7 8 9 10 11 12 | <div class="twelve wide column"> <a class="ui large header" href="{{ article.link }}"> {{ article.title }} </a> <!-- right here --> <div class="meta">({{ article.domain() }})</div> <ul class="ui big horizontal list voters"> <li class="item"> <a href (click)="voteUp()"> <i class="arrow up icon"></i> upvote |
Conduct reloading the browser, the domain name of each URL will be displayed. (Note the URL must include http: //)
Re-sorting Based on Score
When clicking and performing a vote, we see that there is something wrong here: the articles not sorted based on the score . And what I want is to see that the item with the highest score will show first, and the item with the lower score will show below. We are saving articles in the array in the AppComponent class, but the array is not being sorted. A simple way to handle this problem, is to create a new method, sortedArticles in AppComponent :
1 2 3 4 | sortedArticles(): Article[] { return this.articles.sort((a: Article, b: Article) => b.votes - a.votes); } |
ES6 Arrow Function
The above code used the function (=>) from ES6. Refer to the Arrow function
We are also using the built-in sort () function. Refer to the sort () method
In ngFor we will iterate over sortedArticles() (instead of iterating directly on articles )
1 2 3 4 5 | <div class="ui grid posts"> <app-article *ngFor="let foobar of sortedArticles()" [article]="foobar"> </app-article> </div> |
Deployment
So we have finished the application, and we want it to run on the internet so it can be shared with friends.
Deployment and performance in products are the next topic that I will cover later on. At the moment, I want to introduce a basic, easy way to deploy applications to the internet.
Deploy is an act of pushing your code onto the server, which is accessible to others. In more detail, the idea we will do is:
Compileall TypeScript code into JavaScript code (which the browser can read)Bundle(encapsulate) all JavaScript code in one or two files.- Then
uploadJavaScript, HTML, CSS and images to the server.
Basically, this Angular app is an HTML file that loads the JavaScript code. And we need to upload this code to a computer on the internet.
First, let’s build our Angular app.
Building Our App for Production
The Angular CLI tool – the one we used to generate the app in the beginning can be used to build the app in a single command.
In angular-reddit project, we type the following command:
ng build --prod
This will require ng tool build our application environment for production .
This command will run for a moment, and after it is finished, the dist folder will appear.
1 2 3 4 5 6 7 | Time: 16707ms chunk {0} runtime.26209474bfa8dc87a77c.js (runtime) 1.41 kB [entry] [rendered] chunk {1} es2015-polyfills.b0657154bc33c6ff11ae.js (es2015-polyfills) 56.6 kB [initial] [rendered] chunk {2} main.395e7d51ca3415f1ee22.js (main) 157 kB [initial] [rendered] chunk {3} polyfills.8bbb231b43165d65d357.js (polyfills) 41 kB [initial] [rendered] chunk {4} styles.e2ec57636eec1960d4aa.css (styles) 498 kB [initial] [rendered] |
These files are the result of our complete application aggregation. Note that there is a long string in the middle of each file, as shown below:
main.395e7d51ca3415f1ee22.js
These characters are hash codes of the content. (For each computer, it may be different). When looking at each file, we can see some of the following files: icons, index.html, main.js, a polyfills.js, a vendor.js, and styles.css.
What we need to do next is to upload it all to the server.
Uploading to a Server
There are many ways to host your HTML and Javascript code. To demo, we have the easiest way is to use Now
If you don’t want to use
Now, you can use any method you want. For example, you can host sites on Heroku, AWS S3, upload files to your own server via FTP … etc.
Importantly, the server can display all the files in thedistdirectory on the internet.
Installing now
We can install now by using npm :
npm install -g now
Or use yarn:
yarn global add now
And run the following command to deploy:
1 2 3 | cd dist/angular-reddit #change into the dist folder Now |
The now command will ask you a few questions (such as your email address), and you need to check your mail and click on the link in it.
After you confirm your account, now will upload your code, and will provide you with a URL so you can view your application.
Go to that URL, and view your app. If it works, send this URL and show it to your friends!
Congratulations! You have successfully built and deployed the first Angular application!
Full Code Listing
So we have learned a lot about Angular in seria creating this application. You can read through the previous articles to better understand.
Wrapping Up
Thus, we have completed the first Angular application, simple but quite interesting application, right ?!
We have learned a lot of things like: understanding data flow, making AJAX requests, built-in directives, routing, manipulating DOM … etc.
The main tasks for writing the Angular application, we have all done above:
- Split the app into components.
- Create the view
- Define models.
- Display models.
- Add interaction.
In the following articles, we will continue to explore other topics related to Angular.
Getting Help
If you have something to discuss, please comment below each article.
Source: https://www.ng-book.com/2/