In today’s tutorial we will go from the first steps to building a simple blockchain network in python language. Giving us the best overview of how a blockchain works.
Using microframework Flask to create endpoints, then run on multiple machines to create a decentralized network. We will learn how to build a simple user interface to interact with blockchain and store information for every use case, such as peer-to-peer payments, chat or e-commerce.
The goal is to build an application that allows users to share information by posting posts. Content will be stored on the blockchain, so it will not be changed and exist forever. Users will interact with the application through a simple web interface.
We will use the bottom-up approach. Start by defining the data structure that we will store in the blockchain. Each post will include three essential elements:
- Nội dung
- Author
- Timestamp
Here we will go into the steps:
Store transactions in blocks
Here we will store in the widely used format that is JSON. And here is what a post will be stored in the blockchain:
1 2 3 4 5 6 | { "author": "some_author_name", "content": "Some thoughts that author wants to share", "timestamp": "The time at which the content was created" } |
The term data in blockchain is often replaced by transaction . So here we agree to use the term transaction to refer to data in this application.
Transactions will be packaged into blocks. A block may contain one or more transactions. Blocks containing transactions are generated regularly and added to the blockchain. Because there are many blocks, each block will have a unique ID :
1 2 3 4 5 6 7 8 9 10 11 12 | <span class="token keyword">class</span> <span class="token class-name">Block</span> <span class="token punctuation">:</span> <span class="token keyword">def</span> <span class="token function">__init__</span> <span class="token punctuation">(</span> self <span class="token punctuation">,</span> index <span class="token punctuation">,</span> transactions <span class="token punctuation">,</span> timestamp <span class="token punctuation">)</span> <span class="token punctuation">:</span> <span class="token triple-quoted-string string">""" Constructor cho một `Block` class. :param index: Chỉ số ID duy nhất của một block. :param transactions: Danh sách các transactions. :param timestamp: Thời gian tạo block. """</span> self <span class="token punctuation">.</span> index <span class="token operator">=</span> index self <span class="token punctuation">.</span> transactions <span class="token operator">=</span> transactions self <span class="token punctuation">.</span> timestamp <span class="token operator">=</span> timestamp |
Add digital signatures to blocks
To prevent fake data from being stored inside the blocks and to detect this we will use the hash function.
A hash function is a function that takes data of any size and creates data of a fixed size, often used to determine input data. Ideal hash functions often have the following characteristics:
- Easy to calculate.
- The same data will always result in the same hash value.
- There must be uniform consistency which means that even a single bit change in data will change the hash value significantly.
The results of these properties are:
- It is almost impossible to predict the hashed input. (The only way is to try all possible input cases)
- If you know both the input and the hash value, you only need to pass the input via the hash function to verify the provided hash value is correct.
There are various common hash functions. Here is an example in Python we use the SHA-256 hash function:
1 2 3 4 5 6 7 8 9 10 11 | <span class="token operator">>></span> <span class="token operator">></span> <span class="token keyword">from</span> hashlib <span class="token keyword">import</span> sha256 <span class="token operator">>></span> <span class="token operator">></span> data <span class="token operator">=</span> b <span class="token string">"Some variable length data"</span> <span class="token operator">>></span> <span class="token operator">></span> sha256 <span class="token punctuation">(</span> data <span class="token punctuation">)</span> <span class="token punctuation">.</span> hexdigest <span class="token punctuation">(</span> <span class="token punctuation">)</span> <span class="token string">'b919fbbcae38e2bdaebb6c04ed4098e5c70563d2dc51e085f784c058ff208516'</span> <span class="token operator">>></span> <span class="token operator">></span> sha256 <span class="token punctuation">(</span> data <span class="token punctuation">)</span> <span class="token punctuation">.</span> hexdigest <span class="token punctuation">(</span> <span class="token punctuation">)</span> <span class="token comment"># bất kể bạn chạy nó bao nhiêu lần, kết quả sẽ là cùng một chuỗi 256 ký tự</span> <span class="token string">'b919fbbcae38e2bdaebb6c04ed4098e5c70563d2dc51e085f784c058ff208516'</span> <span class="token operator">>></span> <span class="token operator">></span> data <span class="token operator">=</span> b <span class="token string">"Some variable length data2"</span> <span class="token comment"># Đã thêm một ký tự ở cuối.</span> <span class="token string">'9fcaab521baf8e83f07512a7de7a0f567f6eef2688e8b9490694ada0a3ddeec8'</span> <span class="token comment"># Note: giá trị băm đã thay đổi hoàn toàn !</span> |
We will store the block’s hash value into a field inside the Block object and it will act like the digital signature (or signature) of the data contained therein:
1 2 3 4 5 6 7 8 9 10 | <span class="token keyword">from</span> hashlib <span class="token keyword">import</span> sha256 <span class="token keyword">import</span> json <span class="token keyword">def</span> <span class="token function">compute_hash</span> <span class="token punctuation">(</span> block <span class="token punctuation">)</span> <span class="token punctuation">:</span> <span class="token triple-quoted-string string">""" Chuyển đối tượng block thành dạng string JSON sau đó trả về giá trị băm. """</span> block_string <span class="token operator">=</span> json <span class="token punctuation">.</span> dumps <span class="token punctuation">(</span> self <span class="token punctuation">.</span> __dict__ <span class="token punctuation">,</span> sort_keys <span class="token operator">=</span> <span class="token boolean">True</span> <span class="token punctuation">)</span> <span class="token keyword">return</span> sha256 <span class="token punctuation">(</span> block_string <span class="token punctuation">.</span> encode <span class="token punctuation">(</span> <span class="token punctuation">)</span> <span class="token punctuation">)</span> <span class="token punctuation">.</span> hexdigest <span class="token punctuation">(</span> <span class="token punctuation">)</span> |
Join blocks into chains
We need a way to ensure that any changes in the previous blocks will invalidate the entire chain. The way Bitcoin works is to create dependencies between successive blocks by stringing them with the block’s hash value immediately. This means saving the hash of the previous block in the current block when adding a new field to the previous_hash .
There will be a question: what about the first block? That block is called the genesis block and it can be created manually or through some logic.
1 2 3 4 5 6 7 8 9 10 11 12 13 14 15 16 17 18 19 20 21 22 23 24 25 26 27 28 29 30 31 32 33 34 35 36 37 38 39 40 41 42 43 44 45 46 47 48 49 50 51 52 | <span class="token keyword">from</span> hashlib <span class="token keyword">import</span> sha256 <span class="token keyword">import</span> json <span class="token keyword">import</span> time <span class="token keyword">class</span> <span class="token class-name">Block</span> <span class="token punctuation">:</span> def__init__ <span class="token punctuation">(</span> self <span class="token punctuation">,</span> index <span class="token punctuation">,</span> transactions <span class="token punctuation">,</span> timestamp <span class="token punctuation">,</span> previous_hash <span class="token punctuation">)</span> <span class="token punctuation">:</span> <span class="token triple-quoted-string string">""" Constructor cho một `Block` class. :param index: Chỉ số ID duy nhất của một block. :param transactions: Danh sách các transactions. :param timestamp: Thời gian tạo block. :param previous_hash: Chứa giá trị băm của block đứng trước trong chain. """</span> self <span class="token punctuation">.</span> index <span class="token operator">=</span> index self <span class="token punctuation">.</span> transactions <span class="token operator">=</span> transactions self <span class="token punctuation">.</span> timestamp <span class="token operator">=</span> timestamp self <span class="token punctuation">.</span> previous_hash <span class="token operator">=</span> previous_hash <span class="token comment"># thêm trường previous_hash</span> <span class="token keyword">def</span> <span class="token function">compute_hash</span> <span class="token punctuation">(</span> self <span class="token punctuation">)</span> <span class="token punctuation">:</span> <span class="token triple-quoted-string string">""" Chuyển đối tượng block thành dạng string JSON sau đó trả về giá trị băm. """</span> block_string <span class="token operator">=</span> json <span class="token punctuation">.</span> dumps <span class="token punctuation">(</span> self <span class="token punctuation">.</span> __dict__ <span class="token punctuation">,</span> sort_keys <span class="token operator">=</span> <span class="token boolean">True</span> <span class="token punctuation">)</span> <span class="token keyword">return</span> sha256 <span class="token punctuation">(</span> block_string <span class="token punctuation">.</span> encode <span class="token punctuation">(</span> <span class="token punctuation">)</span> <span class="token punctuation">)</span> <span class="token punctuation">.</span> hexdigest <span class="token punctuation">(</span> <span class="token punctuation">)</span> <span class="token keyword">class</span> <span class="token class-name">Blockchain</span> <span class="token punctuation">:</span> <span class="token keyword">def</span> <span class="token function">__init__</span> <span class="token punctuation">(</span> self <span class="token punctuation">)</span> <span class="token punctuation">:</span> <span class="token triple-quoted-string string">""" Constructor của class `Blockchain`. """</span> self <span class="token punctuation">.</span> chain <span class="token operator">=</span> <span class="token punctuation">[</span> <span class="token punctuation">]</span> self <span class="token punctuation">.</span> create_genesis_block <span class="token punctuation">(</span> <span class="token punctuation">)</span> <span class="token keyword">def</span> <span class="token function">create_genesis_block</span> <span class="token punctuation">(</span> self <span class="token punctuation">)</span> <span class="token punctuation">:</span> <span class="token triple-quoted-string string">""" Hàm generate ra `block genesis` và thêm nó vào chain. Block này có index bằng 0, previous_hash là 0 và một giá trị băm hợp lệ. """</span> genesis_block <span class="token operator">=</span> Block <span class="token punctuation">(</span> <span class="token number">0</span> <span class="token punctuation">,</span> <span class="token punctuation">[</span> <span class="token punctuation">]</span> <span class="token punctuation">,</span> time <span class="token punctuation">.</span> time <span class="token punctuation">(</span> <span class="token punctuation">)</span> <span class="token punctuation">,</span> <span class="token string">"0"</span> <span class="token punctuation">)</span> genesis_block <span class="token punctuation">.</span> <span class="token builtin">hash</span> <span class="token operator">=</span> genesis_block <span class="token punctuation">.</span> compute_hash <span class="token punctuation">(</span> <span class="token punctuation">)</span> self <span class="token punctuation">.</span> chain <span class="token punctuation">.</span> append <span class="token punctuation">(</span> genesis_block <span class="token punctuation">)</span> @ <span class="token builtin">property</span> <span class="token keyword">def</span> <span class="token function">last_block</span> <span class="token punctuation">(</span> self <span class="token punctuation">)</span> <span class="token punctuation">:</span> <span class="token triple-quoted-string string">""" Một cách đơn giản để lấy block cuối cùng trong chain. Chú ý chain sẽ luôn có một block đó chính là block genesis """</span> <span class="token keyword">return</span> self <span class="token punctuation">.</span> chain <span class="token punctuation">[</span> <span class="token operator">-</span> <span class="token number">1</span> <span class="token punctuation">]</span> |
Now, if the contents of any previous blocks change:
- The hash of the previous block will change.
- This will result in mismatch with the previous_hash field in the next block.
- Because the input data to calculate the hash value of any block also includes the previous_hash field, the hash value of the next block will also change.
In the end, the whole chain as a replacement block is disabled and the only way to fix it is to recalculate the entire chain.
Implementing the Proof-Of-Work algorithm (Proof of Work)
The problem, though, is that the hash value of all subsequent blocks can be easily recalculated to create another valid blockchain. To prevent this, we can exploit the asymmetry of the hash function we discussed above to make the task of calculating the hash value more difficult and random. What this means: Instead of accepting any hash value for the block, we add some constraints to it. Let’s add a constraint that our hash value will start with n leading zeros where n is a positive integer.
Here we will add some dummy data that we can change. We will add a new field which is the nonce field. The nonce number is a number that we can keep changing until we have a constrained hash function. The fact that the nonce satisfies the constraints acts as evidence that some calculations have been performed. This technique is a simplified version of the Hashcash algorithm used in Bitcoin. The number of zeroes specified in the constraint determines the difficulty of the PoW algorithm (the greater the number of zeroes, the harder it is to find nonce).
Also due to the asymmetry, Proof-of-work (PoW) is difficult to calculate but very easy to verify once you find the nonce (you just need to run the hash function again):
1 2 3 4 5 6 7 8 9 10 11 12 13 14 15 16 17 18 19 20 21 | <span class="token keyword">class</span> <span class="token class-name">Blockchain</span> <span class="token punctuation">:</span> <span class="token comment"># độ khó của thuật toán POW</span> difficulty <span class="token operator">=</span> <span class="token number">2</span> <span class="token punctuation">.</span> <span class="token punctuation">.</span> <span class="token punctuation">.</span> <span class="token punctuation">.</span> <span class="token punctuation">.</span> <span class="token punctuation">.</span> <span class="token keyword">def</span> <span class="token function">proof_of_work</span> <span class="token punctuation">(</span> self <span class="token punctuation">,</span> block <span class="token punctuation">)</span> <span class="token punctuation">:</span> <span class="token triple-quoted-string string">""" Hàm thử các giá trị khác nhau của nonce để lấy giá trị băm thỏa mãn """</span> block <span class="token punctuation">.</span> nonce <span class="token operator">=</span> <span class="token number">0</span> computed_hash <span class="token operator">=</span> block <span class="token punctuation">.</span> compute_hash <span class="token punctuation">(</span> <span class="token punctuation">)</span> <span class="token keyword">while</span> <span class="token operator">not</span> computed_hash <span class="token punctuation">.</span> startswith <span class="token punctuation">(</span> <span class="token string">'0'</span> <span class="token operator">*</span> Blockchain <span class="token punctuation">.</span> difficulty <span class="token punctuation">)</span> <span class="token punctuation">:</span> block <span class="token punctuation">.</span> nonce <span class="token operator">+=</span> <span class="token number">1</span> computed_hash <span class="token operator">=</span> block <span class="token punctuation">.</span> compute_hash <span class="token punctuation">(</span> <span class="token punctuation">)</span> <span class="token keyword">return</span> computed_hash |
Add blocks to the Chain
To add a block to the chain, we must first verify that:
- The data is not tampered with (proof of work provided is accurate).
- The order of transactions is kept the same.
1 2 3 4 5 6 7 8 9 10 11 12 13 14 15 16 17 18 19 20 21 22 23 24 25 26 27 28 29 30 31 | <span class="token keyword">class</span> <span class="token class-name">Blockchain</span> <span class="token punctuation">:</span> <span class="token punctuation">.</span> <span class="token punctuation">.</span> <span class="token punctuation">.</span> <span class="token punctuation">.</span> <span class="token punctuation">.</span> <span class="token keyword">def</span> <span class="token function">add_block</span> <span class="token punctuation">(</span> self <span class="token punctuation">,</span> block <span class="token punctuation">,</span> proof <span class="token punctuation">)</span> <span class="token punctuation">:</span> <span class="token triple-quoted-string string">""" Chức năng thêm block vào chain sau khi xác minh. Xác minh bao gồm: * Check nếu proof is đúng. * Trường previous_hash đúng và là giá trị băm của block mới nhất trong chain. """</span> previous_hash <span class="token operator">=</span> self <span class="token punctuation">.</span> last_block <span class="token punctuation">.</span> <span class="token builtin">hash</span> <span class="token keyword">if</span> previous_hash <span class="token operator">!=</span> block <span class="token punctuation">.</span> previous_hash <span class="token punctuation">:</span> <span class="token keyword">return</span> <span class="token boolean">False</span> <span class="token keyword">if</span> <span class="token operator">not</span> Blockchain <span class="token punctuation">.</span> is_valid_proof <span class="token punctuation">(</span> block <span class="token punctuation">,</span> proof <span class="token punctuation">)</span> <span class="token punctuation">:</span> <span class="token keyword">return</span> <span class="token boolean">False</span> block <span class="token punctuation">.</span> <span class="token builtin">hash</span> <span class="token operator">=</span> proof self <span class="token punctuation">.</span> chain <span class="token punctuation">.</span> append <span class="token punctuation">(</span> block <span class="token punctuation">)</span> <span class="token keyword">return</span> <span class="token boolean">True</span> <span class="token keyword">def</span> <span class="token function">is_valid_proof</span> <span class="token punctuation">(</span> self <span class="token punctuation">,</span> block <span class="token punctuation">,</span> block_hash <span class="token punctuation">)</span> <span class="token punctuation">:</span> <span class="token triple-quoted-string string">""" Kiểm tra xem block_hash có phải là giá trị băm hợp lệ của block hay không và thỏa mãn các tiêu chí độ khó. """</span> <span class="token keyword">return</span> <span class="token punctuation">(</span> block_hash <span class="token punctuation">.</span> startswith <span class="token punctuation">(</span> <span class="token string">'0'</span> <span class="token operator">*</span> Blockchain <span class="token punctuation">.</span> difficulty <span class="token punctuation">)</span> <span class="token operator">and</span> block_hash <span class="token operator">==</span> block <span class="token punctuation">.</span> compute_hash <span class="token punctuation">(</span> <span class="token punctuation">)</span> <span class="token punctuation">)</span> |
Mining
The original transactions will be stored as a group of unconfirmed transactions. The process of putting unconfirmed transactions into a block and calculating the POW is called Mining blocks. When the nonce that meets the constraints is found, we can say that a block has been mined and it can be put into the blockchain.
In most cryptocurrencies (including Bitcoin), miners can be given a number of cryptocurrencies as a reward for using their computational power to calculate POW. Here is the function mining:
1 2 3 4 5 6 7 8 9 10 11 12 13 14 15 16 17 18 19 20 21 22 23 24 25 26 27 28 29 30 31 32 33 34 35 36 | <span class="token keyword">class</span> <span class="token class-name">Blockchain</span> <span class="token punctuation">:</span> <span class="token keyword">def</span> <span class="token function">__init__</span> <span class="token punctuation">(</span> self <span class="token punctuation">)</span> <span class="token punctuation">:</span> self <span class="token punctuation">.</span> unconfirmed_transactions <span class="token operator">=</span> <span class="token punctuation">[</span> <span class="token punctuation">]</span> <span class="token comment"># list transactions chưa được xác nhận</span> self <span class="token punctuation">.</span> chain <span class="token operator">=</span> <span class="token punctuation">[</span> <span class="token punctuation">]</span> self <span class="token punctuation">.</span> create_genesis_block <span class="token punctuation">(</span> <span class="token punctuation">)</span> <span class="token punctuation">.</span> <span class="token punctuation">.</span> <span class="token punctuation">.</span> <span class="token punctuation">.</span> <span class="token keyword">def</span> <span class="token function">add_new_transaction</span> <span class="token punctuation">(</span> self <span class="token punctuation">,</span> transaction <span class="token punctuation">)</span> <span class="token punctuation">:</span> self <span class="token punctuation">.</span> unconfirmed_transactions <span class="token punctuation">.</span> append <span class="token punctuation">(</span> transaction <span class="token punctuation">)</span> <span class="token keyword">def</span> <span class="token function">mine</span> <span class="token punctuation">(</span> self <span class="token punctuation">)</span> <span class="token punctuation">:</span> <span class="token triple-quoted-string string">""" Hàm thêm transactions pending vào blockchain bằng các thêm chúng vào block và đưa ra PoW. """</span> <span class="token keyword">if</span> <span class="token operator">not</span> self <span class="token punctuation">.</span> unconfirmed_transactions <span class="token punctuation">:</span> <span class="token keyword">return</span> <span class="token boolean">False</span> last_block <span class="token operator">=</span> self <span class="token punctuation">.</span> last_block new_block <span class="token operator">=</span> Block <span class="token punctuation">(</span> index <span class="token operator">=</span> last_block <span class="token punctuation">.</span> index <span class="token operator">+</span> <span class="token number">1</span> <span class="token punctuation">,</span> transactions <span class="token operator">=</span> self <span class="token punctuation">.</span> unconfirmed_transactions <span class="token punctuation">,</span> timestamp <span class="token operator">=</span> time <span class="token punctuation">.</span> time <span class="token punctuation">(</span> <span class="token punctuation">)</span> <span class="token punctuation">,</span> previous_hash <span class="token operator">=</span> last_block <span class="token punctuation">.</span> <span class="token builtin">hash</span> <span class="token punctuation">)</span> proof <span class="token operator">=</span> self <span class="token punctuation">.</span> proof_of_work <span class="token punctuation">(</span> new_block <span class="token punctuation">)</span> self <span class="token punctuation">.</span> add_block <span class="token punctuation">(</span> new_block <span class="token punctuation">,</span> proof <span class="token punctuation">)</span> self <span class="token punctuation">.</span> unconfirmed_transactions <span class="token operator">=</span> <span class="token punctuation">[</span> <span class="token punctuation">]</span> <span class="token keyword">return</span> new_block <span class="token punctuation">.</span> index |
Ok this is the code of the processing: source code
Create the interface
In this section, we will create the interface for the blockchain node to interact with the application we have just built. Here will use a popular Python microframework called Flask to create interactive REST APIs and invoke various actions in our blockchain node. If you’ve worked with any previous web framework, the code below won’t be hard to follow.
1 2 3 4 5 6 7 8 9 | <span class="token keyword">from</span> flask <span class="token keyword">import</span> Flask <span class="token punctuation">,</span> request <span class="token keyword">import</span> requests <span class="token comment"># Khởi tại ứng dụng flask</span> app <span class="token operator">=</span> Flask <span class="token punctuation">(</span> __name__ <span class="token punctuation">)</span> <span class="token comment"># Khởi tạo object Blockchain</span> blockchain <span class="token operator">=</span> Blockchain <span class="token punctuation">(</span> <span class="token punctuation">)</span> |
We need a route for the application to create a new transaction and this is the post
1 2 3 4 5 6 7 8 9 10 11 12 13 14 15 | @app <span class="token punctuation">.</span> route <span class="token punctuation">(</span> <span class="token string">'/new_transaction'</span> <span class="token punctuation">,</span> methods <span class="token operator">=</span> <span class="token punctuation">[</span> <span class="token string">'POST'</span> <span class="token punctuation">]</span> <span class="token punctuation">)</span> <span class="token keyword">def</span> <span class="token function">new_transaction</span> <span class="token punctuation">(</span> <span class="token punctuation">)</span> <span class="token punctuation">:</span> tx_data <span class="token operator">=</span> request <span class="token punctuation">.</span> get_json <span class="token punctuation">(</span> <span class="token punctuation">)</span> required_fields <span class="token operator">=</span> <span class="token punctuation">[</span> <span class="token string">"author"</span> <span class="token punctuation">,</span> <span class="token string">"content"</span> <span class="token punctuation">]</span> <span class="token keyword">for</span> field <span class="token keyword">in</span> required_fields <span class="token punctuation">:</span> <span class="token keyword">if</span> <span class="token operator">not</span> tx_data <span class="token punctuation">.</span> get <span class="token punctuation">(</span> field <span class="token punctuation">)</span> <span class="token punctuation">:</span> <span class="token keyword">return</span> <span class="token string">"Invalid transaction data"</span> <span class="token punctuation">,</span> <span class="token number">404</span> tx_data <span class="token punctuation">[</span> <span class="token string">"timestamp"</span> <span class="token punctuation">]</span> <span class="token operator">=</span> time <span class="token punctuation">.</span> time <span class="token punctuation">(</span> <span class="token punctuation">)</span> blockchain <span class="token punctuation">.</span> add_new_transaction <span class="token punctuation">(</span> tx_data <span class="token punctuation">)</span> <span class="token keyword">return</span> <span class="token string">"Success"</span> <span class="token punctuation">,</span> <span class="token number">201</span> |
There will be a route that returns a copy of the chain. And this route the application will use to query all data to display:
1 2 3 4 5 6 7 8 | @app <span class="token punctuation">.</span> route <span class="token punctuation">(</span> <span class="token string">'/chain'</span> <span class="token punctuation">,</span> methods <span class="token operator">=</span> <span class="token punctuation">[</span> <span class="token string">'GET'</span> <span class="token punctuation">]</span> <span class="token punctuation">)</span> <span class="token keyword">def</span> <span class="token function">get_chain</span> <span class="token punctuation">(</span> <span class="token punctuation">)</span> <span class="token punctuation">:</span> chain_data <span class="token operator">=</span> <span class="token punctuation">[</span> <span class="token punctuation">]</span> <span class="token keyword">for</span> block <span class="token keyword">in</span> blockchain <span class="token punctuation">.</span> chain <span class="token punctuation">:</span> chain_data <span class="token punctuation">.</span> append <span class="token punctuation">(</span> block <span class="token punctuation">.</span> __dict__ <span class="token punctuation">)</span> <span class="token keyword">return</span> json <span class="token punctuation">.</span> dumps <span class="token punctuation">(</span> <span class="token punctuation">{</span> <span class="token string">"length"</span> <span class="token punctuation">:</span> <span class="token builtin">len</span> <span class="token punctuation">(</span> chain_data <span class="token punctuation">)</span> <span class="token punctuation">,</span> <span class="token string">"chain"</span> <span class="token punctuation">:</span> chain_data <span class="token punctuation">}</span> <span class="token punctuation">)</span> |
And here is the route to send a mine request – validating unverified transactions (if any). We will use it to start a mine command from our own application:
1 2 3 4 5 6 7 8 9 10 11 | @app <span class="token punctuation">.</span> route <span class="token punctuation">(</span> <span class="token string">'/mine'</span> <span class="token punctuation">,</span> methods <span class="token operator">=</span> <span class="token punctuation">[</span> <span class="token string">'GET'</span> <span class="token punctuation">]</span> <span class="token punctuation">)</span> <span class="token keyword">def</span> <span class="token function">mine_unconfirmed_transactions</span> <span class="token punctuation">(</span> <span class="token punctuation">)</span> <span class="token punctuation">:</span> result <span class="token operator">=</span> blockchain <span class="token punctuation">.</span> mine <span class="token punctuation">(</span> <span class="token punctuation">)</span> <span class="token keyword">if</span> <span class="token operator">not</span> result <span class="token punctuation">:</span> <span class="token keyword">return</span> <span class="token string">"No transactions to mine"</span> <span class="token keyword">return</span> <span class="token string">"Block #{} is mined."</span> <span class="token punctuation">.</span> <span class="token builtin">format</span> <span class="token punctuation">(</span> result <span class="token punctuation">)</span> @app <span class="token punctuation">.</span> route <span class="token punctuation">(</span> <span class="token string">'/pending_tx'</span> <span class="token punctuation">)</span> <span class="token keyword">def</span> <span class="token function">get_pending_tx</span> <span class="token punctuation">(</span> <span class="token punctuation">)</span> <span class="token punctuation">:</span> <span class="token keyword">return</span> json <span class="token punctuation">.</span> dumps <span class="token punctuation">(</span> blockchain <span class="token punctuation">.</span> unconfirmed_transactions <span class="token punctuation">)</span> |
Establish a consensus and dispersion mechanism
There is a blockchain problem that we have deployed running on a computer. Although we have linked the blocks with the hash value and applied POW, it is still not possible to trust a single entity (in this case, a single machine). We need distributed data or multiple nodes to maintain the blockchain. So, to move from a single node to a peer network, let’s first create a mechanism so that a new node can learn about other peers in the network:
1 2 3 4 5 6 7 8 9 10 11 12 13 14 15 16 17 18 19 20 21 22 23 24 25 26 27 28 29 30 31 32 33 34 35 36 37 38 39 40 41 42 43 44 45 46 47 48 49 50 51 52 53 54 55 56 57 58 59 60 61 62 63 64 65 | <span class="token comment"># Chứa địa chỉ host của các thành viên tham gia khác của mạng</span> peers <span class="token operator">=</span> <span class="token builtin">set</span> <span class="token punctuation">(</span> <span class="token punctuation">)</span> <span class="token comment"># route thêm một peer mới vào mạng</span> @app <span class="token punctuation">.</span> route <span class="token punctuation">(</span> <span class="token string">'/register_node'</span> <span class="token punctuation">,</span> methods <span class="token operator">=</span> <span class="token punctuation">[</span> <span class="token string">'POST'</span> <span class="token punctuation">]</span> <span class="token punctuation">)</span> <span class="token keyword">def</span> <span class="token function">register_new_peers</span> <span class="token punctuation">(</span> <span class="token punctuation">)</span> <span class="token punctuation">:</span> <span class="token comment"># Địa chỉ host đến các node ngang hàng </span> node_address <span class="token operator">=</span> request <span class="token punctuation">.</span> get_json <span class="token punctuation">(</span> <span class="token punctuation">)</span> <span class="token punctuation">[</span> <span class="token string">"node_address"</span> <span class="token punctuation">]</span> <span class="token keyword">if</span> <span class="token operator">not</span> node_address <span class="token punctuation">:</span> <span class="token keyword">return</span> <span class="token string">"Invalid data"</span> <span class="token punctuation">,</span> <span class="token number">400</span> <span class="token comment"># Thêm địa chỉ node vào danh sách</span> peers <span class="token punctuation">.</span> add <span class="token punctuation">(</span> node_address <span class="token punctuation">)</span> <span class="token comment"># Trả lại blockchain mới</span> <span class="token keyword">return</span> get_chain <span class="token punctuation">(</span> <span class="token punctuation">)</span> @app <span class="token punctuation">.</span> route <span class="token punctuation">(</span> <span class="token string">'/register_with'</span> <span class="token punctuation">,</span> methods <span class="token operator">=</span> <span class="token punctuation">[</span> <span class="token string">'POST'</span> <span class="token punctuation">]</span> <span class="token punctuation">)</span> <span class="token keyword">def</span> <span class="token function">register_with_existing_node</span> <span class="token punctuation">(</span> <span class="token punctuation">)</span> <span class="token punctuation">:</span> <span class="token triple-quoted-string string">""" Trong nội bộ gọi đến route `register_node` để đăng ký node hiện tại với node từ xa được chỉ định trong request và cập nhật lại mạng blockchain """</span> node_address <span class="token operator">=</span> request <span class="token punctuation">.</span> get_json <span class="token punctuation">(</span> <span class="token punctuation">)</span> <span class="token punctuation">[</span> <span class="token string">"node_address"</span> <span class="token punctuation">]</span> <span class="token keyword">if</span> <span class="token operator">not</span> node_address <span class="token punctuation">:</span> <span class="token keyword">return</span> <span class="token string">"Invalid data"</span> <span class="token punctuation">,</span> <span class="token number">400</span> data <span class="token operator">=</span> <span class="token punctuation">{</span> <span class="token string">"node_address"</span> <span class="token punctuation">:</span> request <span class="token punctuation">.</span> host_url <span class="token punctuation">}</span> headers <span class="token operator">=</span> <span class="token punctuation">{</span> <span class="token string">'Content-Type'</span> <span class="token punctuation">:</span> <span class="token string">"application/json"</span> <span class="token punctuation">}</span> <span class="token comment"># Reuqest đăng ký với node từ xa và lấy thông tin</span> response <span class="token operator">=</span> requests <span class="token punctuation">.</span> post <span class="token punctuation">(</span> node_address <span class="token operator">+</span> <span class="token string">"/register_node"</span> <span class="token punctuation">,</span> data <span class="token operator">=</span> json <span class="token punctuation">.</span> dumps <span class="token punctuation">(</span> data <span class="token punctuation">)</span> <span class="token punctuation">,</span> headers <span class="token operator">=</span> headers <span class="token punctuation">)</span> <span class="token keyword">if</span> response <span class="token punctuation">.</span> status_code <span class="token operator">==</span> <span class="token number">200</span> <span class="token punctuation">:</span> <span class="token keyword">global</span> blockchain <span class="token keyword">global</span> peers <span class="token comment"># update chain và các peers</span> chain_dump <span class="token operator">=</span> response <span class="token punctuation">.</span> json <span class="token punctuation">(</span> <span class="token punctuation">)</span> <span class="token punctuation">[</span> <span class="token string">'chain'</span> <span class="token punctuation">]</span> blockchain <span class="token operator">=</span> create_chain_from_dump <span class="token punctuation">(</span> chain_dump <span class="token punctuation">)</span> peers <span class="token punctuation">.</span> update <span class="token punctuation">(</span> response <span class="token punctuation">.</span> json <span class="token punctuation">(</span> <span class="token punctuation">)</span> <span class="token punctuation">[</span> <span class="token string">'peers'</span> <span class="token punctuation">]</span> <span class="token punctuation">)</span> <span class="token keyword">return</span> <span class="token string">"Registration successful"</span> <span class="token punctuation">,</span> <span class="token number">200</span> <span class="token keyword">else</span> <span class="token punctuation">:</span> <span class="token comment"># Nếu có lỗi xảy ra, API sẽ trả lại response</span> <span class="token keyword">return</span> response <span class="token punctuation">.</span> content <span class="token punctuation">,</span> response <span class="token punctuation">.</span> status_code <span class="token keyword">def</span> <span class="token function">create_chain_from_dump</span> <span class="token punctuation">(</span> chain_dump <span class="token punctuation">)</span> <span class="token punctuation">:</span> blockchain <span class="token operator">=</span> Blockchain <span class="token punctuation">(</span> <span class="token punctuation">)</span> <span class="token keyword">for</span> idx <span class="token punctuation">,</span> block_data <span class="token keyword">in</span> <span class="token builtin">enumerate</span> <span class="token punctuation">(</span> chain_dump <span class="token punctuation">)</span> <span class="token punctuation">:</span> block <span class="token operator">=</span> Block <span class="token punctuation">(</span> block_data <span class="token punctuation">[</span> <span class="token string">"index"</span> <span class="token punctuation">]</span> <span class="token punctuation">,</span> block_data <span class="token punctuation">[</span> <span class="token string">"transactions"</span> <span class="token punctuation">]</span> <span class="token punctuation">,</span> block_data <span class="token punctuation">[</span> <span class="token string">"timestamp"</span> <span class="token punctuation">]</span> <span class="token punctuation">,</span> block_data <span class="token punctuation">[</span> <span class="token string">"previous_hash"</span> <span class="token punctuation">]</span> <span class="token punctuation">)</span> proof <span class="token operator">=</span> block_data <span class="token punctuation">[</span> <span class="token string">'hash'</span> <span class="token punctuation">]</span> <span class="token keyword">if</span> idx <span class="token operator">></span> <span class="token number">0</span> <span class="token punctuation">:</span> added <span class="token operator">=</span> blockchain <span class="token punctuation">.</span> add_block <span class="token punctuation">(</span> block <span class="token punctuation">,</span> proof <span class="token punctuation">)</span> <span class="token keyword">if</span> <span class="token operator">not</span> added <span class="token punctuation">:</span> <span class="token keyword">raise</span> Exception <span class="token punctuation">(</span> <span class="token string">"The chain dump is tampered!!"</span> <span class="token punctuation">)</span> <span class="token keyword">else</span> <span class="token punctuation">:</span> <span class="token comment"># block này là một block genesis nên không cần verification</span> blockchain <span class="token punctuation">.</span> chain <span class="token punctuation">.</span> append <span class="token punctuation">(</span> block <span class="token punctuation">)</span> <span class="token keyword">return</span> blockchain |
A new node joining the network can call register_with_existing_node to register with existing nodes in the network. This will help the following:
- Request the remote node to add a new peer to the existing peer list.
- Easily Initialize blockchain of new node by retrieving remote node.
- Re-sync the blockchain to the network if that node is no longer connected to the network.
However, there is a problem with many nodes due to intentional or unintentional reasons (such as network latency), the chain copy of several nodes may be different. In that case the nodes need to agree with some version of the chain to maintain the integrity of the entire system. In other words, we need to reach a consensus.
A simple consensus algorithm can agree with the longest valid chain when the chains of participating nodes in the network appear forked. The reason behind this method is that the longest chain proves the most work done (remember PoW is very fastidious):
1 2 3 4 5 6 7 8 9 10 11 12 13 14 15 16 17 18 19 20 21 22 23 24 25 26 27 28 29 30 31 32 33 34 35 36 37 38 39 40 41 42 43 44 45 46 47 48 49 50 51 52 53 | <span class="token keyword">class</span> <span class="token class-name">Blockchain</span> <span class="token punctuation">.</span> <span class="token punctuation">.</span> <span class="token punctuation">.</span> <span class="token punctuation">.</span> <span class="token keyword">def</span> <span class="token function">check_chain_validity</span> <span class="token punctuation">(</span> cls <span class="token punctuation">,</span> chain <span class="token punctuation">)</span> <span class="token punctuation">:</span> <span class="token triple-quoted-string string">""" Là một hàm helper để check nếu toàn bộ blockchain là đúng """</span> result <span class="token operator">=</span> <span class="token boolean">True</span> previous_hash <span class="token operator">=</span> <span class="token string">"0"</span> <span class="token comment"># Lặp lại qua tất cả các block</span> <span class="token keyword">for</span> block <span class="token keyword">in</span> chain <span class="token punctuation">:</span> block_hash <span class="token operator">=</span> block <span class="token punctuation">.</span> <span class="token builtin">hash</span> <span class="token comment"># xóa trường đã băm để tính toán lại giá trị băm</span> <span class="token comment"># sử dụng `compute_hash` method.</span> <span class="token builtin">delattr</span> <span class="token punctuation">(</span> block <span class="token punctuation">,</span> <span class="token string">"hash"</span> <span class="token punctuation">)</span> <span class="token keyword">if</span> <span class="token operator">not</span> cls <span class="token punctuation">.</span> is_valid_proof <span class="token punctuation">(</span> block <span class="token punctuation">,</span> block <span class="token punctuation">.</span> <span class="token builtin">hash</span> <span class="token punctuation">)</span> <span class="token operator">or</span> previous_hash <span class="token operator">!=</span> block <span class="token punctuation">.</span> previous_hash <span class="token punctuation">:</span> result <span class="token operator">=</span> <span class="token boolean">False</span> <span class="token keyword">break</span> block <span class="token punctuation">.</span> <span class="token builtin">hash</span> <span class="token punctuation">,</span> previous_hash <span class="token operator">=</span> block_hash <span class="token punctuation">,</span> block_hash <span class="token keyword">return</span> result <span class="token keyword">def</span> <span class="token function">consensus</span> <span class="token punctuation">(</span> <span class="token punctuation">)</span> <span class="token punctuation">:</span> <span class="token triple-quoted-string string">""" Thuật toán đồng thuận đơn giản ở đấy là nếu một chuỗi hợp lệ dài hơn được tìm thấy, chain của chúng ta sẽ thay thế bằng nó. """</span> <span class="token keyword">global</span> blockchain longest_chain <span class="token operator">=</span> <span class="token boolean">None</span> current_len <span class="token operator">=</span> <span class="token builtin">len</span> <span class="token punctuation">(</span> blockchain <span class="token punctuation">.</span> chain <span class="token punctuation">)</span> <span class="token keyword">for</span> node <span class="token keyword">in</span> peers <span class="token punctuation">:</span> response <span class="token operator">=</span> requests <span class="token punctuation">.</span> get <span class="token punctuation">(</span> <span class="token string">'{}/chain'</span> <span class="token punctuation">.</span> <span class="token builtin">format</span> <span class="token punctuation">(</span> node <span class="token punctuation">)</span> <span class="token punctuation">)</span> length <span class="token operator">=</span> response <span class="token punctuation">.</span> json <span class="token punctuation">(</span> <span class="token punctuation">)</span> <span class="token punctuation">[</span> <span class="token string">'length'</span> <span class="token punctuation">]</span> chain <span class="token operator">=</span> response <span class="token punctuation">.</span> json <span class="token punctuation">(</span> <span class="token punctuation">)</span> <span class="token punctuation">[</span> <span class="token string">'chain'</span> <span class="token punctuation">]</span> <span class="token keyword">if</span> length <span class="token operator">></span> current_len <span class="token operator">and</span> blockchain <span class="token punctuation">.</span> check_chain_validity <span class="token punctuation">(</span> chain <span class="token punctuation">)</span> <span class="token punctuation">:</span> <span class="token comment"># Chain hợp lệ dài hơn được tìm thấy!</span> current_len <span class="token operator">=</span> length longest_chain <span class="token operator">=</span> chain <span class="token keyword">if</span> longest_chain <span class="token punctuation">:</span> blockchain <span class="token operator">=</span> longest_chain <span class="token keyword">return</span> <span class="token boolean">True</span> <span class="token keyword">return</span> <span class="token boolean">False</span> |
Next we need to develop a way for any node to inform the network that it has mined a block so that everyone can update their blockchain and move on to mining other blocks. Other nodes may only need to verify the PoW and add the newly mined block to their respective chain (remember that verification is easy when knowing the nonce):
1 2 3 4 5 6 7 8 9 10 11 12 13 14 15 16 17 18 19 20 21 22 23 24 25 26 27 28 29 | <span class="token comment"># Route này để thêm khối người khác vừa mined.</span> <span class="token comment"># Đầu tiên cần xac minh block và sau đó là thêm vào chain</span> @app <span class="token punctuation">.</span> route <span class="token punctuation">(</span> <span class="token string">'/add_block'</span> <span class="token punctuation">,</span> methods <span class="token operator">=</span> <span class="token punctuation">[</span> <span class="token string">'POST'</span> <span class="token punctuation">]</span> <span class="token punctuation">)</span> <span class="token keyword">def</span> <span class="token function">verify_and_add_block</span> <span class="token punctuation">(</span> <span class="token punctuation">)</span> <span class="token punctuation">:</span> block_data <span class="token operator">=</span> request <span class="token punctuation">.</span> get_json <span class="token punctuation">(</span> <span class="token punctuation">)</span> block <span class="token operator">=</span> Block <span class="token punctuation">(</span> block_data <span class="token punctuation">[</span> <span class="token string">"index"</span> <span class="token punctuation">]</span> <span class="token punctuation">,</span> block_data <span class="token punctuation">[</span> <span class="token string">"transactions"</span> <span class="token punctuation">]</span> <span class="token punctuation">,</span> block_data <span class="token punctuation">[</span> <span class="token string">"timestamp"</span> <span class="token punctuation">]</span> <span class="token punctuation">,</span> block_data <span class="token punctuation">[</span> <span class="token string">"previous_hash"</span> <span class="token punctuation">]</span> <span class="token punctuation">)</span> proof <span class="token operator">=</span> block_data <span class="token punctuation">[</span> <span class="token string">'hash'</span> <span class="token punctuation">]</span> added <span class="token operator">=</span> blockchain <span class="token punctuation">.</span> add_block <span class="token punctuation">(</span> block <span class="token punctuation">,</span> proof <span class="token punctuation">)</span> <span class="token keyword">if</span> <span class="token operator">not</span> added <span class="token punctuation">:</span> <span class="token keyword">return</span> <span class="token string">"The block was discarded by the node"</span> <span class="token punctuation">,</span> <span class="token number">400</span> <span class="token keyword">return</span> <span class="token string">"Block added to the chain"</span> <span class="token punctuation">,</span> <span class="token number">201</span> <span class="token keyword">def</span> <span class="token function">announce_new_block</span> <span class="token punctuation">(</span> block <span class="token punctuation">)</span> <span class="token punctuation">:</span> <span class="token triple-quoted-string string">""" Một hàm thông báo cho mạng sau khi một block đã được mined. Các block khác chỉ có thể xác minh PoW và thêm nó vào chuỗi tương ứng. """</span> <span class="token keyword">for</span> peer <span class="token keyword">in</span> peers <span class="token punctuation">:</span> url <span class="token operator">=</span> <span class="token string">"{}add_block"</span> <span class="token punctuation">.</span> <span class="token builtin">format</span> <span class="token punctuation">(</span> peer <span class="token punctuation">)</span> requests <span class="token punctuation">.</span> post <span class="token punctuation">(</span> url <span class="token punctuation">,</span> data <span class="token operator">=</span> json <span class="token punctuation">.</span> dumps <span class="token punctuation">(</span> block <span class="token punctuation">.</span> __dict__ <span class="token punctuation">,</span> sort_keys <span class="token operator">=</span> <span class="token boolean">True</span> <span class="token punctuation">)</span> <span class="token punctuation">)</span> |
The announce_new_block function should be called after each block is mined by nodes so other peers can add it to their chain.
1 2 3 4 5 6 7 8 9 10 11 12 13 14 | @app <span class="token punctuation">.</span> route <span class="token punctuation">(</span> <span class="token string">'/mine'</span> <span class="token punctuation">,</span> methods <span class="token operator">=</span> <span class="token punctuation">[</span> <span class="token string">'GET'</span> <span class="token punctuation">]</span> <span class="token punctuation">)</span> <span class="token keyword">def</span> <span class="token function">mine_unconfirmed_transactions</span> <span class="token punctuation">(</span> <span class="token punctuation">)</span> <span class="token punctuation">:</span> result <span class="token operator">=</span> blockchain <span class="token punctuation">.</span> mine <span class="token punctuation">(</span> <span class="token punctuation">)</span> <span class="token keyword">if</span> <span class="token operator">not</span> result <span class="token punctuation">:</span> <span class="token keyword">return</span> <span class="token string">"No transactions to mine"</span> <span class="token keyword">else</span> <span class="token punctuation">:</span> <span class="token comment"># Đảm bảo chúng ta có chain dài nhất trước khi thông báo với mạng</span> chain_length <span class="token operator">=</span> <span class="token builtin">len</span> <span class="token punctuation">(</span> blockchain <span class="token punctuation">.</span> chain <span class="token punctuation">)</span> consensus <span class="token punctuation">(</span> <span class="token punctuation">)</span> <span class="token keyword">if</span> chain_length <span class="token operator">==</span> <span class="token builtin">len</span> <span class="token punctuation">(</span> blockchain <span class="token punctuation">.</span> chain <span class="token punctuation">)</span> <span class="token punctuation">:</span> <span class="token comment"># thông báo block được mined gần đây vào mạng</span> announce_new_block <span class="token punctuation">(</span> blockchain <span class="token punctuation">.</span> last_block <span class="token punctuation">)</span> <span class="token keyword">return</span> <span class="token string">"Block #{} is mined."</span> <span class="token punctuation">.</span> <span class="token builtin">format</span> <span class="token punctuation">(</span> blockchain <span class="token punctuation">.</span> last_block <span class="token punctuation">.</span> index |
Build web application
So the blockchain server is set up. You can see the source code here .
Now it’s time to start developing the web application interface. We have used the Jinja2 template to display views and some CSS to make things look good.
The application needs to connect to a node in the blockchain network to fetch data and also to send new data.
1 2 3 4 5 6 7 8 9 10 11 12 13 | <span class="token keyword">import</span> datetime <span class="token keyword">import</span> json <span class="token keyword">import</span> requests <span class="token keyword">from</span> flask <span class="token keyword">import</span> render_template <span class="token punctuation">,</span> redirect <span class="token punctuation">,</span> request <span class="token keyword">from</span> app <span class="token keyword">import</span> app <span class="token comment"># Node mà chúng ta sẽ kết nối để fetch dữ liệu về</span> CONNECTED_NODE_ADDRESS <span class="token operator">=</span> <span class="token string">"http://127.0.0.1:8000"</span> posts <span class="token operator">=</span> <span class="token punctuation">[</span> <span class="token punctuation">]</span> |
fetch_posts function:
1 2 3 4 5 6 7 8 9 10 11 12 13 14 15 16 17 18 19 20 | <span class="token keyword">def</span> <span class="token function">fetch_posts</span> <span class="token punctuation">(</span> <span class="token punctuation">)</span> <span class="token punctuation">:</span> <span class="token triple-quoted-string string">""" Hàm get chain từ node, phân tíc dữ liệu và lưu trữ cục bộ """</span> get_chain_address <span class="token operator">=</span> <span class="token string">"{}/chain"</span> <span class="token punctuation">.</span> <span class="token builtin">format</span> <span class="token punctuation">(</span> CONNECTED_NODE_ADDRESS <span class="token punctuation">)</span> response <span class="token operator">=</span> requests <span class="token punctuation">.</span> get <span class="token punctuation">(</span> get_chain_address <span class="token punctuation">)</span> <span class="token keyword">if</span> response <span class="token punctuation">.</span> status_code <span class="token operator">==</span> <span class="token number">200</span> <span class="token punctuation">:</span> content <span class="token operator">=</span> <span class="token punctuation">[</span> <span class="token punctuation">]</span> chain <span class="token operator">=</span> json <span class="token punctuation">.</span> loads <span class="token punctuation">(</span> response <span class="token punctuation">.</span> content <span class="token punctuation">)</span> <span class="token keyword">for</span> block <span class="token keyword">in</span> chain <span class="token punctuation">[</span> <span class="token string">"chain"</span> <span class="token punctuation">]</span> <span class="token punctuation">:</span> <span class="token keyword">for</span> tx <span class="token keyword">in</span> block <span class="token punctuation">[</span> <span class="token string">"transactions"</span> <span class="token punctuation">]</span> <span class="token punctuation">:</span> tx <span class="token punctuation">[</span> <span class="token string">"index"</span> <span class="token punctuation">]</span> <span class="token operator">=</span> block <span class="token punctuation">[</span> <span class="token string">"index"</span> <span class="token punctuation">]</span> tx <span class="token punctuation">[</span> <span class="token string">"hash"</span> <span class="token punctuation">]</span> <span class="token operator">=</span> block <span class="token punctuation">[</span> <span class="token string">"previous_hash"</span> <span class="token punctuation">]</span> content <span class="token punctuation">.</span> append <span class="token punctuation">(</span> tx <span class="token punctuation">)</span> <span class="token keyword">global</span> posts posts <span class="token operator">=</span> <span class="token builtin">sorted</span> <span class="token punctuation">(</span> content <span class="token punctuation">,</span> key <span class="token operator">=</span> <span class="token keyword">lambda</span> k <span class="token punctuation">:</span> k <span class="token punctuation">[</span> <span class="token string">'timestamp'</span> <span class="token punctuation">]</span> <span class="token punctuation">,</span> reverse <span class="token operator">=</span> <span class="token boolean">True</span> <span class="token punctuation">)</span> |
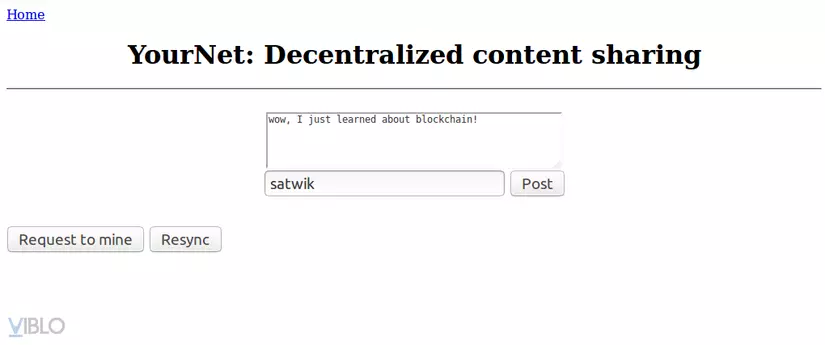
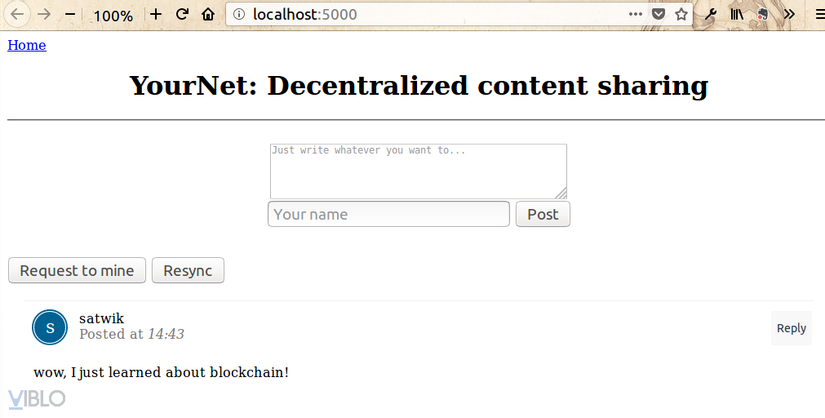
The application has an HTML form to enter the user input and then makes a POST request to the connected node to add transactions to the unconfirmed transactions group. The transaction is then mined by the network and finally fetched after reloading the page:
1 2 3 4 5 6 7 8 9 10 11 12 13 14 15 16 17 18 19 20 21 22 23 | @app <span class="token punctuation">.</span> route <span class="token punctuation">(</span> <span class="token string">'/submit'</span> <span class="token punctuation">,</span> methods <span class="token operator">=</span> <span class="token punctuation">[</span> <span class="token string">'POST'</span> <span class="token punctuation">]</span> <span class="token punctuation">)</span> <span class="token keyword">def</span> <span class="token function">submit_textarea</span> <span class="token punctuation">(</span> <span class="token punctuation">)</span> <span class="token punctuation">:</span> <span class="token triple-quoted-string string">""" Route để tạo transaction mới """</span> post_content <span class="token operator">=</span> request <span class="token punctuation">.</span> form <span class="token punctuation">[</span> <span class="token string">"content"</span> <span class="token punctuation">]</span> author <span class="token operator">=</span> request <span class="token punctuation">.</span> form <span class="token punctuation">[</span> <span class="token string">"author"</span> <span class="token punctuation">]</span> post_object <span class="token operator">=</span> <span class="token punctuation">{</span> <span class="token string">'author'</span> <span class="token punctuation">:</span> author <span class="token punctuation">,</span> <span class="token string">'content'</span> <span class="token punctuation">:</span> post_content <span class="token punctuation">,</span> <span class="token punctuation">}</span> <span class="token comment"># Submit transaction</span> new_tx_address <span class="token operator">=</span> <span class="token string">"{}/new_transaction"</span> <span class="token punctuation">.</span> <span class="token builtin">format</span> <span class="token punctuation">(</span> CONNECTED_NODE_ADDRESS <span class="token punctuation">)</span> requests <span class="token punctuation">.</span> post <span class="token punctuation">(</span> new_tx_address <span class="token punctuation">,</span> json <span class="token operator">=</span> post_object <span class="token punctuation">,</span> headers <span class="token operator">=</span> <span class="token punctuation">{</span> <span class="token string">'Content-type'</span> <span class="token punctuation">:</span> <span class="token string">'application/json'</span> <span class="token punctuation">}</span> <span class="token punctuation">)</span> <span class="token comment"># Trả về homepage</span> <span class="token keyword">return</span> redirect <span class="token punctuation">(</span> <span class="token string">'/'</span> <span class="token punctuation">)</span> |
Run the application
Here we have it! source code
Place to place:
1 2 3 | $ <span class="token function">cd</span> python_blockchain_app $ pip <span class="token function">install</span> -r requirements.txt |
Run a blockchain node on port 8000
1 2 3 | $ <span class="token function">export</span> FLASK_APP <span class="token operator">=</span> node_server.py $ flask run --port 8000 |
run the web application:
1 2 | $ python run_app.py |
The application will run at http: // localhost: 5000 .

Run multiple nodes
We will run multiple nodes by running on different ports. And use register_with to register as a peer network:
1 2 3 4 5 6 | <span class="token comment"># already running</span> $ flask run --port 8000 <span class="token operator">&</span> <span class="token comment"># spinning up new nodes</span> $ flask run --port 8001 <span class="token operator">&</span> $ flask run --port 8002 <span class="token operator">&</span> |
1 2 3 4 5 6 7 8 9 10 | $ <span class="token function">curl</span> -X POST http://127.0.0.1:8001/register_with -H <span class="token string">'Content-Type: application/json'</span> -d <span class="token string">'{"node_address": "http://127.0.0.1:8000"}'</span> $ <span class="token function">curl</span> -X POST http://127.0.0.1:8002/register_with -H <span class="token string">'Content-Type: application/json'</span> -d <span class="token string">'{"node_address": "http://127.0.0.1:8000"}'</span> |
You can run the application (python run_app.py) and create transactions (post via web interface) and when you mined transactions, all nodes in the network will update the chain. And nodes can also be checked by calling with cURL or Postman.
1 2 3 | $ <span class="token function">curl</span> -X GET http://localhost:8001/chain $ <span class="token function">curl</span> -X GET http://localhost:8002/chain |
Authenticate transactions
You may have noticed an application flaw: Anyone can change the name and post any content. Also, posts are easily fake while sending transactions on the blockchain network. One way to solve this is to create a user account, using the public key cryptography. Each new user needs a public key and a private key to post in the application:
- Each newly sent transaction (post post) is signed with the user’s private key. This signature is added to the transaction data along with the user information.
- During the verification phase when mining transactions, we can verify that the requested owner of the post is the same as the owner specified in the transaction data and the message is not modified if incorrect. This can be done using the signature and the public key of the owner who submits the post.
conclude
This tutorial covers the fundamentals of a public blockchain. If you’ve followed that up, you can now deploy a blockchain from scratch and build a simple application that allows users to share information on the blockchain. Hopefully the article will bring you useful and very interesting knowledge and see you in the next article.