In the previous section we learned how to install AWS and use AWS’s built-in user authentication, in this section we will learn some more interesting mechanisms of AWS.
Analytic
Analytic events can be tracked using the Analytics class
1 2 | Analytics <span class="token punctuation">.</span> <span class="token function">record</span> <span class="token punctuation">(</span> <span class="token string">'sale price section viewed'</span> <span class="token punctuation">)</span> |
We can call this event with more detailed properties:
1 2 | Analytics <span class="token punctuation">.</span> <span class="token function">record</span> <span class="token punctuation">(</span> <span class="token string">'sale price item viewed'</span> <span class="token punctuation">,</span> <span class="token punctuation">{</span> itemName <span class="token punctuation">:</span> <span class="token string">'USA Socks'</span> <span class="token punctuation">,</span> timestamp <span class="token punctuation">:</span> <span class="token string">'June 13 2018 4:03pm ET'</span> <span class="token punctuation">}</span> <span class="token punctuation">)</span> |
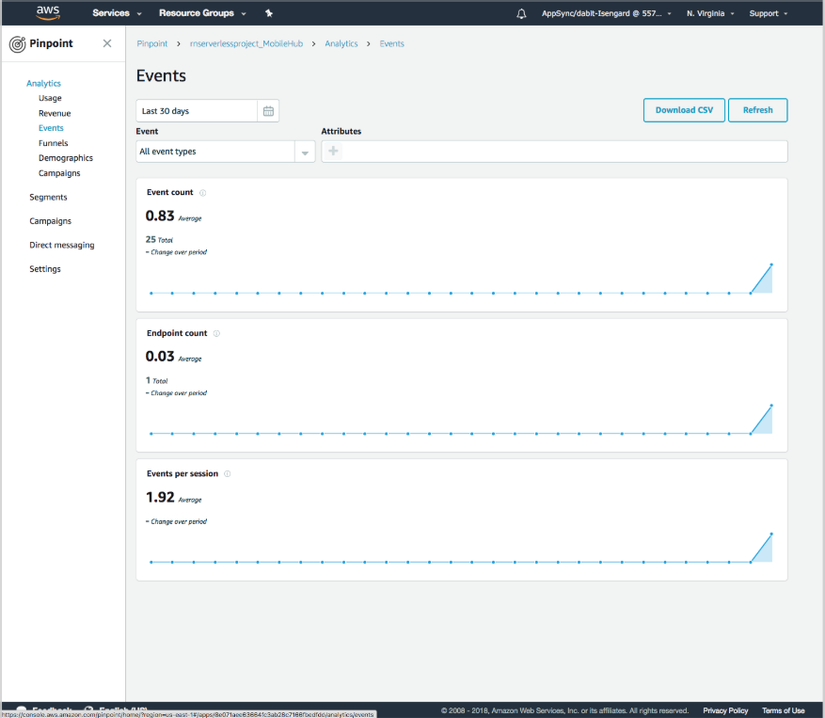
To view analytic data, we can go to the AWS Mobile Hub project in the console, by clicking Resources in the upper right corner and selecting Pinpoint and clicking on your service.
1 2 3 | awsmobile console <span class="token comment">// Ấn vào Resources, sau đó Pinpoint</span> |
Storage
Amplify has a Storage class that allows interaction with React Native to make storing and accessing image, video files easier, and more seamless with Amazon S3.
We can open the storage function in AWS Mobile Hub from the command line:
1 2 3 | awsmobile user <span class="token operator">-</span> files enable awsmobile push |
We can now use the Storage class from within the app:
1 2 | <span class="token keyword">import</span> <span class="token punctuation">{</span> Storage <span class="token punctuation">}</span> <span class="token keyword">from</span> <span class="token string">'aws-amplify'</span> |
We save the data into storage as follows:
1 2 3 4 | Storage <span class="token punctuation">.</span> <span class="token function">put</span> <span class="token punctuation">(</span> <span class="token string">'test.txt'</span> <span class="token punctuation">,</span> <span class="token string">'Hello'</span> <span class="token punctuation">)</span> <span class="token punctuation">.</span> <span class="token function">then</span> <span class="token punctuation">(</span> result <span class="token operator">=></span> console <span class="token punctuation">.</span> <span class="token function">log</span> <span class="token punctuation">(</span> result <span class="token punctuation">)</span> <span class="token punctuation">)</span> <span class="token punctuation">.</span> <span class="token keyword">catch</span> <span class="token punctuation">(</span> err <span class="token operator">=></span> console <span class="token punctuation">.</span> <span class="token function">log</span> <span class="token punctuation">(</span> err <span class="token punctuation">)</span> <span class="token punctuation">)</span> <span class="token punctuation">;</span> |
And read it from storage:
1 2 3 4 | Storage <span class="token punctuation">.</span> <span class="token keyword">get</span> <span class="token punctuation">(</span> <span class="token string">'test.txt'</span> <span class="token punctuation">)</span> <span class="token punctuation">.</span> <span class="token function">then</span> <span class="token punctuation">(</span> result <span class="token operator">=></span> console <span class="token punctuation">.</span> <span class="token function">log</span> <span class="token punctuation">(</span> result <span class="token punctuation">)</span> <span class="token punctuation">)</span> <span class="token punctuation">.</span> <span class="token keyword">catch</span> <span class="token punctuation">(</span> err <span class="token operator">=></span> console <span class="token punctuation">.</span> <span class="token function">log</span> <span class="token punctuation">(</span> err <span class="token punctuation">)</span> <span class="token punctuation">)</span> <span class="token punctuation">;</span> |
We can save media files easily into storage (assuming you have installed react-native-fetch-blob ).
1 2 3 4 5 6 7 8 9 10 11 12 13 14 | <span class="token keyword">import</span> RNFetchBlob <span class="token keyword">from</span> <span class="token string">'react-native-fetch-blob'</span> <span class="token punctuation">;</span> <span class="token function">readFile</span> <span class="token punctuation">(</span> filePath <span class="token punctuation">)</span> <span class="token punctuation">{</span> <span class="token keyword">return</span> RNFetchBlob <span class="token punctuation">.</span> fs <span class="token punctuation">.</span> <span class="token function">readFile</span> <span class="token punctuation">(</span> filePath <span class="token punctuation">,</span> <span class="token string">'base64'</span> <span class="token punctuation">)</span> <span class="token punctuation">.</span> <span class="token function">then</span> <span class="token punctuation">(</span> data <span class="token operator">=></span> <span class="token keyword">new</span> <span class="token class-name">Buffer</span> <span class="token punctuation">(</span> data <span class="token punctuation">,</span> <span class="token string">'base64'</span> <span class="token punctuation">)</span> <span class="token punctuation">)</span> <span class="token punctuation">;</span> <span class="token punctuation">}</span> <span class="token function">readFile</span> <span class="token punctuation">(</span> imagePath <span class="token punctuation">)</span> <span class="token punctuation">.</span> <span class="token function">then</span> <span class="token punctuation">(</span> buffer <span class="token operator">=></span> <span class="token punctuation">{</span> Storage <span class="token punctuation">.</span> <span class="token function">put</span> <span class="token punctuation">(</span> <span class="token string">'MYKEY'</span> <span class="token punctuation">,</span> buffer <span class="token punctuation">,</span> <span class="token punctuation">{</span> contentType <span class="token punctuation">:</span> <span class="token string">'image/jpeg'</span> <span class="token punctuation">}</span> <span class="token punctuation">)</span> <span class="token punctuation">}</span> <span class="token punctuation">)</span> <span class="token punctuation">.</span> <span class="token keyword">catch</span> <span class="token punctuation">(</span> e <span class="token operator">=></span> <span class="token punctuation">{</span> console <span class="token punctuation">.</span> <span class="token function">log</span> <span class="token punctuation">(</span> e <span class="token punctuation">)</span> <span class="token punctuation">;</span> <span class="token punctuation">}</span> <span class="token punctuation">)</span> <span class="token punctuation">;</span> |
To see the S3 bucket, we run the awsmobile console command then click on Resources and under Amazon S3 Buckets click on userfiles .
Lambda Functions
When you hear the word “Serverless”, you will immediately think of the Lambda function. We can install one of them directly and connect it to one of AWS Amplify’s resources, or use the AWS Moible CLI to install it for us. Let’s start using CLI to create the Lambda function.
To add a configured Lambda, run the following command:
1 2 | awsmobile cloud <span class="token operator">-</span> api enable |
awsmobile cloud-api enable will automatically create an API in the API Gateway along with the Lambda function and reconnect them.
Now let’s look inside the project, in awsmobilejs / backend / cloud-api to see a new configuration. There will be a newly created folder named sampleLambda that holds the new Lambda function that has been implemented for us.
The Lambda function was created for us using the AWS Serverless Express package to connect the express server to customized endpoints. These endpoints can be updated in local code and pushed to the server by using awsmobile push .
Update the app.get function in the items directory located in awsmobilejs / backend / cloud-api / sampleLambda :
1 2 3 4 5 6 7 | <span class="token comment">/// rest of file omitted</span> app <span class="token punctuation">.</span> <span class="token keyword">get</span> <span class="token punctuation">(</span> <span class="token string">'/items'</span> <span class="token punctuation">,</span> <span class="token keyword">function</span> <span class="token punctuation">(</span> req <span class="token punctuation">,</span> res <span class="token punctuation">)</span> <span class="token punctuation">{</span> res <span class="token punctuation">.</span> <span class="token function">json</span> <span class="token punctuation">(</span> <span class="token punctuation">{</span> body <span class="token punctuation">:</span> <span class="token string">"HELLO WORLD"</span> <span class="token punctuation">}</span> <span class="token punctuation">)</span> <span class="token punctuation">;</span> <span class="token punctuation">}</span> <span class="token punctuation">)</span> <span class="token punctuation">;</span> |
Then push this API to the AWS Mobile Hub project:
awsmobile push
Now open the AWS Mobile Hub console to get the API name:
awsmobile console
Click on Cloud Logic and copy the API name (my sampleCloudApi is sampleCloudApi ).
Now we will check in the Lambda function. In App.js , create a new componentDidMount function.
1 2 3 4 5 | <span class="token keyword">async</span> <span class="token function">componentDidMount</span> <span class="token punctuation">(</span> <span class="token punctuation">)</span> <span class="token punctuation">{</span> <span class="token keyword">const</span> data <span class="token operator">=</span> <span class="token keyword">await</span> <span class="token constant">API</span> <span class="token punctuation">.</span> <span class="token keyword">get</span> <span class="token punctuation">(</span> <span class="token string">'sampleCloudApi'</span> <span class="token punctuation">,</span> <span class="token string">'/items'</span> <span class="token punctuation">)</span> console <span class="token punctuation">.</span> <span class="token function">log</span> <span class="token punctuation">(</span> <span class="token string">'data: '</span> <span class="token punctuation">,</span> data <span class="token punctuation">)</span> <span class="token punctuation">}</span> |
Manage API and Data tier

AWS Amplify offers a client called GraphQL that can work with any GraphQL API. In our case, let’s look at AWS AppSync, which is managed by the GraphQL service.
With AWS AppSync , you can have a GraphQL API interact with any data source you want. There are many sources of data built underground such as Amazon DynamoDB, AWS Lambda Function or Amazon Elasticsearch, with a Lambd function, you can access any service or database that you want seamlessly with only one API layer. GraphQL is in the shape of your AppSync API.
We will go into an example that is making a Todo app.
To get started, click https://console.aws.amazon.com/appsync and then click on CREATE API .
From here, name this API and choose Custom Schema , then click Create .
Now the API has been created and we will add some information such as URL and Key.
Click on Schema in the left menu as follows:
1 2 3 4 5 6 7 8 9 | type Todo <span class="token punctuation">{</span> id <span class="token punctuation">:</span> <span class="token constant">ID</span> <span class="token operator">!</span> name <span class="token punctuation">:</span> String <span class="token operator">!</span> completed <span class="token punctuation">:</span> Boolean <span class="token operator">!</span> <span class="token punctuation">}</span> type Query <span class="token punctuation">{</span> <span class="token function">fetchTodos</span> <span class="token punctuation">(</span> id <span class="token punctuation">:</span> <span class="token constant">ID</span> <span class="token operator">!</span> <span class="token punctuation">)</span> <span class="token punctuation">:</span> Todo <span class="token punctuation">}</span> |
Click on Save and click on Create Resources . 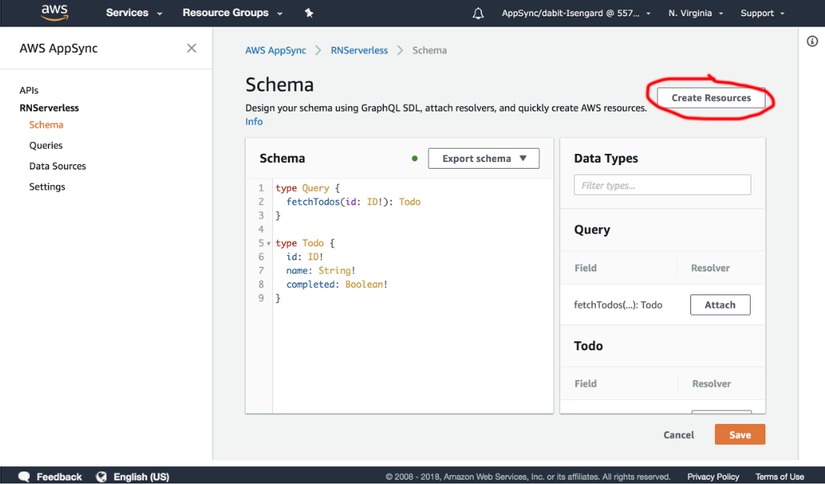
Create Resources will automatically configure a DynamoDB database, adding to the GraphQL Schema for many processes including queries, mutations, subscriptions, and resolvers that connect the GraphQL process to the data source.
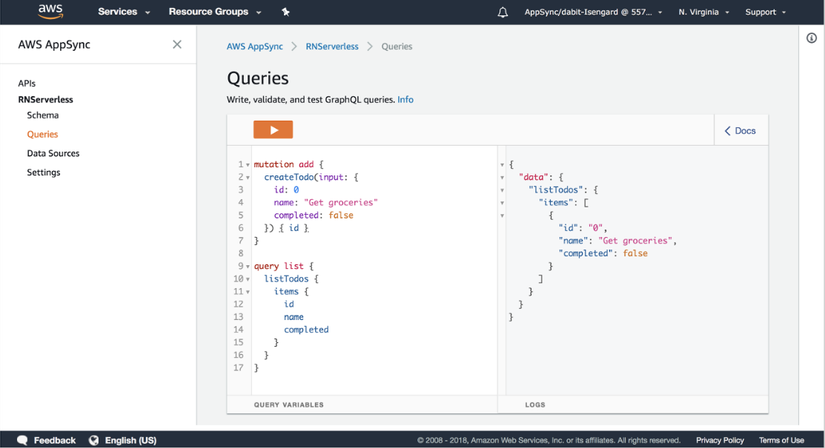
Next, click on Queries in the left menu to test mutation and query to make sure everything works.
1 2 3 4 5 6 7 8 9 10 11 12 13 14 15 16 17 | mutation add { createTodo(input: { name: "Get groceries" completed: false }) { id } } query list { listTodos { items { id name completed } } } |
Now test this API from the client. First, we need to update the configure to identify the AppSync API.
Create a file named appsync-config.js in root:
1 2 3 4 5 6 7 | <span class="token keyword">export</span> <span class="token keyword">default</span> <span class="token punctuation">{</span> <span class="token string">'aws_appsync_graphqlEndpoint'</span> <span class="token punctuation">:</span> <span class="token string">'https://*******.appsync-api.us-east-1.amazonaws.com/graphql'</span> <span class="token punctuation">,</span> <span class="token string">'aws_appsync_region'</span> <span class="token punctuation">:</span> <span class="token string">'us-east-1'</span> <span class="token punctuation">,</span> <span class="token string">'aws_appsync_authenticationType'</span> <span class="token punctuation">:</span> <span class="token string">'API_KEY'</span> <span class="token punctuation">,</span> <span class="token string">'aws_appsync_apiKey'</span> <span class="token punctuation">:</span> <span class="token string">'da2-*************'</span> <span class="token punctuation">,</span> <span class="token punctuation">}</span> |
Next is the Amplify client. Please update it to recognize AppSync’s configuration.
1 2 3 4 5 6 7 8 | <span class="token keyword">import</span> <span class="token punctuation">{</span> AppRegistry <span class="token punctuation">}</span> <span class="token keyword">from</span> <span class="token string">'react-native'</span> <span class="token punctuation">;</span> <span class="token keyword">import</span> App <span class="token keyword">from</span> <span class="token string">'./App'</span> <span class="token punctuation">;</span> <span class="token keyword">import</span> Amplify <span class="token keyword">from</span> <span class="token string">'aws-amplify'</span> <span class="token keyword">import</span> config <span class="token keyword">from</span> <span class="token string">'./aws-exports'</span> <span class="token keyword">import</span> AppSyncConfig <span class="token keyword">from</span> <span class="token string">'./appsync-config'</span> <span class="token comment">// NEW</span> Amplify <span class="token punctuation">.</span> <span class="token function">configure</span> <span class="token punctuation">(</span> <span class="token punctuation">{</span> <span class="token operator">...</span> config <span class="token punctuation">,</span> <span class="token operator">...</span> AppSyncConfig <span class="token punctuation">}</span> <span class="token punctuation">)</span> <span class="token comment">// UPDATED</span> AppRegistry <span class="token punctuation">.</span> <span class="token function">registerComponent</span> <span class="token punctuation">(</span> <span class="token string">'ServerlessProject'</span> <span class="token punctuation">,</span> <span class="token punctuation">(</span> <span class="token punctuation">)</span> <span class="token operator">=></span> App <span class="token punctuation">)</span> <span class="token punctuation">;</span> |
Now we can easily create and execute the process with the following API: In App.js, add the following query:
1 2 3 4 5 6 7 8 9 10 11 12 13 14 15 16 17 18 19 20 21 22 23 24 25 26 27 28 29 30 31 32 33 34 35 36 37 38 39 40 41 42 43 44 45 46 47 48 49 50 51 52 53 54 55 56 57 58 59 60 | <span class="token keyword">import</span> React <span class="token punctuation">,</span> <span class="token punctuation">{</span> Component <span class="token punctuation">}</span> <span class="token keyword">from</span> <span class="token string">'react'</span> <span class="token punctuation">;</span> <span class="token keyword">import</span> <span class="token punctuation">{</span> StyleSheet <span class="token punctuation">,</span> Text <span class="token punctuation">,</span> View <span class="token punctuation">}</span> <span class="token keyword">from</span> <span class="token string">'react-native'</span> <span class="token punctuation">;</span> <span class="token keyword">import</span> <span class="token punctuation">{</span> withAuthenticator <span class="token punctuation">}</span> <span class="token keyword">from</span> <span class="token string">'aws-amplify-react-native'</span> <span class="token keyword">import</span> <span class="token punctuation">{</span> <span class="token constant">API</span> <span class="token punctuation">,</span> graphqlOperation <span class="token punctuation">}</span> <span class="token keyword">from</span> <span class="token string">'aws-amplify'</span> <span class="token keyword">const</span> query <span class="token operator">=</span> <span class="token template-string"><span class="token string">` query list { listTodos { items { id name completed } } } `</span></span> <span class="token keyword">class</span> <span class="token class-name">App</span> <span class="token keyword">extends</span> <span class="token class-name">Component</span> <span class="token punctuation">{</span> state <span class="token operator">=</span> <span class="token punctuation">{</span> todos <span class="token punctuation">:</span> <span class="token punctuation">[</span> <span class="token punctuation">]</span> <span class="token punctuation">}</span> <span class="token keyword">async</span> <span class="token function">componentDidMount</span> <span class="token punctuation">(</span> <span class="token punctuation">)</span> <span class="token punctuation">{</span> <span class="token keyword">const</span> todos <span class="token operator">=</span> <span class="token keyword">await</span> <span class="token constant">API</span> <span class="token punctuation">.</span> <span class="token function">graphql</span> <span class="token punctuation">(</span> <span class="token function">graphqlOperation</span> <span class="token punctuation">(</span> query <span class="token punctuation">)</span> <span class="token punctuation">)</span> <span class="token keyword">this</span> <span class="token punctuation">.</span> <span class="token function">setState</span> <span class="token punctuation">(</span> <span class="token punctuation">{</span> todos <span class="token punctuation">:</span> todos <span class="token punctuation">.</span> data <span class="token punctuation">.</span> listTodos <span class="token punctuation">.</span> items <span class="token punctuation">}</span> <span class="token punctuation">)</span> <span class="token punctuation">}</span> <span class="token function">render</span> <span class="token punctuation">(</span> <span class="token punctuation">)</span> <span class="token punctuation">{</span> <span class="token keyword">return</span> <span class="token punctuation">(</span> <span class="token operator"><</span> View style <span class="token operator">=</span> <span class="token punctuation">{</span> styles <span class="token punctuation">.</span> container <span class="token punctuation">}</span> <span class="token operator">></span> <span class="token operator"><</span> Text style <span class="token operator">=</span> <span class="token punctuation">{</span> styles <span class="token punctuation">.</span> welcome <span class="token punctuation">}</span> <span class="token operator">></span> Todos <span class="token operator"><</span> <span class="token operator">/</span> Text <span class="token operator">></span> <span class="token punctuation">{</span> <span class="token keyword">this</span> <span class="token punctuation">.</span> state <span class="token punctuation">.</span> todos <span class="token punctuation">.</span> <span class="token function">map</span> <span class="token punctuation">(</span> <span class="token punctuation">(</span> todo <span class="token punctuation">,</span> index <span class="token punctuation">)</span> <span class="token operator">=></span> <span class="token punctuation">(</span> <span class="token operator"><</span> Text key <span class="token operator">=</span> <span class="token punctuation">{</span> index <span class="token punctuation">}</span> <span class="token operator">></span> <span class="token punctuation">{</span> todo <span class="token punctuation">.</span> name <span class="token punctuation">}</span> <span class="token operator"><</span> <span class="token operator">/</span> Text <span class="token operator">></span> <span class="token punctuation">)</span> <span class="token punctuation">)</span> <span class="token punctuation">}</span> <span class="token operator"><</span> <span class="token operator">/</span> View <span class="token operator">></span> <span class="token punctuation">)</span> <span class="token punctuation">;</span> <span class="token punctuation">}</span> <span class="token punctuation">}</span> <span class="token keyword">export</span> <span class="token keyword">default</span> <span class="token function">withAuthenticator</span> <span class="token punctuation">(</span> App <span class="token punctuation">)</span> <span class="token keyword">const</span> styles <span class="token operator">=</span> StyleSheet <span class="token punctuation">.</span> <span class="token function">create</span> <span class="token punctuation">(</span> <span class="token punctuation">{</span> container <span class="token punctuation">:</span> <span class="token punctuation">{</span> flex <span class="token punctuation">:</span> <span class="token number">1</span> <span class="token punctuation">,</span> justifyContent <span class="token punctuation">:</span> <span class="token string">'center'</span> <span class="token punctuation">,</span> alignItems <span class="token punctuation">:</span> <span class="token string">'center'</span> <span class="token punctuation">,</span> backgroundColor <span class="token punctuation">:</span> <span class="token string">'#F5FCFF'</span> <span class="token punctuation">,</span> <span class="token punctuation">}</span> <span class="token punctuation">,</span> welcome <span class="token punctuation">:</span> <span class="token punctuation">{</span> fontSize <span class="token punctuation">:</span> <span class="token number">20</span> <span class="token punctuation">,</span> textAlign <span class="token punctuation">:</span> <span class="token string">'center'</span> <span class="token punctuation">,</span> margin <span class="token punctuation">:</span> <span class="token number">10</span> <span class="token punctuation">,</span> <span class="token punctuation">}</span> <span class="token punctuation">}</span> <span class="token punctuation">)</span> <span class="token punctuation">;</span> |
Push Notification
Installing Push Notification takes more time than any other type of service because it requires services from Apple and Google. The specific settings you can see here: iOS , Android .
In our project just as follows:
1 2 3 4 5 6 7 8 9 10 11 12 13 14 15 | <span class="token keyword">import</span> <span class="token punctuation">{</span> PushNotification <span class="token punctuation">}</span> <span class="token keyword">from</span> <span class="token string">'aws-amplify-react-native'</span> <span class="token punctuation">;</span> <span class="token comment">// get the registration token</span> PushNotification <span class="token punctuation">.</span> <span class="token function">onRegister</span> <span class="token punctuation">(</span> <span class="token punctuation">(</span> token <span class="token punctuation">)</span> <span class="token operator">=></span> <span class="token punctuation">{</span> console <span class="token punctuation">.</span> <span class="token function">log</span> <span class="token punctuation">(</span> <span class="token string">'in app registration'</span> <span class="token punctuation">,</span> token <span class="token punctuation">)</span> <span class="token punctuation">;</span> <span class="token punctuation">}</span> <span class="token punctuation">)</span> <span class="token punctuation">;</span> PushNotification <span class="token punctuation">.</span> <span class="token function">onNotification</span> <span class="token punctuation">(</span> <span class="token punctuation">(</span> notification <span class="token punctuation">)</span> <span class="token operator">=></span> <span class="token punctuation">{</span> <span class="token comment">// Note that the notification object structure is different from Android and IOS</span> console <span class="token punctuation">.</span> <span class="token function">log</span> <span class="token punctuation">(</span> <span class="token string">'in app notification'</span> <span class="token punctuation">,</span> notification <span class="token punctuation">)</span> <span class="token punctuation">;</span> <span class="token comment">// required on iOS only (see fetchCompletionHandler docs: https://facebook.github.io/react-native/docs/pushnotificationios.html)</span> notification <span class="token punctuation">.</span> <span class="token function">finish</span> <span class="token punctuation">(</span> PushNotificationIOS <span class="token punctuation">.</span> FetchResult <span class="token punctuation">.</span> NoData <span class="token punctuation">)</span> <span class="token punctuation">;</span> <span class="token punctuation">}</span> <span class="token punctuation">)</span> <span class="token punctuation">;</span> |
Thank you for reading, wish you success.