Node.js is gaining popularity with microservice or REST Api applications because of their extremely fast performance and asynchronousness. Especially very compact and simultaneously handle many requests with super fast response time.
But regardless of the language we need to build a sturdy skeleton that can be followed to easily maintain and develop it. So today we share and build a skeleton for ourselves together.
Construct
Just like other REST API languages we can also build skeletons in the form of MVC pattern. But in this article we only build to the API that only needs to use the controller and models combined with the middleware to handle requests and responses. You can refer to below: 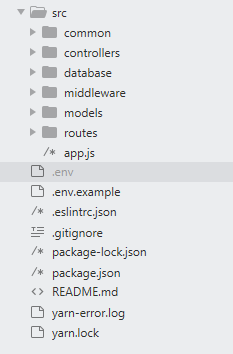
The directory structure includes:
- common : functions, contants common to the whole project.
- controllers : navigational actions that process requests and responses.
- database : contains config files for mongosee, mysql connection, etc …
- middleware : contains rules to handle requests and responses.
- models : contains models and data processing functions.
- routes : contains functions that lack navigation with routes.
Init skeleton
Before building a REST API server with Express , we need to install some basic libraries as follows:
1 2 3 4 5 6 7 8 9 10 11 12 13 14 15 16 | <span class="token string">"dependencies"</span> <span class="token operator">:</span> <span class="token punctuation">{</span> <span class="token string">"bcrypt"</span> <span class="token operator">:</span> <span class="token string">"^5.0.0"</span> <span class="token punctuation">,</span> <span class="token string">"body-parser"</span> <span class="token operator">:</span> <span class="token string">"^1.18.2"</span> <span class="token punctuation">,</span> <span class="token string">"express"</span> <span class="token operator">:</span> <span class="token string">"^4.16.2"</span> <span class="token punctuation">,</span> <span class="token string">"jquery"</span> <span class="token operator">:</span> <span class="token string">"^3.5.1"</span> <span class="token punctuation">,</span> <span class="token string">"jsonwebtoken"</span> <span class="token operator">:</span> <span class="token string">"^8.1.0"</span> <span class="token punctuation">,</span> <span class="token string">"mongoose"</span> <span class="token operator">:</span> <span class="token string">"^5.9.25"</span> <span class="token punctuation">,</span> <span class="token string">"nodemon"</span> <span class="token operator">:</span> <span class="token string">"^2.0.4"</span> <span class="token punctuation">,</span> <span class="token string">"request"</span> <span class="token operator">:</span> <span class="token string">"^2.83.0"</span> <span class="token punctuation">,</span> <span class="token string">"request-promise"</span> <span class="token operator">:</span> <span class="token string">"^4.2.2"</span> <span class="token punctuation">,</span> <span class="token string">"validator"</span> <span class="token operator">:</span> <span class="token string">"^9.1.1"</span> <span class="token punctuation">}</span> <span class="token punctuation">,</span> <span class="token string">"devDependencies"</span> <span class="token operator">:</span> <span class="token punctuation">{</span> <span class="token string">"env-cmd"</span> <span class="token operator">:</span> <span class="token string">"^10.1.0"</span> <span class="token punctuation">}</span> |
Since the database we will be using is mongo, we will need to use mongoose to access the database and will need env-cmd to load the .evn file (environment variables).
Database
mongoose.js contains mongodb connection configuration information.
1 2 3 4 5 6 7 8 9 | <span class="token keyword">let</span> mongoose <span class="token operator">=</span> <span class="token function">require</span> <span class="token punctuation">(</span> <span class="token string">'mongoose'</span> <span class="token punctuation">)</span> <span class="token punctuation">;</span> mongoose <span class="token punctuation">.</span> Promise <span class="token operator">=</span> global <span class="token punctuation">.</span> Promise <span class="token punctuation">;</span> mongoose <span class="token punctuation">.</span> <span class="token function">connect</span> <span class="token punctuation">(</span> process <span class="token punctuation">.</span> env <span class="token punctuation">.</span> <span class="token constant">MONGODB_URL</span> <span class="token punctuation">,</span> <span class="token punctuation">{</span> useNewUrlParser <span class="token operator">:</span> <span class="token boolean">true</span> <span class="token punctuation">,</span> useCreateIndex <span class="token operator">:</span> <span class="token boolean">true</span> <span class="token punctuation">,</span> <span class="token punctuation">}</span> <span class="token punctuation">)</span> <span class="token punctuation">;</span> module <span class="token punctuation">.</span> exports <span class="token operator">=</span> mongoose <span class="token punctuation">;</span> |
Models
use.model.js contains Schema initialization information along with functions. It is completely possible to separate the schema into a separate directory for the code to be clearer and clearer.
1 2 3 4 5 6 7 8 9 10 11 12 13 14 15 16 17 18 19 20 21 22 23 24 25 26 27 28 29 30 31 32 33 34 35 36 37 38 39 40 41 42 43 44 45 46 47 48 49 50 51 52 53 54 55 56 57 58 59 60 61 62 63 64 65 66 67 68 69 70 71 72 73 74 75 76 77 78 79 80 81 82 83 84 85 | <span class="token keyword">const</span> mongoose <span class="token operator">=</span> <span class="token function">require</span> <span class="token punctuation">(</span> <span class="token string">'mongoose'</span> <span class="token punctuation">)</span> <span class="token punctuation">;</span> <span class="token keyword">const</span> bcrypt <span class="token operator">=</span> <span class="token function">require</span> <span class="token punctuation">(</span> <span class="token string">'bcrypt'</span> <span class="token punctuation">)</span> <span class="token punctuation">;</span> <span class="token keyword">const</span> jwt <span class="token operator">=</span> <span class="token function">require</span> <span class="token punctuation">(</span> <span class="token string">'jsonwebtoken'</span> <span class="token punctuation">)</span> <span class="token punctuation">;</span> <span class="token keyword">const</span> UserSchema <span class="token operator">=</span> <span class="token keyword">new</span> <span class="token class-name">mongoose <span class="token punctuation">.</span> Schema</span> <span class="token punctuation">(</span> <span class="token punctuation">{</span> username <span class="token operator">:</span> <span class="token punctuation">{</span> type <span class="token operator">:</span> String <span class="token punctuation">,</span> lowercase <span class="token operator">:</span> <span class="token boolean">true</span> <span class="token punctuation">,</span> required <span class="token operator">:</span> <span class="token punctuation">[</span> <span class="token boolean">true</span> <span class="token punctuation">,</span> <span class="token string">'can't be blank'</span> <span class="token punctuation">]</span> <span class="token punctuation">,</span> match <span class="token operator">:</span> <span class="token punctuation">[</span> <span class="token regex">/^[a-zA-Z0-9]+$/</span> <span class="token punctuation">,</span> <span class="token string">'is invalid'</span> <span class="token punctuation">]</span> <span class="token punctuation">,</span> index <span class="token operator">:</span> <span class="token boolean">true</span> <span class="token punctuation">}</span> <span class="token punctuation">,</span> email <span class="token operator">:</span> <span class="token punctuation">{</span> type <span class="token operator">:</span> String <span class="token punctuation">,</span> lowercase <span class="token operator">:</span> <span class="token boolean">true</span> <span class="token punctuation">,</span> required <span class="token operator">:</span> <span class="token punctuation">[</span> <span class="token boolean">true</span> <span class="token punctuation">,</span> <span class="token string">'can't be blank'</span> <span class="token punctuation">]</span> <span class="token punctuation">,</span> match <span class="token operator">:</span> <span class="token punctuation">[</span> <span class="token regex">/ <a class="__cf_email__" href="/cdn-cgi/l/email-protection">[email protected]</a> S+.S+/</span> <span class="token punctuation">,</span> <span class="token string">'is invalid'</span> <span class="token punctuation">]</span> <span class="token punctuation">,</span> index <span class="token operator">:</span> <span class="token boolean">true</span> <span class="token punctuation">}</span> <span class="token punctuation">,</span> password <span class="token operator">:</span> <span class="token punctuation">{</span> type <span class="token operator">:</span> String <span class="token punctuation">,</span> required <span class="token operator">:</span> <span class="token boolean">true</span> <span class="token punctuation">,</span> minLength <span class="token operator">:</span> <span class="token number">7</span> <span class="token punctuation">}</span> <span class="token punctuation">,</span> tokens <span class="token operator">:</span> <span class="token punctuation">[</span> <span class="token punctuation">{</span> token <span class="token operator">:</span> <span class="token punctuation">{</span> type <span class="token operator">:</span> String <span class="token punctuation">,</span> required <span class="token operator">:</span> <span class="token boolean">true</span> <span class="token punctuation">}</span> <span class="token punctuation">}</span> <span class="token punctuation">]</span> <span class="token punctuation">}</span> <span class="token punctuation">,</span> <span class="token punctuation">{</span> timestamps <span class="token operator">:</span> <span class="token boolean">true</span> <span class="token punctuation">}</span> <span class="token punctuation">)</span> <span class="token punctuation">;</span> UserSchema <span class="token punctuation">.</span> <span class="token function">pre</span> <span class="token punctuation">(</span> <span class="token string">'save'</span> <span class="token punctuation">,</span> <span class="token keyword">async</span> <span class="token keyword">function</span> <span class="token punctuation">(</span> <span class="token parameter">next</span> <span class="token punctuation">)</span> <span class="token punctuation">{</span> <span class="token keyword">const</span> user <span class="token operator">=</span> <span class="token keyword">this</span> <span class="token punctuation">;</span> <span class="token keyword">if</span> <span class="token punctuation">(</span> user <span class="token punctuation">.</span> <span class="token function">isModified</span> <span class="token punctuation">(</span> <span class="token string">'password'</span> <span class="token punctuation">)</span> <span class="token punctuation">)</span> <span class="token punctuation">{</span> user <span class="token punctuation">.</span> password <span class="token operator">=</span> <span class="token keyword">await</span> bcrypt <span class="token punctuation">.</span> <span class="token function">hash</span> <span class="token punctuation">(</span> user <span class="token punctuation">.</span> password <span class="token punctuation">,</span> <span class="token number">8</span> <span class="token punctuation">)</span> <span class="token punctuation">;</span> <span class="token punctuation">}</span> <span class="token function">next</span> <span class="token punctuation">(</span> <span class="token punctuation">)</span> <span class="token punctuation">;</span> <span class="token punctuation">}</span> <span class="token punctuation">)</span> <span class="token punctuation">;</span> UserSchema <span class="token punctuation">.</span> methods <span class="token punctuation">.</span> <span class="token function-variable function">toAuthJSON</span> <span class="token operator">=</span> <span class="token keyword">function</span> <span class="token punctuation">(</span> <span class="token punctuation">)</span> <span class="token punctuation">{</span> <span class="token keyword">return</span> <span class="token punctuation">{</span> username <span class="token operator">:</span> <span class="token keyword">this</span> <span class="token punctuation">.</span> username <span class="token punctuation">,</span> email <span class="token operator">:</span> <span class="token keyword">this</span> <span class="token punctuation">.</span> email <span class="token punctuation">,</span> token <span class="token operator">:</span> <span class="token keyword">this</span> <span class="token punctuation">.</span> <span class="token function">generateAuthToken</span> <span class="token punctuation">(</span> <span class="token punctuation">)</span> <span class="token punctuation">}</span> <span class="token punctuation">;</span> <span class="token punctuation">}</span> <span class="token punctuation">;</span> UserSchema <span class="token punctuation">.</span> methods <span class="token punctuation">.</span> <span class="token function-variable function">generateAuthToken</span> <span class="token operator">=</span> <span class="token keyword">function</span> <span class="token punctuation">(</span> <span class="token punctuation">)</span> <span class="token punctuation">{</span> <span class="token keyword">const</span> token <span class="token operator">=</span> jwt <span class="token punctuation">.</span> <span class="token function">sign</span> <span class="token punctuation">(</span> <span class="token punctuation">{</span> _id <span class="token operator">:</span> <span class="token keyword">this</span> <span class="token punctuation">.</span> _id <span class="token punctuation">,</span> username <span class="token operator">:</span> <span class="token keyword">this</span> <span class="token punctuation">.</span> username <span class="token punctuation">}</span> <span class="token punctuation">,</span> process <span class="token punctuation">.</span> env <span class="token punctuation">.</span> <span class="token constant">JWT_KEY</span> <span class="token punctuation">)</span> <span class="token punctuation">;</span> <span class="token keyword">this</span> <span class="token punctuation">.</span> tokens <span class="token operator">=</span> <span class="token keyword">this</span> <span class="token punctuation">.</span> tokens <span class="token punctuation">.</span> <span class="token function">concat</span> <span class="token punctuation">(</span> <span class="token punctuation">{</span> token <span class="token punctuation">}</span> <span class="token punctuation">)</span> <span class="token punctuation">;</span> <span class="token keyword">this</span> <span class="token punctuation">.</span> <span class="token function">save</span> <span class="token punctuation">(</span> <span class="token punctuation">)</span> <span class="token punctuation">;</span> <span class="token keyword">return</span> token <span class="token punctuation">;</span> <span class="token punctuation">}</span> <span class="token punctuation">;</span> UserSchema <span class="token punctuation">.</span> statics <span class="token punctuation">.</span> <span class="token function-variable function">findByCredentials</span> <span class="token operator">=</span> <span class="token keyword">async</span> <span class="token punctuation">(</span> <span class="token parameter">email <span class="token punctuation">,</span> password</span> <span class="token punctuation">)</span> <span class="token operator">=></span> <span class="token punctuation">{</span> <span class="token keyword">const</span> user <span class="token operator">=</span> <span class="token keyword">await</span> User <span class="token punctuation">.</span> <span class="token function">findOne</span> <span class="token punctuation">(</span> <span class="token punctuation">{</span> email <span class="token punctuation">}</span> <span class="token punctuation">)</span> <span class="token punctuation">;</span> <span class="token keyword">if</span> <span class="token punctuation">(</span> <span class="token operator">!</span> user <span class="token punctuation">)</span> <span class="token punctuation">{</span> <span class="token keyword">throw</span> <span class="token keyword">new</span> <span class="token class-name">Error</span> <span class="token punctuation">(</span> <span class="token punctuation">{</span> error <span class="token operator">:</span> <span class="token string">'Invalid login credentials'</span> <span class="token punctuation">}</span> <span class="token punctuation">)</span> <span class="token punctuation">;</span> <span class="token punctuation">}</span> <span class="token keyword">const</span> isPasswordMatch <span class="token operator">=</span> <span class="token keyword">await</span> bcrypt <span class="token punctuation">.</span> <span class="token function">compare</span> <span class="token punctuation">(</span> password <span class="token punctuation">,</span> user <span class="token punctuation">.</span> password <span class="token punctuation">)</span> <span class="token punctuation">;</span> <span class="token keyword">if</span> <span class="token punctuation">(</span> <span class="token operator">!</span> isPasswordMatch <span class="token punctuation">)</span> <span class="token punctuation">{</span> <span class="token keyword">throw</span> <span class="token keyword">new</span> <span class="token class-name">Error</span> <span class="token punctuation">(</span> <span class="token punctuation">{</span> error <span class="token operator">:</span> <span class="token string">'Invalid login credentials'</span> <span class="token punctuation">}</span> <span class="token punctuation">)</span> <span class="token punctuation">;</span> <span class="token punctuation">}</span> <span class="token keyword">return</span> user <span class="token punctuation">;</span> <span class="token punctuation">}</span> <span class="token punctuation">;</span> <span class="token keyword">const</span> User <span class="token operator">=</span> mongoose <span class="token punctuation">.</span> <span class="token function">model</span> <span class="token punctuation">(</span> <span class="token string">'User'</span> <span class="token punctuation">,</span> UserSchema <span class="token punctuation">)</span> <span class="token punctuation">;</span> module <span class="token punctuation">.</span> exports <span class="token operator">=</span> User <span class="token punctuation">;</span> |
Middleware
auth.middleware.js for security we need to verify the request again before allowing authorization to continue interacting by checking the token with the Authorization header.
1 2 3 4 5 6 7 8 9 10 11 12 13 14 15 16 17 18 19 20 21 22 23 24 | <span class="token keyword">const</span> User <span class="token operator">=</span> <span class="token function">require</span> <span class="token punctuation">(</span> <span class="token string">'../models/user.model'</span> <span class="token punctuation">)</span> <span class="token punctuation">;</span> <span class="token keyword">const</span> jwt <span class="token operator">=</span> <span class="token function">require</span> <span class="token punctuation">(</span> <span class="token string">'jsonwebtoken'</span> <span class="token punctuation">)</span> <span class="token punctuation">;</span> <span class="token keyword">const</span> <span class="token function-variable function">auth</span> <span class="token operator">=</span> <span class="token keyword">async</span> <span class="token punctuation">(</span> <span class="token parameter">req <span class="token punctuation">,</span> res <span class="token punctuation">,</span> next</span> <span class="token punctuation">)</span> <span class="token operator">=></span> <span class="token punctuation">{</span> <span class="token keyword">const</span> token <span class="token operator">=</span> req <span class="token punctuation">.</span> <span class="token function">header</span> <span class="token punctuation">(</span> <span class="token string">'Authorization'</span> <span class="token punctuation">)</span> <span class="token punctuation">.</span> <span class="token function">replace</span> <span class="token punctuation">(</span> <span class="token string">'Bearer '</span> <span class="token punctuation">,</span> <span class="token string">''</span> <span class="token punctuation">)</span> <span class="token punctuation">;</span> <span class="token keyword">const</span> data <span class="token operator">=</span> jwt <span class="token punctuation">.</span> <span class="token function">verify</span> <span class="token punctuation">(</span> token <span class="token punctuation">,</span> process <span class="token punctuation">.</span> env <span class="token punctuation">.</span> <span class="token constant">JWT_KEY</span> <span class="token punctuation">)</span> <span class="token punctuation">;</span> <span class="token keyword">try</span> <span class="token punctuation">{</span> <span class="token keyword">const</span> user <span class="token operator">=</span> <span class="token keyword">await</span> User <span class="token punctuation">.</span> <span class="token function">findOne</span> <span class="token punctuation">(</span> <span class="token punctuation">{</span> _id <span class="token operator">:</span> data <span class="token punctuation">.</span> _id <span class="token punctuation">,</span> <span class="token string">'tokens.token'</span> <span class="token operator">:</span> token <span class="token punctuation">}</span> <span class="token punctuation">)</span> <span class="token punctuation">;</span> <span class="token keyword">if</span> <span class="token punctuation">(</span> <span class="token operator">!</span> user <span class="token punctuation">)</span> <span class="token punctuation">{</span> <span class="token keyword">throw</span> <span class="token keyword">new</span> <span class="token class-name">Error</span> <span class="token punctuation">(</span> <span class="token punctuation">)</span> <span class="token punctuation">;</span> <span class="token punctuation">}</span> req <span class="token punctuation">.</span> user <span class="token operator">=</span> user <span class="token punctuation">;</span> req <span class="token punctuation">.</span> token <span class="token operator">=</span> token <span class="token punctuation">;</span> <span class="token function">next</span> <span class="token punctuation">(</span> <span class="token punctuation">)</span> <span class="token punctuation">;</span> <span class="token punctuation">}</span> <span class="token keyword">catch</span> <span class="token punctuation">(</span> error <span class="token punctuation">)</span> <span class="token punctuation">{</span> res <span class="token punctuation">.</span> <span class="token function">status</span> <span class="token punctuation">(</span> <span class="token number">401</span> <span class="token punctuation">)</span> <span class="token punctuation">.</span> <span class="token function">send</span> <span class="token punctuation">(</span> <span class="token punctuation">{</span> error <span class="token operator">:</span> <span class="token string">'Not authorized to access this resource'</span> <span class="token punctuation">}</span> <span class="token punctuation">)</span> <span class="token punctuation">;</span> <span class="token punctuation">}</span> <span class="token punctuation">}</span> <span class="token punctuation">;</span> module <span class="token punctuation">.</span> exports <span class="token operator">=</span> auth <span class="token punctuation">;</span> |
Routes
index.js will play a role in loading the entire route configuration
1 2 3 4 5 6 7 8 | <span class="token keyword">const</span> express <span class="token operator">=</span> <span class="token function">require</span> <span class="token punctuation">(</span> <span class="token string">'express'</span> <span class="token punctuation">)</span> <span class="token punctuation">;</span> <span class="token keyword">const</span> authRoute <span class="token operator">=</span> <span class="token function">require</span> <span class="token punctuation">(</span> <span class="token string">'./auth.routes'</span> <span class="token punctuation">)</span> <span class="token punctuation">;</span> <span class="token keyword">const</span> router <span class="token operator">=</span> express <span class="token punctuation">.</span> <span class="token function">Router</span> <span class="token punctuation">(</span> <span class="token punctuation">)</span> <span class="token punctuation">;</span> router <span class="token punctuation">.</span> <span class="token function">use</span> <span class="token punctuation">(</span> <span class="token string">'/'</span> <span class="token punctuation">,</span> authRoute <span class="token punctuation">)</span> <span class="token punctuation">;</span> module <span class="token punctuation">.</span> exports <span class="token operator">=</span> router <span class="token punctuation">;</span> |
auth.route.js will set up handler methods and direct them to controller – action. We will split into two types of routes, public and private, by setting the middleware for them.
1 2 3 4 5 6 7 8 9 10 11 12 13 14 | <span class="token keyword">let</span> router <span class="token operator">=</span> <span class="token function">require</span> <span class="token punctuation">(</span> <span class="token string">'express'</span> <span class="token punctuation">)</span> <span class="token punctuation">.</span> <span class="token function">Router</span> <span class="token punctuation">(</span> <span class="token punctuation">)</span> <span class="token punctuation">;</span> <span class="token keyword">const</span> AuthController <span class="token operator">=</span> <span class="token function">require</span> <span class="token punctuation">(</span> <span class="token string">'../controllers/auth.controller'</span> <span class="token punctuation">)</span> <span class="token punctuation">;</span> <span class="token keyword">const</span> auth <span class="token operator">=</span> <span class="token function">require</span> <span class="token punctuation">(</span> <span class="token string">'../middleware/auth.middleware'</span> <span class="token punctuation">)</span> <span class="token punctuation">;</span> <span class="token comment">//public</span> router <span class="token punctuation">.</span> <span class="token function">post</span> <span class="token punctuation">(</span> <span class="token string">'/login'</span> <span class="token punctuation">,</span> AuthController <span class="token punctuation">.</span> login <span class="token punctuation">)</span> <span class="token punctuation">;</span> router <span class="token punctuation">.</span> <span class="token function">post</span> <span class="token punctuation">(</span> <span class="token string">'/signup'</span> <span class="token punctuation">,</span> UserController <span class="token punctuation">.</span> signup <span class="token punctuation">)</span> <span class="token punctuation">;</span> <span class="token comment">//private</span> router <span class="token punctuation">.</span> <span class="token function">post</span> <span class="token punctuation">(</span> <span class="token string">'/logout'</span> <span class="token punctuation">,</span> auth <span class="token punctuation">,</span> AuthController <span class="token punctuation">.</span> logout <span class="token punctuation">)</span> <span class="token punctuation">;</span> router <span class="token punctuation">.</span> <span class="token function">post</span> <span class="token punctuation">(</span> <span class="token string">'/logout-all'</span> <span class="token punctuation">,</span> auth <span class="token punctuation">,</span> AuthController <span class="token punctuation">.</span> logoutAll <span class="token punctuation">)</span> <span class="token punctuation">;</span> module <span class="token punctuation">.</span> exports <span class="token operator">=</span> router <span class="token punctuation">;</span> |
Controllers
Here, we need to create functions corresponding to the actions as declared at auth.route.js . Actions play a role in navigating and processing the returned data before the response comes back.
auth.controller.js
1 2 3 4 5 6 7 8 9 10 11 12 13 14 15 16 17 18 19 20 21 22 23 24 25 26 27 28 29 30 31 32 33 34 35 36 37 38 39 40 41 42 43 44 45 46 47 48 49 50 51 52 53 54 55 56 57 58 59 60 61 62 63 64 65 | <span class="token keyword">const</span> User <span class="token operator">=</span> <span class="token function">require</span> <span class="token punctuation">(</span> <span class="token string">'../models/user.model'</span> <span class="token punctuation">)</span> <span class="token punctuation">;</span> <span class="token keyword">function</span> <span class="token function">AuthController</span> <span class="token punctuation">(</span> <span class="token punctuation">)</span> <span class="token punctuation">{</span> <span class="token keyword">this</span> <span class="token punctuation">.</span> <span class="token function-variable function">signup</span> <span class="token operator">=</span> <span class="token punctuation">(</span> <span class="token parameter">req <span class="token punctuation">,</span> res</span> <span class="token punctuation">)</span> <span class="token operator">=></span> <span class="token punctuation">{</span> <span class="token keyword">try</span> <span class="token punctuation">{</span> <span class="token keyword">let</span> user <span class="token operator">=</span> <span class="token keyword">new</span> <span class="token class-name">User</span> <span class="token punctuation">(</span> <span class="token punctuation">)</span> <span class="token punctuation">;</span> user <span class="token punctuation">.</span> username <span class="token operator">=</span> req <span class="token punctuation">.</span> body <span class="token punctuation">.</span> username <span class="token punctuation">;</span> user <span class="token punctuation">.</span> email <span class="token operator">=</span> req <span class="token punctuation">.</span> body <span class="token punctuation">.</span> email <span class="token punctuation">;</span> user <span class="token punctuation">.</span> password <span class="token operator">=</span> req <span class="token punctuation">.</span> body <span class="token punctuation">.</span> password <span class="token punctuation">;</span> user <span class="token punctuation">.</span> <span class="token function">save</span> <span class="token punctuation">(</span> <span class="token punctuation">)</span> <span class="token punctuation">.</span> <span class="token function">then</span> <span class="token punctuation">(</span> <span class="token keyword">function</span> <span class="token punctuation">(</span> <span class="token punctuation">)</span> <span class="token punctuation">{</span> <span class="token keyword">return</span> res <span class="token punctuation">.</span> <span class="token function">json</span> <span class="token punctuation">(</span> <span class="token punctuation">{</span> user <span class="token operator">:</span> user <span class="token punctuation">.</span> <span class="token function">toAuthJSON</span> <span class="token punctuation">(</span> <span class="token punctuation">)</span> <span class="token punctuation">}</span> <span class="token punctuation">)</span> <span class="token punctuation">;</span> <span class="token punctuation">}</span> <span class="token punctuation">)</span> <span class="token punctuation">.</span> <span class="token function">catch</span> <span class="token punctuation">(</span> <span class="token keyword">function</span> <span class="token punctuation">(</span> <span class="token parameter">error</span> <span class="token punctuation">)</span> <span class="token punctuation">{</span> <span class="token keyword">return</span> res <span class="token punctuation">.</span> <span class="token function">status</span> <span class="token punctuation">(</span> <span class="token number">400</span> <span class="token punctuation">)</span> <span class="token punctuation">.</span> <span class="token function">json</span> <span class="token punctuation">(</span> error <span class="token punctuation">)</span> <span class="token punctuation">;</span> <span class="token punctuation">}</span> <span class="token punctuation">)</span> <span class="token punctuation">;</span> <span class="token punctuation">}</span> <span class="token keyword">catch</span> <span class="token punctuation">(</span> error <span class="token punctuation">)</span> <span class="token punctuation">{</span> <span class="token keyword">return</span> res <span class="token punctuation">.</span> <span class="token function">status</span> <span class="token punctuation">(</span> <span class="token number">400</span> <span class="token punctuation">)</span> <span class="token punctuation">.</span> <span class="token function">json</span> <span class="token punctuation">(</span> error <span class="token punctuation">)</span> <span class="token punctuation">;</span> <span class="token punctuation">}</span> <span class="token punctuation">}</span> <span class="token punctuation">;</span> <span class="token keyword">this</span> <span class="token punctuation">.</span> <span class="token function-variable function">login</span> <span class="token operator">=</span> <span class="token keyword">async</span> <span class="token punctuation">(</span> <span class="token parameter">req <span class="token punctuation">,</span> res</span> <span class="token punctuation">)</span> <span class="token operator">=></span> <span class="token punctuation">{</span> <span class="token keyword">try</span> <span class="token punctuation">{</span> <span class="token keyword">const</span> <span class="token punctuation">{</span> email <span class="token punctuation">,</span> password <span class="token punctuation">}</span> <span class="token operator">=</span> req <span class="token punctuation">.</span> body <span class="token punctuation">;</span> <span class="token keyword">const</span> user <span class="token operator">=</span> <span class="token keyword">await</span> User <span class="token punctuation">.</span> <span class="token function">findByCredentials</span> <span class="token punctuation">(</span> email <span class="token punctuation">,</span> password <span class="token punctuation">)</span> <span class="token punctuation">;</span> <span class="token keyword">if</span> <span class="token punctuation">(</span> <span class="token operator">!</span> user <span class="token punctuation">)</span> <span class="token punctuation">{</span> <span class="token keyword">return</span> res <span class="token punctuation">.</span> <span class="token function">status</span> <span class="token punctuation">(</span> <span class="token number">401</span> <span class="token punctuation">)</span> <span class="token punctuation">.</span> <span class="token function">send</span> <span class="token punctuation">(</span> <span class="token punctuation">{</span> error <span class="token operator">:</span> <span class="token string">'Login failed! Check authentication credentials'</span> <span class="token punctuation">}</span> <span class="token punctuation">)</span> <span class="token punctuation">;</span> <span class="token punctuation">}</span> res <span class="token punctuation">.</span> <span class="token function">send</span> <span class="token punctuation">(</span> <span class="token punctuation">{</span> user <span class="token operator">:</span> user <span class="token punctuation">.</span> <span class="token function">toAuthJSON</span> <span class="token punctuation">(</span> <span class="token punctuation">)</span> <span class="token punctuation">}</span> <span class="token punctuation">)</span> <span class="token punctuation">;</span> <span class="token punctuation">}</span> <span class="token keyword">catch</span> <span class="token punctuation">(</span> error <span class="token punctuation">)</span> <span class="token punctuation">{</span> res <span class="token punctuation">.</span> <span class="token function">status</span> <span class="token punctuation">(</span> <span class="token number">400</span> <span class="token punctuation">)</span> <span class="token punctuation">.</span> <span class="token function">send</span> <span class="token punctuation">(</span> <span class="token punctuation">{</span> error <span class="token operator">:</span> <span class="token string">'Login failed'</span> <span class="token punctuation">}</span> <span class="token punctuation">)</span> <span class="token punctuation">;</span> <span class="token punctuation">}</span> <span class="token punctuation">}</span> <span class="token punctuation">;</span> <span class="token keyword">this</span> <span class="token punctuation">.</span> <span class="token function-variable function">logout</span> <span class="token operator">=</span> <span class="token keyword">async</span> <span class="token punctuation">(</span> <span class="token parameter">req <span class="token punctuation">,</span> res</span> <span class="token punctuation">)</span> <span class="token operator">=></span> <span class="token punctuation">{</span> <span class="token keyword">try</span> <span class="token punctuation">{</span> req <span class="token punctuation">.</span> user <span class="token punctuation">.</span> tokens <span class="token operator">=</span> req <span class="token punctuation">.</span> user <span class="token punctuation">.</span> tokens <span class="token punctuation">.</span> <span class="token function">filter</span> <span class="token punctuation">(</span> <span class="token punctuation">(</span> <span class="token parameter">token</span> <span class="token punctuation">)</span> <span class="token operator">=></span> <span class="token punctuation">{</span> <span class="token keyword">return</span> token <span class="token punctuation">.</span> token <span class="token operator">!=</span> req <span class="token punctuation">.</span> token <span class="token punctuation">;</span> <span class="token punctuation">}</span> <span class="token punctuation">)</span> <span class="token punctuation">;</span> <span class="token keyword">await</span> req <span class="token punctuation">.</span> user <span class="token punctuation">.</span> <span class="token function">save</span> <span class="token punctuation">(</span> <span class="token punctuation">)</span> <span class="token punctuation">;</span> res <span class="token punctuation">.</span> <span class="token function">send</span> <span class="token punctuation">(</span> <span class="token punctuation">{</span> <span class="token string">'message'</span> <span class="token operator">:</span> <span class="token string">'Logout Done!'</span> <span class="token punctuation">}</span> <span class="token punctuation">)</span> <span class="token punctuation">;</span> <span class="token punctuation">}</span> <span class="token keyword">catch</span> <span class="token punctuation">(</span> error <span class="token punctuation">)</span> <span class="token punctuation">{</span> res <span class="token punctuation">.</span> <span class="token function">status</span> <span class="token punctuation">(</span> <span class="token number">500</span> <span class="token punctuation">)</span> <span class="token punctuation">.</span> <span class="token function">send</span> <span class="token punctuation">(</span> error <span class="token punctuation">)</span> <span class="token punctuation">;</span> <span class="token punctuation">}</span> <span class="token punctuation">}</span> <span class="token punctuation">;</span> <span class="token keyword">this</span> <span class="token punctuation">.</span> <span class="token function-variable function">logoutAll</span> <span class="token operator">=</span> <span class="token keyword">async</span> <span class="token punctuation">(</span> <span class="token parameter">req <span class="token punctuation">,</span> res</span> <span class="token punctuation">)</span> <span class="token operator">=></span> <span class="token punctuation">{</span> <span class="token keyword">try</span> <span class="token punctuation">{</span> req <span class="token punctuation">.</span> user <span class="token punctuation">.</span> tokens <span class="token punctuation">.</span> <span class="token function">splice</span> <span class="token punctuation">(</span> <span class="token number">0</span> <span class="token punctuation">,</span> req <span class="token punctuation">.</span> user <span class="token punctuation">.</span> tokens <span class="token punctuation">.</span> length <span class="token punctuation">)</span> <span class="token punctuation">;</span> <span class="token keyword">await</span> req <span class="token punctuation">.</span> user <span class="token punctuation">.</span> <span class="token function">save</span> <span class="token punctuation">(</span> <span class="token punctuation">)</span> <span class="token punctuation">;</span> res <span class="token punctuation">.</span> <span class="token function">send</span> <span class="token punctuation">(</span> <span class="token punctuation">)</span> <span class="token punctuation">;</span> <span class="token punctuation">}</span> <span class="token keyword">catch</span> <span class="token punctuation">(</span> error <span class="token punctuation">)</span> <span class="token punctuation">{</span> res <span class="token punctuation">.</span> <span class="token function">status</span> <span class="token punctuation">(</span> <span class="token number">500</span> <span class="token punctuation">)</span> <span class="token punctuation">.</span> <span class="token function">send</span> <span class="token punctuation">(</span> error <span class="token punctuation">)</span> <span class="token punctuation">;</span> <span class="token punctuation">}</span> <span class="token punctuation">}</span> <span class="token punctuation">;</span> <span class="token keyword">return</span> <span class="token keyword">this</span> <span class="token punctuation">;</span> <span class="token punctuation">}</span> module <span class="token punctuation">.</span> exports <span class="token operator">=</span> <span class="token function">AuthController</span> <span class="token punctuation">(</span> <span class="token punctuation">)</span> <span class="token punctuation">;</span> |
Create server run app
Create app.js with the following content:
1 2 3 4 5 6 7 8 9 10 11 12 13 14 15 | <span class="token keyword">const</span> express <span class="token operator">=</span> <span class="token function">require</span> <span class="token punctuation">(</span> <span class="token string">'express'</span> <span class="token punctuation">)</span> <span class="token punctuation">;</span> <span class="token keyword">const</span> port <span class="token operator">=</span> process <span class="token punctuation">.</span> env <span class="token punctuation">.</span> <span class="token constant">PORT</span> <span class="token operator">||</span> <span class="token number">3000</span> <span class="token punctuation">;</span> <span class="token keyword">const</span> app <span class="token operator">=</span> <span class="token function">express</span> <span class="token punctuation">(</span> <span class="token punctuation">)</span> <span class="token punctuation">;</span> <span class="token keyword">const</span> route <span class="token operator">=</span> <span class="token function">require</span> <span class="token punctuation">(</span> <span class="token string">'./routes/index'</span> <span class="token punctuation">)</span> <span class="token punctuation">;</span> <span class="token keyword">const</span> bodyParser <span class="token operator">=</span> <span class="token function">require</span> <span class="token punctuation">(</span> <span class="token string">'body-parser'</span> <span class="token punctuation">)</span> <span class="token punctuation">;</span> <span class="token function">require</span> <span class="token punctuation">(</span> <span class="token string">'./database/mongoose'</span> <span class="token punctuation">)</span> <span class="token punctuation">;</span> app <span class="token punctuation">.</span> <span class="token function">use</span> <span class="token punctuation">(</span> bodyParser <span class="token punctuation">.</span> <span class="token function">json</span> <span class="token punctuation">(</span> <span class="token punctuation">)</span> <span class="token punctuation">)</span> <span class="token punctuation">;</span> app <span class="token punctuation">.</span> <span class="token function">use</span> <span class="token punctuation">(</span> express <span class="token punctuation">.</span> <span class="token function">json</span> <span class="token punctuation">(</span> <span class="token punctuation">)</span> <span class="token punctuation">)</span> <span class="token punctuation">;</span> app <span class="token punctuation">.</span> <span class="token function">use</span> <span class="token punctuation">(</span> <span class="token string">'/'</span> <span class="token punctuation">,</span> route <span class="token punctuation">)</span> <span class="token punctuation">;</span> app <span class="token punctuation">.</span> <span class="token function">listen</span> <span class="token punctuation">(</span> port <span class="token punctuation">,</span> <span class="token punctuation">(</span> <span class="token punctuation">)</span> <span class="token operator">=></span> <span class="token punctuation">{</span> console <span class="token punctuation">.</span> <span class="token function">log</span> <span class="token punctuation">(</span> <span class="token string">'Server listening on '</span> <span class="token operator">+</span> port <span class="token punctuation">)</span> <span class="token punctuation">;</span> <span class="token punctuation">}</span> <span class="token punctuation">)</span> <span class="token punctuation">;</span> |
Since we need to process the data in json format, we will need a json parser with bodyParser . Then load the entire route with require('./routes/index');
Before testing, we need to reconfigure package.json so that the application can load environment variables with:
1 2 3 4 5 | <span class="token string">"scripts"</span> <span class="token operator">:</span> <span class="token punctuation">{</span> <span class="token string">"start"</span> <span class="token operator">:</span> <span class="token string">"env-cmd -f ./.env node src/app.js"</span> <span class="token punctuation">,</span> <span class="token string">"dev"</span> <span class="token operator">:</span> <span class="token string">"env-cmd -f ./.env nodemon --exec "node src/app.js""</span> <span class="token punctuation">}</span> |
nodemon will be used as a tool to automatically reload the app after the successful save.
Next, we try to run the skeleton test. http: // localhost: 3000 /
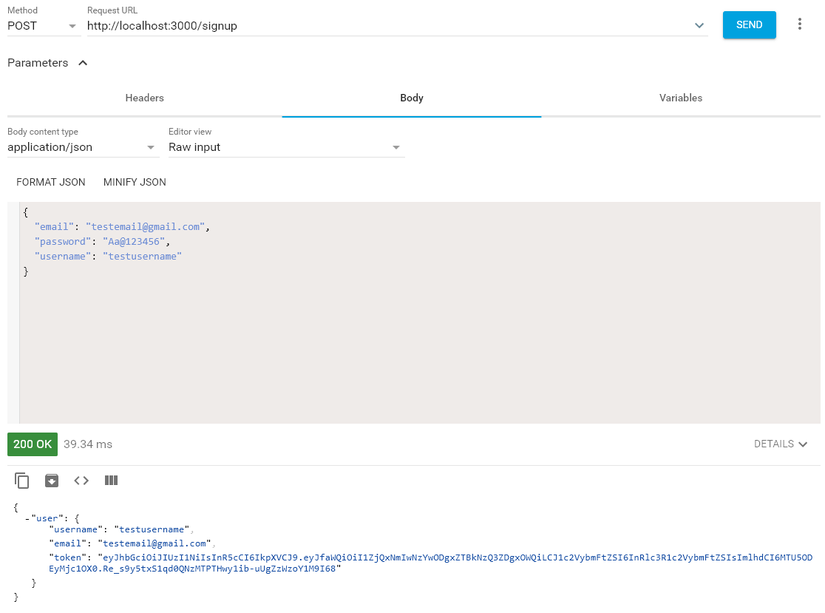
Signup API
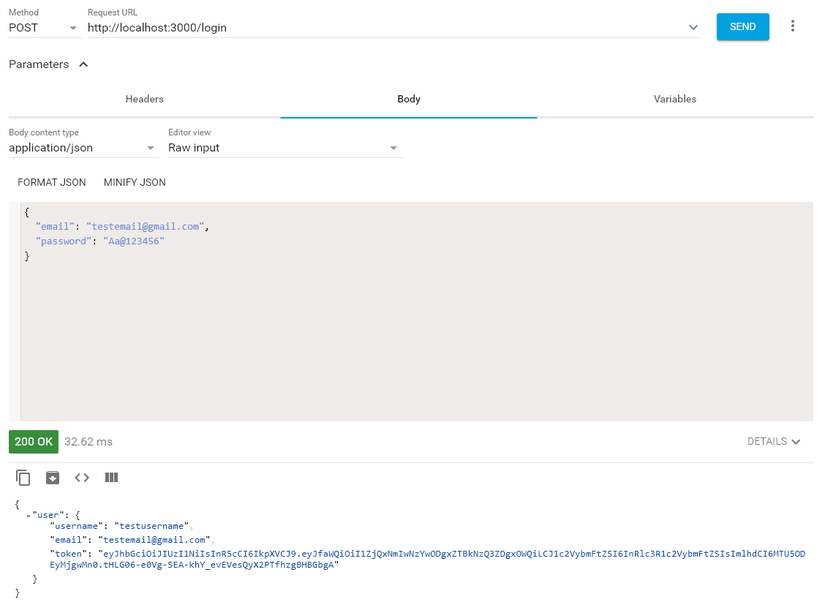
Login API
Conclude
Thus, we were able to create a simple skeleton with full of basic features such as login, signup, logout. In addition we can add ourselves a full skeleton with many other cool features. Hope the article will be useful to you guys in this language Newbie. All contributions will help the author improve in the next articles.