In this article we will learn how to back up the database on google driver with project laravel
Requirements
Install project laravel
Google Drive hosting
Mysql
Basic knowledge of PHP setting up packages in laravel.
Installation
We will start with installing the package spatie / laravel-backup into the laravel project.
1 2 | $ composer require spatie/laravel-backup |
Register service provider in config / app.php file.
1 2 3 4 5 | 'providers' => [ ... SpatieBackupBackupServiceProvider::class ] |
Publish the config file.
1 2 | $ php artisan vendor:publish --provider="SpatieBackupBackupServiceProvider" |
Schedule to run backupdate database custome without sending a notification email.
1 2 3 4 | // Backups (to Google Drive) $schedule->command('backup:clean --disable-notifications')->dailyAt('01:30'); $schedule->command('backup:run --only-db --disable-notifications')->dailyAt('01:35'); |
Change the configuration of the app / backup.php file to use google driver.
1 2 3 4 5 | 'disks' => [ 'google', 'local', ], |
Install Flysystem to use Google Drive:
1 2 | $ php artisan make:provider GoogleDriveServiceProvider.php |
Then in the newly created GoogleDriveServiceProvider.php file in the boot() we will modify the following to add google driver to the filesystem.
1 2 3 4 5 6 7 8 9 10 | Storage::extend('google', function ($app, $config) { $client = new Google_Client(); $client->setClientId($config['clientId']); $client->setClientSecret($config['clientSecret']); $client->refreshToken($config['refreshToken']); $service = new Google_Service_Drive($client); $adapter = new HypwebFlysystemGoogleDriveGoogleDriveAdapter($service, $config['folderId']); return new LeagueFlysystemFilesystem($adapter); }); |
Register the GoogleDriveServiceProvider provider in config / app.php
1 2 3 4 5 | 'providers' => [ ... AppProvidersGoogleDriveServiceProvider::class, ] |
Add the google driver storage to our config / filesystems.php:
1 2 3 4 5 6 7 8 9 10 11 12 13 14 15 16 17 18 19 20 21 22 23 | return [ // ... 'disks' => [ // ... 'google' => [ 'driver' => 'google', 'clientId' => env('GOOGLE_DRIVE_CLIENT_ID'), 'clientSecret' => env('GOOGLE_DRIVE_CLIENT_SECRET'), 'refreshToken' => env('GOOGLE_DRIVE_REFRESH_TOKEN'), 'folderId' => env('GOOGLE_DRIVE_FOLDER_ID'), ], // ... ], // ... ]; |
Update your .env file:
1 2 3 4 5 | GOOGLE_DRIVE_CLIENT_ID=xxx.apps.googleusercontent.com GOOGLE_DRIVE_CLIENT_SECRET=xxx GOOGLE_DRIVE_REFRESH_TOKEN=xxx GOOGLE_DRIVE_FOLDER_ID=null |
Get Google credentials
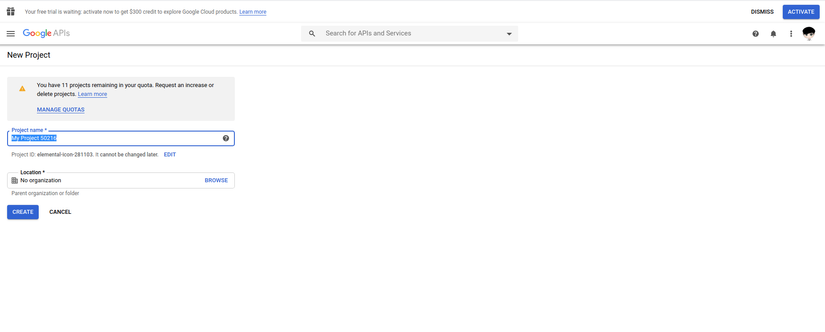
Go to https://console.developers.google.com/ and create our new project.
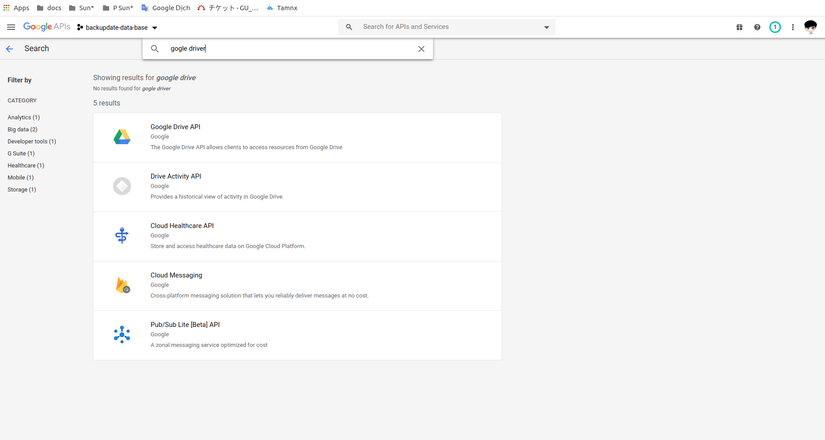
Next we Library and search google driver and enable google driver api.
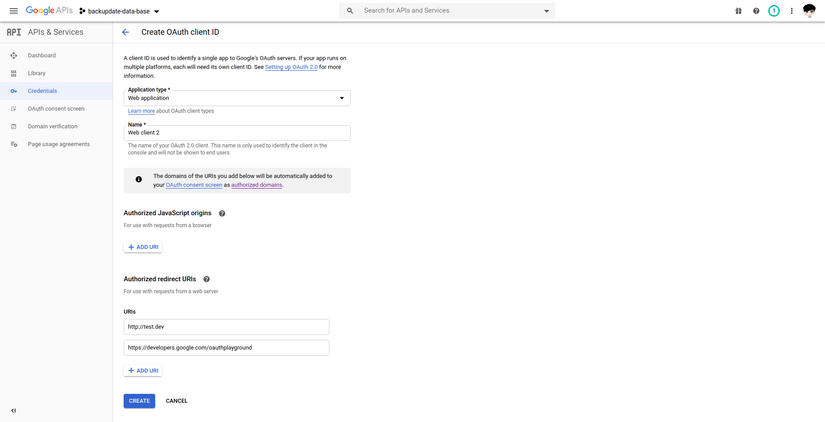
Next we will create OAuth client ID

Next we will select Web Application and name it. and need to add Authorized redirect URIs to create a private production key later and then create.
Add temporary https://developers.google.com/oauthplayground , because you will need to use it in the next step.
Now popup show window will have Your Client ID and Your Client Secret . Next let’s go to the page: https://developers.google.com/oauthplayground . Make sure the URL to your Authorized redirect URIs in the previous step is correct for your site. In the right corner of the screen click the icon settings and check, Use your own OAuth credentials and you paste the Client ID and Client Secret just obtained in the previous step. And add authorized applications to your google driver.
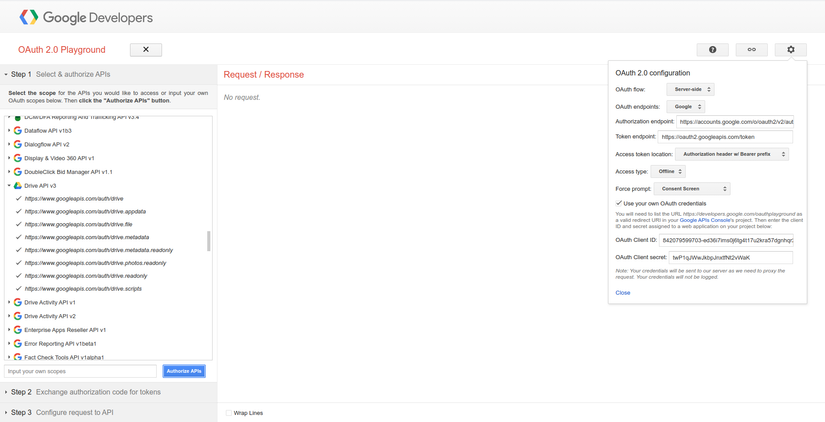
Then press the Authorize APIs button and accept the access. Next we will go to step 2. and check Auto-refresh the token before it expires ”and click“ Exchange authorization code for tokens ”. 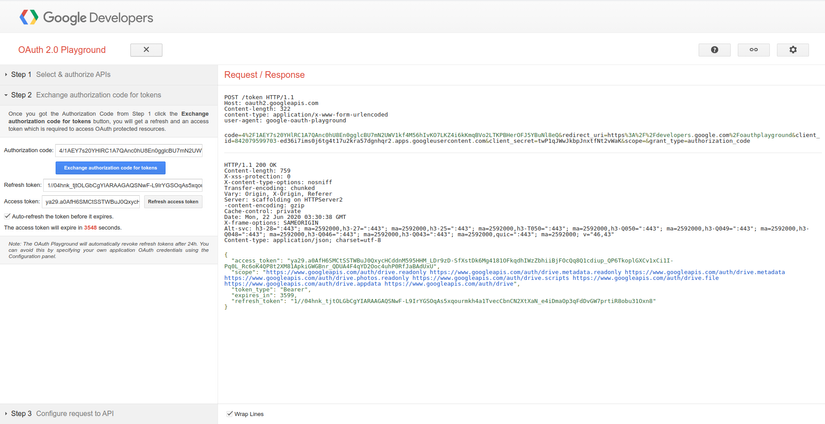
Now we have the Refresh token. Next, based on the information we have just received, we update the .env
Update .env config
1 2 3 4 5 | GOOGLE_DRIVE_CLIENT_ID=xxx.apps.googleusercontent.com GOOGLE_DRIVE_CLIENT_SECRET=xxx GOOGLE_DRIVE_REFRESH_TOKEN=xxx GOOGLE_DRIVE_FOLDER_ID=null |
To get the backup directory id we access the directory then get the ID then update to .env

We will now perform the database backup job.
Run bacth backup
1 2 | backup:run --only-db |
If there are errors you will edit the config in config / backup.php as follows and then run again.
1 2 | 'name' => env('GOOGLE_DRIVE_FOLDER_ID', ''), |
Next we will check the results on the directory where we backed up the results. My article is here to meet you again in the next article:
References:
https://console.developers.google.com/
https://developers.google.com/oauthplayground/
https://medium.com/@dennissmink/laravel-backup-database-to-your-google-drive-f4728a2b74bd