In this article, we will learn how to use Auto Layout Visual Format in code to layout UI for App.
The Auto Layout Visual Formart Language (VFL) allows us to define constraints by using an “ASCII-art formatted string”.
With one line of code, we can create constraints in both horizontal and vertical directions. From there, save a lot of code we have to use when creating each constrainst.
Through this article, you will learn how to:
- Create Horizontal and Vertical Contraints
- Definition of views inside the VFL string
- Using metrics constants inside the VFL string
- Use layout options to create relationships between objects on the UI
- Handling Safe Area on the iPhone X series spilled over
Begin
First, visit the link below to download the project:
https://koenig-media.raywenderlich.com/uploads/2017/11/Grapevine-Starter-1.zip
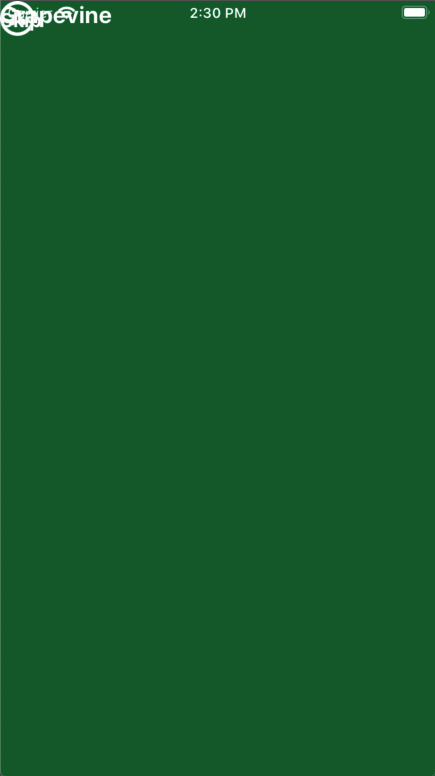
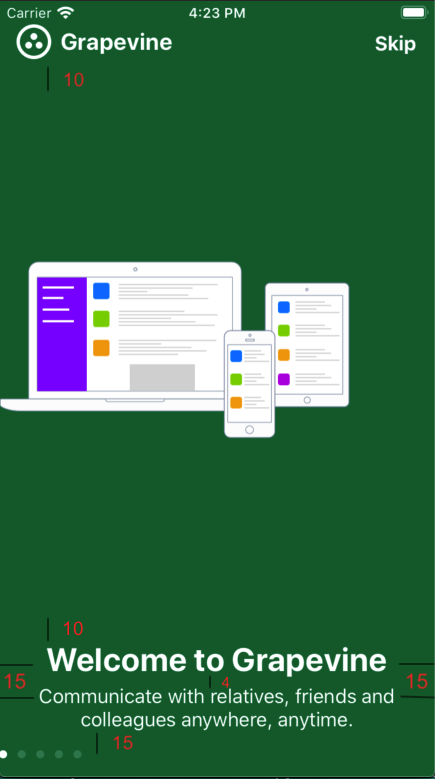
The project has already created some objects for the Layout process. Running the project, we will get the result as shown below
UI objects are located in the upper left corner of the View. This is because the AutoLayout Constraints have been removed during compilation (You should not do this in real Projects ^^) In this example, creating objects with Interface Builder is so we don’t have to write A large amount of initialization code, layout we will recreate with code)
Visual Format String Grammar
Before starting the layout, we should have a basic knowledge of VFL First, the VFL Format string can be divided into smaller components. ”
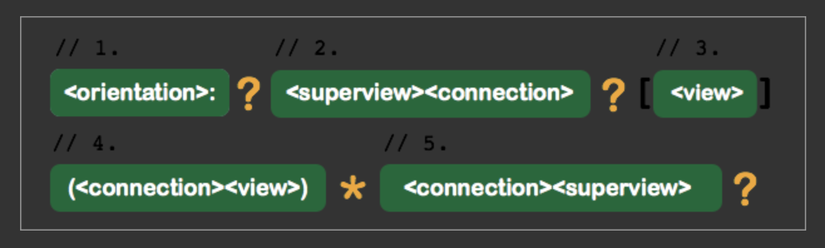
- Direction of Contraints (Optional). You can choose 1 of the values:
- H: Horizontal – Horizontal
- V: Vertical – Vertical
- Without declaration: The default Auto Layout set is Horizontal
- Leading Spacing, Top Spacing versus Superview (Optional)
- Distance from the top of the View to layout with the top of Superview (Veritcal)
- The distance from the leading (left corner) of the View needs layout with the leading of Superview (Horizontal) Those of you who are familiar with Auto Layout layout using Interface Builder (made directly on Storyboard) will easily imagine these two values.
- The view you are currently layout (Required)
- Link with other views (Optional)
- Trailing Spacing and Bottom Spacing versus Superview (Optional)
- The distance from the bottom (the bottom edge) of the view to the bottom of the Superview
- Distance from trailing (right edge) of view compared to traiiew of Superview
In the picture, there are 2 special characters that appear, their meanings are:
- “?” – This element is optional inside layout code
- “*” – this element may appear 0 or once inside the layout code
The symbols are valid
- “|” – Superview
- “-” – Standard spacing (Usually 8 points, this value may change if it is the distance to an edge of Superview)
- ” == “- Degree
- “-20-” – non-standard dimensions (20 points)
- “<=” – Less than or equal to
- “> =” – Greater than or equal to
- @ 250 – Contraint priority (Can receive values from 0 to 1000)
- 250: Low priority
- 750: High priority
- 1000: Required level
For example:
1 2 | H <span class="token punctuation">:</span> <span class="token operator">|</span> <span class="token operator">-</span> <span class="token punctuation">[</span> <span class="token function">icon</span> <span class="token punctuation">(</span> <span class="token operator">==</span> iconDate <span class="token punctuation">)</span> <span class="token punctuation">]</span> <span class="token operator">-</span> <span class="token number">20</span> <span class="token operator">-</span> <span class="token punctuation">[</span> <span class="token function">iconLabel</span> <span class="token punctuation">(</span> <span class="token number">120</span> @ <span class="token number">250</span> <span class="token punctuation">)</span> <span class="token punctuation">]</span> <span class="token operator">-</span> <span class="token number">20</span> @ <span class="token number">750</span> <span class="token operator">-</span> <span class="token punctuation">[</span> <span class="token function">iconDate</span> <span class="token punctuation">(</span> <span class="token operator">>=</span> <span class="token number">50</span> <span class="token punctuation">)</span> <span class="token punctuation">]</span> <span class="token operator">-</span> <span class="token operator">|</span> |
- Explain
H: Layout horizontally (Horizontal) | – [icon: the left edge of the icon will have a standard distance from the left edge of the superview
== iconDate: the size of the icon is calculated by the width of the iconDate
] -20- [iconLabel: the right edge of the icon is 20 points from the right edge of iconLabel
[iconLabel ( [email protected] )]: iconLabel should be 120 points wide. Priority is set to low, Auto Layout can break this constraint if a conflict arises
[iconDate (> = 50)]: iconDate should be greater than or equal to 50 points
– |: the right side of the iconDate should have a standard distance from the right side of the superview These are the basic and important knowledge about VFL that you should know before using them.
Start creating Constraints
Apple provides us with methods of constraints (withVisualFormat: options: metrics: views 🙂 in NSLayoutConstraint to create Contraints using VFL. You will use this function to layout our project
Open ViewController.swift in Xcode and follow these steps:
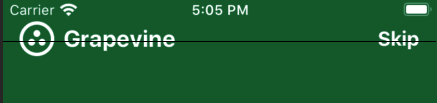
- Hide some objects, leaving only iconImageView and appNameLabel for our layout (the purpose of this step is to make it easy for us to observe)

- Build and Rerun the project, we get the results as shown below
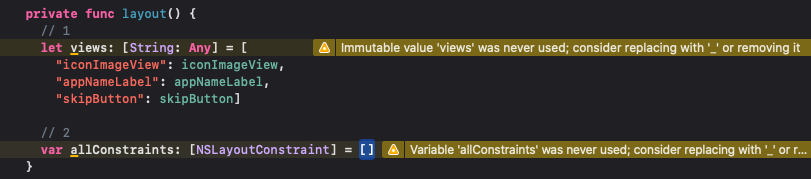
- Create a funtion, here we will put all the code related to the Layout. Add the following code into the function. And remember to call the function in viewDidLoad () ^^
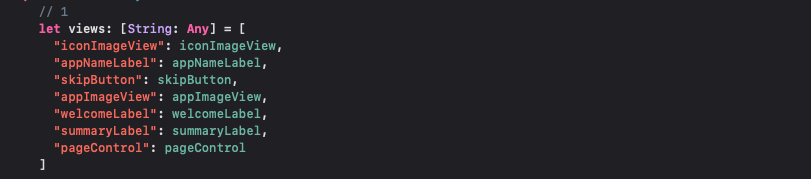
- (1) Create a dictionary containing strings representing the views we will handle
- (2) Create an array of type NSLayoutConstraint to hold the layouts we created. You can activate for each Layout, but put in an array, then activating this Array will save us code.
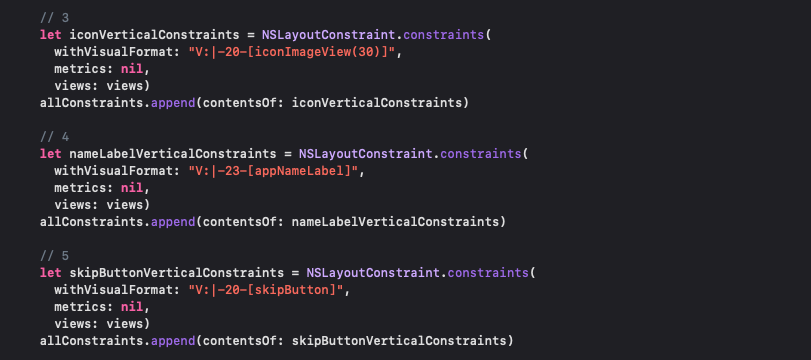
- Next, we start the layout, first vertically
- (3) Create Vertical Constraints for iconImageView. The top edge is 20 points (Top Spacing) compared to the top edge of the superview, the height is 30 points (If the height is Veritcal, it will default to being set Height)
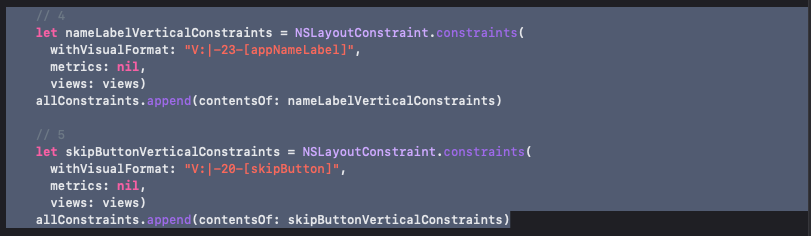
- (4) Create Vertical Constraints for nameLabel. The top edge is 23 points (Top Spacing) compared to the top edge of the superview.
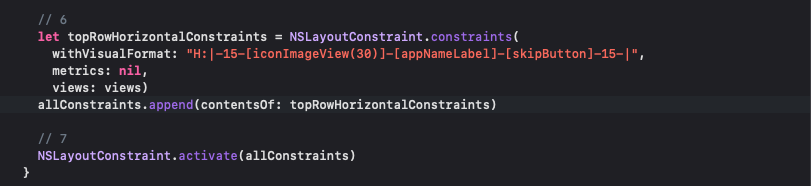
- (5) Create Vertical Constraints for skipButton. The top edge is 20 points (Top Spacing) from the top of the superview.
- The generated Constraints are all append into allConstraints. The views in the method called dictionary contain the corresponding views and string labels originally created. metrics will be covered more clearly in part 2 of this article, currently we will set nil.
- After creating the Veritcal Constraints, we need to create Horizontal Constraints to complete the Layout of an object
- (6) Setup Horizontal for all 3 objects. The left side of the iconImageView will be 15 points (Leading Spacing) compared to the left side of the superview, the width is 30 points. The left side of nameLabel will be 8 points (due to not mentioning should be set defaut) compared to the right edge of iconImageView (Can understand this is the distance between 2 objects). Similarly, skipButton is 8 points away from appNameLabel, and 15 points from the right side of the superview.
- (7) Activate the newly created Constraint
- Build and Run project, get the following results:
- To better understand the parameters we just set, we will see the illustration below:
- We will continue the Layout of the remaining objects in View. Go to viewDidLoad (), delete the isHidden command written earlier .. Then add to the dictionary views the remaining objects with the corresponding string label:
- Add the following code to the Layout function (), before activating allConstraints
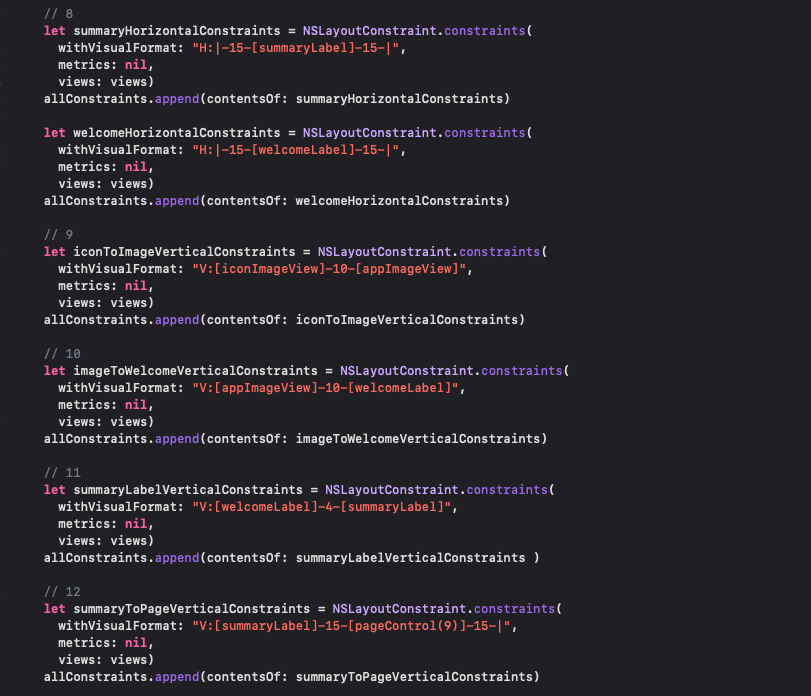
- (8) The right edge of Summary is 15 points from the right margin of the superview, the left edge is 15 points from the left margin. Similar to welcomLabel
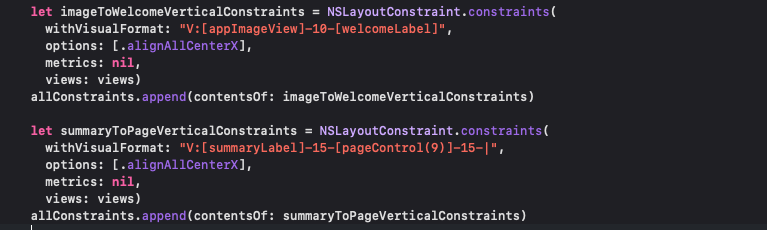
- (9) The top edge of the appImageView will be 10 points from the bottom of the iconImageView.
- (10) The top edge of welcomeLabel is 10 points from the bottom of the appImageView.
- (11) The top edge of summaryLabel will be 4 points from the bottom edge of welcomLabel.
- (12) The top edge of the pageControl will be 15 points away from the bottom edge of summaryLabel. The height of pageControl is 9 points. The bottom edge of the pageControl will be 15 points below the bottom margin of the superview.
- Build and run the project again, get the following result:

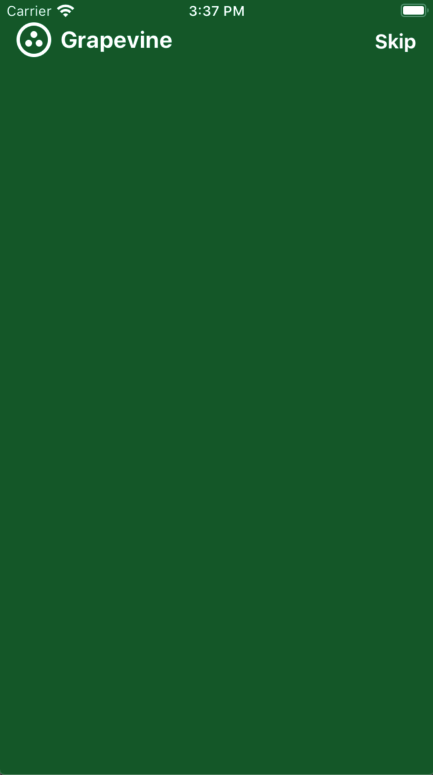

However, the image and pageControl are stuck to the left margin rather than in the middle. To solve that situation, we can add 1 Horizontal Constraint to them, so that the distance from the left and right edges of the superview is the same, similar to the way we do with welcomLabel and summaryLabel.
Here, we can use another way, which is Layout Options
Layout Option
If you have arranged directly on the Storyboard, surely we are no stranger to how to set the object horizontally with another object (Center Horizontally and Center Vertically – see examples and illustrations below to make it easier to understand). Here the Layout Option allows us to perform the same operations using the NSLayoutFormatOptions.AlignAllCenterY and NSLayoutFormatOptions.AlignAllCenterX methods.
- Go back to our code and delete these 2 lines
- We have just removed the Vertical Constraints for nameLabel and skipButton. So now we need another constraint to identify them. Remember we still have the iconImageView intact, so it still has all the elements defined. Now we can rely on iconImageView to layout for nameLabel and skipButton, we will arrange them in a horizontal row. To do that, we need to edit the topRowHorizontalConstraints a little and add a parameter to its constructor.
Look at the illustration to understand how to identify Vertical Constraints based on a fully defined object
- Similarly, we will remove welcomeHorizontalConstraints. Can see now welcomeLabel no Horizontal Layout. We need to create another constraint for it.
- To get the same as the original, we can change the summaryLabelVerticalConstraints to the following:
- Build and Rerun Project, we get the same results as the original. WelcomLabel’s Horizontal Constraints are defined as follows (left and right margins coincide with summaryLabel’s).
- Here we can also replace [.alignAllLeading, .alignAllTrailing] with [.alignAllCenterX] that will produce the same result (But the implementation is not the same, then it will center align the middle of welcomeLabel and summaryLabel the same. )
- We will do the same for summaryToPageVerticalConstraints and imageToWelcomeVerticalConstraints as follows:
- Build and Rerun the project, we will get the final result:


Later in this article, I will mention Metrics as well as how to deal with Safe Area on the “rabbit ears” iPhone series (from X poured down)
Reference source: https://www.raywenderlich.com/277-auto-layout-visual-format-language-tutorial