In this article, we will build a complete Rails application using docker. Applications will include Postgresql, Redis and Sidekiq.
Also, we will install Unicorn and Nginx for production.
After reading this article: Knowledge to use includes:
- Basic knowledge of Docker
- How Docker assists the development process
- How you use CI / CD to build and test
What is Docker?
Docker allows us to package an application or service with all its dependent libraries or tools into one standard unit. This is called a Docker image .
The Docker image will contain all the code, runtime libraries, or system libraries to keep the server running.
Docker is different from Virtual Machine
We have tools like Vagrant, VirtualBox or VMWare which are all virtual machines _ virtualization technology, allowing you to isolate services, but there are many disadvantages.
That is, you need an entire operating system for each application you want to isolate. This takes quite a while to start up a virtual machine, and each virtual machine needs several GB of memory.
The Docker container takes a different approach, kernel sharing, and isolating is done through the linux kernel libraries and cgroups. Thanks to this, Docker is very light, and it only takes a few seconds for a container to start and the running process does not take up much space.
So how can you develop Rails apps in an isolated environment without using RVM or make it easier to change the Ruby version?
Or suppose you are a freelancer with 10 projects, you want to install or switch between projects without wasting disk space?
Or do you want to share your project on Github and other developers can download and run everything in a matter of minutes?
Benefits of Docker
If you want to improve productivity and make for a better programming experience, Docker fits those requirements, with benefits like:
1. Keep environmental parameters intact
Docker allows you to package applications and easily switch environments. It works effectively for all environments and on all devices that run Docker.
2. Expanding rapidly developing team
In the past, you might need up to 30 pages of documentation for new developers to show how to install locally. This can take a long time, and with new developers it is entirely possible that mistakes.
With Docker, all developers on the team can install applications or services that run automatically and efficiently, with just a few commands and a few minutes.
3. Use whatever technology is appropriate
If you only speak one language, you put yourself at a disadvantage and your programming skills lag. But by isolating the application in the Docker container, we can extend our programming knowledge vertically by experimenting with new languages and frameworks.
You don’t have to worry about how other developers install technology. You can package them all into a Docker image and they just have to run the Docker container and that’s it.
4. Create an image once and use it many times
Because your application resides in a built-in Docker image, it can be run in seconds, making it very easy to scale.
Time for additional library work just need to rebuild. Once the image has been built, you can use it on multiple hosts.
This not only helps the scaling process quickly, but also makes deploying predictable and consistent.
5. Developers and operations managers can work together
Docker tools allow developers and operations managers to work together towards the common goal of deploying an application.
Docker acts as an abstract class. You can distribute the application to other members, and they do not need to know the detailed configuration of the environment.
Install Docker
How to install based on the operating system:
Linux: https://docs.docker.com/get-started/
Windows and Mac: https://www.docker.com/products/docker-desktop
Create Rails app
We will create a Rails project without having Ruby installed on the machine using the official Ruby Docker image version.
Create Rails Image
To create a Rails app in a Docker container, you need a Dockerfile . Dockerfile contains all the commands you need to create programs and libraries.
Create the file Dockerfile.rails :
1 2 3 4 5 6 7 8 9 10 11 12 13 14 15 16 17 18 19 20 | # Dockerfile.rails FROM ruby:2.7 ARG USER_ID ARG GROUP_ID RUN addgroup --gid $GROUP_ID user RUN adduser --uid $USER_ID --gid $GROUP_ID user ENV INSTALL_PATH /opt/app RUN mkdir -p $INSTALL_PATH RUN gem install rails bundler RUN chown -R user:user /opt/app WORKDIR /opt/app USER $USER_ID CMD ["/bin/sh"] |
The basic Dockerfile commands are:
FROM: specifies the image to start with. We’ll be using the official version of the Ruby image.ARG: specifies parameter variables during build time. If you run in Linux, then the user and group id should be the same between host and docker container.RUN: run commands in the container. For example, you use it to create a user and group and install Rails gems.ENV: definition of environment variablesWORKDIR: specifies the current directory in the container.USER: change the active user in the container.CMD: run the program when the container starts
To build the image, we run the command:
1 2 3 4 5 | $ docker build -t rails-toolbox --build-arg USER_ID=$(id -u) --build-arg GROUP_ID=$(id -g) -f Dockerfile.rails . |
Create Project
We will use the Rails image to create the project:
1 2 3 4 | $ docker run -it -v $PWD:/opt/app rails-toolbox rails new --skip-bundle rails_demo |
Docker runs a new container and runs the command rails new where:
-it: assigns your terminal process to the container.-v $PWD:/opt/app: assigns the current directory of the host on your machine to the container, to map the files created in the corresponding copy container to your local machine.rails new --skip-bundle rails_demo: This command is passed into the Rails image, to create a new project, rails_demo
After running the above command, you will see a new Rails folder.
Install a few main libraries
Edit Gemfile
1 2 3 4 5 | gem 'unicorn', '~> 5.5.2' gem 'pg', '~> 1.2.2' gem 'sidekiq', '~> 6.0.4' gem 'redis-rails', '~> 5.0.2' |
Edit Database configuration
We edit the file config/database.yml :
1 2 3 4 5 6 7 8 9 10 11 12 13 14 | --- development: url: <%= ENV['DATABASE_URL'].gsub('?', '_development?') %> test: url: <%= ENV['DATABASE_URL'].gsub('?', '_test?') %> staging: url: <%= ENV['DATABASE_URL'].gsub('?', '_staging?') %> production: url: <%= ENV['DATABASE_URL'].gsub('?', '_production?') %> |
We use environment variables to configure the app.
Add some config in the config/application.rb file:
1 2 3 4 5 6 7 8 9 10 11 12 13 14 | module RailsDemo class Application < Rails::Application # Since we're using Redis for Sidekiq, we might as well use Redis to back # our cache store. This keeps our application stateless as well. config.cache_store = :redis_store, ENV['CACHE_URL'], { namespace: 'rails_demo::cache' } # If you've never dealt with background workers before, this is the Rails # way to use them through Active Job. We just need to tell it to use Sidekiq. config.active_job.queue_adapter = :sidekiq # ... end end |
Create Unicorn Config
Add file config/unicorn.rb :
1 2 3 4 5 6 7 8 9 10 11 12 13 14 15 16 17 18 19 20 21 22 23 24 25 26 27 28 29 30 31 32 33 34 35 36 37 38 39 40 41 42 43 44 45 46 47 48 49 50 51 52 53 54 55 56 57 58 59 60 61 62 63 64 65 66 67 68 69 70 | # Heavily inspired by GitLab: # https://github.com/gitlabhq/gitlabhq/blob/master/config/unicorn.rb.example # Go with at least 1 per CPU core, a higher amount will usually help for fast # responses such as reading from a cache. worker_processes ENV['WORKER_PROCESSES'].to_i # Listen on a tcp port or unix socket. listen ENV['LISTEN_ON'] # Use a shorter timeout instead of the 60s default. If you are handling large # uploads you may want to increase this. timeout 30 # Combine Ruby 2.0.0dev or REE with "preload_app true" for memory savings: # http://rubyenterpriseedition.com/faq.html#adapt_apps_for_cow preload_app true GC.respond_to?(:copy_on_write_friendly=) && GC.copy_on_write_friendly = true # Enable this flag to have unicorn test client connections by writing the # beginning of the HTTP headers before calling the application. This # prevents calling the application for connections that have disconnected # while queued. This is only guaranteed to detect clients on the same # host unicorn runs on, and unlikely to detect disconnects even on a # fast LAN. check_client_connection false before_fork do |server, worker| # Don't bother having the master process hang onto older connections. defined?(ActiveRecord::Base) && ActiveRecord::Base.connection.disconnect! # The following is only recommended for memory/DB-constrained # installations. It is not needed if your system can house # twice as many worker_processes as you have configured. # # This allows a new master process to incrementally # phase out the old master process with SIGTTOU to avoid a # thundering herd (especially in the "preload_app false" case) # when doing a transparent upgrade. The last worker spawned # will then kill off the old master process with a SIGQUIT. old_pid = "#{server.config[:pid]}.oldbin" if old_pid != server.pid begin sig = (worker.nr + 1) >= server.worker_processes ? :QUIT : :TTOU Process.kill(sig, File.read(old_pid).to_i) rescue Errno::ENOENT, Errno::ESRCH end end # Throttle the master from forking too quickly by sleeping. Due # to the implementation of standard Unix signal handlers, this # helps (but does not completely) prevent identical, repeated signals # from being lost when the receiving process is busy. # sleep 1 end after_fork do |server, worker| # Per-process listener ports for debugging, admin, migrations, etc.. # addr = "127.0.0.1:#{9293 + worker.nr}" # server.listen(addr, tries: -1, delay: 5, tcp_nopush: true) defined?(ActiveRecord::Base) && ActiveRecord::Base.establish_connection # If preload_app is true, then you may also want to check and # restart any other shared sockets/descriptors such as Memcached, # and Redis. TokyoCabinet file handles are safe to reuse # between any number of forked children (assuming your kernel # correctly implements pread()/pwrite() system calls). end |
Create installation file Sidekiq
We add the file config/initializers/sidekiq.rb :
1 2 3 4 5 6 7 8 9 10 | sidekiq_config = { url: ENV['JOB_WORKER_URL'] } Sidekiq.configure_server do |config| config.redis = sidekiq_config end Sidekiq.configure_client do |config| config.redis = sidekiq_config end |
Whitelist Docker Host
Rails has a security feature that is blocking access from undefined sources. I want other docker containers to communicate with each other, so need to add rails_demo containter to the whitelist.
We modify the file config/environment/development.rb :
1 2 | config.hosts << "rails_demo" |
Create an Environment variable file
Create an env file containing environment variables on par with the Dockerfile.rails file
1 2 3 | $ cd .. $ touch env-example |
The content of the environment variable file can be:
1 2 3 4 5 6 7 8 9 10 11 12 | # Docker user và group ids # Trong Linux thì 2 giá này phải map với host USER_ID=1000 # bạn có thể lấy được bằng lệnh id -u GROUP_ID=1000 # bạn có thể lấy được bằng lệnh id -g WORKER_PROCESSES=1 LISTEN_ON=0.0.0.0:8010 DATABASE_URL=postgresql://user: <a class="__cf_email__" href="/cdn-cgi/l/email-protection">[email protected]</a> :5432/user?encoding=utf8&pool=5&timeout=5000 CACHE_URL=redis://redis:6379/0 JOB_WORKER_URL=redis://redis:6379/0 |
Copy the file to .env and need to remove .env from the git control:
1 2 3 | $ cp env-example .env $ echo ".env" >> .gitignore |
Dockerizing Rails Application
Create a Dockerfile file:
1 2 3 4 5 6 7 8 9 10 11 12 13 14 15 16 17 18 19 20 21 22 23 24 25 26 27 28 | # Dockerfile - Development environment FROM ruby:2.7 ARG USER_ID ARG GROUP_ID RUN addgroup --gid $GROUP_ID user RUN adduser --uid $USER_ID --gid $GROUP_ID user ENV INSTALL_PATH /opt/app RUN mkdir -p $INSTALL_PATH # nodejs RUN curl -sS https://dl.yarnpkg.com/debian/pubkey.gpg -o /root/yarn-pubkey.gpg && apt-key add /root/yarn-pubkey.gpg RUN echo "deb https://dl.yarnpkg.com/debian/ stable main" > /etc/apt/sources.list.d/yarn.list RUN apt-get update && apt-get install -y --no-install-recommends nodejs yarn # rails RUN gem install rails bundler COPY rails_demo/Gemfile Gemfile WORKDIR /opt/app/rails_demo RUN bundle install RUN chown -R user:user /opt/app USER $USER_ID VOLUME ["$INSTALL_PATH/public"] CMD bundle exec unicorn -c config/unicorn.rb |
This file creates a Docker image with:
- NodeJS and Yarn
- Rails
- Gems in Gemfile
The last line of Dockerfile specified the user, added permissions for the file, and started the unicorn HTTP server.
Configure Ngnix
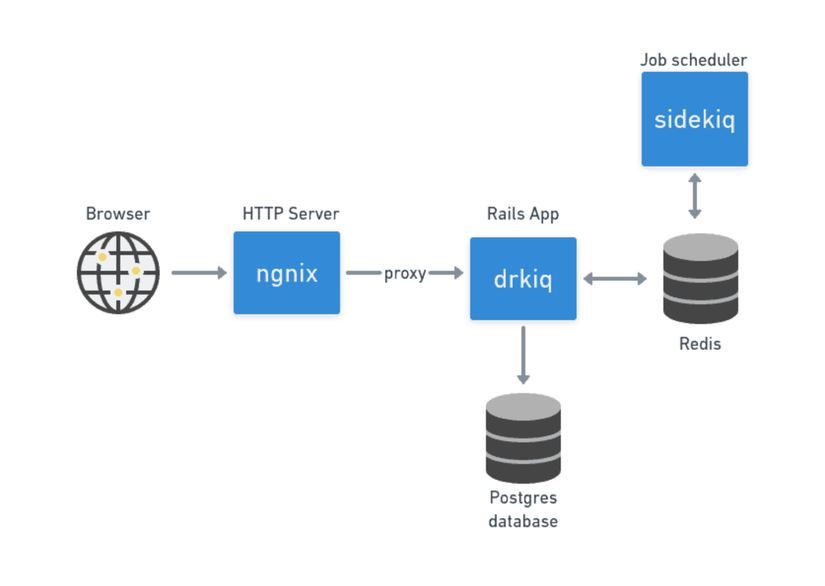
While unicorn is sufficient to support the application, for better performance and security goals, you should put an HTTP server first. An HTTP server is configured as a reverse proxy to protect the application from slow requests and speed up connection through cache.
We will use Nginx, and make the configuration file _ reverse-proxy.conf _ on par with Dockerfiles:
1 2 3 4 5 6 7 8 9 10 11 12 13 | # reverse-proxy.conf server { listen 8020; server_name example.org; location / { proxy_pass http://drkiq:8010; proxy_set_header Host $host; proxy_set_header X-Forwarded-For $proxy_add_x_forwarded_for; } } |
Create a new file called Dockerfile.nginx to create a custom Nginx image:
1 2 3 4 5 6 7 8 | # Dockerfile.nginx FROM nginx:latest COPY reverse-proxy.conf /etc/nginx/conf.d/reverse-proxy.conf EXPOSE 8020 STOPSIGNAL SIGTERM CMD ["nginx", "-g", "daemon off;"] |
Create file dockerignore
Create a .dockerignore file with the following content:
1 2 3 4 | .git .dockerignore .env |
This file is similar to .gitignore, the purpose is to ignore files or folders from the Docker image build process
What is Docker Compose?
Docker Compose allows you to run 1 or more Docker containers easily. You can define anything in the YAML file and the other developers just run the docker-compose up command and everything will run concurrently.
Create Docker Compose Configuration File
We create the file docker-compose.yml :
1 2 3 4 5 6 7 8 9 10 11 12 13 14 15 16 17 18 19 20 21 22 23 24 25 26 27 28 29 30 31 32 33 34 35 36 37 38 39 40 41 42 43 44 45 46 47 48 49 50 51 52 53 54 55 56 57 58 59 60 61 62 63 64 65 66 67 68 69 | version: "3.7" services: postgres: image: postgres:12.1 environment: POSTGRES_USER: user POSTGRES_PASSWORD: test_db_password ports: - '5432:5432' volumes: - user-postgres:/var/lib/postgresql/data redis: image: redis:5.0.7 ports: - '6379:6379' volumes: - user-redis:/var/lib/redis/data rails_demo: build: context: . args: USER_ID: "${USER_ID:-1000}" GROUP_ID: "${GROUP_ID:-1000}" depends_on: - postgres - redis volumes: - type: bind source: ./drkiq target: /opt/app/rails_demo ports: - '8010:8010' env_file: - .env sidekiq: build: context: . args: USER_ID: "${USER_ID:-1000}" GROUP_ID: "${GROUP_ID:-1000}" command: bundle exec sidekiq depends_on: - postgres - redis volumes: - type: bind source: ./rails_demo target: /opt/app/rails_demo env_file: - .env nginx: build: context: . dockerfile: ./Dockerfile.nginx depends_on: - rails_demo ports: - '8020:8020' volumes: user-postgres: user-redis: |
From the file above, we have:
- Postgres and Redis use Docker volumes to save data for later.
- Postgres, Redis and rails_demo both expose the same port
- RailsDemo and Sidekiq both use volumes to mount the app code for direct editing
- RailsDemo and Sidekiq both linked to Postgres and Redis and read the environment variables together from .env
- Sidekiq overrides the default CMD command to run Sidekiq instead of Unicorn
Create Volumes
In the file docker-compose.yml, we use the same volumes that do not exist yet, we can create them with the following commands:
1 2 3 | $ docker volume create --name user-postgres $ docker volume create --name user-redis |
Once the data is stored in PostgreSQL or Redis, it will be stored in volumes on your local machine. This way, you don’t need to worry about data being lost when restarting service, because Docker container is stateless.
Run everything
Let’s run everything with the command:
1 2 | $ docker-compose up |
The above command will take a long time to run for the first time because it needs to load all the Docker images that the application requests.
This process is fast and slow depending on the network speed
Then the terminal will show:
1 2 3 4 5 6 | postgres_1 | ... redis_1 | ... rails_demo_1 | ... sidekiq_1 | ... nginx_1 | ... |
However, the rails_demo_1 container reported an error that the database doesn’t exist. That’s because we haven’t initialized the database when we ran the Rails app.
Database initialization
Press CTRL + C in terminal to stop up command and run the following commands to create database.
1 2 3 | $ docker-compose run --user "$(id -u):$(id -g)" rails_demo rake db:reset $ docker-compose run --user "$(id -u):$(id -g)" rails_demo rake db:migrate |
We run the up command again to initialize all:
1 2 | $ docker-compose up |
Test the service
Let’s check again in the link: http: // localhost: 8020
Works with Rails app
Currently the source code is on my machine, and the source code has been mounted in the Docker container directly through the volume. That means every time you edit a file, the changes will be reflected immediately.
For example:
Create a Controller
Run the following command to create the Page controller:
1 2 | docker-compose run --user "$(id -u):$(id -g)" rails_demo rails g controller Pages home |
Recompile Assets
To recompile CSS and JavaScript code or use webpack for optimization, we use the command:
1 2 3 | $ docker-compose run --user "$(id -u):$(id -g)" rails_demo rails webpacker:install $ docker-compose run --user "$(id -u):$(id -g)" rails_demo rails assets:precompile |
In this article, we have built a fairly complete Rails application with technology stacks using Docker
Everyone can see the code on Github: https://github.com/sonlh-0262/docker-rails
In the next section, we will learn how to use Docker with CI / CD