When you build an Android application, you probably can’t use TextView. But I am sure that you will mainly use TextView in Android at the basic level. That is to display only one text on the TextView and forget that the TextView has a lot of cool features. Through this article, I want to share 6 cool tricks about TextView in android that few people know.
Automatically display style link with AutoLink with textview in Android
Imagine when the application has too many urls or emails … You want them to automatically switch to the clickable form and open the corresponding website. If you do it manually and deal with Kotlin code, it must be “very tired”.
In particular, you cannot install the click event in the usual way even if you have enough patience. To solve this problem, you only need to use the AutoLink feature of TextView. There are 2 ways to use autoLink of TextView in android.
Method 1: Set the autoLink attribute with Kotlin
textView.setMovementMethod (LinkMovementMethod.getInstance ()) textView.setText (“github: https://github.com/ngotuannghia/Fast-Flashlight “)
** Method 2: Install now in the xml file **
With this way, you simply turn on the following flag: android: autoLink = “web”
<TextView android: autoLink = “all” android: textColorLink = “# FF0000” android: linksClickable = “true” android: text = “github: https://github.com/ngotuannghia/Fast-Flashlight” android: layout_width = ” wrap_content “android: layout_height =” wrap_content “/>
Refer to the value in string.xml from another string value
This is a technique that is not superior at all. You simply need to define a string into a string.xml file and then reuse it anywhere as needed.
With this approach, you will help your application easily support multiple languages. In addition, it also helps reduce code duplication, reducing application size.
If you have watched VNTALKING, I have mentioned serious mistakes when you are lazy not to define strings in strings.xml but indiscriminately hardcode string.
Actually there are many people who know how to do this, just that you are lazy and don’t want to do it.
<resources> <string name = “description”> The created by & author app; </string> </resources>
<TextView android: layout_width = “match_parent” android: layout_height = “wrap_content” android: text = “@ string / description” />
String string = getString (R.string.hello);
Techniques for creating hyphens in e-commerce applications
If you pay attention to sales applications such as Lazada, Shopee, Tiki … very good with the original price brick and replaced with the reduced price. Same as the picture below:
To do so, there are 2 ways:
Method 1: Use available features of Android
You can use the following flag: Paint.STRIKE_THRU_TEXT_FLAG to underline whole text using TextView
tv.setPaintFlags (tv.getPaintFlags () | Paint.STRIKE_THRU_TEXT_FLAG);
If you just want to underline part of the text in TextView, do the following:
val sampleText = “This is a test strike” val spanBuilder = SpannableStringBuilder (sampleText) val strikethroughSpan = StrikethroughSpan () spanBuilder.setSpan (strikethroughSpan, // Span to add 0, // Start 4, // End of the span (exclusive) Spanned.SPAN_EXCLUSIVE_EXCLUSIVE // Text changes will not reflect in the strike changing) textView.setText (spanBuilder)
Method 2: Inherit the TextView class
If you want higher customization, using Android’s built-in feature is not enough. Still another way is to extend from the TextView class, you can do everything you want in the onDraw () function.
val onDraw: Unit (Canvas) canvas run ({super.onDraw (canvas) if (isStroke && paint! = null) canvas.drawLine (0, getMeasuredHeight () / 2, getMeasuredWidth (), getMeasuredHeight () / 2, paint) }) val paint: Paint val isStroke: Boolean if (isStroke) {paint = Paint () paint.setColor (Color.RED) paint.setStrokeWidth ((getResources (). getDisplayMetrics (). density * 1))}
Technique added underline
With this technique, I can only give here enough. I believe you all know it
tv.setPaintFlags (tv.getPaintFlags () | Paint.UNDERLINE_TEXT_FLAG);
Customize font TextView in Android
You want a great application, a lively, modern UI can’t ignore the default android font change.
Follow these steps to make this a reality:
Step 1: choose your favorite fonts and save to the folder assets
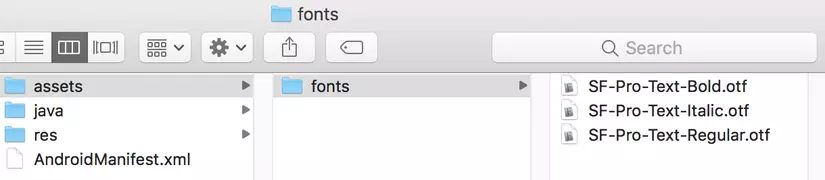 https://images.viblo.asia/106dabb3-fc1b-4e2d-b154-806f1864e60a.png
Step 2: Use Typeface to change the font
val txt = findViewById (R.id.custom_font) as TextView val font = Typeface.createFromAsset (getAssets (), “fonts / SF-Pro-Text-Regular.otf”) txt.setTypeface (font)
TextView in Android displays HTML content
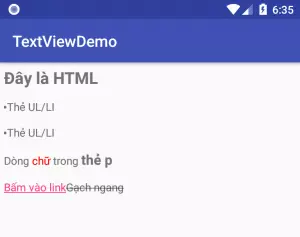
You can display a text content in HTML format, then assign it to TextView with the setText () method.
For example:
1 | val htmlcontent = ("<h1>Đây là HTML</h1><ul><li>Thẻ UL/LI</li><li>Thẻ UL/LI</li></ul>" + "<p>Dòng <font color="red">chữ</font> trong <big><b>thẻ p</b></big><p>" + "<a href="...">Bấm vào link</a>" + "<strike>Gạch ngang</strike>") mytextview.setText(android.text.Html.fromHtml(htmlcontent)) |
 https://images.viblo.asia/83314ca1-5bcb-4007-ae45-b8584720fda3.png
So you write HTML content and call Html.fromHTML (), to convert HTML content into Spanned and then assign it to TextView with the setText () method.
Note that the following HTML tags are supported to be able to assign to TextView:
<p>
<b> <i> <strong> <em> <u> <tt> <dfn> <sub> <sup> <blockquote> <cite> <big> <small> <font size = “…” color = “…” face = “…”> <h1>, <h2>, <h3>, <h4>, <h5>, <h6> <a href=”…”> <img src = “…”> <ul> <ol> <li> <code> <center> <strike>
So, I shared with you the advanced techniques that few people know when using TextView in Android. Although the implementation is not difficult, it is very useful for your application.