Money Setup
Remember to check that you have installed Docker and Docker-compose already. If not, then check the end of your previous post to know how to install it.
Setup
You clone source code here about offline.
In this article we will only care about docker-python folder after clone . There, I have setup for you a Python application using Flask framework (if any PHP dev can treat it like Laravel of PHP)
If you have Python installed on your computer, you can run the following command to run the project:
1 2 3 | pip install -r requirements.txt python app.py |
Open the browser at localhost: 5000 and you will see the Hello World line
If your device does not have Python, then it is still great. As long as you have Docker and Docker compose installed, everything else, whether or not it doesn’t matter
Build Docker Image
As in the previous article , we first need to create the Dockerfile configuration file and define the environment we want, then we will build the image and run it.
Configure Dockerfile
In the docker-python folder you create the file named Dockerfile , inside has the following content:
1 2 3 4 5 6 7 8 9 10 | <span class="token keyword">FROM</span> python <span class="token punctuation">:</span> 3.6 <span class="token punctuation">-</span> alpine <span class="token keyword">WORKDIR</span> /app <span class="token keyword">COPY</span> . . <span class="token keyword">RUN</span> pip install <span class="token punctuation">-</span> r requirements.txt <span class="token keyword">CMD</span> <span class="token punctuation">[</span> <span class="token string">"python"</span> <span class="token punctuation">,</span> <span class="token string">"app.py"</span> <span class="token punctuation">]</span> |
Explain:
- First line FROM : We start from an Image with Alpint environment and have Python installed with version 3.6. See the list of Image Python where, you check in the official link offline
- Why choose Alpine but not Ubuntu or Debian, CentOS, …. Then in the previous article in this section, I have analyzed it. Also throughout this series I will always use the Alpine Linux operating system environment
- Next in the file Dockerfile we have WORKDIR : I will move to the path is / app inside Image, if this path does not exist, it will be automatically created always
- Next we copy all the files from the folder in the original environment (outside – docker-python folder) and put in the path / app inside Image
- Next, we install the dependencies, we need to install what we mentioned in the requirements.txt file (this command you can see it looks like npm install in NodeJS)
- Finally, we use CMD to indicate the default command when a container is initialized from Image: here we will launch the file app.py
Build Docker Image
After fine configuration, the next step is to build Image. You run the following command to build Image offline:
1 2 | docker build -t learning-docker/python:v1 . |
In the previous post I explained to you what the above command did, you can review it.
Quick explanation: The above command will build an image named learning-docker / python with the tag v1 , both the name and the tag we can choose arbitrarily, if we don’t leave the tag, it will automatically be taken as latest . The “dot” at the bottom of the dock indicates that “look for the Dockerfile file in the current directory and build” 
After the Image build process is successful, you can check with the command:
1 2 | docker images |
Will see the following display:

Run Project
After we have successfully built Image, the next step is to run the project and see the results .
Still in the docker-python folder, you create the docker-compose.yml file, with the following content:
1 2 3 4 5 6 7 8 9 | <span class="token key atrule">version</span> <span class="token punctuation">:</span> <span class="token string">"3.7"</span> <span class="token key atrule">services</span> <span class="token punctuation">:</span> <span class="token key atrule">app</span> <span class="token punctuation">:</span> <span class="token key atrule">image</span> <span class="token punctuation">:</span> learning <span class="token punctuation">-</span> docker/python <span class="token punctuation">:</span> v1 <span class="token key atrule">ports</span> <span class="token punctuation">:</span> <span class="token punctuation">-</span> <span class="token string">"5000:5000"</span> <span class="token key atrule">restart</span> <span class="token punctuation">:</span> unless <span class="token punctuation">-</span> stopped |
In the previous part of the project, I explained to you the above. If you have not read it, you should take a look .
Quick explanation:
- We define a service named app , this service will create a corresponding container when running, the container is created from the image with the name we have chosen.
- We map port from port 5000 on the root machine (outside) to port 5000 inside the container, because our project is run on port 5000 (Flask default)
It seems like the setup is not different from the previous one with NodeJS  .
.
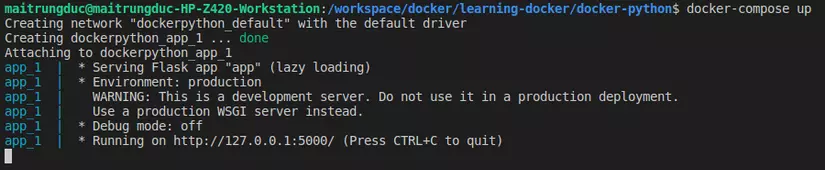
To start the project, run the following command:
1 2 | docker-compose up |
Then you will see at the terminal displayed as follows
Too good, let’s try it out. You open the browser at the address localhost: 5000 okay.
And BOOM 
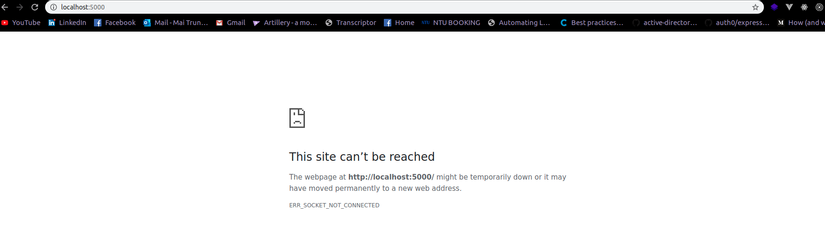
Nothing happens 
Try reviewing the code again:
- The app.py file is quite simple, nothing formidable
- There is already a command to run the app in the Dockerfile file
- The port also has a map in file docker-compose.yml
So where is the problem ??
Obviously if I run directly from the external environment, my root machine (if you have Python installed on the root machine), do not use Docker anymore, then everything is okay … 
Try reviewing the docs of Flask here , and we have found the truth, we noticed the Externally Visible Server . I will translate for you all:
1 2 | Nếu bạn chạy ứng dụng lên thì bạn sẽ để ý thấy rằng ứng dụng của bạn chỉ có thể truy cập được trong phạm vi máy của bạn (localhost), điều này được cài đặt mặc định |
Therefore, when running our project in a container, only the environment in the container can access the project, our project considers that environment to be localhost , and from the original (external) environment, the query will not be called localhost again.
Note: you pay attention to this because later when dockerize project Nuxt will be similar
So to fix this we do the following.
You modify the file app.py a little as follows:
1 2 3 4 5 6 7 8 9 10 11 | <span class="token keyword">from</span> flask <span class="token keyword">import</span> Flask <span class="token punctuation">,</span> render_template app <span class="token operator">=</span> Flask <span class="token punctuation">(</span> __name__ <span class="token punctuation">)</span> @app <span class="token punctuation">.</span> route <span class="token punctuation">(</span> <span class="token string">"/"</span> <span class="token punctuation">)</span> <span class="token keyword">def</span> <span class="token function">hello</span> <span class="token punctuation">(</span> <span class="token punctuation">)</span> <span class="token punctuation">:</span> <span class="token keyword">return</span> render_template <span class="token punctuation">(</span> <span class="token string">'index.html'</span> <span class="token punctuation">,</span> title <span class="token operator">=</span> <span class="token string">'Docker Python'</span> <span class="token punctuation">,</span> name <span class="token operator">=</span> <span class="token string">'James'</span> <span class="token punctuation">)</span> <span class="token keyword">if</span> __name__ <span class="token operator">==</span> <span class="token string">"__main__"</span> <span class="token punctuation">:</span> app <span class="token punctuation">.</span> run <span class="token punctuation">(</span> host <span class="token operator">=</span> <span class="token string">"0.0.0.0"</span> <span class="token punctuation">)</span> |
Above, we only added host = 0.0.0.0 to tell our project to “accept for all access IPs”
It’s okay, let’s rebuild the image then:
1 2 | docker build -t learning-docker/python:v1 . |
After the build is complete, we need to restart the project, run the following command:
1 2 3 | docker-compose down docker-compose up |
And finally open your browser and test it:

Great 
Environment variables (ENV)
The previous article and the one you can see is that the project has been fixed hard 1 port (the previous article is 3000, this article is 5000), so if we want the container to run at a different port, we have to fix the code? ?
At that time, we will think about environment variables , in the dev process and when actually running, using environment variables will help us a lot in minimizing the need to edit code.
Environment variable in Dockerfile
First, we will try using the environment variable declared in Dockerfile to set Port (port) for the project running in the container. (I mean the container will not run at port 5000 anymore)
In the app.js file, we correct the following:
1 2 3 4 5 6 7 8 9 10 11 12 | <span class="token keyword">from</span> flask <span class="token keyword">import</span> Flask <span class="token punctuation">,</span> render_template <span class="token keyword">import</span> os app <span class="token operator">=</span> Flask <span class="token punctuation">(</span> __name__ <span class="token punctuation">)</span> @app <span class="token punctuation">.</span> route <span class="token punctuation">(</span> <span class="token string">"/"</span> <span class="token punctuation">)</span> <span class="token keyword">def</span> <span class="token function">hello</span> <span class="token punctuation">(</span> <span class="token punctuation">)</span> <span class="token punctuation">:</span> <span class="token keyword">return</span> render_template <span class="token punctuation">(</span> <span class="token string">'index.html'</span> <span class="token punctuation">,</span> title <span class="token operator">=</span> <span class="token string">'Docker Python'</span> <span class="token punctuation">,</span> name <span class="token operator">=</span> <span class="token string">'James'</span> <span class="token punctuation">)</span> <span class="token keyword">if</span> __name__ <span class="token operator">==</span> <span class="token string">"__main__"</span> <span class="token punctuation">:</span> app <span class="token punctuation">.</span> run <span class="token punctuation">(</span> host <span class="token operator">=</span> <span class="token string">"0.0.0.0"</span> <span class="token punctuation">,</span> port <span class="token operator">=</span> os <span class="token punctuation">.</span> environ <span class="token punctuation">[</span> <span class="token string">'PORT'</span> <span class="token punctuation">]</span> <span class="token punctuation">)</span> <span class="token comment"># Chạy project ở PORT nhận vào từ biến môi trường</span> |
Then in the Dockerfile file we modify the following:
1 2 3 4 5 6 7 8 9 10 11 12 13 | <span class="token keyword">FROM</span> python <span class="token punctuation">:</span> 3.6 <span class="token punctuation">-</span> alpine <span class="token keyword">WORKDIR</span> /app <span class="token comment"># Tạo ra biến môi trường tên là PORT với giá trị 5555</span> <span class="token keyword">ENV</span> PORT 5555 <span class="token keyword">COPY</span> . . <span class="token keyword">RUN</span> pip install <span class="token punctuation">-</span> r requirements.txt <span class="token keyword">CMD</span> <span class="token punctuation">[</span> <span class="token string">"python"</span> <span class="token punctuation">,</span> <span class="token string">"app.py"</span> <span class="token punctuation">]</span> |
In the docker-compose.yml file, we modified a bit as follows:
1 2 3 4 5 6 7 8 9 | <span class="token key atrule">version</span> <span class="token punctuation">:</span> <span class="token string">"3.7"</span> <span class="token key atrule">services</span> <span class="token punctuation">:</span> <span class="token key atrule">app</span> <span class="token punctuation">:</span> <span class="token key atrule">image</span> <span class="token punctuation">:</span> learning <span class="token punctuation">-</span> docker/python <span class="token punctuation">:</span> v1 <span class="token key atrule">ports</span> <span class="token punctuation">:</span> <span class="token punctuation">-</span> <span class="token string">"5000:5555"</span> <span class="token key atrule">restart</span> <span class="token punctuation">:</span> unless <span class="token punctuation">-</span> stopped |
You notice above when we map port we only move the right side, the right side is the port of the project running in the container , the left side is the port in the original environment (outside, we can choose arbitrary , and here, port 5000 is the port that users will use to access in the browser)
Next, we proceed to rebuild the image:
1 2 | docker build -t learning-docker/python:v1 . |
And restart the project:
1 2 3 | docker-compose down docker-compose up |
Open the browser at localhost: 5000 (still the same), you will see everything runs normally, but looking through the Terminal, you will see the following:
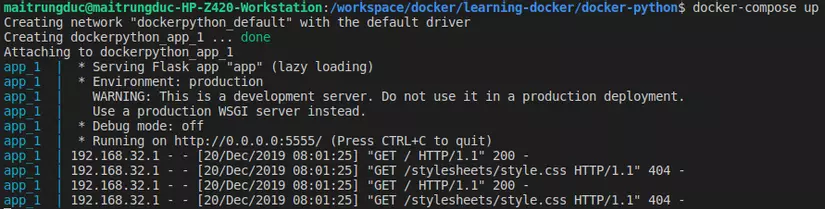
In the image above we see that inside the container, our project has been run at port 5555 already
So if we now want to change the port of the project in the container to 6666, why do we have to rebuild Image?
With environment variables that are easy to change, we have another simple option which is declared in the docker-compose.yml file.
Environment variable in docker-compose
In order to not have to rebuild the image every time we change the port, we will declare an environment variable in docker-compose.yml . Why:
- The environment variable in the Dockerfile file will be declared when we build the image
- The environment variable in the docker-compose.yml file will be initialized when the container is initialized , ie when we run docker-compose up . So to change environment variables we just need to download and upload is done

Let’s try it …
In the Dockerfile file, delete the line ENV PORT 5555 .
Then in the file docker-compose.yml we modify the following:
1 2 3 4 5 6 7 8 9 10 11 | <span class="token key atrule">version</span> <span class="token punctuation">:</span> <span class="token string">"3.7"</span> <span class="token key atrule">services</span> <span class="token punctuation">:</span> <span class="token key atrule">app</span> <span class="token punctuation">:</span> <span class="token key atrule">image</span> <span class="token punctuation">:</span> learning <span class="token punctuation">-</span> docker/python <span class="token punctuation">:</span> v1 <span class="token key atrule">ports</span> <span class="token punctuation">:</span> <span class="token punctuation">-</span> <span class="token string">"5000:6666"</span> <span class="token key atrule">restart</span> <span class="token punctuation">:</span> unless <span class="token punctuation">-</span> stopped <span class="token key atrule">environment</span> <span class="token punctuation">:</span> <span class="token key atrule">PORT</span> <span class="token punctuation">:</span> <span class="token number">6666</span> |
Now we still need to rebuild the image once to get the new updates applied:
1 2 | docker build -t learning-docker/python:v1 . |
Then we restarted the project:
1 2 3 | docker-compose down docker-compose up |
Then F5 re-browse to make sure everything is ok, and look at the terminal:
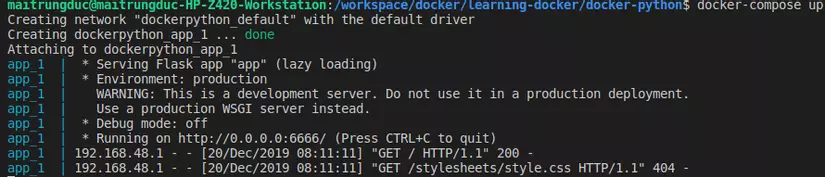
So we can easily change the port of the project in the container when using environment variables. Try changing it to 7777 (remember to download and upload docker-compose) )
A better way to create environment variables
In the above example, if we want to change PORT to 7777 for example, we have to fix it in 2 places in the docker-compose.yml file, so what if the variable is used in 100 places?
docker-compose support is a simpler, more convenient way to initialize environment variables, which is located in the .env file (just like Laravel  , which means that if we dockerize the Laravel project, we only need 1 common file is .env )
Let’s try it 
In the docker-python folder we create the .env file with the following content:
1 2 3 | PORT=8888 PUBLIC_PORT=9999 |
Explain:
- variable PORT : indicates the port of the project that runs inside the container
- variable PUBLIC_PORT : only the port that the “outside world” uses to access the project (I mean the port we call in the browser)
We modified the docker-compose.yml file as follows:
1 2 3 4 5 6 7 8 9 10 11 | <span class="token key atrule">version</span> <span class="token punctuation">:</span> <span class="token string">"3.4"</span> <span class="token key atrule">services</span> <span class="token punctuation">:</span> <span class="token key atrule">app</span> <span class="token punctuation">:</span> <span class="token key atrule">image</span> <span class="token punctuation">:</span> learning <span class="token punctuation">-</span> docker/python <span class="token punctuation">:</span> v1 <span class="token key atrule">ports</span> <span class="token punctuation">:</span> <span class="token punctuation">-</span> <span class="token string">"${PUBLIC_PORT}:${PORT}"</span> <span class="token key atrule">restart</span> <span class="token punctuation">:</span> unless <span class="token punctuation">-</span> stopped <span class="token key atrule">environment</span> <span class="token punctuation">:</span> <span class="token key atrule">PORT</span> <span class="token punctuation">:</span> $ <span class="token punctuation">{</span> PORT <span class="token punctuation">}</span> |
Then we restarted the project:
1 2 3 | docker-compose down docker-compose up |
Check in the terminal we will see:

Great, the project successfully ran at port 8888 in the container. Now check it on the browser.
We open the browser at the address localhost: xxxx (you fill in xxxx see what it is )
Push Image onto the registry
In the previous article too long I did not add images to the registry and how others can run your project from the image. In this song, we have a place to play
Docker build runs smoothly on our computer and then try to show others how they run
The registry is where we store the Docker image (like a github for saving code, but this is for the Docker image), there are many registry, public and private.
In this series, we will use Gitlab to save the code and save the image on their registry. Gitlab gives us unlimited images in the private registry for each repository (great but also free and private)
Create accounts and repositories on Gitlab
First you need to create an account on Gitlab.com (if not already). Then we create a repository named learning-docker for the whole series
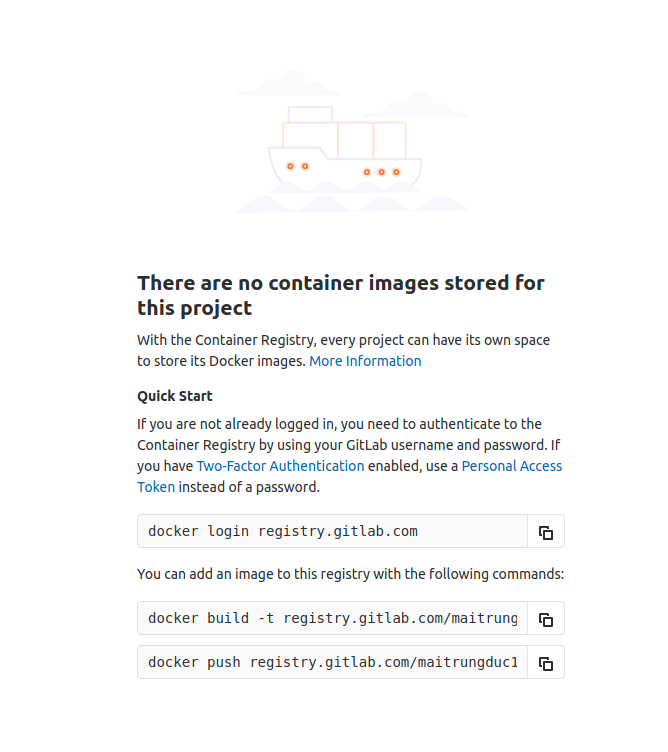
Then click the repository we just created, notice the sidebar on the left, hover over Packages , then click Container Registry , this is where we will store the image.
You will see the following display:
Begin
Now we will practice pushing the registry image of gitlab
First, as in the image above, we need to log into the Gitlab registry first (because this registry is private ). We run the following command to login:
1 2 | docker login registry.gitlab.com |
We will see in the terminal asking for the email and password of the gitlab account, please enter your parameters.
Then the next step as in the image above we need to build the image. But because our image is already local, we don’t need to rebuild it.
“Ok so I can push it to Gitlab right away?” – You can’t eat it right now
When pushing the image onto the gitlab registry we need to name the image according to their standards, the tag can be arbitrary but the name must be correct, in the following format:
1 2 | registry.gitlab.com/<username>/<tên repo> |
In the image above, copy and paste the docker push command to see how you need to name the image
After knowing how to name then we have 2 options:
- Rebuild the image as command test 2 in the image above to get an image with the name in the format
- Renaming the existing Image is available locally
Here I will choose the number 2 is to change the name so we don’t have to rebuild the image
We run the following command to list the image:
1 2 | docker images |
We will see the following:

Next we will run the following command:
1 2 | docker tag learning-docker/python:v1 registry.gitlab.com/maitrungduc1410/learning-docker |
Note: the name of the gitlab image above is for you, and if you try to list the image, you will see a new image is a copy of the old image, the old image is still there, You can delete the old image if necessary
Finally, we push the image onto the registry.
1 2 | docker push registry.gitlab.com/maitrungduc1410/learning-docker ## thay tên image cho khớp với của các bạn nhé |
After successful upload, we return to the Container Registry page on gitlab and check:
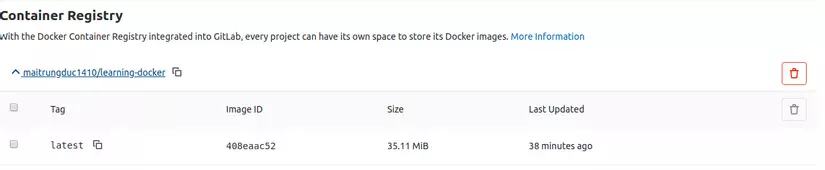
You can see that we have an image on the registry with the latest tag (because just now renamed and when pushing I did not say what the tag is, the docker default tag is latest )
Pull Image and run it
It’s time for the truth, I wonder if everything is fine when I bring the image to another device or somewhere ??
Now you will use a different machine, or if you do not have then move to a certain folder to test, if using another machine, remember that it must have Docker and Docker compose installed offline.
We create a test folder called test-docker wherever you want. In it we have the following files:
- .env to create environment variables
- docker-compose.yml to launch the project
The file .env we keep the content, but the file docker-compose.yml we modified as follows:
1 2 3 4 5 6 7 8 9 10 11 12 | <span class="token key atrule">version</span> <span class="token punctuation">:</span> <span class="token string">"3.4"</span> <span class="token key atrule">services</span> <span class="token punctuation">:</span> <span class="token key atrule">app</span> <span class="token punctuation">:</span> <span class="token comment"># đổi tên image ở đây cho đúng với của bạn (không nói gì về tag thì mặc định là 'latest')</span> <span class="token key atrule">image</span> <span class="token punctuation">:</span> registry.gitlab.com/maitrungduc1410/learning <span class="token punctuation">-</span> docker <span class="token key atrule">ports</span> <span class="token punctuation">:</span> <span class="token punctuation">-</span> <span class="token string">"${PUBLIC_PORT}:${PORT}"</span> <span class="token key atrule">restart</span> <span class="token punctuation">:</span> unless <span class="token punctuation">-</span> stopped <span class="token key atrule">environment</span> <span class="token punctuation">:</span> <span class="token key atrule">PORT</span> <span class="token punctuation">:</span> $ <span class="token punctuation">{</span> PORT <span class="token punctuation">}</span> |
Then we just need to run the following command to launch the project:
1 2 | docker-compose up |
Because the image we put is on a private gitlab, only we can retrieve the image, so if you see an authentication error, run the following command to login:
1 2 3 | docker login registry.gitlab.com # Chạy xong ta lại docker-compose up là được nhé |
And everything will run as usual , we will have the same results as in our original machine, no matter what we put the image to run on any machine.
End
I know this article is causing you eye pain because of the length, because there are many things I want to talk about, but gradually the new concepts will end and we will focus more on practice, eye pain. I hope so it decreases 
Through this article, you have seen how to dockerize a Python application like the previous one for NodeJS, right? . We still do not need to install Python directly in the (external) native environment, still only docker and docker-compose 
In this article there are 2 important content I want to talk about:
- How to use environment variables
- How to upload an image to the registry so that you can download it later and how to download an image to run it
Thank you for watching, if you have any questions please comment below let me know .
Source code for this article I put here (branch complete-tutorial okay)
See you in the next post ^^