World Flux Architecture in iOS (part 2)
PART 1
Perform a feature using Flux pattern
Learn more about the implementation of the features built into Flux pattern.
In an example in the next two sections, we will use a feature that was used in the production of the PlanGrid application. This feature allows users to filter the notes in the blueprint:
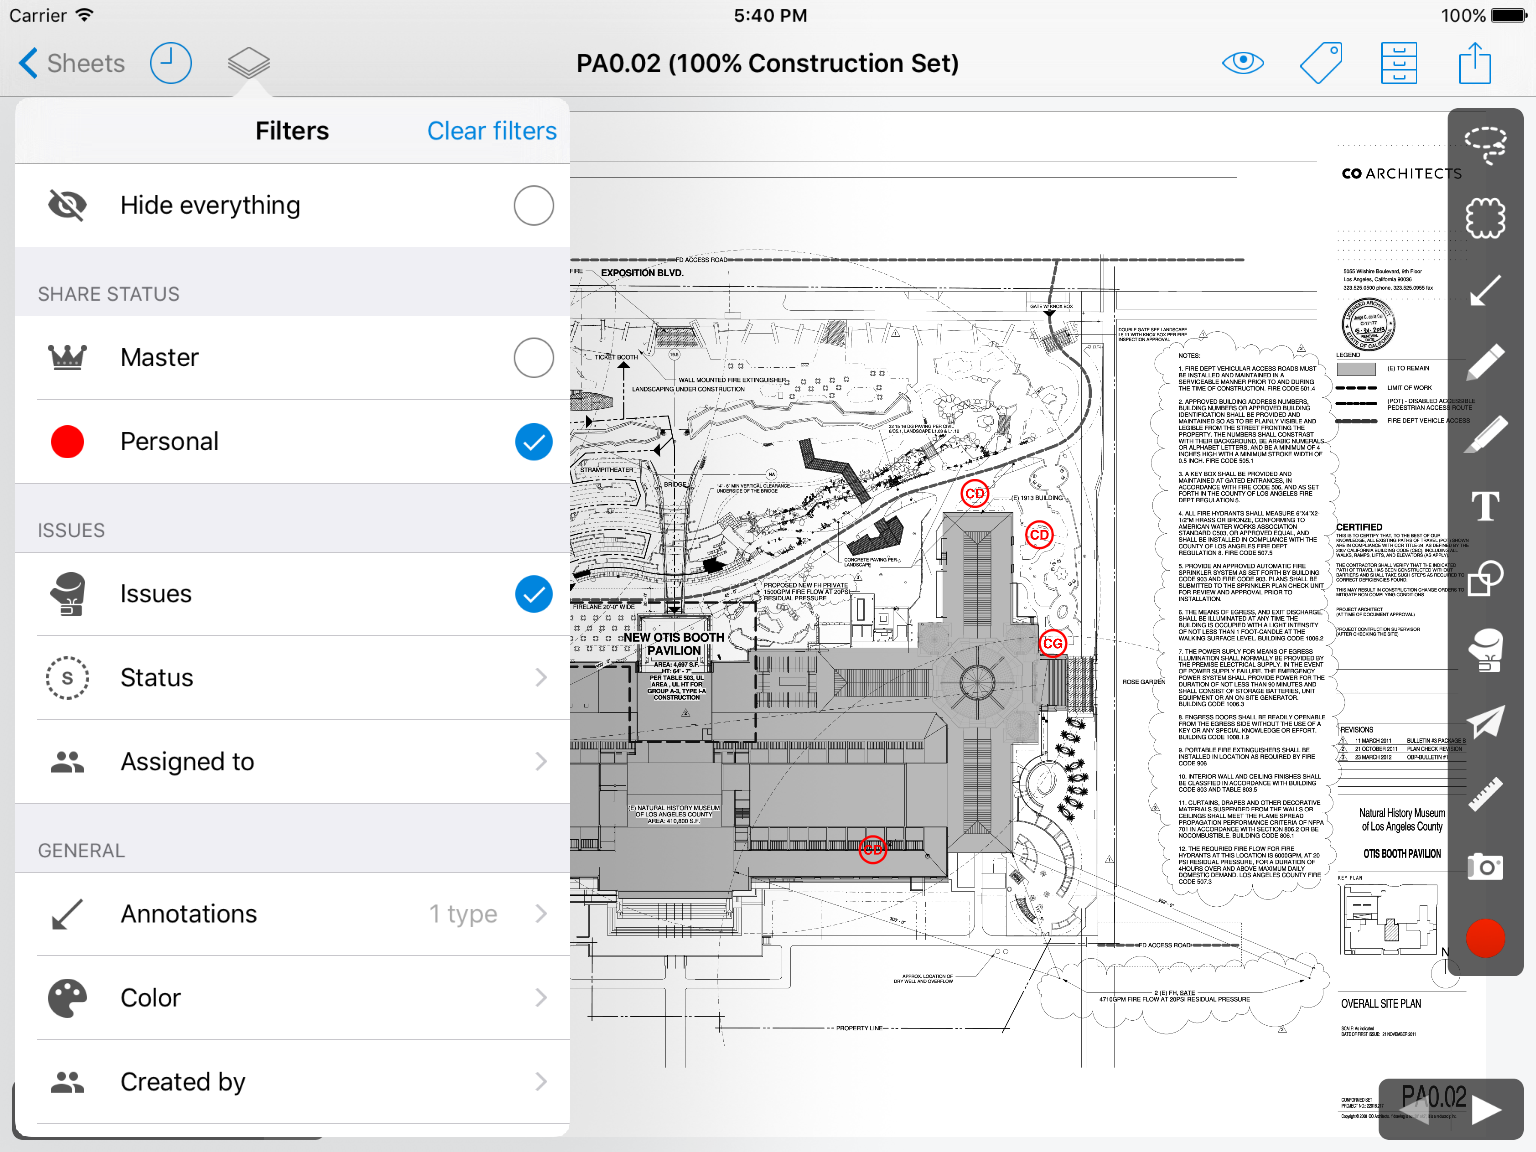
The feature we mentioned will be in the left-side popover section of the screenshot.
Step 1: Specify state
Usually, I start implementing a new feature by specifying the appropriate state for that feature. That state will show everything the UI needs to know to render an instance of a feature.
Our example will show the state of the filter comments:
1 2 3 4 5 6 7 8 9 10 | struct AnnotationFilterState { let hideEverythingFilter: RepresentableAnnotationFilter let shareStatusFilters: [RepresentableAnnotationFilter] let issueFilters: [RepresentableAnnotationFilter] let generalFilters: [RepresentableAnnotationFilter] var selectedFilterGroup: AnnotationFilterGroupType? = nil /// Indicates if any filter is active right now var isFiltering: Bool = false } |
State includes a list of different filters, a new filter group and a boolean flag, indicating whether any filters are active or not.
This state is adapted to the UI requirements. List of rendered filters in a table view. Filtered filter groups are used to display / hide details about a particular filter group selected. Flag isFiltering is used to determine whether to enable or disable a button to delete all filters in the UI.
Step 2: Format the actions
After formatting the state for a certain feature, I often think about different state mutations in the next step. In the Flux architiecture state mutations are modeled as actions to describe what state change is expected to occur. For annotation filtering, the list of actions is quite short:
1 2 3 4 5 6 7 8 9 10 11 12 13 14 15 16 17 18 19 20 21 22 23 | struct AnnotationFilteringActions { /// Enables / disables a filter. struct ToggleFilterAction: AnyAction { let filter: AnnotationFilterType } /// Navigates to details of a filter group. struct EnterFilterGroup: AnyAction { let filterGroup: AnnotationFilterGroupType } /// Leaves detail view of a filter group. struct LeaveFilterGroup: AnyAction {} /// Disables all filters. struct ResetFilters: AnyAction {} /// Disables all filters within a filter group. struct ResetFiltersInGroup: AnyAction { let filterGroup: AnnotationFilterGroupType } } |
Without the ability to deeply understand the feature, the list of actions must be easy to understand, indicating which states have initiated state transitions. One of the benefits of Flux architecture is that this list of actions has a comprehensive view of all state changes that can be enabled for this specific feature.
Step 3: Execute feedback for Actions in Store
In this step, we implement the core business logic of a feature. I personally tend to implement this step using TDD. The implementation of a store can be summarized as follows:
- Register the store with the dispatcher for all the actions dispatcher is interested in. A current example includes all
AnnotationFilteringActions. - Execute a handler called for each individual action
- In the handler, perform the necessary business logic and update the state until it is completed
The following specific instance will help us know how AnnotationFilterStore handles toggleFilterAction :
1 2 3 4 5 6 7 8 9 10 11 12 13 14 15 16 17 18 19 | func handleToggleFilterAction (toggleFilterAction: AnnotationFilteringActions.ToggleFilterAction) { var filter = toggleFilterAction.filter filter.enabled =! filter.enabled // Check for issue specific filters if filter is IssueAssignedToFilter || filter is IssueStatusAnnotationFilter || filter is IssueAssignedToFilter || filter is IssueUnassignedFilter { // if no annotation types are filtered, activate the issue / punchItem type var issueTypeFilter = self._annotationFilterService.annotationTypeFilterGroup.issueTypeFilter if self._annotationFilterService.annotationTypeFilterGroup.activeFilterCount () == 0 || issueTypeFilter ?.enabled == false { issueTypeFilter ?.abled = true } } self._applyFilter () } |
This example intentionally is not simplified. So split them up. handleToggleFilterAction is enabled whenever the ToggleFilterAction is sent. ToggleFilterAction brings information about which specific filer should be switched mode.
As an almost essential step first when implementing this business logic, the above method will simply convert the filter by converting the filter.enabled value.
After that, we implemented several custom business logic for this feature. When working with defined filters to filter the problem annotations, we encounter a few cases that need to activate issueTypeFilter . You do not need to deeply analyze the PlanGrid feature, but this method can encapsulate any business logic related to conversion filters.
At the end of the method, we will call the _applyFilter() method. This is a shared method and used by many action handlers:
1 2 3 4 5 6 7 8 9 10 11 | func _applyFilter () { self._annotationFilterService.applyFilter () self._state.value? .isFiltering = self._annotationFilterService.allFilterGroups.reduce (false) {isFiltering, print filterGroup isFiltering || (filterGroup.activeFilterCount ()> 0) } // Phantom state update to refresh cell state, không thể xác định vì bộ đệm là reference types // và trước báo cáo đã đăng nhập một cập nhật state. self._state.value = self._state.value } |
Call self._annotationFilterService.applyFilter() will actually enable filtering of the comments displayed on a sheet. Logical filtering is quite complicated, so you can convert this logic to a separate, dedicated type.
The role of each store is to provide UI-compatible state information and become a coordination point to update the state. This does not mean that the entire business logic needs to be implemented in its own store.
The last step in each action handler is to update the state. In the _applyFilter() method, we update the state isFiltering value by checking whether any filters are active.
There is one important thing to note about this store: you would like to see an additional update of the filter values stored in AnnotationFilterState . Overall, this is how to implement our stores, but this implementation is quite special.
Because filters are stored in AnnotationFilterState requires interaction with our existing Objective-C code, we have decided to model filters into classes. Then, they will be the reference types, store, and annotated UI filters sharing 1 reference to the same instances. Accordingly, all changes to filters in the store are automatically visible by the UI. Overall, we try to avoid this by using only value types in the state structs – but this is a blog post about the real Flux world and in this particular case, compromise the creation of Objective-C interop easily. More has been accepted.
If filters are value types, we need to transfer the updated filters to our state property so that the UI can observe the changes. Because we are using reference types here, we will instead perform an update on phantom state.
1 2 3 | // Phantom state update to refresh cell state, không thể xác định vì bộ đệm là reference types // và trước báo cáo đã đăng nhập một cập nhật state. self._state.value = self._state.value |
Switching to _state property will start the UI update mechanism.
We have deeply analyzed the implementation details, so we want to end the section with reminders of high-level store tasks:
- Register store with the dispatcher of all actions dispatcher is interested in. In the recent example, that would be all
AnnotationFilteringActions. - Implement 1 handler will be called for each single action
- In the handler, perform the necessary business logic and update the state after completion
Next, we will talk about how Ui receives state updates from the store.
Step 4: Mount UI with Store
One of the core Flux concepts is an automatic UI update that will be activated any time the state update occurs. This ensures that the UI always shows the latest state and removes any code required to manually maintain these updates. This step is similar to the constraints of a View with ViewModel in architecture MVVM.
There are many ways to do this – in PlanGrid we decided to use Reactive. The store to store can provide an observable state property. The code below will show how AnnotationFilterStore executes this pattern:
1 2 3 4 | /// The `AnnotationFilterState` current, this should be observed within the layer view. let state: SignalProducer <AnnotationFilterState?, NoError> /// Internal state. let _state: MutableProperty <AnnotationFilterState?> = MutableProperty (nil) |
Property _state is used in store to transform state. Customers who want to register for a store will use property state . This allows store registrants to receive state updates but does not allow them to convert live state updates (state conversion only occurs through actions!).
In initializer, the internal property is simply observed to be bound to the external signal producer:
1 | self.state = self._state.producer |
Now, any update of _state will automatically send the latest state value via the signal producer stored in the state .
The left part is the code, ensuring that the UI updates whenever new state values are generated. This may be one of the hardest parts when starting with the Flux pattern in iOS. On his website, Flux works very well with Facebook's React framework. React is designed for a special situation: re-render the UI after the state updates without requiring any additional code .
When working with UIKit, we are not so comfortable, instead we need to implementcasc manual UI updates. The key point is that we have built several components that provide 1 React like API for UITableView and UICollectionView , we will consider them later.
If you want to study these components, check out the recent talk I have made , as well as the 2 GitHub repositories that come with it ( AutoTable , UILib ).
Take a look at some real world code (in this case, the code has been simplified a bit) from the caption filtering feature. This code appears in AnnotationFilterViewController :
1 2 3 4 5 6 7 8 9 10 11 12 13 14 15 16 17 18 19 20 21 22 | func _bind (compositeDisposable: CompositeDisposable) { // On every state update, recalculate the cells for table này xem và cung cấp thêm // the data source. compositeDisposable + = self.tableViewDataSource.tableViewModel <~ self.store.state .ignoreNil () .map {[weak self] printed self? .annotationFilterViewProvider.tableViewModelForState ($ 0) } .on (event: {[weak self] _ in self? .tableViewDataSource.refreshViews () }) compositeDisposable + = self.store.state .ignoreNil () .take (1) .startWithNext {[weak self] _ in self? .tableView.reloadData () } compositeDisposable + = self.navigationItem.rightBarButtonItem! .racEnabled <~ self.store.state .map {$ 0? .isFiltering ?? false} } |
In codebase, we follow a convention that each view controller has a _bind method called from within viewWillAppear . This _bind method is responsible for registering the state of the store and providing the UI update code when state changes occur.
Because we need to implement partial UI updates and cannot depend on a framework like React, this method usually has descriptive code how a certain state updates maps into a UI update. ReactiveCool is very handy because it provides many different operators ( skipUntil , take , map …) to support setting these relationships more easily. If you haven't used a Reactive library before, this code can be a bit confusing – but you can study a small part of ReactiveCocoa that we use.
The first line in the _bind method example above ensures that table view is updated whenever a state update occurs. We use the ReactiveCocoa ignoreNil() operator to ensure that we do not start updates for a blank state. After that, we used the map operatore to delineate the latest state from store to 1 describing the display of table view.
Chart outline will be done in the method annotationFilterViewProvider.tableViewModelForState This is when the UIKit wrapper like React is customizable.
I will not study all the details of the implementation, but below is the view of the tableViewModelForState method
1 2 3 4 5 6 7 8 9 10 11 12 13 14 15 16 17 18 19 20 21 22 23 24 25 26 27 28 29 30 31 32 33 | func tableViewModelForState (state: AnnotationFilterState) -> FluxTableViewModel { let hideEverythingSection = FluxTableViewModel.SectionModel ( headerTitle: nil, headerHeight: nil, cellViewModels: AnnotationFilterViewProvider.cellViewModelsForGroup ([state.hideEverythingFilter]) ) let shareStatusSection = FluxTableViewModel.SectionModel ( headerTitle: "annotation_filters.share_status_section.title" .translate (), headerHeight: 28, cellViewModels: AnnotationFilterViewProvider.cellViewModelsForGroup (state.shareStatusFilters) ) let issueFilterSection = FluxTableViewModel.SectionModel ( headerTitle: "annotation_filters.issues_section.title" .translate (), headerHeight: 28, cellViewModels: AnnotationFilterViewProvider.cellViewModelsForGroup (state.issueFilters) ) let generalFilterSection = FluxTableViewModel.SectionModel ( headerTitle: "annotation_filters.general_section.title" .translate (), headerHeight: 28, cellViewModels: AnnotationFilterViewProvider.cellViewModelsForGroup (state.generalFilters) ) return FluxTableViewModel (sectionModels: [ hideEverythingSection, shareStatusSection, issueFilterSection, generalFilterSection ]) } |
Source: IDE Academy via Blog.Benjamin (continued)