Introduce
JSON Web Token (JWT) is an open standard ( RFC 7519 ) for verifying security information between Client-Server parties in the form of JSON objects. This information can be verified and trusted because it is digitally signed. JWT can be signed using a secret (with HMAC algorithm) or public / private key pair using standard RSA or ECDSA.
Signed tokens can verify the integrity of the claims contained therein, while encrypted tokens hide claims from other parties. When the token is registered by public / private keys, the signature also confirms that only the party holding the private key is where it registered it.
When should we use JSON Web Tokens?
Here are the benefits of using JWT:
- Authorization – Authorization: This is the case where JWT should be used. Once the user is logged in, every subsequent request sent from the Client will include JWT, allowing the user access to the routes, services, and resources allowed with the token. Single Sign ON is the widely used JWT feature, because it is low cost and easy to use on different domains.
- Information Exchange – JSON Web Tokens is a good way to securely transfer information between Client and Server parties. Because JWT can sign. For example, using public / private key pairs, you can be sure of the sender. Also, because the signature is determined based on header and payload, you can also verify that the content has not been tampered with.
JSON Web Token structure
JSON Web Tokens consists of 3 parts separated by dots (.):
Header Payload Signature
Therefore, JWT usually looks like this:
xxxxx.yyyyy.zzzzz
Let’s find out each part!
Header
In the header, there are 2 parts, that is: token code type, that is JWT; and the algorithm used, such as HMAC SHA256 or RSA.
For example:
1 2 3 4 5 | { "alg": "HS256", "typ": "JWT" } |
This JSON is then encoded Base64Url to form the first component of JWT.
Payload
The second part of the token is payload, it contains the claims. Claims usually contain attributes such as: typically, user information and additional data. There are 3 types of claims: registered, public, and private claims.
- Registered claims: This is a set of optional but predefined claims that are recommended, to provide a useful, interactive set of claims. Usually: iss (publisher), exp (expiration time), sub (subject), aud (audience) and others.
Note that claim names usually only contain 3 characters.
- Public claims: They can be determined at the discretion of JWT users. But to avoid conflicts, they must be specified in the IANA JSON Web Token Registry or defined as a URI containing the anti-conflict namespace.
- Private claims: These are custom claims created to share information between parties who agree to use them and not registered or public claims.
The payload example might look like this:
1 2 3 4 5 6 | { "sub": "1234567890", "name": "John Doe", "admin": true } |
The payload is then encrypted Base64Url to create the second component of the JSON Web Token.
Please note that for signed tokens, this information, although protected from tampering, can be read by anyone. Do not include security information in payload elements or headers of JWT unless encrypted.
Signature
To create a signature you must get an encrypted header, an encrypted payload, a secret, an algorithm specified in the header and sign. For example, if you use HMAC SHA256 algorithm, the signature will be created as follows:
1 2 3 4 5 | HMACSHA256( base64UrlEncode(header) + "." + base64UrlEncode(payload), secret) |
The signature is used to verify that the message has not been changed on the transmission line, and in case the token is signed with a private key, it can also verify the JWT sender.
How does JSON Web Tokens work?
In authentication, when the user successfully logs in with their login information, JSON Web Token will be returned. Since tokens are credentials, care must be taken to prevent security problems. In general, you shouldn’t hold tokens for longer than required.
You also should not store sensitive data on sessions in the browser memory due to lack of security.
Whenever a user wants to access a protected route or resource, the user agent should send JWT, adding Authorization in the header with the content as Bearer + token. The content of the header will look like this:
Authorization: Bearer <token>
The server server will check the validity of JWT in the header every time the request is received, and if validated the user will be allowed to access protected resources. If JWT contains the necessary data, the demand for database queries for certain operations may be reduced, although this may not always be the case.
If the token is sent in the Authorization header, Cross-Origin Resource Sharing (CORS) will not be a problem because it does not use cookies.
The following diagram shows how JWT is obtained and used to access the API or resource:
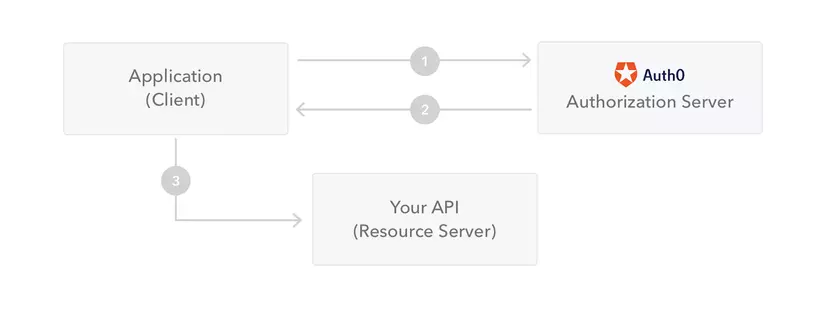
- Application or client requests authorization to the authorization server. This is done through one of the different authorization streams. For example, a typical OpenID Connect compliant web application will go through / oauth / endpoint authorization using the authorization code stream.
- When the authorization is granted, the authorization server returns the access token to the application.
- The application will use access token to access resources (such as API).
Please note that with signed tokens, all information in the token is still visible to users or other parties, although they cannot change that information. This means you should not put security information in the token.
Above is the section on learning JSON Web Token that I refer to from Introduction to JSON Web Tokens hope to help you.