We want to develop a multiple platforms application with React Native or have been using it for a long time, but I’m sure it’s not always the common commands or tricks you use! In this article, I will list some useful tips that you can use to find them whenever you need or if someone new to React Native will easily synthesize and apply them.
Of course, if you have done well with RN, you will find some very simple commands, but on the position someone is learning, it is also a bit complicated because different from some other languages such as Swift or Android. You have an IDE to support it all you just need to find out and remember. As for RN, you have to do it by command, of course, we need to remember it, there is no other option, right? Continue to the main part of you …
1. Project initialization order
You run in Terminal: react-native init FirstProject
Note: Leave your project in the desired folder (easy to remember, you must cd pathname_foldername_project ) before running the above command. Avoid the case of creating the project and then return to the code after 2 days not knowing where I left it =))
2. Build App
Running in Terminal, this is of course already so from the next part I will not mention this again
After running the command line in section 1 you execute this command: cd FirstProject
- Android:
react-native run-android - iOS:
react-native run-ios
3. Show device list
Lists the devices on which you can run your application
- MAC:
xcrun simctl list devices - Other:
emulator -list-avds
Ex: Pixel_2_API_24
4. Autolinking
This is a new change from RN 0.60, before after you want to add a new library to the project you usually use command: react-native link
But now we will use this new method for both iOS and Android platforms:
1 2 3 4 5 6 7 | # install yarn add react-native-webview cd ios && pod install && cd .. # CocoaPods on iOS needs this extra step # run yarn react-native run-ios yarn react-native run-android |
5. Upgrading React Native
From the above section, please check your RN version by: react-native -v
EX:
react-native-cli: 2.0.1
react-native: 0.60.5
If it is already old, update it using the following command: npm install --save [email protected]
Next: react-native upgrade
You just want an updated package, then use: npm install --save [email protected]
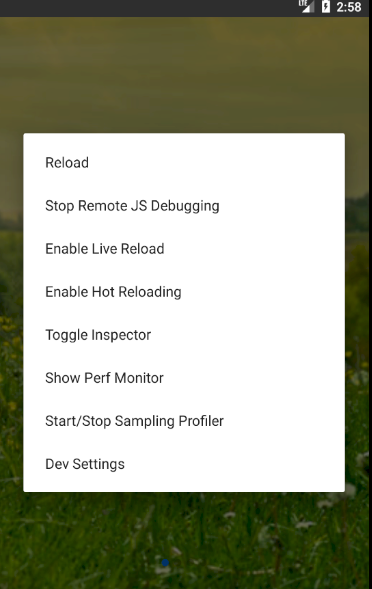
6. Debug
You can enable some of these features by:
- Android: Ctrl + M
- iOS: Command + D
Then select the feature you want:
- Enabling Hot Reloading
- Enabling Remote Debugging
7. Useful tips
a. Screen size
1 2 3 4 5 | import { Dimensions } from 'react-native'; const { width, height } = Dimensions.get('window'); Alert.alert(`Screen size: ${width} x ${height}`); |
b. Text Component
Capitalization:
<Text>{this.props.title.toUpperCase()}</Text>
Switch to lowercase;
<Text>{this.props.title.toLowerCase()}</Text>
Max line:
1 2 3 4 | <Text numberOfLines={2}> Max lines are two </Text> |
c. Properties
– Default Prop
1 2 3 4 | static defaultProps = { title: 'Default Header' } |
– Spread Attributes
1 2 3 4 5 6 7 8 | render() { const props = { title: 'My Title', size: 20, }; return <Header {...props} />; } |
– Summary of Object values into a new object
1 2 3 4 5 6 7 8 9 10 11 | render() { const { title, size, ...rest } = this.props; return ( <View> <Text style={[styles.header, { fontSize: size }]} {...rest}> {title.toUpperCase()} </Text> </View> ); } |
You see in the example that is very concise and even if it is written in a long time, it will not add much code, but in this way, it is not so concise. Because its practical application case will be very different.
For example: Usually I will use this method when retrieving data from the API, the task you need to synthesize it into a new object to transfer to another component to use the way the client wants. So the line of code: const { title, size, ...rest } = this.props; the traditional way of extracting and retrieving data would be very long. Thankfully, RN already supports such declaration.
d. UI Tips
– Use multiple styles
1 2 | <View style={[styles.generic, styles.specific, { color: 'blue' }]} /> |
** – Draw 1 circle **
1 2 3 4 5 6 7 | <View style={{ width: 90, height: 90, borderRadius: 90 / 2, backgroundColor: '#2196F3' }}/> |
– Show image under a customized View
1 2 3 4 5 6 7 8 9 10 11 12 13 | <View style={{ backgroundColor: '#dddddd', flex: 1, }}> <Image source={{ uri: 'https://placekitten.com/g/800/600' }} style={{ position: 'absolute', top: 0, left: 0, bottom: 0, right: 0, }} /> </View> |
– Adjust the position of the view:
Placing the view in the desired position is an essential task when making the interface, you can apply the following method to adjust your UI more easily.
You need to pay attention to the parameter of the following object: flexDirection It allows you to arrange the view by row and column
Comes with justifyContent which allows you to arrange content by location, detailed example below:
flex-start

center

flex-end

space-around

space-between

You only need to declare the following in the container style as follows:
1 2 3 4 5 | container: { flexDirection: 'row', justifyContent: 'space-between' } |
Note: Replace the value of flexDirection and justifyContent with the parameters above
- Next you can use
alignItemsif you need to align the view vertically
flex-start

center

flex-end

stretch
This is the default state you test run the code to know the results offline.
1 2 3 4 5 6 | container: { flexDirection: 'row', justifyContent: 'space-between', alignItems: 'flex-end' } |
8. Summary
Above are the tips as well as the commands that we often use and not outside the original purpose we mentioned, hope that someone will find useful in the article we share. If you have any interesting ways and useful tips, don’t be afraid to share yourself and others to learn. If there are difficulties in applying you also leave a comment I will support.