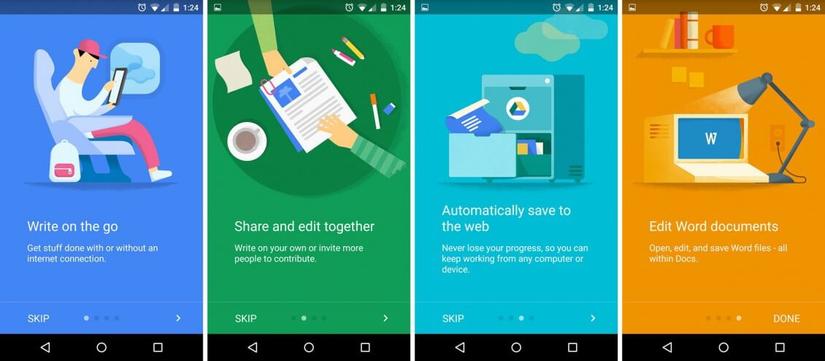
The image above is the screen on the Google Docs mobile application. Here, by swiping right / left, four times, you’ll get an idea of what the Google Docs app does.
This type of View is very common in almost any application you download from Google Play. You just swipe left or right and you will get an overview of what that application does, what functions it has.
Well, the above view is ViewPager , which is very familiar. In this article, I will introduce you to ViewPager2 .
It sounds like an upgrade, such as RecyclerView and ListView. Let’s find out.
ViewPager2
ViewPager2 was released by Google on February 7, 2019, an updated version of ViewPager. It does the same thing as ViewPager but in a smarter and more efficient way.
ViewPager2 comes with a host of new features. But the most important feature is the use of RecyclerView.
Why say this is the most important feature because with ViewPager, things become more difficult when we need to add some dynamic fragments. Now, if we are using RecyclerView in ViewPager2, half of your task has been reduced.
Dig deep into ViewPager2
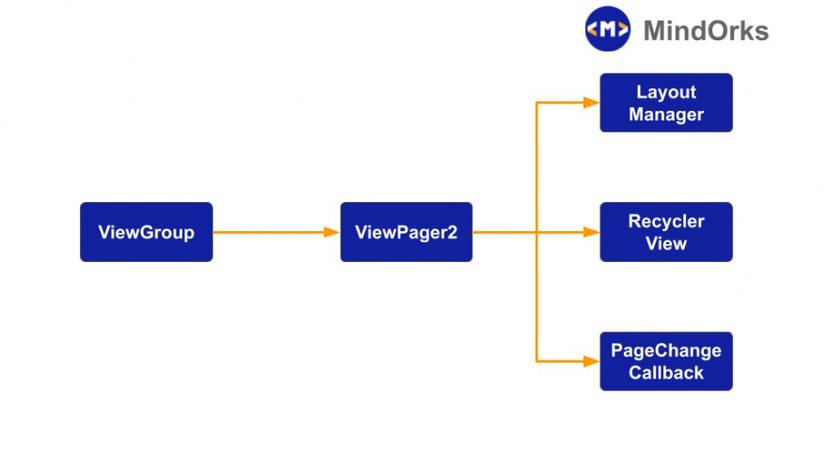
Like the View Pager, ViewPager2 extends from the ViewGroup class – from there, things are a bit different.
LayoutManager
LayoutManager in ViewPager2 is the same as in ViewPager. LayoutManager’s task is to determine the orientation of the components on the screen.
In Viewpager (older versions) we only had horizontal orientation, but with ViewPager2, we could set the orientation of the screen to be vertical also by calling setOrientation (). That way, we can change the screen by swiping up and down.
RecyclerView
ViewPager2 uses RecyclerView to display content on the screen. There are many benefits of using RecyclerView.
You have the ability to scroll smoothly, the data can be flexibly changed, the views are changed flexibly and smoothly. So you can use all components of RecyclerView and apply it in ViewPager2.
For example, to handle vertical orientation:
1 2 | view_pager2.orientation = ViewPager2.ORIENTATION_VERTICAL |
Page Change Callback
The callback when the page changes as follows:
– onPageScrolled () – will be triggered, whenever there is scrolling event for the current page
– onPageSelected () – will be activated when you select a new page
– onPageScrollStateChanged () – will be triggered when the scrolling status will be changed.
Coding
- We will code a simple app using ViewPager2.
You open Android Studio. Choose File> New project
- Add the following dependency to app / build.gradle :
1 2 | implementation "androidx.viewpager2:viewpager2:1.0.0" |
- To use ViewPager2, we will add the MainActivity layout as follows:
activity_main.xml
1 2 3 4 5 6 7 8 9 10 11 12 13 14 15 16 | <?xml version="1.0" encoding="utf-8"?> <androidx.constraintlayout.widget.ConstraintLayout xmlns:android="http://schemas.android.com/apk/res/android" xmlns:tools="http://schemas.android.com/tools" xmlns:app="http://schemas.android.com/apk/res-auto" android:layout_width="match_parent" android:layout_height="match_parent" tools:context=".MainActivity"> <androidx.viewpager2.widget.ViewPager2 android:id="@+id/view_pager2" android:layout_width="match_parent" android:layout_height="match_parent"/> </androidx.constraintlayout.widget.ConstraintLayout> |
- From here, the processing will be the same as you would with RecyclerView. We will create a new layout, which will display like the main page:
res / layout> item_page.xml
1 2 3 4 5 6 7 8 9 10 11 12 13 14 15 16 17 18 19 20 21 22 23 24 25 26 27 28 29 30 31 32 33 34 35 36 37 38 39 40 41 42 43 | <?xml version="1.0" encoding="utf-8"?> <androidx.constraintlayout.widget.ConstraintLayout xmlns:android="http://schemas.android.com/apk/res/android" xmlns:app="http://schemas.android.com/apk/res-auto" xmlns:tools="http://schemas.android.com/tools" android:id="@+id/container" android:layout_width="match_parent" android:layout_height="match_parent"> <androidx.appcompat.widget.AppCompatTextView android:id="@+id/tvTitle" android:textColor="#FFFFFF" android:layout_width="wrap_content" tools:text="Topic" android:textSize="32sp" android:layout_height="wrap_content" app:layout_constraintBottom_toBottomOf="@id/ivImage" android:layout_margin="32dp" android:gravity="center_horizontal" android:layout_marginEnd="8dp" app:layout_constraintEnd_toEndOf="parent" android:layout_marginStart="8dp" app:layout_constraintStart_toStartOf="parent" app:layout_constraintTop_toBottomOf="@+id/ivImage"/> <TextView android:id="@+id/tvAbout" android:layout_width="wrap_content" android:layout_height="wrap_content" android:textSize="24sp" android:text="About Topic" android:layout_margin="16dp" android:textColor="#FFFFFF" android:layout_marginTop="8dp" app:layout_constraintTop_toBottomOf="@+id/tvTitle" android:layout_marginEnd="8dp" app:layout_constraintEnd_toEndOf="parent" android:layout_marginStart="8dp" app:layout_constraintStart_toStartOf="parent"/> <ImageView android:id="@+id/ivImage" android:layout_width="200dp" android:layout_height="200dp" app:layout_constraintEnd_toEndOf="parent" android:layout_marginEnd="8dp" app:layout_constraintStart_toStartOf="parent" android:layout_marginStart="8dp" android:layout_marginTop="8dp" app:layout_constraintTop_toTopOf="parent"/> </androidx.constraintlayout.widget.ConstraintLayout> |
Thus, we have used 2 TextView and 1 ImageView to display random values.
OK, create layout for the finished item. Now let’s create the adapter, just like RecyclerView.
Name the class ViewPageAdapter.kt :
1 2 3 4 5 6 7 8 9 10 11 12 13 14 15 16 17 18 19 20 21 22 23 24 25 26 27 28 29 30 31 32 33 34 35 36 37 38 39 40 41 42 43 44 45 46 47 | class ViewPagerAdapter : RecyclerView.Adapter<PagerVH>() { //array of colors to change the background color of screen private val colors = intArrayOf( android.R.color.black, android.R.color.holo_red_light, android.R.color.holo_blue_dark, android.R.color.holo_purple ) override fun onCreateViewHolder(parent: ViewGroup, viewType: Int): PagerVH = PagerVH(LayoutInflater.from(parent.context).inflate(R.layout.item_page, parent, false)) //get the size of color array override fun getItemCount(): Int = Int.MAX_VALUE //binding the screen with view override fun onBindViewHolder(holder: PagerVH, position: Int) = holder.itemView.run { if(position == 0){ tvTitle.text = "ViewPager2" tvAbout.text = "In this application we will learn about ViewPager2" ivImage.setImageResource(R.drawable.face_image) container.setBackgroundResource(colors[position]) } if(position == 1) { tvTitle.text = "ViewPager2" tvAbout.text = "In this application we will learn about ViewPager2" ivImage.setImageResource(R.drawable.face_image) container.setBackgroundResource(colors[position]) } if(position == 2) { tvTitle.text = "ViewPager2" tvAbout.text = "In this application we will learn about ViewPager2" ivImage.setImageResource(R.drawable.face_image) container.setBackgroundResource(colors[position]) } if(position == 3) { tvTitle.text = "ViewPager2" tvAbout.text = "In this application we will learn about ViewPager2" ivImage.setImageResource(R.drawable.face_image) container.setBackgroundResource(colors[position]) } } } class PagerVH(itemView: View) : RecyclerView.ViewHolder(itemView) |
Finally, we call the adapter from MainActivity as follows:
1 2 3 4 5 6 7 8 9 10 11 12 13 | class MainActivity : AppCompatActivity() { override fun onCreate(savedInstanceState: Bundle?) { super.onCreate(savedInstanceState) setContentView(R.layout.activity_main) view_pager2.adapter = ViewPagerAdapter() //below line can be used to change the orientation to vertical i.e. vertical swipe //view_pager2.orientation = ViewPager2.ORIENTATION_VERTICAL } } |