
Introduce
In Google IO ’19, Google launched Jetpack Compose to create a declarative UI. Basically, declarative UI means creating a UI by specifying a specific set of UI components we need and structuring it in some way.
So let’s discuss them one by one about how we can use jetpack compose.
Source: https://blog.mindorks.com/using-jetpack-compose-to-build-ui-in-android
Step 01. Install
Add google () to the project’s build.gradle file
1 2 3 4 5 6 7 | allprojects <span class="token punctuation">{</span> repositories <span class="token punctuation">{</span> <span class="token function">google</span> <span class="token punctuation">(</span> <span class="token punctuation">)</span> <span class="token function">jcenter</span> <span class="token punctuation">(</span> <span class="token punctuation">)</span> <span class="token punctuation">}</span> <span class="token punctuation">}</span> |
Step 02. App’s Gradle
1 2 3 4 5 6 7 8 9 10 11 12 13 14 15 16 17 18 19 20 21 22 23 24 | android <span class="token punctuation">{</span> defaultConfig <span class="token punctuation">{</span> <span class="token operator">..</span> <span class="token punctuation">.</span> minSdkVersion <span class="token number">21</span> <span class="token punctuation">}</span> buildFeatures <span class="token punctuation">{</span> <span class="token comment">// Enables Jetpack Compose for this module</span> compose <span class="token boolean">true</span> <span class="token punctuation">}</span> <span class="token operator">..</span> <span class="token punctuation">.</span> <span class="token comment">// Set both the Java and Kotlin compilers to target Java 8.</span> compileOptions <span class="token punctuation">{</span> sourceCompatibility JavaVersion <span class="token punctuation">.</span> VERSION_1_8 targetCompatibility JavaVersion <span class="token punctuation">.</span> VERSION_1_8 <span class="token punctuation">}</span> kotlinOptions <span class="token punctuation">{</span> jvmTarget <span class="token operator">=</span> <span class="token string">"1.8"</span> <span class="token punctuation">}</span> <span class="token punctuation">}</span> |
Step 03. Project’s gradle file
1 2 3 4 | dependencies <span class="token punctuation">{</span> classpath <span class="token string">'com.android.tools.build:gradle:4.0.0-alpha01'</span> classpath <span class="token string">"org.jetbrains.kotlin:kotlin-gradle-plugin:1.3.60-eap-25"</span> <span class="token punctuation">}</span> |
Step 04. Finally, add the Project dependency
1 2 3 4 5 6 7 8 9 | implementation <span class="token string">"androidx.compose:compose-runtime:0.1.0-dev02"</span> implementation <span class="token string">"androidx.ui:ui-core:0.1.0-dev02"</span> implementation <span class="token string">"androidx.ui:ui-layout:0.1.0-dev02"</span> implementation <span class="token string">"androidx.ui:ui-framework:0.1.0-dev02"</span> implementation <span class="token string">"androidx.ui:ui-material:0.1.0-dev02"</span> implementation <span class="token string">"androidx.ui:ui-foundation:0.1.0-dev02"</span> implementation <span class="token string">"androidx.ui:ui-text:0.1.0-dev02"</span> implementation <span class="token string">"androidx.ui:ui-tooling:0.1.0-dev02"</span> |
Now we have completed the project setup. Let’s build the UI. Now, we use setContentView to increase the layout from an XML file. But in this tutorial, we will use Jetpack compose to design the layout file.
Step 05. In Activity File
1 2 3 4 5 6 7 | <span class="token keyword">override</span> <span class="token keyword">fun</span> <span class="token function">onCreate</span> <span class="token punctuation">(</span> savedInstanceState <span class="token operator">:</span> Bundle <span class="token operator">?</span> <span class="token punctuation">)</span> <span class="token punctuation">{</span> <span class="token keyword">super</span> <span class="token punctuation">.</span> <span class="token function">onCreate</span> <span class="token punctuation">(</span> savedInstanceState <span class="token punctuation">)</span> setContent <span class="token punctuation">{</span> <span class="token comment">//your design </span> <span class="token punctuation">}</span> <span class="token punctuation">}</span> |
Now, we put the design in the setContent . Here we call using composable functions . Let’s start with Hello World.
1 2 3 4 5 6 7 8 9 | <span class="token keyword">class</span> MainActivity <span class="token operator">:</span> <span class="token function">AppCompatActivity</span> <span class="token punctuation">(</span> <span class="token punctuation">)</span> <span class="token punctuation">{</span> <span class="token keyword">override</span> <span class="token keyword">fun</span> <span class="token function">onCreate</span> <span class="token punctuation">(</span> savedInstanceState <span class="token operator">:</span> Bundle <span class="token operator">?</span> <span class="token punctuation">)</span> <span class="token punctuation">{</span> <span class="token keyword">super</span> <span class="token punctuation">.</span> <span class="token function">onCreate</span> <span class="token punctuation">(</span> savedInstanceState <span class="token punctuation">)</span> setContent <span class="token punctuation">{</span> <span class="token function">Text</span> <span class="token punctuation">(</span> <span class="token string">"Hello world!"</span> <span class="token punctuation">)</span> <span class="token punctuation">}</span> <span class="token punctuation">}</span> <span class="token punctuation">}</span> |
Step 06. Discuss how to create a composable function.
To create a composable function , we need to use the @Composable annotation.
1 2 3 4 5 | <span class="token annotation builtin">@Composable</span> <span class="token keyword">fun</span> <span class="token function">helloWorld</span> <span class="token punctuation">(</span> <span class="token punctuation">)</span> <span class="token punctuation">{</span> <span class="token function">Text</span> <span class="token punctuation">(</span> text <span class="token operator">=</span> <span class="token string">"Hello World"</span> <span class="token punctuation">)</span> <span class="token punctuation">}</span> |
and call helloWorld () in setContent {}
- Composable functions can only be called from another Composable function.
Step 07. Let’s identify a container.
Here if we need a behavior in linearLayout with orientation in portrait mode. Here, we use containers,
1 2 3 4 | Column <span class="token punctuation">{</span> <span class="token comment">//the inside widgets</span> <span class="token punctuation">}</span> |
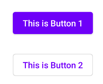
This will put the elements in a linear layout in vertical order. In this section, discuss with an example of buttons,
1 2 3 4 5 6 7 8 9 10 11 12 13 14 15 16 17 18 | Column <span class="token punctuation">{</span> <span class="token function">Button</span> <span class="token punctuation">(</span> text <span class="token operator">=</span> <span class="token string">"This is Button 1"</span> <span class="token punctuation">,</span> onClick <span class="token operator">=</span> <span class="token punctuation">{</span> <span class="token comment">//the click listeners</span> <span class="token punctuation">}</span> <span class="token punctuation">,</span> style <span class="token operator">=</span> <span class="token function">ContainedButtonStyle</span> <span class="token punctuation">(</span> <span class="token punctuation">)</span> <span class="token punctuation">)</span> <span class="token function">HeightSpacer</span> <span class="token punctuation">(</span> <span class="token number">32</span> <span class="token punctuation">.</span> dp <span class="token punctuation">)</span> <span class="token function">Button</span> <span class="token punctuation">(</span> text <span class="token operator">=</span> <span class="token string">"This is Button 2"</span> <span class="token punctuation">,</span> onClick <span class="token operator">=</span> <span class="token punctuation">{</span> <span class="token comment">//the click listeners</span> <span class="token punctuation">}</span> <span class="token punctuation">,</span> style <span class="token operator">=</span> <span class="token function">OutlinedButtonStyle</span> <span class="token punctuation">(</span> <span class="token punctuation">)</span> <span class="token punctuation">)</span> <span class="token punctuation">}</span> |
Here, we design two different types of buttons
- ContainedButtonStyle () – this will build a button with colorful buttons in material design.
- OutlinesButtonStyle () – this will only have one outline button with white fill
Result
- We can also have TextButtonStyle () where we only have text in the button. If we want to design material design principles in Android, we can use MaterialTheme ()
1 2 3 4 5 6 | MaterialTheme <span class="token punctuation">{</span> <span class="token comment">// Widgets 1</span> <span class="token comment">// Widgets 2</span> <span class="token comment">// Widgets 3</span> <span class="token punctuation">}</span> |
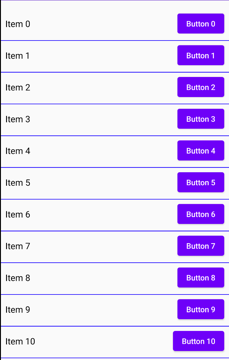
Step 08. Discuss how to create lists using Jetpack Compose
1 2 3 4 5 6 7 | <span class="token keyword">override</span> <span class="token keyword">fun</span> <span class="token function">onCreate</span> <span class="token punctuation">(</span> savedInstanceState <span class="token operator">:</span> Bundle <span class="token operator">?</span> <span class="token punctuation">)</span> <span class="token punctuation">{</span> <span class="token keyword">super</span> <span class="token punctuation">.</span> <span class="token function">onCreate</span> <span class="token punctuation">(</span> savedInstanceState <span class="token punctuation">)</span> setContent <span class="token punctuation">{</span> <span class="token function">createListView</span> <span class="token punctuation">(</span> <span class="token punctuation">)</span> <span class="token punctuation">}</span> <span class="token punctuation">}</span> |
Here, createListView is a composable function. And in that, we define the list items.
1 2 3 4 5 6 7 8 9 10 11 12 13 14 15 | <span class="token annotation builtin">@Composable</span> <span class="token keyword">private</span> <span class="token keyword">fun</span> <span class="token function">createListView</span> <span class="token punctuation">(</span> <span class="token punctuation">)</span> <span class="token punctuation">{</span> MaterialTheme <span class="token punctuation">{</span> VerticalScroller <span class="token punctuation">{</span> Column <span class="token punctuation">{</span> <span class="token punctuation">(</span> <span class="token number">0</span> <span class="token operator">..</span> <span class="token number">10</span> <span class="token punctuation">)</span> <span class="token punctuation">.</span> <span class="token function">forEachIndexed</span> <span class="token punctuation">{</span> index <span class="token punctuation">,</span> _ <span class="token operator">-></span> <span class="token function">createListItem</span> <span class="token punctuation">(</span> index <span class="token punctuation">)</span> <span class="token function">Divider</span> <span class="token punctuation">(</span> color <span class="token operator">=</span> Color <span class="token punctuation">.</span> Blue <span class="token punctuation">,</span> height <span class="token operator">=</span> <span class="token number">1</span> <span class="token punctuation">.</span> dp <span class="token punctuation">)</span> <span class="token punctuation">}</span> <span class="token punctuation">}</span> <span class="token punctuation">}</span> <span class="token punctuation">}</span> <span class="token punctuation">}</span> |
Now, in this, let’s discuss them one by one.
- MaterialTheme – this will determine the theme of the view taken from the material container
- VerticalScroller – Basically, this helps scroll the list of items
- Column – It creates a column to create and overlay all items in the listview vertically. In particular, we create 10item using forEachIndexed and we call the createListItem (index) function as composable function to create list items specifically. Now, createdListItem looks like
1 2 3 4 5 6 7 8 9 10 11 12 13 14 15 16 17 18 19 20 21 22 23 24 | <span class="token annotation builtin">@Composable</span> <span class="token keyword">private</span> <span class="token keyword">fun</span> <span class="token function">createListItem</span> <span class="token punctuation">(</span> itemIndex <span class="token operator">:</span> Int <span class="token punctuation">)</span> <span class="token punctuation">{</span> <span class="token function">Padding</span> <span class="token punctuation">(</span> left <span class="token operator">=</span> <span class="token number">8</span> <span class="token punctuation">.</span> dp <span class="token punctuation">,</span> right <span class="token operator">=</span> <span class="token number">8</span> <span class="token punctuation">.</span> dp <span class="token punctuation">,</span> top <span class="token operator">=</span> <span class="token number">8</span> <span class="token punctuation">.</span> dp <span class="token punctuation">,</span> bottom <span class="token operator">=</span> <span class="token number">8</span> <span class="token punctuation">.</span> dp <span class="token punctuation">)</span> <span class="token punctuation">{</span> <span class="token function">FlexRow</span> <span class="token punctuation">(</span> crossAxisAlignment <span class="token operator">=</span> CrossAxisAlignment <span class="token punctuation">.</span> Center <span class="token punctuation">)</span> <span class="token punctuation">{</span> <span class="token function">expanded</span> <span class="token punctuation">(</span> <span class="token number">1.0f</span> <span class="token punctuation">)</span> <span class="token punctuation">{</span> <span class="token function">Text</span> <span class="token punctuation">(</span> <span class="token string">"Item <span class="token interpolation variable">$itemIndex</span> "</span> <span class="token punctuation">)</span> <span class="token punctuation">}</span> inflexible <span class="token punctuation">{</span> <span class="token function">Button</span> <span class="token punctuation">(</span> <span class="token string">"Button <span class="token interpolation variable">$itemIndex</span> "</span> <span class="token punctuation">,</span> style <span class="token operator">=</span> <span class="token function">ContainedButtonStyle</span> <span class="token punctuation">(</span> <span class="token punctuation">)</span> <span class="token punctuation">,</span> onClick <span class="token operator">=</span> <span class="token punctuation">{</span> Toast <span class="token punctuation">.</span> <span class="token function">makeText</span> <span class="token punctuation">(</span> <span class="token keyword">this</span> <span class="token label symbol">@MainActivity</span> <span class="token punctuation">,</span> <span class="token string">"Item name <span class="token interpolation variable">$itemIndex</span> "</span> <span class="token punctuation">,</span> Toast <span class="token punctuation">.</span> LENGTH_SHORT <span class="token punctuation">)</span> <span class="token punctuation">.</span> <span class="token function">show</span> <span class="token punctuation">(</span> <span class="token punctuation">)</span> <span class="token punctuation">}</span> <span class="token punctuation">)</span> <span class="token punctuation">}</span> <span class="token punctuation">}</span> <span class="token punctuation">}</span> <span class="token punctuation">}</span> |
In this section, we add the padding designation with the 8dp unit from all the endings using Padding and then we create FlexRow.
- FlexRow is like a column but in it, it aligns elements in a horizontal direction.
- crossAxisAlocation here specifies the association of children.
- expanded like weight and in that we created a Text.
- Inflexible is like wrap_content and in that we create a Button in each item that has click listener. Now, run the application and see the preview
 We have now finished creating a List in Jetpack Compose.
Marginal
To create the Alert Dialog we use,
1 2 3 4 5 6 7 8 9 10 11 12 13 14 15 16 17 18 19 20 | <span class="token function">AlertDialog</span> <span class="token punctuation">(</span> onCloseRequest <span class="token operator">=</span> <span class="token punctuation">{</span> <span class="token comment">//closing request</span> <span class="token punctuation">}</span> <span class="token punctuation">,</span> title <span class="token operator">=</span> <span class="token punctuation">{</span> <span class="token function">Text</span> <span class="token punctuation">(</span> <span class="token string">"Title of Alert Box"</span> <span class="token punctuation">)</span> <span class="token punctuation">}</span> <span class="token punctuation">,</span> text <span class="token operator">=</span> <span class="token punctuation">{</span> <span class="token function">Text</span> <span class="token punctuation">(</span> <span class="token string">"Message of Alert Box"</span> <span class="token punctuation">)</span> <span class="token punctuation">}</span> <span class="token punctuation">,</span> confirmButton <span class="token operator">=</span> <span class="token punctuation">{</span> <span class="token function">Button</span> <span class="token punctuation">(</span> text <span class="token operator">=</span> <span class="token string">"OK"</span> <span class="token punctuation">,</span> onClick <span class="token operator">=</span> <span class="token punctuation">{</span> <span class="token comment">//click listeners request</span> <span class="token punctuation">}</span> <span class="token punctuation">)</span> <span class="token punctuation">}</span> <span class="token punctuation">)</span> |
Here, onCloseRequest is like setCancelable and the rest is like filling data.
- To design a floating action button, we use
1 2 3 4 5 6 7 8 | <span class="token function">FloatingActionButton</span> <span class="token punctuation">(</span> icon <span class="token operator">=</span> <span class="token function">imageFromResource</span> <span class="token punctuation">(</span> resources <span class="token punctuation">,</span> R <span class="token punctuation">.</span> drawable <span class="token punctuation">.</span> ic_add <span class="token punctuation">)</span> <span class="token punctuation">,</span> color <span class="token operator">=</span> <span class="token comment">//color,</span> onClick <span class="token operator">=</span> <span class="token punctuation">{</span> <span class="token comment">// TODO click action</span> <span class="token punctuation">}</span> <span class="token punctuation">)</span> |
- To create a progress bar, we use,
1 2 | <span class="token function">CircularProgressIndicator</span> <span class="token punctuation">(</span> <span class="token punctuation">)</span> <span class="token comment">//a circular progress bar</span> |
and
1 2 | <span class="token function">LinearProgressIndicator</span> <span class="token punctuation">(</span> <span class="token punctuation">)</span> <span class="token comment">//a horizontal progress bar</span> |
To see a composable function preview, we do it by using,
1 2 3 4 5 6 | <span class="token annotation builtin">@Preview</span> <span class="token annotation builtin">@Composable</span> <span class="token keyword">private</span> <span class="token keyword">fun</span> <span class="token function">helloWorld</span> <span class="token punctuation">(</span> <span class="token punctuation">)</span> <span class="token punctuation">{</span> <span class="token punctuation">}</span> |
You can see we are using the Preview annotation to check the preview of the composable functions.
This is how we can work with Jetpack Compose. To read more about it, try https://developer.android.com/jetpack/compose .