In the previous post, I wrote an article about uploading a translated file from Laravel Daily , but it was too old because it was written in 2017. In this article, I will write a new way to upload files with Dropzone.js and Laravel MediaLibrary. This article I also translated on Daily Laravel , so I would like to keep the examples of the author. My original link below the article.
Uploading files is one of the most popular features of the web today. And there are quite a few libraries that can help us with this function. Here we use Dropzone for the client side and Spatie MediaLibrary for the server side.
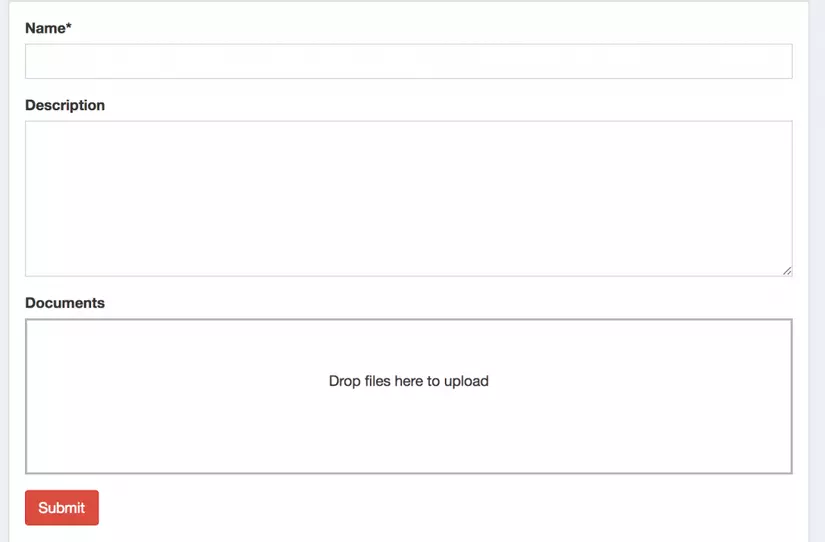
First, let’s see the demo image of Dropzone.
Step 1. Install MediaLibrary
We install MediaLibrary with this command:
1 2 | composer require spatie/laravel-medialibrary:^7.0.0 |
Next, we publish the migration file:
1 2 | php artisan vendor:publish --provider="SpatieMediaLibraryMediaLibraryServiceProvider" --tag="migrations" |
And run migration:
1 2 | php artisan migrate |
Up to now, we have the media table in our database.
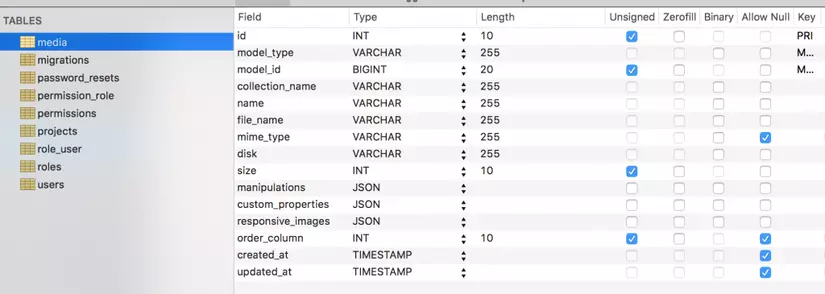
This table uses polymorphic relationships .
Step 2. Work with Dropzone.js
In view file using this blade, we need to use JavaScript code of Dropzone .
1 2 3 4 5 6 7 8 9 10 11 12 13 14 15 16 | <form action="{{ route("projects.store") }}" method="POST" enctype="multipart/form-data"> @csrf {{-- Name/Description fields, irrelevant for this article --}} <div class="form-group"> <label for="document">Documents</label> <div class="needsclick dropzone" id="document-dropzone"> </div> </div> <div> <input class="btn btn-danger" type="submit"> </div> </form> |
In the above code, we see:
- Forms will be sent via route projects.store – we’ll talk about this later.
- Dropzone it only includes 1 Div tag containing id and class of dropzone.
Now, use JavaScript at the end of the code:
1 2 3 4 5 6 7 8 9 10 11 12 13 14 15 16 17 18 19 20 21 22 23 24 25 26 27 28 29 30 31 32 33 34 35 36 37 38 39 40 | @section('scripts') <script> var uploadedDocumentMap = {} Dropzone.options.documentDropzone = { url: '{{ route('projects.storeMedia') }}', maxFilesize: 2, // MB addRemoveLinks: true, headers: { 'X-CSRF-TOKEN': "{{ csrf_token() }}" }, success: function (file, response) { $('form').append('<input type="hidden" name="document[]" value="' + response.name + '">') uploadedDocumentMap[file.name] = response.name }, removedfile: function (file) { file.previewElement.remove() var name = '' if (typeof file.file_name !== 'undefined') { name = file.file_name } else { name = uploadedDocumentMap[file.name] } $('form').find('input[name="document[]"][value="' + name + '"]').remove() }, init: function () { @if(isset($project) && $project->document) var files = {!! json_encode($project->document) !!} for (var i in files) { var file = files[i] this.options.addedfile.call(this, file) file.previewElement.classList.add('dz-complete') $('form').append('<input type="hidden" name="document[]" value="' + file.file_name + '">') } @endif } } </script> @stop |
- route (‘admin.projects.storeMedia’) – it will be the URL to process the selected file before the form is submitted.
- $ (‘form’). append () – after the above URL has uploaded the file, we will get the file name and assign it to the value of the hidden input.
- There is also a function to remove files , after deleting, the hidden inputs are also deleted.
- A few other details such as CSRF-token or upload file limit , please find out in the code above.
Note: this JavaScript code will still be ok with the edit function, not just with create .
Now we need to add some css and js from cdn:
1 2 3 4 5 6 7 8 9 10 11 12 13 14 | {{-- CSS assets in head section --}} <link href="https://cdnjs.cloudflare.com/ajax/libs/dropzone/5.5.1/min/dropzone.min.css" rel="stylesheet" /> {{-- ... a lot of main HTML code ... --}} {{-- JS assets at the bottom --}} <script src="https://cdnjs.cloudflare.com/ajax/libs/jquery/3.3.1/jquery.min.js"></script> <script src="https://cdnjs.cloudflare.com/ajax/libs/twitter-bootstrap/3.3.7/js/bootstrap.js"></script> {{-- ...Some more scripts... --}} <script src="https://cdnjs.cloudflare.com/ajax/libs/dropzone/5.5.1/min/dropzone.min.js"></script> @yield('scripts') </html> |
Now we can upload a file to Dropzone, but it can’t be submitted yet because we need to do a few more.
Step 3. Upload the file
First, in the routes / web.php file, we will have this line, if not, add it:
1 2 3 | Route::post('projects/media', ' <a class="__cf_email__" href="/cdn-cgi/l/email-protection" data-cfemail="88d8fae7e2edebfcfbcbe7e6fcfae7e4e4edfac8fbfce7faedc5edece1e9">[email protected]</a> ') ->name('projects.storeMedia'); |
Next, open the app / Http / Controllers / ProjectsController.php file:
1 2 3 4 5 6 7 8 9 10 11 12 13 14 15 16 17 18 19 20 | public function storeMedia(Request $request) { $path = storage_path('tmp/uploads'); if (!file_exists($path)) { mkdir($path, 0777, true); } $file = $request->file('file'); $name = uniqid() . '_' . trim($file->getClientOriginalName()); $file->move($path, $name); return response()->json([ 'name' => $name, 'original_name' => $file->getClientOriginalName(), ]); } |
Nothing special here, just use the normal PHP – Laravel functions to upload the file, create its unique file name and return along with the original name, like the JSON result, so the Dropzone script can continue.
Note: storage / tmp / uploads is only a temporary path, you can choose another path.
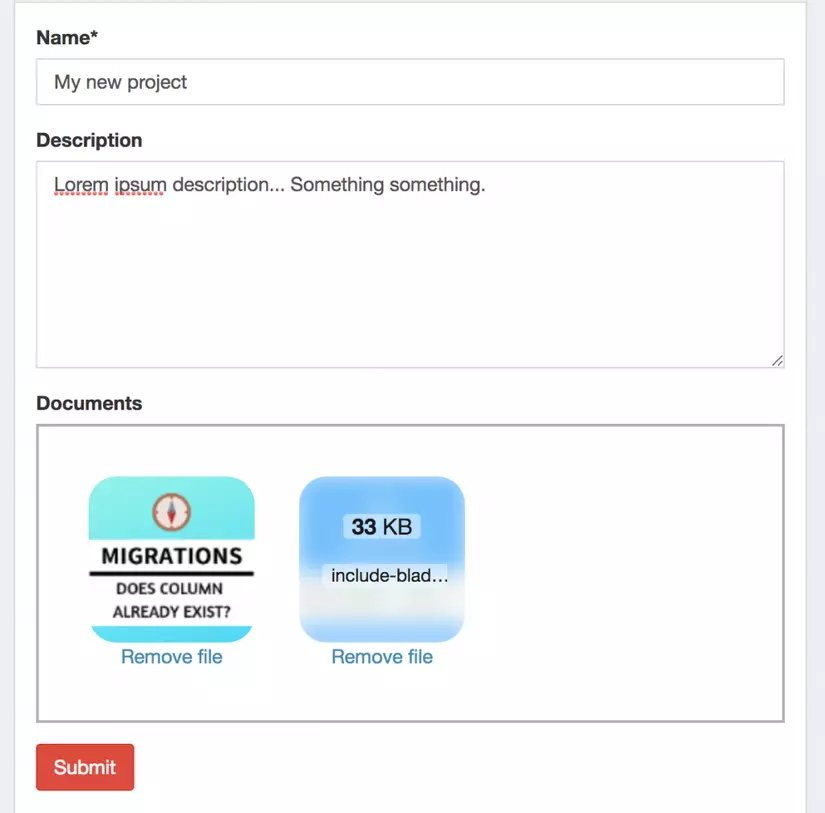
Now we have the files uploaded to the server, but there is no data in the database yet, because the form hasn’t been submitted yet, so it looks like this:
Step 4. Submit the form
After pressing the Submit button, we call the [email protected] () function, which is the resource function available in Laravel:
1 2 3 4 5 6 7 8 9 10 11 | public function store(StoreProjectRequest $request) { $project = Project::create($request->all()); foreach ($request->input('document', []) as $file) { $project->addMedia(storage_path('tmp/uploads/' . $file))->toMediaCollection('document'); } return redirect()->route('projects.index'); } |
Step 5. Edit / Update form
With the Edit function, the client’s Dropzone has not changed, only the server side needs to look a bit:
1 2 3 4 5 6 7 8 9 10 11 12 13 14 15 16 17 18 19 20 21 22 23 | public function update(UpdateProjectRequest $request, Project $project) { $project->update($request->all()); if (count($project->document) > 0) { foreach ($project->document as $media) { if (!in_array($media->file_name, $request->input('document', []))) { $media->delete(); } } } $media = $project->document->pluck('file_name')->toArray(); foreach ($request->input('document', []) as $file) { if (count($media) === 0 || !in_array($file, $media)) { $project->addMedia(storage_path('tmp/uploads/' . $file))->toMediaCollection('document'); } } return redirect()->route('admin.projects.index'); } |
Understand simple code above is: first we delete the unused files, then assign only those files not in the list.
Other case
Assuming the user has chosen to upload their files but not the submit button, those files will still be saved on the server. This will depend on your processing: save to the user’s memory for later use or use a cron job to clean up but unused files, for example.
Reference: This article I translated from https://laraveldaily.com/multiple-file-upload-with-dropzone-js-and-laravel-medialibrary-package/ .
Thank you for taking the time to look over.