Authentication with login credentials and passwords is known as a common approach for identifying users on the internet and accessing resources on the web. However, today, with the existing computing power, network attackers have the facility to test billions of password combinations in a second. What's more, statistics say that 65% of people use the same password, usually a simple password, everywhere. This means that stealing your credentials or picking them up via brute-force attacks is no longer a complicated task.
Two-factor authentication (also known as 2FA) is a method of verifying user identity in which the user is granted access only after successfully presenting two elements to the authentication mechanism:
- what they and only they know – login & password, PIN, etc.)
- possesses (what they and only they have). Factors of ownership may be – ID card, security token, smartphone, etc. – something that is not a logical thing you know, but a physical entity.
In this post, I want to demonstrate how to implement two-factor authentication for web applications using Google Authenticator as the security element of ownership.
TOTP (One time password algorithm based on time)
The Google Authenticator application is based on the TOTP algorithm. The one-time-based password algorithm (TOTP) is an algorithm that calculates a one-time password for the general secret key and the current time. This algorithm is described and standardized in RFC 6238. And here, in the sample application, I used the TOTP constructor to deploy.
Perform
As a basis for the 2FA example, I created a very simple Java Web application through Spring Boot. The structure of this application is very simple. It includes:
4 static HTML pages Home User registration page Login page Secure page – not available for anonymous users, but accessible for users who have gone through two steps of authentication Javascript file containing files JQuery statement to add functionality to static HTML pages. Spring REST controller for login and user registration on the server side And the basic services to support the implementation of the REST controller You can see the version of the application has been deployed and in operation in the GitHub repository:
1 2 | https://github.com/asholokh/google-auth-sample |
User registration
The user registration flow consists of two steps:
- Specify login and password
- Register the secret key generated in the Google Authenticator application
When the application creates a new user with specific login and password, it also generates a unique secret key. This key will then be used to generate time-based code. So it is clear that this secret key (token) should not be shared with anyone, like passwords.
Here's how the user registration flow looks on the UI:
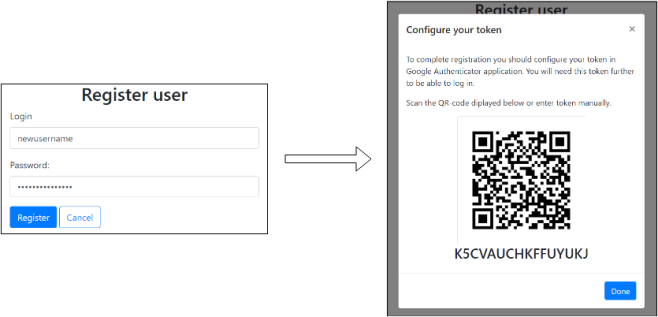
The token on this screenshot is the user secret key encrypted in Base32 format. This is a requirement to make it can be used in Google Authenticator or other OTP applications.
QR codes represent a link with a specific format, which can be scanned and understood by Google Authenicator. The format of this link is as follows
1 2 | otpauth://TYPE/LABEL?PARAMETERS |
For example :
1 2 | otpauth://totp/2FaExample.com?secret=3djh8sdjhfg7n634856dn&issuer=2FaExample |
To create my own QR image, I used the zxing.org service using the following link:
1 2 | https://zxing.org/w/chart?cht=qr&chs=250x250&chld=M&choe=UTF-8&chl=otpauth://totp/2FaExample.com?secret=" + data + "&issuer=2FaExample |
where 'data' is the user's secret key chain.
After clicking 'Done' on the 'Configure your token' screen, registered users will be ready for login attempts. Please note that the secret key is only shown to the user once. So it's important to save or remember it. If not, it will not be able to login.
Authentication stream
The authentication process consists of two steps:
- Login / verify password
- Check the TOTP token once.
Look at the diagram below for more details. 
In the sample application described, I used the TOTP algorithm reference implementation, provided as part of RFC 6238. I copied and pasted that deployment into the project, so I won't describe anything related to it. You can go here and review it.
What the application does is:
- Get user login information and password
- Verify that the user with login and password information exists.
- Get token from user (screenshot above)
- Get the user's secret key from the database.
- By this secret key and the current time generated TOTP by the algorithm mentioned.
- Compare the generated TOTP (step 5) with the user provided token (step 3).
It is important to say that there is a requirement to make this flow work properly. Because TOTP algorithm uses time to calculate token code, the current time on the application server and on the device with Google Authenticator installed must match. Otherwise, the tokens will never match step 6.
Worth more
It is important to understand that the Google Authenicator application is only one of the implementations of the TOTP creation algorithm. It is possible to use any application that does the same specifications, for example FreeOTP, Authy or even your own. It only takes one time password algorithm to create a one-time password.
In this post, I described how to implement two-factor authentication using Google Authenticator and TOTP algorithms to generate tokens. To make 2FA even more secure, any other token generation method can be used, e.g. SMS, phone calls, native hardware tokens, etc.
Source: https://andriysholokh.com/2018/03/20/two-factor-authentication-with-google-authenticator/