Try making photo coloring apps with Deep Learning network
- Tram Ho
Google Photos and the feature for coloring black and white photos
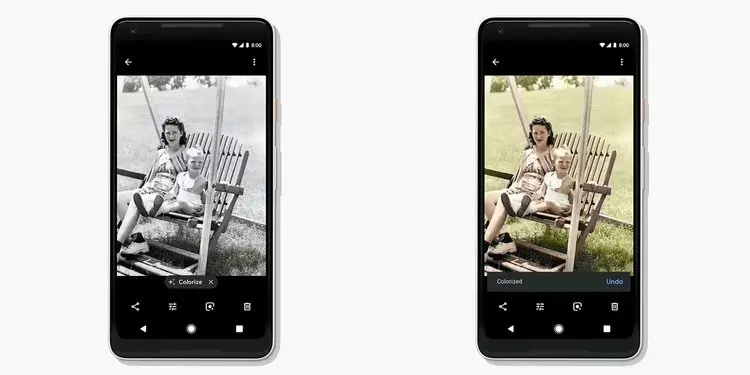
The picture you are looking at above is one of the photos at the Google I / O 2018 event. The photo was released to publish one of the impressive features that Google is preparing to integrate into. Google Photos app – Use artificial intelligence to color gray photos . Along with many other new gadgets, this is considered a great ambition of Google, wishing to “upgrade” Google Photos is not only a common photo storage application but also equipped with additional AI technologies to complement Add more smart features.
The feature, when released, will help users to “turn” a gray photo (probably photos taken from the past) into color images. The application is able to guess the best colors for the photo.
Target
Problem Coloring for photos like Google is solving above when approaching by Deep Learning method can bring very good results if we build reasonable neuron network and find quality dataset sets high. As a person who likes to try-wrong ? ? nên so in the article I will try to build a model to make this application see!
Implementation steps
As I said above, with the Deep Learning approach, data collection – processing along with building a logical network is required. And with this application, we will go through the following steps
- Collect and pre-process data
- Building and training DL models
- Tracking results and optimizations
1. Collect and pre-process data
HSV color system
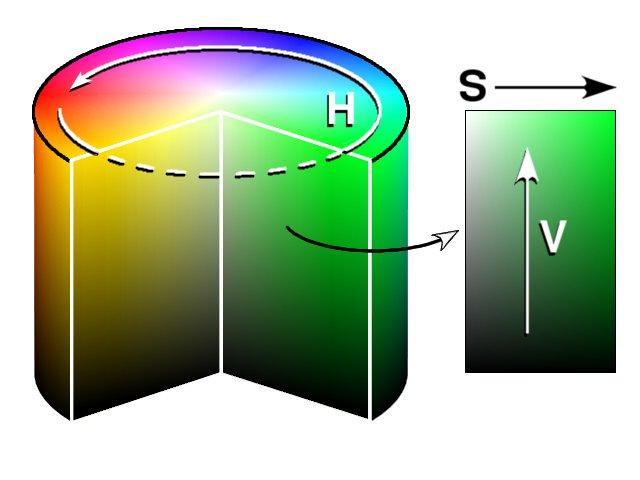
Most of us today when it comes to colors, people will often think of the RGB color system (Red, Green, Blue) or a few will probably know the CMYK color system (cyan, magenta, yellow, key) . However, if you pay attention, in the color picker, the HSV color system (hue, saturation, value) will often be used. The reason is that unlike RGB and CMYK, using the combination of the original colors to define the rest of the colors, the HSV color system defines colors in a way that is quite similar to the way the eye people feel about color (That’s also the reason for choosing tools that use this color system). As follows.
Any color in the HSV system will be defined by 3 parameters
- Hue (H) : Color – This is the color display parameter (Circle in the image above). Depending on what color it is, H will have specific parameters (Example Red will fall from 0-60 degrees, green 120-180 degrees, blue sky 240-300 degrees )
- Saturation (S) : Saturation – A parameter for the gray level shown in the colors (Horizontal axis in the upper image). With the maximum value of the saturation, the color will be most clearly expressed, whereas the color will be grayed out.
- Value (V) : Some definitions called B – Brightness – Combine with parameter S to create the brightness and intensity of the color. IF THE PRIVATE DIRECTORY VALUE V IS, I CAN HAVE THIS IS THE GRAY OF A COLOR PHOTO
Choose handling and training on HSV color system
Our problem here is that the input is a gray image (1 channel), the model will process and output the output as a color image (3 channel – with RGB system). In order to minimize the parameters that need to be treated, using the HSV color system, based on considering the gray input image is the V value of the output image, our model will only have to guess the 2 color systems. (instead of 3 if using RGB, 4 if using CMYK). So in short, we choose HSV color system to handle for 2 main reasons as follows:
- HSV color system is similar to the way human eyes perceive color => Deep Learning model training will be able to have higher accuracy.
- HSV color system with parameter V is considered as the gray image of the original image => Minimize the parameters needed to train the Deep Learning model.
Data collection
Our data needs this time with no special requirements, just that they are color images. You can get any photos to put into training. For me, I will use Photo365 Places365 – a very large dataset used in image recognition challenges. Dataset includes landscape shots of many parts of the world in different time periods, along with labels of shooting locations. But here, we will just need to take pictures!
You can find and download the Places365 file here: http://places2.csail.mit.edu/download.html
Very much data, I will only download the test file on it to use this time (~ 4.7GB)
Money handling data
With the choice of processing on the HSV color system, our work in the pre-treatment stage will be to bring the image to the HSV color system, split the channel V into the input image, and 2 channels H, S as the label for training. . I do the following:
1 2 3 4 5 | def split_hsv_img (img_path): img = cv2.imread (img_path) img = cv2.resize (img, (224, 224)) img_hsv = cv2.cvtColor (img, cv2.COLOR_BGR2HSV) return img_hsv [:,:,: 2], img_hsv [:,:, 2] |
Once done, we will have a training set that includes gray images for training and labels that are in two H and S channels.
X.shape = (-1, 224, 224)
y.shape = (-1, 224, 224, 2)
2. Build Deep Learning network
U-Net network
With this coloring problem, there are currently many DL networks that are very effective, but in this article, to make it easy to understand, I will use Resnet network, modify it a little according to U- idea. net (A network in common use for image partitioning competitions by its speed and accuracy – segmentation)
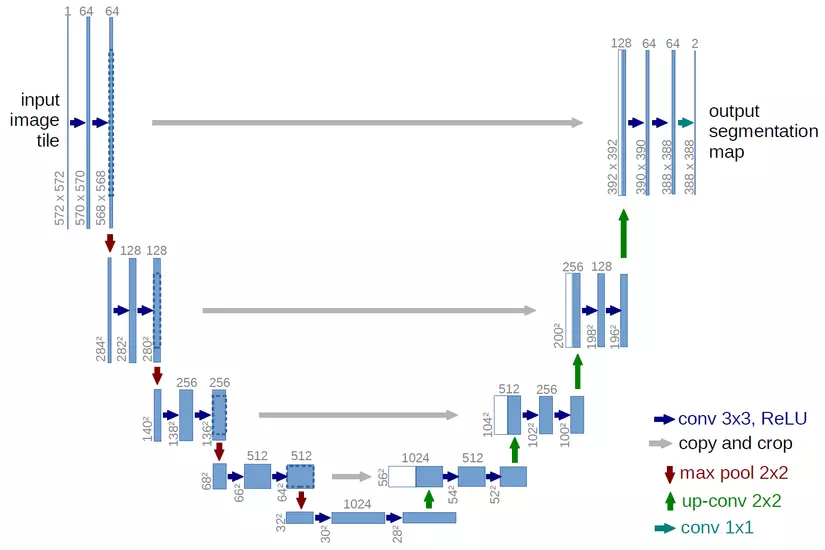
The main idea of U-Net is almost like an auto-encoder, from an initial image, use Conv2D layers to analyze and extract features, downscale to the Fully Connected class, then use Conv2D Transpose to upscale back to the original image size. This feature extraction makes the neuron network often quite deep, so at the end layers, the model can be forgotten about the characteristics from the original or featured image extracted from the original layers, so U -Net will take the images from the original class into the training process of the following classes as a parameter to avoid that situation.
Building models for coloring problems
I will use the base network Resnet and build based on the recent U-Net idea.
1 2 3 4 5 6 7 8 9 10 11 12 13 14 15 16 17 18 19 20 21 22 23 24 25 26 27 28 29 30 | import tensorflow as tf from tensorflow.keras.layers import * from tensorflow.keras import backend as K from tensorflow.keras.models import Model from tensorflow.keras import applications resnet = applications.resnet50.ResNet50 (weights = None, classes = 365) x = resnet.output model_tmp = Model (inputs = resnet.input, outputs = x) #Get outputs of decode layers layer_3, layer_7, layer_13, layer_16 = model_tmp.get_layer ('activation_9'). output, model_tmp.get_layer ('activation_21'). output, model_tmp.get_layer ('activation_39'). output, model_tmp.get_layer ('activation_48'). output #Adding outputs decoder with encoder layers fcn1 = Conv2D (filters = 2, kernel_size = 1, name = 'fcn1') (layer_16) fcn2 = Conv2DTranspose (filters = layer_13.get_shape (). as_list () [- 1], kernel_size = 4, strides = 2, padding = 'same', name = 'fcn2') (fcn1) fcn2_skip_connected = Add (name = "fcn2_plus_layer13") ([fcn2, layer_13]) fcn3 = Conv2DTranspose (filters = layer_7.get_shape (). as_list () [- 1], kernel_size = 4, strides = 2, padding = 'same', name = "fcn3") (fcn2_skip_connected) fcn3_skip_connected = Add (name = "fcn3_plus_layer_7") ([fcn3, layer_7]) fcn4 = Conv2DTranspose (filters = layer_3.get_shape (). as_list () [- 1], kernel_size = 4, strides = 2, padding = 'same', name = "fcn4") (fcn3_skip_connected) fcn4_skip_connected = Add (name = "fcn4_plus_layer_3") ([fcn4, layer_3]) # Upsample again fcn5 = Conv2DTranspose (filters = 2, kernel_size = 16, strides = (4, 4), padding = 'same', name = "fcn5") (fcn4_skip_connected) relu255 = ReLU (max_value = 255) (fcn5) |
1 2 | model = Model (inputs = resnet.input, outputs = relu255) model.summary () |
Models obtained
1 2 3 4 5 6 7 8 9 10 11 12 13 14 15 16 17 18 19 20 21 22 23 24 25 26 | Layer (type) Output Shape Param # Connected to ================================================== ================================================ input_1 (InputLayer) (None, 224, 224, 3) 0 __________________________________________________________________________________________________ conv1_pad (ZeroPadding2D) (None, 230, 230, 3) 0 input_1 [0] [0] __________________________________________________________________________________________________ conv1 (Conv2D) (None, 112, 112, 64) 9472 conv1_pad [0] [0] __________________________________________________________________________________________________ bn_conv1 (BatchNormalization) (None, 112, 112, 64) 256 conv1 [0] [0] __________________________________________________________________________________________________ activation (Activation) (None, 112, 112, 64) 0 bn_conv1 [0] [0] ...... fcn4 (Conv2DTranspose) (None, 56, 56, 256) 2097408 fcn3_plus_layer_7 [0] [0] __________________________________________________________________________________________________ fcn4_plus_layer_3 (Add) (None, 56, 56, 256) 0 fcn4 [0] [0] activation_9 [0] [0] __________________________________________________________________________________________________ fcn5 (Conv2DTranspose) (None, 224, 224, 2) 131074 fcn4_plus_layer_3 [0] [0] __________________________________________________________________________________________________ re_lu (ReLU) (None, 224, 224, 2) 0 fcn5 [0] [0] ================================================== ================================================ Total params: 34,243,204 Trainable params: 34,190,084 Non-trainable params: 53,120 |
The OpenCV values assigned to the HSV color system will be between 0-255, so in the final layer, I will use ReLU and assign max to 255 to control the output more closely. Notice the output, we need to calculate the parameters of the Conv2D and Conv2DTranspose classes so that its size is exactly the same as the input, but there will be 2 different channels. This is the output we need to compute, to match the input to create a colored HSV image!
Note : You may also notice, the input of the Resnet network will be a 3-dimensional color image . So before putting into training, I will have to perform an operation to bring my 1-dimensional gray image to 3 dimensions. Here I will use OpenCV’s cvtColor function directly for convenience
1 | img = cv2.cvtColor (img, cv2.COLOR_GRAY2BGR) |
OpenCV’s upper function is not, of course, a function that uses artificial intelligence to take a gray image of a color image, its effect is to create an identical 3-channel image from an original channel (multiplying 3 channel numbers). .
Function loss and optimizer
To create visualization, this problem will use the Regression Linear, which means that the value of the guess will be evaluated at the level of error compared to the label value, instead of just caring for the right and wrong. This is much more logical than we use Classification. So here I will use mean_squared_error, optimiser is rmsprop like Regression other common problems.
1 2 | def root_mean_squared_error (y_true, y_pred): return K.sqrt (K.mean (K.square (y_pred - y_true)))) |
1 | model.compile (loss = root_mean_squared_error, optimizer = 'rmsprop') |
Conduct training
1 2 3 4 5 6 7 8 9 10 11 12 13 | batch_size = 32 for i in range (0, 150): i = np.random.randint (1, 9) images, gt_images = load_data (i) model.fit_generator (generator = image_batch_generator (images, gt_images, batch_size), steps_per_epoch = len (images) // batch_size, epochs = 5, verbose = 1, validation_data = image_batch_generator (images_val, gt_images_val, batch_size), validation_steps = len (images_val) // batch_size, callbacks = callbacks_list) del images, gt_images |
Big training data problem
Because the amount of data is very large, it’s best to use the fit_generator function to avoid having to load all training data into RAM or GPU. Here due to big data, I had to split up to do many training exercises (Here I divided the data into 10 small volumes, the number 10 will do the data to validate), I will perform random loading of 1 of them. go to training 5 epochs and continue to take another episode.
1 2 3 4 5 6 7 8 9 10 11 12 13 | ..... Epoch 00001: loss did not improve from 36.42126 312/312 [==============================] - 552s 2s / step - loss: 47.1491 - val_loss: 53.8508 Epoch 2/5 311/312 [============================>.] - ETA: 1s - loss: 44.4026 Epoch 00002: loss did not improve from 36.42126 312/312 [==============================] - 552s 2s / step - loss: 44.4070 - val_loss: 55.8593 Epoch 3/5 311/312 [============================>.] - ETA: 1s - loss: 42.5710 Epoch 00003: loss did not improve from 36.42126 312/312 [==============================] - 552s 2s / step - loss: 42.5674 - val_loss: 54.0140 Epoch 4/5 197/312 [=================> ............] - ETA: 2:37 - loss: 41.1402 |
I stopped training after about 5 hours running on Google Colab because I don’t have much time. If possible, you download a larger data set and wait patiently for training for as long as possible to get much better results!
3. See the results of training!
The model will receive the input as a gray image, and give us the output as a 2-dimensional image with 2 channels H and S. To test the results, we need to re-combine the 3D into the HSV formation and then put them Return to the normal RGB color system to display.
1 2 3 4 5 6 7 8 9 10 | def regenerate_img (gray, hs): img = np.zeros ((224, 224, 3)) img [:,:, 2] = gray #V img [:,:, 0] = hs [:,:, 0] #H img [:,:, 1] = hs [:,:, 1] #S img = np.array (img, np.uint8) img = cv2.cvtColor (img, cv2.COLOR_HSV2RGB) #Convert to RGB return img |
This is the result of my model, I randomly selected several photos in the validate set to display
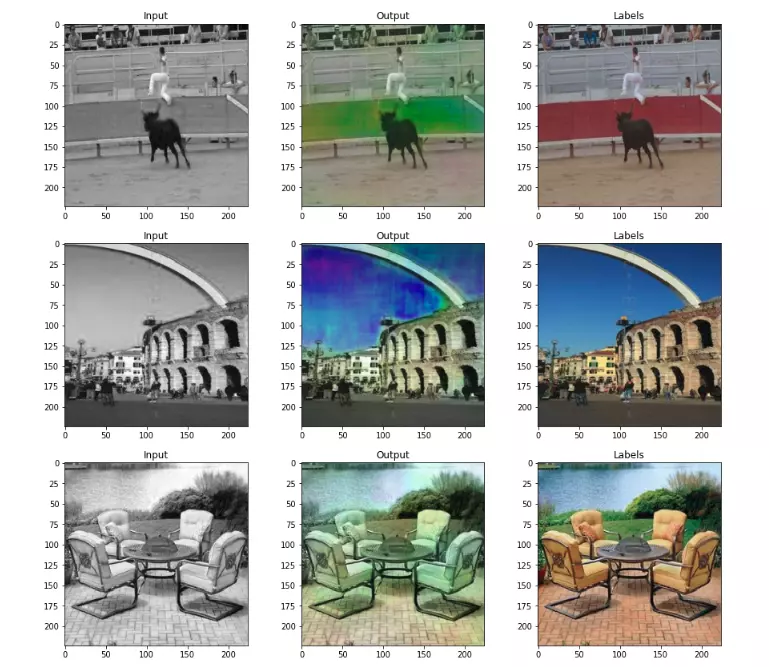
In the Predict file on your repo, let the other results images in the validate file, you can go to see more.
Depending on the data set you use for training, our model will have different “creative” ways when coloring. If you want to color the landscape image, select dataset Places365 as a bad choice, but if you want to color the portrait (image restoring), look for the dataset for the portrait image (Example As of CelebA), if you want to color images with multiple objects, ImageNet will probably be suitable.
summary
Today’s article, I tried to train a Deep Learning model to solve the problem of coloring for gray images . The model I build is based on a fairly familiar network and is available in the Keras library Resnet so I hope to reduce difficulties for you in reading and following code.
In order for the model to predict the colors more effectively and reasonably, in addition to using Deep Learning normally, we will need to use more knowledge and algorithms about the other color distribution that we have not convenient. In the article, you can find a lot of current paper related to this problem.
I pushed my source code to github to make it easier for you to follow:
https://github.com/hoanganhpham1006/colorizationviblo