Introduction
Today I will briefly introduce you the PyTorch model-specific deployment tool. This tool is called TorchServe, recently developed so the repo is less star than Tensorflow Serving and the bug is more.. Link Git repo: https://github.com/pytorch/serve
TorchServe system diagram
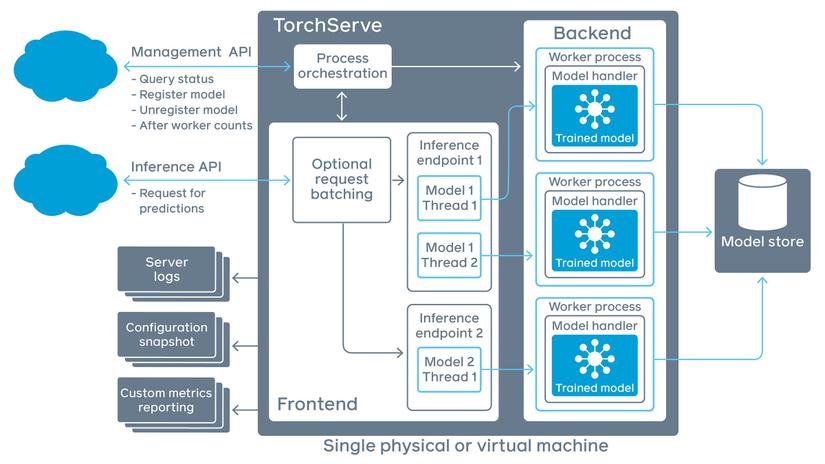
As shown above, TorchServe system is divided into 3 parts: API, Core (Backend & Frontend), Model Storage.
The API will be divided into two parts: Management API and Inference API, the first will manage the state of the query, the state of the model, the number of workers, the second is where the user request is received.
In the core of TorchServe there are 2 parts: Frontend and Backend. The frontend receives the user’s request if multiple requests are batching and return the request status logs. These batch requests pass the inference endpoint to the backend, where the backend splits the batch requests to each worker process, each worker managing an instance of the trained model.
So where does the model get? Of course, in the model storage, there are many models used for different tasks: Classification, Detection, Segmentation, … Each model will have many different versions. TorchServe will automatically load the model based on the user’s config.
Install TorchServe and torch-model-archiver
First you need to clone the repo to already:
1 2 3 | git clone https://github.com/pytorch/serve cd serve |
Based on the environment you need, the following installation options are available:
- With CPU for Torch 1.7.1
1 2 | python ./ts_scripts/install_dependencies.py |
- With GPU and Cuda 10.2
1 2 | python ./ts_scripts/install_dependencies.py --cuda=cu102 |
- With GPU and Cuda 10.1
1 2 | python ./ts_scripts/install_dependencies.py --cuda=cu101 |
- With GPU and Cuda 9.2
1 2 | python ./ts_scripts/install_dependencies.py --cuda=cu92 |
=> Install necessary dependencies
Next install two important libraries: torchserve and torch-model-archiver can be made by conda or pip
- With Conda
1 2 | conda install torchserve torch-model-archiver -c pytorch |
- With Pip
1 2 | pip install torchserve torch-model-archiver |
Save models using TorchServe
Create a folder anywhere, named model_store
1 2 | mkdir model_store |
Download a sample model to deploy and predict. Here I use densene161
1 2 | wget https://download.pytorch.org/models/densenet161-8d451a50.pth |
Use the torch-model-archive library to save the models in a format that TorchServe supports
1 2 3 4 5 6 7 8 9 | torch-model-archiver --model-name densenet161 --version 1.0 --model-file ./serve/examples/image_classifier/densenet_161/model.py --serialized-file densenet161-8d451a50.pth --export-path model_store --extra-files ./serve/examples/image_classifier/index_to_name.json --handler image_classifier |
Explain the parameters in the above statement:
model-name: model nameversion: version how manymodel-file: model file, if you save the model with torch save then not needed (Optional)serialized-file: required, trained model awaits conversion, here is typed the path to the modelexport-path:export-pathlocationextra-files: json file contains label (Optional)handler: required, file processing (preprocessing, post-processing), can inherit from the classes available in the repo or customize it as you like.
Result:

Run the TorchServe server
After having the above file, you use this command. This command will open the endpoint for the user request as well as execute hidden processes to serve the model.
1 2 3 4 5 | torchserve --start --ncs --model-store model_store --models densenet161.mar |
start: Start session of TorchServestop: end of TorchServe sessionmodel-store: the place that contains the model, namely the folder containing the file with the.marextension earliermodels: model to load, egdensenet161.marlog-config: config file for logts-config: special config file for TorchServe, such as adjusting the portforeground: show log when running in terminal, if disable ts will run in the backgroundncs: disable snapshot
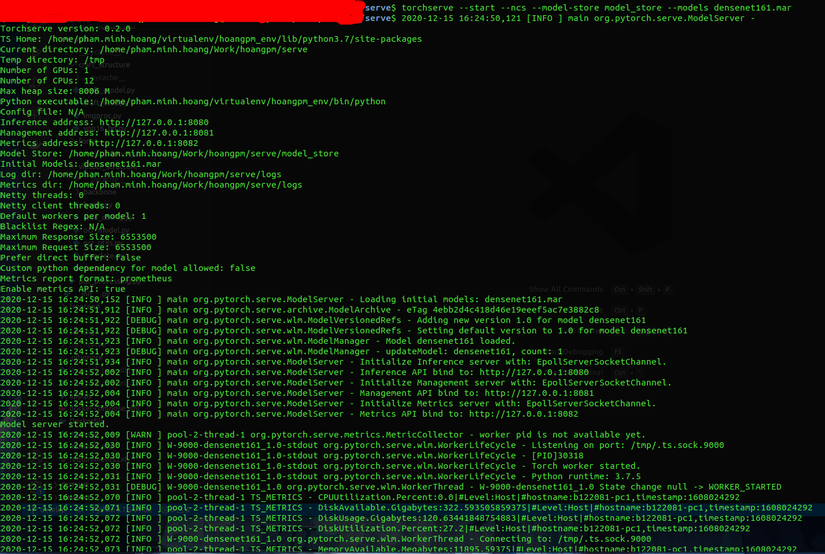
Link Inference API: http://127.0.0.1:8080
Link Management API: http://127.0.0.1:8081
Link Metric API: http://127.0.0.1:8082
The two links below have not been mentioned, let’s find out which first link. This link is used to predict the result using REST API
Download 1 previous image already:
1 2 | curl -O https://raw.githubusercontent.com/pytorch/serve/master/docs/images/kitten_small.jpg |

Use the command line to send an image request with a POST method to the TorchServe endpoint
1 2 | curl http://127.0.0.1:8080/predictions/densenet161 -T kitten_small.jpg |
Output:

1 2 3 4 5 6 7 8 | <span class="token punctuation">{</span> <span class="token property">"tabby"</span> <span class="token operator">:</span> <span class="token number">0.5237820744514465</span> <span class="token punctuation">,</span> <span class="token property">"tiger_cat"</span> <span class="token operator">:</span> <span class="token number">0.18530139327049255</span> <span class="token punctuation">,</span> <span class="token property">"lynx"</span> <span class="token operator">:</span> <span class="token number">0.15431317687034607</span> <span class="token punctuation">,</span> <span class="token property">"tiger"</span> <span class="token operator">:</span> <span class="token number">0.056817926466464996</span> <span class="token punctuation">,</span> <span class="token property">"Egyptian_cat"</span> <span class="token operator">:</span> <span class="token number">0.04702862352132797</span> <span class="token punctuation">}</span> |
Predicting via gRPC
- First of all download the gRPC protocol libraries already
1 2 | pip install -U grpcio protobuf grpcio-tools |
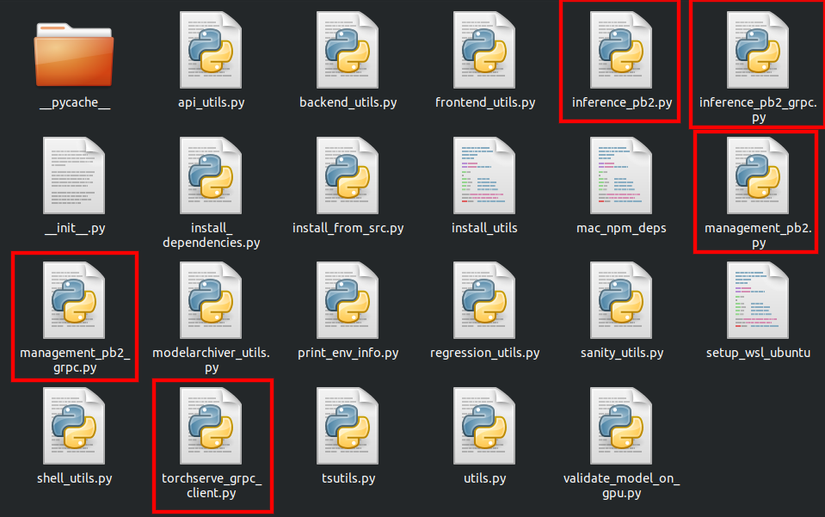
- In the
servefolder, use the proto file to gen gRPC client stub
1 2 3 4 5 | python -m grpc_tools.protoc --proto_path=frontend/server/src/main/resources/proto/ --python_out=ts_scripts --grpc_python_out=ts_scripts frontend/server/src/main/resources/proto/inference.proto frontend/server/src/main/resources/proto/management.proto |
- Use model registration
1 2 | python ts_scripts/torchserve_grpc_client.py register densenet161 |
- Predict a sample using gRPC python client
1 2 | python ts_scripts/torchserve_grpc_client.py infer densenet161 examples/image_classifier/kitten.jpg |
- Unsubscribe the model
1 2 | python ts_scripts/torchserve_grpc_client.py unregister densenet161 |
By default, TorchServe takes 2 port 7070 for the gRPC Inference API and 7071 for the gRPC Management API
As a result, I haven’t tried gRPC so I can’t show it to you (actually tried it but got bug, this prediction method has just been updated on torchserve’s repo so the error is also normal. )
)
Management API
When you have multiple models, this is when you need an efficient management tool and of course torchserve supports this through the API endpoint. Supported functions
- Register 1 model
- Increase / decrease the number of workers for a specified model
- Describe the model’s state
- Unsubscribe the model
- Show registered models
- Specify a model instance as default
Model registration
Use the POST method: POST /models
List of parameters:
- url: path to
.maror link to download model from Internet. Example: https://torchserve.pytorch.org/mar_files/squeezenet1_1.mar - model_name: model name
- handler: Make sure the handler is in PYTHONPATH. Format: module_name: method_name
- runtime: PYTHON default
- batch_size: default 1
- max_batch_delay: batch timeout, default 100 ms
- initial_workers: initialized number of workers, default 0, TorchServe will not run without workers
- synchronous: create synchronous or asynchronous workers, default to
false - response_timeout: timeout, default 120 s
1 2 3 4 5 6 | curl -X POST <span class="token string">"http://localhost:8081/models?url=https://torchserve.pytorch.org/mar_files/squeezenet1_1.mar"</span> <span class="token punctuation">{</span> <span class="token property">"status"</span> <span class="token operator">:</span> <span class="token string">"Model "squeezenet_v1.1" Version: 1.0 registered with 0 initial workers. Use scale workers API to add workers for the model."</span> <span class="token punctuation">}</span> |
Register model together with worker creation
1 2 3 4 5 6 7 8 9 10 11 12 13 14 15 16 17 18 19 20 21 22 23 24 | curl -v -X POST "http://localhost:8081/models?initial_workers=1&synchronous=false&url=https://torchserve.pytorch.org/mar_files/squeezenet1_1.mar" * Trying 127.0.0.1... * TCP_NODELAY set * Connected to localhost (127.0.0.1) port 8081 (#0) > POST /models?initial_workers=1&synchronous=false&url=https://torchserve.pytorch.org/mar_files/squeezenet1_1.mar HTTP/1.1 > Host: localhost:8081 > User-Agent: curl/7.58.0 > Accept: */* > < HTTP/1.1 202 Accepted < content-type: application/json < x-request-id: 61d2b2b4-2a3a-49d4-84c9-e6f2f92cd36d < Pragma: no-cache < Cache-Control: no-cache; no-store, must-revalidate, private < Expires: Thu, 01 Jan 1970 00:00:00 UTC < content-length: 47 < connection: keep-alive < { "status": "Processing worker updates..." } * Connection #0 to host localhost left intact |
Scale workers
Using the PUT method: PUT /models/{model_name}
List of parameters:
- min_worker: (Optional) minimum number of workers, default 1
- max_worker: (Optional) the maximum number of workers, default 1, TorchServe will not create a worker that exceeds this number.
- number_gpu: (Optional) the number of GPU workers created, default is 0, if the number of workers exceeds the number of GPUs on the machine, the remaining workers will run on the CPU.
- synchronous:
falsedefault - timeout: the time it takes for the worker to complete the pending requests. If this number is exceeded, the worker will stop working. A
0will stop worker processing immediately. The value-1will wait indefinitely. Default-1
1 2 3 4 5 6 7 8 9 10 11 12 13 14 15 16 17 18 19 20 21 22 23 24 | curl -v -X PUT "http://localhost:8081/models/squeezenet1_1/?min_worker=3" * Trying 127.0.0.1... * TCP_NODELAY set * Connected to localhost (127.0.0.1) port 8081 (#0) > PUT /models/squeezenet1_1/?min_worker=3 HTTP/1.1 > Host: localhost:8081 > User-Agent: curl/7.58.0 > Accept: */* > < HTTP/1.1 202 Accepted < content-type: application/json < x-request-id: b508190b-ef7d-4e7a-a361-6dac1036d2bd < Pragma: no-cache < Cache-Control: no-cache; no-store, must-revalidate, private < Expires: Thu, 01 Jan 1970 00:00:00 UTC < content-length: 47 < connection: keep-alive < { "status": "Processing worker updates..." } * Connection #0 to host localhost left intact |
If the model has multiple versions: PUT /models/{model_name}/{version}
1 2 | curl -v -X PUT "http://localhost:8081/models/squeezenet1_1/1.0?min_worker=3" |
Model description
Use the GET method: GET /models/{model_name}
1 2 3 4 5 6 7 8 9 10 11 12 13 14 15 16 17 18 19 20 21 22 23 24 25 26 27 28 29 30 31 32 33 34 35 36 37 38 39 | curl http <span class="token operator">:</span> <span class="token comment">//localhost:8081/models/squeezenet1_1</span> <span class="token punctuation">[</span> <span class="token punctuation">{</span> <span class="token property">"modelName"</span> <span class="token operator">:</span> <span class="token string">"squeezenet1_1"</span> <span class="token punctuation">,</span> <span class="token property">"modelVersion"</span> <span class="token operator">:</span> <span class="token string">"1.0"</span> <span class="token punctuation">,</span> <span class="token property">"modelUrl"</span> <span class="token operator">:</span> <span class="token string">"https://torchserve.pytorch.org/mar_files/squeezenet1_1.mar"</span> <span class="token punctuation">,</span> <span class="token property">"runtime"</span> <span class="token operator">:</span> <span class="token string">"python"</span> <span class="token punctuation">,</span> <span class="token property">"minWorkers"</span> <span class="token operator">:</span> <span class="token number">3</span> <span class="token punctuation">,</span> <span class="token property">"maxWorkers"</span> <span class="token operator">:</span> <span class="token number">3</span> <span class="token punctuation">,</span> <span class="token property">"batchSize"</span> <span class="token operator">:</span> <span class="token number">1</span> <span class="token punctuation">,</span> <span class="token property">"maxBatchDelay"</span> <span class="token operator">:</span> <span class="token number">100</span> <span class="token punctuation">,</span> <span class="token property">"loadedAtStartup"</span> <span class="token operator">:</span> <span class="token boolean">false</span> <span class="token punctuation">,</span> <span class="token property">"workers"</span> <span class="token operator">:</span> <span class="token punctuation">[</span> <span class="token punctuation">{</span> <span class="token property">"id"</span> <span class="token operator">:</span> <span class="token string">"9001"</span> <span class="token punctuation">,</span> <span class="token property">"startTime"</span> <span class="token operator">:</span> <span class="token string">"2020-12-16T15:13:43.722Z"</span> <span class="token punctuation">,</span> <span class="token property">"status"</span> <span class="token operator">:</span> <span class="token string">"READY"</span> <span class="token punctuation">,</span> <span class="token property">"gpu"</span> <span class="token operator">:</span> <span class="token boolean">true</span> <span class="token punctuation">,</span> <span class="token property">"memoryUsage"</span> <span class="token operator">:</span> <span class="token number">2044100608</span> <span class="token punctuation">}</span> <span class="token punctuation">,</span> <span class="token punctuation">{</span> <span class="token property">"id"</span> <span class="token operator">:</span> <span class="token string">"9002"</span> <span class="token punctuation">,</span> <span class="token property">"startTime"</span> <span class="token operator">:</span> <span class="token string">"2020-12-16T15:52:52.561Z"</span> <span class="token punctuation">,</span> <span class="token property">"status"</span> <span class="token operator">:</span> <span class="token string">"READY"</span> <span class="token punctuation">,</span> <span class="token property">"gpu"</span> <span class="token operator">:</span> <span class="token boolean">true</span> <span class="token punctuation">,</span> <span class="token property">"memoryUsage"</span> <span class="token operator">:</span> <span class="token number">2045640704</span> <span class="token punctuation">}</span> <span class="token punctuation">,</span> <span class="token punctuation">{</span> <span class="token property">"id"</span> <span class="token operator">:</span> <span class="token string">"9003"</span> <span class="token punctuation">,</span> <span class="token property">"startTime"</span> <span class="token operator">:</span> <span class="token string">"2020-12-16T15:52:52.561Z"</span> <span class="token punctuation">,</span> <span class="token property">"status"</span> <span class="token operator">:</span> <span class="token string">"READY"</span> <span class="token punctuation">,</span> <span class="token property">"gpu"</span> <span class="token operator">:</span> <span class="token boolean">true</span> <span class="token punctuation">,</span> <span class="token property">"memoryUsage"</span> <span class="token operator">:</span> <span class="token number">2060914688</span> <span class="token punctuation">}</span> <span class="token punctuation">]</span> <span class="token punctuation">}</span> <span class="token punctuation">]</span> |
If the model has multiple versions: GET /models/{model_name}/all
Unsubscribe the model
Use the Delete method: DELETE /models/{model_name}/{version}
1 2 3 4 5 6 | curl -X DELETE http <span class="token operator">:</span> <span class="token comment">//localhost:8081/models/squeezenet1_1/1.0</span> <span class="token punctuation">{</span> <span class="token property">"status"</span> <span class="token operator">:</span> <span class="token string">"Model "squeezenet1_1" unregistered"</span> <span class="token punctuation">}</span> |
Lists the models of registration
Use the GET: GET /models
Parameters:
- limit: (Optional) number of items to return, default 100
- next_page_token: (Optional) what page
1 2 3 4 5 6 7 8 9 10 11 12 13 14 15 | curl <span class="token string">"http://localhost:8081/models"</span> <span class="token punctuation">{</span> <span class="token property">"models"</span> <span class="token operator">:</span> <span class="token punctuation">[</span> <span class="token punctuation">{</span> <span class="token property">"modelName"</span> <span class="token operator">:</span> <span class="token string">"densenet161"</span> <span class="token punctuation">,</span> <span class="token property">"modelUrl"</span> <span class="token operator">:</span> <span class="token string">"densenet161.mar"</span> <span class="token punctuation">}</span> <span class="token punctuation">,</span> <span class="token punctuation">{</span> <span class="token property">"modelName"</span> <span class="token operator">:</span> <span class="token string">"squeezenet1_1"</span> <span class="token punctuation">,</span> <span class="token property">"modelUrl"</span> <span class="token operator">:</span> <span class="token string">"https://torchserve.pytorch.org/mar_files/squeezenet1_1.mar"</span> <span class="token punctuation">}</span> <span class="token punctuation">]</span> <span class="token punctuation">}</span> |
Set default model
Use the PUT method: PUT /models/{model_name}/{version}/set-default
1 2 3 4 5 6 7 8 9 10 11 12 13 14 15 16 17 18 19 20 21 22 23 24 | curl -v -X PUT http://localhost:8081/models/squeezenet1_1/1.0/set-default * Trying 127.0.0.1... * TCP_NODELAY set * Connected to localhost (127.0.0.1) port 8081 (#0) > PUT /models/squeezenet1_1/1.0/set-default HTTP/1.1 > Host: localhost:8081 > User-Agent: curl/7.58.0 > Accept: */* > < HTTP/1.1 200 OK < content-type: application/json < x-request-id: 6db1cff1-7517-4826-b146-0e8605ecfd36 < Pragma: no-cache < Cache-Control: no-cache; no-store, must-revalidate, private < Expires: Thu, 01 Jan 1970 00:00:00 UTC < content-length: 93 < connection: keep-alive < { "status": "Default vesion succsesfully updated for model "squeezenet1_1" to "1.0"" } * Connection #0 to host localhost left intact |
Conclude
I have just written here today, anyone interested should go to the TorchServe repo to dabble in it.