As we all know, headles browsers are capable of fast JavaScript execution and emulate clicking or hovering over elements on the page on different devices. Headles browsers are also extremely helpful when it comes to testing network activity, mimicking user behavior while making requests. They are usually faster than real browsers because we do not need to start the browser GUI, so we can ignore the time the real browser takes to load CSS and JavaScript and render the HTML. As such, they are often used during automated testing to make sure everything works as intended before the code is deployed to production environments. There are many solutions for writing test cases using the headless browser and in this article we will learn about the Playwright library together.
What is Playwright?
Playwright is a Node.js library to automate Chromium , Firefox and WebKit with a single API. Playwright is built to enable cross-browser web automation that is ever-green , capable , reliable and fast .
Based on the Playwright introduction, it is a Node.js library that automates Chromium, Firefox, and WebKit with a single API. Playwright Library is built to enable web automation across multiple browsers, always updated with the latest versions, stable, efficient, reliable and fast. Playwright is written by a team of developers from Microsoft, is open source, its source code is available on Github at https://github.com/microsoft/playwright
Playwright was built to automate most of the web browser features, which are increasingly widely used by Single Page Apps and Progressive Web Apps. With Playwright provides us with many facilities as follows:
- Execute spanned test scripts that include multiple pages, domains, and iframes
- Automatically wait for the elements to be ready before performing actions (like clicks, filling in forms, …)
- Block network activity for mimic and spoofed network requests
- Mobile device emulation, geolocation, and permissions management
- Supports web components through shadow-piercing selectors
- Native input events for mouse and keyboard
- Upload and download files
Get started with Playwright
Let’s say you installed Node because Playwright is a library of Node which: v (If not, go to the official Node.js website and download and install it.)
Next, create a directory for your project and start a new Node project inside the directory with the following command:
1 2 | <span class="token function">mkdir</span> playright-example <span class="token operator">&&</span> <span class="token builtin class-name">cd</span> playright-example <span class="token operator">&&</span> <span class="token function">npm</span> init -y |
After the project is set up, we can start writing headless tests. To do that, we need to install the Playwright library and create a file called index.js where we write the code for the test.
1 2 | <span class="token function">touch</span> index.js <span class="token operator">&&</span> <span class="token function">npm</span> i --save playwright |
The above command installs Playwright and the binaries for Chromium, Firefox, and WebKit. Once installed, you can import the Playwright library.
Write headless tests
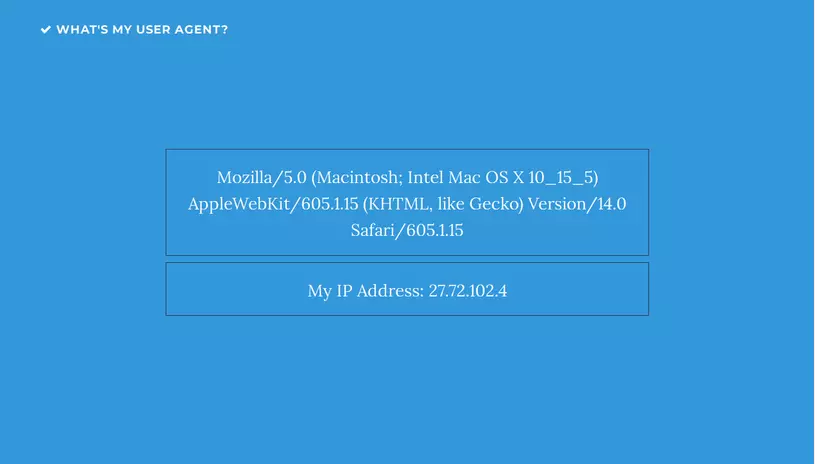
For simplicity’s sake, for the first test case we will go to whatsmyuseragent.org and take a screenshot of the page. If you don’t know then whatsmyuseragent.org is a website that shows your version of the user agent and data, as well as your IP address.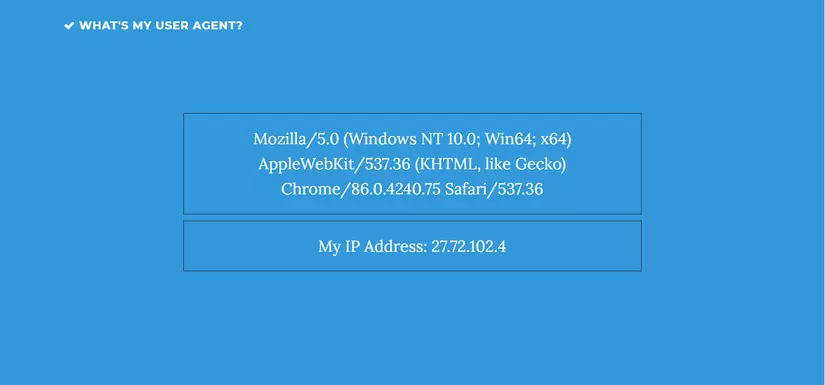
To do that, we need to import the browsers’ engines from playwright such as firefox . Then by calling the launch method to create a browser object then creating a page , which can be understood similarly to a tab when we are browsing using the newPage method, finally using goto and screenshot to go to whatsmyuseragent.org page and take a screenshot. The specific source code for the index.js file can be referenced as follows:
1 2 3 4 5 6 7 8 9 10 11 12 13 14 15 16 17 18 19 20 21 | <span class="token keyword">const</span> <span class="token punctuation">{</span> webkit <span class="token punctuation">,</span> firefox <span class="token punctuation">,</span> chromium <span class="token punctuation">}</span> <span class="token operator">=</span> <span class="token function">require</span> <span class="token punctuation">(</span> <span class="token string">'playwright'</span> <span class="token punctuation">)</span> <span class="token punctuation">;</span> <span class="token keyword">const</span> <span class="token function-variable function">simulate</span> <span class="token operator">=</span> <span class="token keyword">async</span> <span class="token punctuation">(</span> <span class="token parameter">engine</span> <span class="token punctuation">)</span> <span class="token operator">=></span> <span class="token punctuation">{</span> <span class="token keyword">const</span> browser <span class="token operator">=</span> <span class="token keyword">await</span> engine <span class="token punctuation">.</span> <span class="token function">launch</span> <span class="token punctuation">(</span> <span class="token punctuation">)</span> <span class="token punctuation">;</span> <span class="token keyword">const</span> page <span class="token operator">=</span> <span class="token keyword">await</span> browser <span class="token punctuation">.</span> <span class="token function">newPage</span> <span class="token punctuation">(</span> <span class="token punctuation">)</span> <span class="token punctuation">;</span> <span class="token keyword">await</span> page <span class="token punctuation">.</span> <span class="token function">goto</span> <span class="token punctuation">(</span> <span class="token string">'http://whatsmyuseragent.org/'</span> <span class="token punctuation">)</span> <span class="token punctuation">;</span> <span class="token keyword">await</span> page <span class="token punctuation">.</span> <span class="token function">screenshot</span> <span class="token punctuation">(</span> <span class="token punctuation">{</span> path <span class="token operator">:</span> <span class="token template-string"><span class="token template-punctuation string">`</span> <span class="token string">example-</span> <span class="token interpolation"><span class="token interpolation-punctuation punctuation">${</span> engine <span class="token punctuation">.</span> _initializer <span class="token punctuation">.</span> name <span class="token interpolation-punctuation punctuation">}</span></span> <span class="token string">.png</span> <span class="token template-punctuation string">`</span></span> <span class="token punctuation">}</span> <span class="token punctuation">)</span> <span class="token punctuation">;</span> <span class="token keyword">await</span> browser <span class="token punctuation">.</span> <span class="token function">close</span> <span class="token punctuation">(</span> <span class="token punctuation">)</span> <span class="token punctuation">;</span> <span class="token punctuation">}</span> <span class="token punctuation">;</span> <span class="token function">simulate</span> <span class="token punctuation">(</span> firefox <span class="token punctuation">)</span> <span class="token function">simulate</span> <span class="token punctuation">(</span> webkit <span class="token punctuation">)</span> <span class="token function">simulate</span> <span class="token punctuation">(</span> chromium <span class="token punctuation">)</span> |
After executing the code in the index.js file, we have 3 newly created image files named example-chromium.png , example-firefox.png , example-webkit.png These three image files are Screenshot is generated when the screenshot method is called.
| example-chromium | example-firefox.png | example-webkit.png |
|---|---|---|
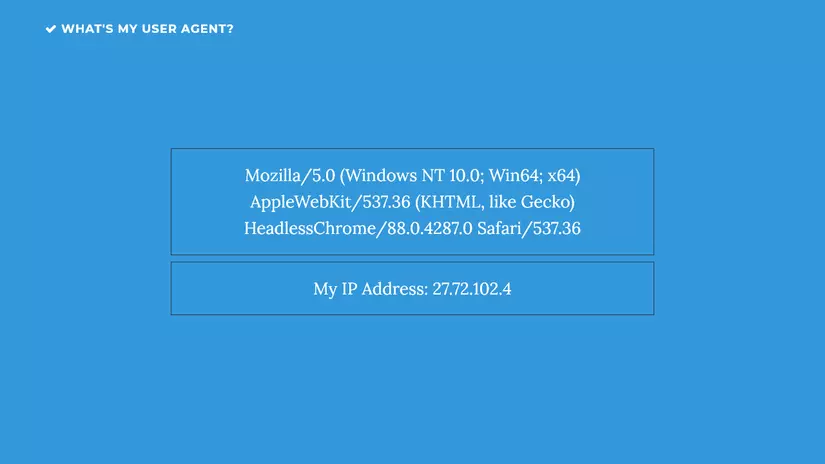 | 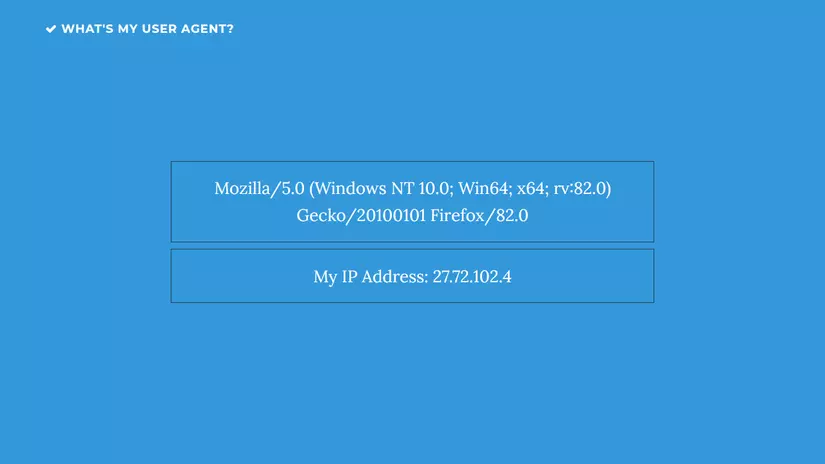 |  |
summary
Each browser engine has its own rules for displaying HTML and CSS on the screen. So automated browser testing libraries can be extremely helpful when we want to make sure the application layout works exactly what we want on all the different devices and browsers that playwright is one of them.
This article takes a quick look at the playwright library and how it works. To get a better understanding of this library, and learn about the differences between it and puppeteer and how it works with For CI / CD systems, you can read more at the links below. This article is over, thank you everyone for taking the time to read,