Question
Recently I had direct contact with socket.io at work and had a problem related to data transmission between clients via socket. My problem can be simply explained as follows:
With 2 given clients (1 Web and 1 App), how can client 1 - App send data to client 2 - Web for processing. As far as I know, there is no way for client 1 to send data directly to client 2 . There is only one way that is through an intermediate server in the middle that plays the role of “transferring” data as shown below.

OK, so the problem has been determined, now how to solve it?
Solution
With interaction from client 1 to server we can use normal API call, but interaction from server to client 2 can not use “API call”. Theoretically we can use one of the following three methods:
- Polling
- Long Polling
- websocket
With Polling , as shown below, the client will “constantly ask” the server whether there is new data or not? This query frequency is set according to the “polling frequency”. In case the answer is intermittent , this “constant asking” will waste time and waste resources

Because Polling works “inefficiently”, we have another approach, Long Polling , as shown below the client will “keep” the connection alive until:
- Get the data returned from the server
timeoutthreshold reached
When the client receives the data returned from the server, it will send a request to the server to continue the Long Polling process as above. However, Long Polling still has the following disadvantages:
client 1andclient 2in the above problem “probably” won’t connect to the same server (this is also a problem I encountered during dev, this problem will be covered in the next section) . The reason is that HTTP isstateless– that is, the server will not know anything about the client’s state, so if theload balanceruses theround robinalgorithm to allocate the request, it “maybe” the server receiving the data cannot connect to the client it needs. receive data- The server also cannot notify the client when the connection is broken
- In case the data is not sent too much, the
request long pollingis still sent continuously whentimeout

The final approach here is websocket , which is a common approach that helps the server to update the changes to the client.

In a nutshell, a websocket is a bi-directional connection initiated on the client side. When initialized, it is still an HTTP connection but will be “upgraded” to become a websocket connection through “handshake” steps. It is not convenient for me to talk about this process in depth here, but you can understand it roughly as follows:
B1: An HTTP/1.1 connection will still be made between the client and the server
B2: The client will send an “upgrade” HTTP request with a header containing at least 2 of the following information
1 2 3 | Connection <span class="token operator">:</span> Upgrade Upgrade <span class="token operator">:</span> websocket |
B3: The client waits until the server responds with a response containing HTTP 101 Switching Protocols , this response shows that the server is switching to the protocol that the client requested to upgrade in the header of the request.
B4: After receiving the response, the websocket connection will be established
More details about websocket you can read at the 2 links below:
- https://sookocheff.com/post/networking/how-do-websockets-work/
- https://developer.mozilla.org/en-US/docs/Web/HTTP/Protocol_upgrade_mechanism
Back to our problem, with this “sustainable” websocket connection, the server can completely update all changes to the client side and the connection management will also be completely on the server side.
Note : the parts about Polling , Long Polling , websocket I all refer to from the book System Design Interview - P1 by author Alex Xu . You can find and buy at the link
Solution
For my problem I decided to use socket.io . For those of you who don’t know, socket.io is a pretty famous library to implement websocket connection for Realtime chat projects, …
Its homepage is: https://socket.io/
The project I take on uses nestjs ( https://nestjs.com/ ) for the server and ReactJS ( https://reactjs.org/ ) for the web side (client 2). For the sake of illustration, I will use ReactJS for both client 1 and client 2
You can refer to the illustrative code in the following repository: https://github.com/tuananhhedspibk/BlogCode/tree/main/SocketIoEmitter
Basically two clients 1 & 2 will interact as shown below, client 1 will send data (here is a message) to client 2 .

Specific explanation
client 1:
https://github.com/tuananhhedspibk/BlogCode/tree/main/SocketIoEmitter/client1/src/App.tsx#L11
1 2 3 4 5 6 7 8 9 10 11 | <span class="token comment">// client 1 sẽ gửi message đến server thông qua lời gọi API POST</span> <span class="token comment">// Ở đây server chạy ở cổng 6969 của localhost</span> <span class="token keyword">const</span> <span class="token function-variable function">submitFormHandler</span> <span class="token operator">=</span> <span class="token keyword">async</span> <span class="token punctuation">(</span> e <span class="token operator">:</span> <span class="token builtin">any</span> <span class="token punctuation">)</span> <span class="token operator">=></span> <span class="token punctuation">{</span> e <span class="token punctuation">.</span> <span class="token function">preventDefault</span> <span class="token punctuation">(</span> <span class="token punctuation">)</span> <span class="token punctuation">;</span> <span class="token keyword">return</span> axios <span class="token punctuation">.</span> <span class="token function">post</span> <span class="token punctuation">(</span> <span class="token string">'http://localhost:6969/app/push-data'</span> <span class="token punctuation">,</span> <span class="token punctuation">{</span> message <span class="token punctuation">,</span> <span class="token punctuation">}</span> <span class="token punctuation">)</span> <span class="token punctuation">;</span> <span class="token punctuation">}</span> <span class="token punctuation">;</span> |
In client 1 I use the axios library to send API POST request to the server. Information about the axios library you can see at the link https://github.com/axios/axios
Servers:
1 2 3 4 5 6 7 8 9 | <span class="token comment">// Server sẽ nhận dữ liệu gửi lên từ client</span> <span class="token comment">// Sau đó sẽ truyền sang xử lí phía socket</span> <span class="token decorator"><span class="token at operator">@</span> <span class="token function">Post</span></span> <span class="token punctuation">(</span> <span class="token string">'/push-data'</span> <span class="token punctuation">)</span> <span class="token function">pushData</span> <span class="token punctuation">(</span> <span class="token decorator"><span class="token at operator">@</span> <span class="token function">Body</span></span> <span class="token punctuation">(</span> <span class="token punctuation">)</span> body <span class="token operator">:</span> <span class="token builtin">any</span> <span class="token punctuation">)</span> <span class="token operator">:</span> <span class="token keyword">void</span> <span class="token punctuation">{</span> <span class="token builtin">console</span> <span class="token punctuation">.</span> <span class="token function">log</span> <span class="token punctuation">(</span> <span class="token template-string"><span class="token template-punctuation string">`</span> <span class="token string">Received message: </span><span class="token interpolation"><span class="token interpolation-punctuation punctuation">${</span> body <span class="token punctuation">.</span> message <span class="token interpolation-punctuation punctuation">}</span></span><span class="token string"> from </span><span class="token interpolation"><span class="token interpolation-punctuation punctuation">${</span> req <span class="token punctuation">.</span> headers <span class="token punctuation">.</span> origin <span class="token interpolation-punctuation punctuation">}</span></span><span class="token string"> by http connection</span> <span class="token template-punctuation string">`</span></span> <span class="token punctuation">)</span> <span class="token punctuation">;</span> <span class="token keyword">return</span> <span class="token keyword">this</span> <span class="token punctuation">.</span> eventGateway <span class="token punctuation">.</span> <span class="token function">sendData</span> <span class="token punctuation">(</span> body <span class="token punctuation">.</span> message <span class="token punctuation">)</span> <span class="token punctuation">;</span> <span class="token punctuation">}</span> |
1 2 3 4 5 6 7 8 9 10 11 12 | <span class="token comment">// Server socket sẽ emit một event có kèm dữ liệu là message</span> <span class="token comment">// Client nào có kết nối websocket tới server và lắng nghe event "EmitData" sẽ nhận được message</span> <span class="token keyword">export</span> <span class="token keyword">class</span> <span class="token class-name">EventsGateway</span> <span class="token punctuation">{</span> <span class="token decorator"><span class="token at operator">@</span> <span class="token function">websocketServer</span></span> <span class="token punctuation">(</span> <span class="token punctuation">)</span> server <span class="token operator">:</span> Server <span class="token punctuation">;</span> <span class="token function">sendData</span> <span class="token punctuation">(</span> message <span class="token operator">:</span> <span class="token builtin">string</span> <span class="token punctuation">)</span> <span class="token punctuation">{</span> <span class="token keyword">this</span> <span class="token punctuation">.</span> server <span class="token punctuation">.</span> <span class="token function">emit</span> <span class="token punctuation">(</span> <span class="token string">'EmitData'</span> <span class="token punctuation">,</span> message <span class="token punctuation">)</span> <span class="token punctuation">;</span> <span class="token punctuation">}</span> <span class="token punctuation">}</span> |
How to implement socket with nestjs you can refer to the 2 links below:
- https://docs.nestjs.com/websockets/gateways
- https://github.com/nestjs/nest/tree/master/sample/02-gateways
client 2:
https://github.com/tuananhhedspibk/BlogCode/tree/main/SocketIoEmitter/client2/src/App.tsx#L5
1 2 3 4 5 6 | <span class="token comment">// client 2 sẽ tạo kết nối websocket tới Server</span> <span class="token keyword">import</span> <span class="token punctuation">{</span> io <span class="token punctuation">}</span> <span class="token keyword">from</span> <span class="token string">'socket.io-client'</span> <span class="token punctuation">;</span> <span class="token keyword">const</span> socket <span class="token operator">=</span> <span class="token function">io</span> <span class="token punctuation">(</span> <span class="token string">'http://localhost:6969'</span> <span class="token punctuation">)</span> <span class="token punctuation">;</span> |
https://github.com/tuananhhedspibk/BlogCode/tree/main/SocketIoEmitter/client2/src/App.tsx#L10
1 2 3 4 5 6 7 | <span class="token comment">// Socket ở client 2 sẽ "lắng nghe" event "EmitData" được phát sinh từ phía server</span> <span class="token comment">// Do lắng nghe sự kiện này nên client 2 sẽ lấy về được message được truyền đi từ server</span> socket <span class="token punctuation">.</span> <span class="token function">on</span> <span class="token punctuation">(</span> <span class="token string">'EmitData'</span> <span class="token punctuation">,</span> <span class="token punctuation">(</span> payload <span class="token punctuation">)</span> <span class="token operator">=></span> <span class="token punctuation">{</span> <span class="token function">setMessage</span> <span class="token punctuation">(</span> payload <span class="token punctuation">)</span> <span class="token punctuation">;</span> <span class="token punctuation">}</span> <span class="token punctuation">)</span> <span class="token punctuation">;</span> |
On the client side 2 I use socket.io-client to deploy, you can refer to the details of installing and using this library at the link https://socket.io/docs/v4/client- initialization/
BINGO!!! So our problem is solved.
But life is not like a dream with local or staging environment this deployment works fine but with production it does NOT , yes it DOESN’T WORK
The problem here is that the system doesn’t throw any exceptions or errors, that’s what’s giving me a headache.
Re-simulate the “scene”
We see that client 1 cannot send a message to client 2 even though the system does not report an error (WTF ???). Here I will recreate the “scene” for your convenience.
Server & Client
On the server side I only have one change in the settings for the gateway socket, namely I specify the connection method as websocket instead of using the default method of polling .
In fact, the default value here is ['polling', 'websocket'] ie nestjs will use polling for socket gateway, in case polling fails, nestjs will use websocket instead.
1 2 3 4 5 6 7 | <span class="token decorator"><span class="token at operator">@</span> <span class="token function">websocketGateway</span></span> <span class="token punctuation">(</span> <span class="token punctuation">{</span> cors <span class="token operator">:</span> <span class="token punctuation">{</span> origin <span class="token operator">:</span> <span class="token string">'*'</span> <span class="token punctuation">,</span> <span class="token punctuation">}</span> <span class="token punctuation">,</span> transports <span class="token operator">:</span> <span class="token punctuation">[</span> <span class="token string">'websocket'</span> <span class="token punctuation">]</span> <span class="token punctuation">,</span> <span class="token punctuation">}</span> <span class="token punctuation">)</span> |
More specifically, you can see the file: https://github.com/tuananhhedspibk/BlogCode/blob/main/SocketIoEmitter/server/src/events/events.gateway.ts#L7
On the client 2 (client listens for events from the server) I also added the transports option to the socket.io-client constructor io()
1 2 | <span class="token keyword">const</span> socket <span class="token operator">=</span> <span class="token function">io</span> <span class="token punctuation">(</span> <span class="token string">'http://localhost:7000'</span> <span class="token punctuation">,</span> <span class="token punctuation">{</span> transports <span class="token operator">:</span> <span class="token punctuation">[</span> <span class="token string">'websocket'</span> <span class="token punctuation">]</span> <span class="token punctuation">}</span> <span class="token punctuation">)</span> <span class="token punctuation">;</span> |
More specifically, you can see the file: https://github.com/tuananhhedspibk/BlogCode/blob/main/SocketIoEmitter/client2/src/App.tsx#L5
Now I will create 2 server instances listening on ports 6969 and 7000 respectively by passing the PORT command line parameter to the server initialization command.
1 2 3 | <span class="token assign-left variable">PORT</span> <span class="token operator">=</span> <span class="token number">6969</span> <span class="token function">yarn</span> start:dev <span class="token comment"># server 1</span> <span class="token assign-left variable">PORT</span> <span class="token operator">=</span> <span class="token number">7000</span> <span class="token function">yarn</span> start:dev <span class="token comment"># server 2</span> |
OK, so both server instances are enabled. The next problem is how to make 2 clients connect to different servers one by one here. The simplest way is to specify the port of the server in each client is different.
- For
client 1I will let it connect to port6969–server 1 - For
client 2I will let it connect to port7000–server 2
Result
Our “scene” will look like this

As shown above, you can also see that our two clients 1 and 2 will not connect to the same server, resulting in a situation where the message sent from client 1 cannot reach client 2.
We can also see it directly on the demo code as shown below

Specifically, client 2 (running at port 3002 ) connects socket to server 2 , and client 1 (running at port 3001 ) connects to server 1 , so the message from client 1 will be sent to server 1 instead of server 2 , resulting in status client 2 DON’T RECEIVE MESSAGE FROM client 1
That’s the problem, what’s the solution?
Solution to the problem that arises
Thinking simply, readers can probably come up with an idea that is to connect these two servers so that they can transfer data to each other and finally transmit to the other 2nd client.
Exactly, our solution here is that, but how to implement???
Fortunately, socket.io has also “thought” of this situation and developed for us a great library that is @socket.io/redis-adapter (github link: https://github.com/socketio/ socket.io-redis-adapter ). As the socket.io homepage ( https://socket.io/docs/v4/adapter/ ) states that an adapter is a server-side component that “broadcasts” events to all clients and when deploying sockets to multiple clients. servers we need to replace in memory adapter default with other implementation and here I choose Redis Adapter
And it’s amazing that nestjs also supports allowing us to implement redis adapter easily (you can refer to it at https://docs.nestjs.com/websockets/adapter )
The steps to deploy redis adapter are as follows:
B1: Build redis instance (deploying redis adapter without redis is strange)
B2: Deploy redis adapter
Build redis instance
You can refer to how to install redis-cli at this link https://redis.io/docs/getting-started/installation/
After booting, the redis instance will listen on port 6379
Deploy redis adapter
You can follow the instructions of nestjs at https://docs.nestjs.com/websockets/adapter
And here is my implementation
- Redis IO Adapter: https://github.com/tuananhhedspibk/BlogCode/blob/main/SocketIoEmitter/server/src/events/redis.adapter.ts
- Attach to main server app: https://github.com/tuananhhedspibk/BlogCode/blob/main/SocketIoEmitter/server/src/main.ts#L17
And finally


You see, the message from client 1 has been sent to client 2, specifically the websocket connection on the client 2 has received the EmitData event with data corresponding to the message sent from client 1
How @socket.io /redis-adapter . works
This library works based on Redis’ publisher/subscriber mechanism
The publisher/subscriber mechanism can be explained simply as shown in the following figure:

Publishers (senders) will send messages to the channel regardless of who the receiver is. The subscriber side will be “interested” in a certain channel, every time this channel has a new message, the subscriber will receive the message without knowing who its sender (publisher) is.
The picture below is how @socket.io/redis-adapter
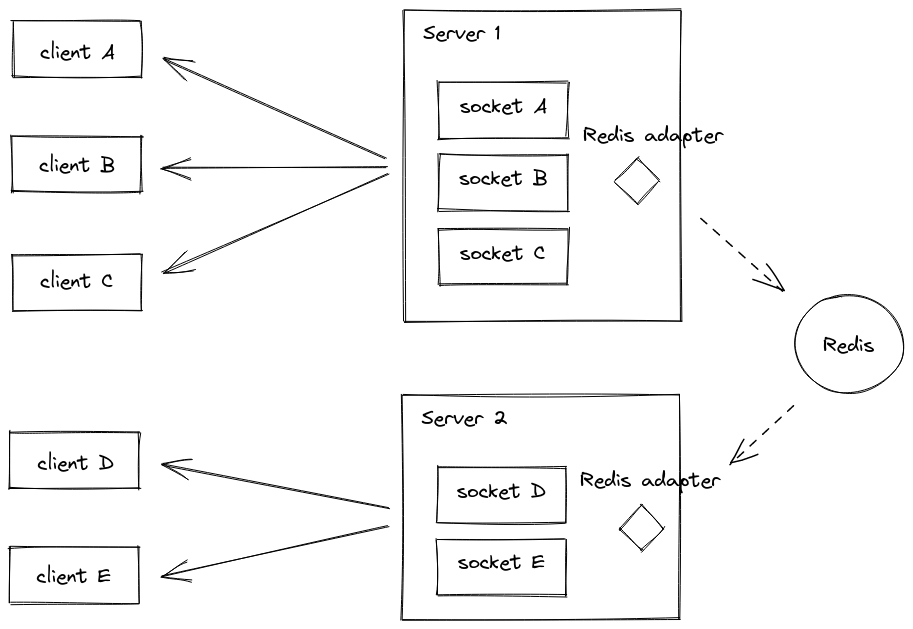
① When the server receives the message, it broadcasts the message to all clients that are connected to it.
② Messages from one server will be published to the redis channel from which the remaining socket.io servers will receive these messages. That’s why each socket.io server is both a publisher and a subscriber as we can see in the code below:
1 2 3 4 5 6 7 8 9 | <span class="token keyword">async</span> <span class="token function">connectToRedis</span> <span class="token punctuation">(</span> <span class="token punctuation">)</span> <span class="token operator">:</span> <span class="token builtin">Promise</span> <span class="token operator"><</span> <span class="token keyword">void</span> <span class="token operator">></span> <span class="token punctuation">{</span> <span class="token keyword">const</span> pubClient <span class="token operator">=</span> <span class="token function">createClient</span> <span class="token punctuation">(</span> <span class="token punctuation">{</span> url <span class="token operator">:</span> <span class="token template-string"><span class="token template-punctuation string">`</span> <span class="token string">redis://127.0.0.1:6379</span> <span class="token template-punctuation string">`</span></span> <span class="token punctuation">}</span> <span class="token punctuation">)</span> <span class="token punctuation">;</span> <span class="token comment">// use to publish message</span> <span class="token keyword">const</span> subClient <span class="token operator">=</span> pubClient <span class="token punctuation">.</span> <span class="token function">duplicate</span> <span class="token punctuation">(</span> <span class="token punctuation">)</span> <span class="token punctuation">;</span> <span class="token comment">// use to receive message</span> <span class="token keyword">await</span> <span class="token builtin">Promise</span> <span class="token punctuation">.</span> <span class="token function">all</span> <span class="token punctuation">(</span> <span class="token punctuation">[</span> pubClient <span class="token punctuation">.</span> <span class="token function">connect</span> <span class="token punctuation">(</span> <span class="token punctuation">)</span> <span class="token punctuation">,</span> subClient <span class="token punctuation">.</span> <span class="token function">connect</span> <span class="token punctuation">(</span> <span class="token punctuation">)</span> <span class="token punctuation">]</span> <span class="token punctuation">)</span> <span class="token punctuation">;</span> <span class="token keyword">this</span> <span class="token punctuation">.</span> adapterConstructor <span class="token operator">=</span> <span class="token function">createAdapter</span> <span class="token punctuation">(</span> pubClient <span class="token punctuation">,</span> subClient <span class="token punctuation">)</span> <span class="token punctuation">;</span> <span class="token punctuation">}</span> |
So when client 1 sends a request containing a message to server 1 , this server will publish that message to redis channel, server 2 subscribe to redis channel will receive a message from there to “broadcast” to client 2 connecting to it. And as a result, the screen side of client 2 can display the message sent from client 1.
Conclude
Above are some of my shares about nestjs , socket.io and @socket.io/redis-adapter I hope you can use it as a reference for your personal projects as well as in your work. Thank you for patiently reading the entire article, see you in another article.