Developing Angular application with Angular CLI is a very interesting experience! The Angular development team has provided us with a great CLI that supports almost everything needed for any project. The project structure is standardized with full testing capabilities (both unit and e2e testing),
code scaffolding, production grade build with support for using specific configurations of each environment. It is a dream come true and saves a lot of time for every new project. Although the Angular CLI works very well from the beginning, we need to know and apply it and practice before we can use them to make our projects even better!
What will I say in this article?
- Best structure for Core, Shared and lazy-loaded Feature modules
- Use aliases for directories in the application and environment to support cleaner imports
- Why and how to use Sass and Angular Material
- How to set up a good production build
- Say goodbye to PhantomJS and use Headless Chrome (testing)
1. A little architecture
OK, because we created our new project using Angular CLI but now continue? Should we continue to create our services and components into some random directories? How do we structure our project?
A good guide to follow is to divide our application into at least three different Core, Shared and Feature modules (we will probably need more than one Feature module).
CoreModule
All services must have one and only one version per application (singleton services) should be implemented here. Typical examples might be authentication service or user service. Consider an example of CoreModule implementation.
1 2 3 4 5 6 7 8 9 10 11 12 13 14 15 16 17 18 19 20 21 22 23 24 25 26 27 28 29 30 31 32 | <span class="token comment">/* 3rd party libraries */</span> <span class="token keyword">import</span> <span class="token punctuation">{</span> NgModule <span class="token punctuation">,</span> Optional <span class="token punctuation">,</span> SkipSelf <span class="token punctuation">}</span> <span class="token keyword">from</span> <span class="token string">'@angular/core'</span> <span class="token punctuation">;</span> <span class="token keyword">import</span> <span class="token punctuation">{</span> CommonModule <span class="token punctuation">}</span> <span class="token keyword">from</span> <span class="token string">'@angular/common'</span> <span class="token punctuation">;</span> <span class="token keyword">import</span> <span class="token punctuation">{</span> HttpClientModule <span class="token punctuation">}</span> <span class="token keyword">from</span> <span class="token string">'@angular/common/http'</span> <span class="token punctuation">;</span> <span class="token comment">/* our own custom services */</span> <span class="token keyword">import</span> <span class="token punctuation">{</span> SomeSingletonService <span class="token punctuation">}</span> <span class="token keyword">from</span> <span class="token string">'./some-singleton/some-singleton.service'</span> <span class="token punctuation">;</span> @ <span class="token function">NgModule</span> <span class="token punctuation">(</span> <span class="token punctuation">{</span> imports <span class="token punctuation">:</span> <span class="token punctuation">[</span> <span class="token comment">/* 3rd party libraries */</span> CommonModule <span class="token punctuation">,</span> HttpClientModule <span class="token punctuation">,</span> <span class="token punctuation">]</span> <span class="token punctuation">,</span> declarations <span class="token punctuation">:</span> <span class="token punctuation">[</span> <span class="token punctuation">]</span> <span class="token punctuation">,</span> providers <span class="token punctuation">:</span> <span class="token punctuation">[</span> <span class="token comment">/* our own custom services */</span> SomeSingletonService <span class="token punctuation">]</span> <span class="token punctuation">}</span> <span class="token punctuation">)</span> <span class="token keyword">export</span> <span class="token keyword">class</span> <span class="token class-name">CoreModule</span> <span class="token punctuation">{</span> <span class="token comment">/* make sure CoreModule is imported only by one NgModule the AppModule */</span> <span class="token keyword">constructor</span> <span class="token punctuation">(</span> @ <span class="token function">Optional</span> <span class="token punctuation">(</span> <span class="token punctuation">)</span> @ <span class="token function">SkipSelf</span> <span class="token punctuation">(</span> <span class="token punctuation">)</span> parentModule <span class="token punctuation">:</span> CoreModule <span class="token punctuation">)</span> <span class="token punctuation">{</span> <span class="token keyword">if</span> <span class="token punctuation">(</span> parentModule <span class="token punctuation">)</span> <span class="token punctuation">{</span> <span class="token keyword">throw</span> <span class="token keyword">new</span> <span class="token class-name">Error</span> <span class="token punctuation">(</span> <span class="token string">'CoreModule is already loaded. Import only in AppModule'</span> <span class="token punctuation">)</span> <span class="token punctuation">;</span> <span class="token punctuation">}</span> <span class="token punctuation">}</span> <span class="token punctuation">}</span> |
SharedModule
All "dumb" components and pipes should be done here. These components do not import and inject services from the core or features in their constructors. Chungs will get all the data even though the properties in the template of the component use them. All this shows the fact that SharedModule does not have any dependencies on the rest of our application. This is also the perfect place to import and re-export Angular Material components.
1 2 3 4 5 6 7 8 9 10 11 12 13 14 15 16 17 18 19 20 21 22 23 24 25 26 27 28 29 30 31 32 33 34 35 | <span class="token comment">/* 3rd party libraries */</span> <span class="token keyword">import</span> <span class="token punctuation">{</span> NgModule <span class="token punctuation">}</span> <span class="token keyword">from</span> <span class="token string">'@angular/core'</span> <span class="token punctuation">;</span> <span class="token keyword">import</span> <span class="token punctuation">{</span> CommonModule <span class="token punctuation">}</span> <span class="token keyword">from</span> <span class="token string">'@angular/common'</span> <span class="token punctuation">;</span> <span class="token keyword">import</span> <span class="token punctuation">{</span> FormsModule <span class="token punctuation">}</span> <span class="token keyword">from</span> <span class="token string">'@angular/forms'</span> <span class="token punctuation">;</span> <span class="token keyword">import</span> <span class="token punctuation">{</span> MdButtonModule <span class="token punctuation">}</span> <span class="token keyword">from</span> <span class="token string">'@angular/material'</span> <span class="token punctuation">;</span> <span class="token comment">/* our own custom components */</span> <span class="token keyword">import</span> <span class="token punctuation">{</span> SomeCustomComponent <span class="token punctuation">}</span> <span class="token keyword">from</span> <span class="token string">'./some-custom/some-custom.component'</span> <span class="token punctuation">;</span> @ <span class="token function">NgModule</span> <span class="token punctuation">(</span> <span class="token punctuation">{</span> imports <span class="token punctuation">:</span> <span class="token punctuation">[</span> <span class="token comment">/* angular stuff */</span> CommonModule <span class="token punctuation">,</span> FormsModule <span class="token punctuation">,</span> <span class="token comment">/* 3rd party components */</span> MdButtonModule <span class="token punctuation">,</span> <span class="token punctuation">]</span> <span class="token punctuation">,</span> declarations <span class="token punctuation">:</span> <span class="token punctuation">[</span> SomeCustomComponent <span class="token punctuation">]</span> <span class="token punctuation">,</span> exports <span class="token punctuation">:</span> <span class="token punctuation">[</span> <span class="token comment">/* angular stuff */</span> CommonModule <span class="token punctuation">,</span> FormsModule <span class="token punctuation">,</span> <span class="token comment">/* 3rd party components */</span> MdButtonModule <span class="token punctuation">,</span> <span class="token comment">/* our own custom components */</span> SomeCustomComponent <span class="token punctuation">]</span> <span class="token punctuation">}</span> <span class="token punctuation">)</span> <span class="token keyword">export</span> <span class="token keyword">class</span> <span class="token class-name">SharedModule</span> <span class="token punctuation">{</span> <span class="token punctuation">}</span> |
How to prepare project structure with Angular CLI
We can create Core and Shared modules right after creating a new project. That way, we will be prepared to create additional components and services from the beginning. Run the core module generator. Then create index.ts file in core folder and re-export CoreModule itself. We will re-export the public services needed throughout the application during further development. That being done, we can do the same for shared modules.
FeatureModule
We will create many feature modules for every feature independent of our application. Feature modules should only import services from CoreModule. If feature module A needs to import service from feature module B, then consider moving that service into the core.
In some cases, the need for services is only shared by some features and it makes no sense to move them to the core. In that case, we can create shared feature modules as described later in this article.
The general rule is to try to create features that do not depend on any other features only on services provided by CoreModule and components provided by SharedModule. This will keep our code clean, maintainable and expandable with new features. It also reduces the effort required for restructuring. If properly followed, we will be confident that changes to a feature cannot affect or disrupt the rest of our application.
LazyLoading
We should lazy load our feature modules whenever possible. Theoretically only one feature module should be loaded synchronously during the application startup to display the original content. Every other feature module should be lazy loading after the user triggered navigation.
2. Aliases for applications and environments
Our application folder and environment aliases will allow us to perform clear and consistent import throughout our entire application. Considering the hypothesis, but the usual situation. We are working on a component that is located three directories deep in feature A and we want to import the service from the core two directories deep. This will lead the import statement to look like import {SomeService} from '../../../core/subpackage1/subpackage2/some.service'.
Definitely not the cleanest import ever…
And what's worse, whenever we want to change the location of any of these two files, our import statement will be corrupted. Compare that to the much shorter import {SomeService} from " @app / core". Seems better right?
To be able to use aliases, we have to add baseUrl and pathsthat attributes to our tsconfig.jso file like this.
1 2 3 4 5 6 7 8 9 10 11 12 | <span class="token punctuation">{</span> <span class="token property">"compilerOptions"</span> <span class="token operator">:</span> <span class="token punctuation">{</span> <span class="token property">"..."</span> <span class="token operator">:</span> <span class="token string">"reduced for brevity"</span> <span class="token punctuation">,</span> <span class="token property">"baseUrl"</span> <span class="token operator">:</span> <span class="token string">"src"</span> <span class="token punctuation">,</span> <span class="token property">"paths"</span> <span class="token operator">:</span> <span class="token punctuation">{</span> <span class="token property">"@app/*"</span> <span class="token operator">:</span> <span class="token punctuation">[</span> <span class="token string">"app/*"</span> <span class="token punctuation">]</span> <span class="token punctuation">,</span> <span class="token property">"@env/*"</span> <span class="token operator">:</span> <span class="token punctuation">[</span> <span class="token string">"environments/*"</span> <span class="token punctuation">]</span> <span class="token punctuation">}</span> <span class="token punctuation">}</span> <span class="token punctuation">}</span> |
We are also adding alias @env so we can easily access environment variables from anywhere in our application using the same import statement {environment} from " @env / environment". It will work for all specified environments because it will automatically resolve the correct environment file based on the –env flag passed to
ng build. With our paths, we can now import env and service like this:
1 2 3 4 5 6 7 8 9 10 11 12 13 14 15 16 17 18 19 20 21 22 | <span class="token comment">/* 3rd party libraries */</span> <span class="token keyword">import</span> <span class="token punctuation">{</span> Component <span class="token punctuation">,</span> OnInit <span class="token punctuation">}</span> <span class="token keyword">from</span> <span class="token string">'@angular/core'</span> <span class="token punctuation">;</span> <span class="token keyword">import</span> <span class="token punctuation">{</span> Observable <span class="token punctuation">}</span> <span class="token keyword">from</span> <span class="token string">'rxjs/Observable'</span> <span class="token punctuation">;</span> <span class="token comment">/* globally accessible app code (in every feature module) */</span> <span class="token keyword">import</span> <span class="token punctuation">{</span> SomeSingletonService <span class="token punctuation">}</span> <span class="token keyword">from</span> <span class="token string">'@app/core'</span> <span class="token punctuation">;</span> <span class="token keyword">import</span> <span class="token punctuation">{</span> environment <span class="token punctuation">}</span> <span class="token keyword">from</span> <span class="token string">'@env/environment'</span> <span class="token punctuation">;</span> <span class="token comment">/* localy accessible feature module code, always use relative path */</span> <span class="token keyword">import</span> <span class="token punctuation">{</span> ExampleService <span class="token punctuation">}</span> <span class="token keyword">from</span> <span class="token string">'./example.service'</span> <span class="token punctuation">;</span> @ <span class="token function">Component</span> <span class="token punctuation">(</span> <span class="token punctuation">{</span> <span class="token comment">/* ... */</span> <span class="token punctuation">}</span> <span class="token punctuation">)</span> <span class="token keyword">export</span> <span class="token keyword">class</span> <span class="token class-name">ExampleComponent</span> <span class="token keyword">implements</span> <span class="token class-name">OnInit</span> <span class="token punctuation">{</span> <span class="token keyword">constructor</span> <span class="token punctuation">(</span> <span class="token keyword">private</span> someSingletonService <span class="token punctuation">:</span> SomeSingletonService <span class="token punctuation">,</span> <span class="token keyword">private</span> exampleService <span class="token punctuation">:</span> ExampleService <span class="token punctuation">)</span> <span class="token punctuation">{</span> <span class="token punctuation">}</span> <span class="token punctuation">}</span> |
You may have noticed that we are importing entities (like SomeSingletonServicet in the example above) directly from @app / core instead of @app /core/some-package/some-singleton.service. This may be due to re-exporting all public entities in the main index.ts file. We create an index.ts file for the package (folder) and they look like this:
1 2 3 4 5 | <span class="token keyword">export</span> <span class="token operator">*</span> <span class="token keyword">from</span> <span class="token string">'./core.module'</span> <span class="token punctuation">;</span> <span class="token keyword">export</span> <span class="token operator">*</span> <span class="token keyword">from</span> <span class="token string">'./auth/auth.service'</span> <span class="token punctuation">;</span> <span class="token keyword">export</span> <span class="token operator">*</span> <span class="token keyword">from</span> <span class="token string">'./user/user.service'</span> <span class="token punctuation">;</span> <span class="token keyword">export</span> <span class="token operator">*</span> <span class="token keyword">from</span> <span class="token string">'./some-singleton-service/some-singleton.service'</span> <span class="token punctuation">;</span> |
In most applications, components and services of specific feature modules will usually only have access to services from CoreModule and components from SharedModule. Sometimes this may not be enough to address specific businesses and we will also need some types of "shared feature modules", which provide functionality for a limited subset of other feature modules.
In this case, we will end up with something like import { SomeService } from '@app/shared-feature'; Similar to core, shared-feature is also accessed by @app alias. 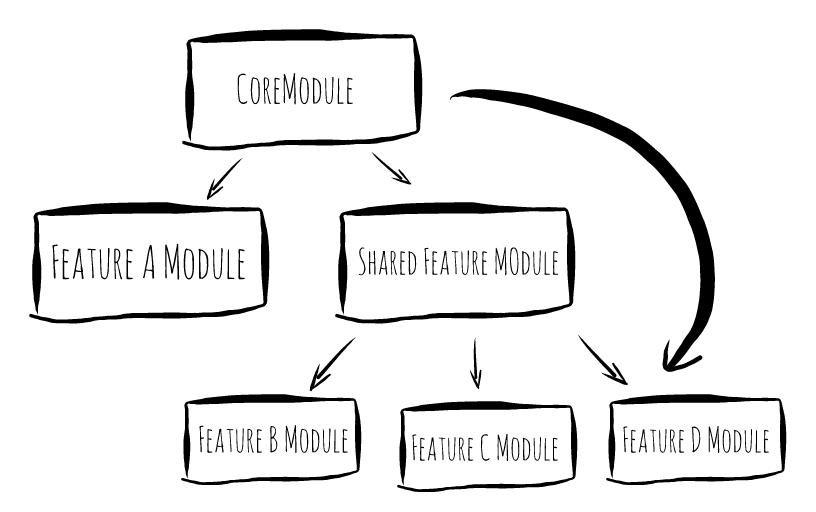
3. Use Sass
Sass is a type preprocessor that provides support for favorite things like variables (although css will soon receive variables), functions, mixins, etc.Sass is also required to use the effect. Official Angular Material Components library with extensive theming capabilities. It is safe to assume that using Sass is the default choice for most projects. To use Sass, we must create our project using the ng new tron Angular CLI command with the --style scss flag. This sets up most of the required configuration. One thing that is not added by default is stylePreprocessorOptions with includePaths and we can set it manually with the original values "./" and the optional "./themes" option.
1 2 3 4 5 6 7 8 9 10 11 12 | <span class="token punctuation">{</span> <span class="token property">"apps"</span> <span class="token operator">:</span> <span class="token punctuation">[</span> <span class="token punctuation">{</span> <span class="token property">"..."</span> <span class="token operator">:</span> <span class="token string">"reduced for brevity"</span> <span class="token punctuation">,</span> <span class="token property">"stylePreprocessorOptions"</span> <span class="token operator">:</span> <span class="token punctuation">{</span> <span class="token property">"includePaths"</span> <span class="token operator">:</span> <span class="token punctuation">[</span> <span class="token string">"./"</span> <span class="token punctuation">,</span> <span class="token string">"./themes"</span> <span class="token punctuation">]</span> <span class="token punctuation">}</span> <span class="token punctuation">}</span> <span class="token punctuation">]</span> <span class="token punctuation">}</span> |
This our editor finds imported symbols and enhances the developer experience with the completion code of Angular Material variables and functions.
4. "PROD" build
Projects created by the Angular CLI only come with a very simple ng build script. To create production grade artifacts, we have to do a little bit of customization on our own. We add "build:prod": "ng build --target production --build-optimizer --vendor-chunk" to our package.json script.
Target Production
This is a flag that allows you to shrink your code. Along with it, there will be many other flags to accompany, many useful build flags often come with default values when running the command. Eg:
-
--environment prod– useenvironment.prod.tsfile for environment variables. -
--aot– allow Ahead-of-Time compilation. This will become a default setting in future versions of Angular CLI, but in Angular 6 we have to manually enable this option. -
--output-hashing all– hash contents of generated file and appends the hash to the file name to facilitate browser cache (any changes to the file content will result in different hash functions and thus submit The browser must download the new version of the file) -
--extract-css trueextracts all css into its own style-sheet file -
--sourcemaps falsedisables the creation of source maps -
--named-chunks falsedisables the use of human readable names for chunk and uses numbers instead
Other useful flags
-
--build-optimizernew feature leads to smaller bundles but construction time is much longer so use with caution! (should also be enabled by default in the future) -
--vendor-chunk– extract all endor (library) code into separate chunk Also check official docs for other available configuration flags that may be helpful in your personal project.
5. Phantom JS is obsolete! Headless Chrome will be an alternative!
PhantomJS is a headless browser for running frontend testing on CI servers and many dev machines. While still fine, support for modern ECMAScript features has been delayed. Moreover, its non-standard behavior causes headaches in many cases, when the operations are performed locally without any problems but they still fail in the CI environment. Fortunately, we don't have to deal with it anymore! As the official document says:
Headless Chrome is shipping in Chrome 59. It's a way to run the Chrome browser in a headless environment. Essentially, running Chrome without chrome! It brings all modern web platform features provided by Chromium and the Blink rendering engine to the command line.
Great! So how can we use it in our Angular CLI project? We added the --browser ChromeHeadless flag to the ng test to use: ng test --browser ChromeHeadless --single-run and the ng test --browser ChromeHeadless in the package.json file in our project, quite simple. Right?
Further
For users (Intellij IDEA, Webstorm) Intellij IDEA will not always find all links by default, this will result in many red error marks and crippled code completion is paralyzed. Fortunately, the solution is very simple. Just select the src folder and mark it as Sources Root. 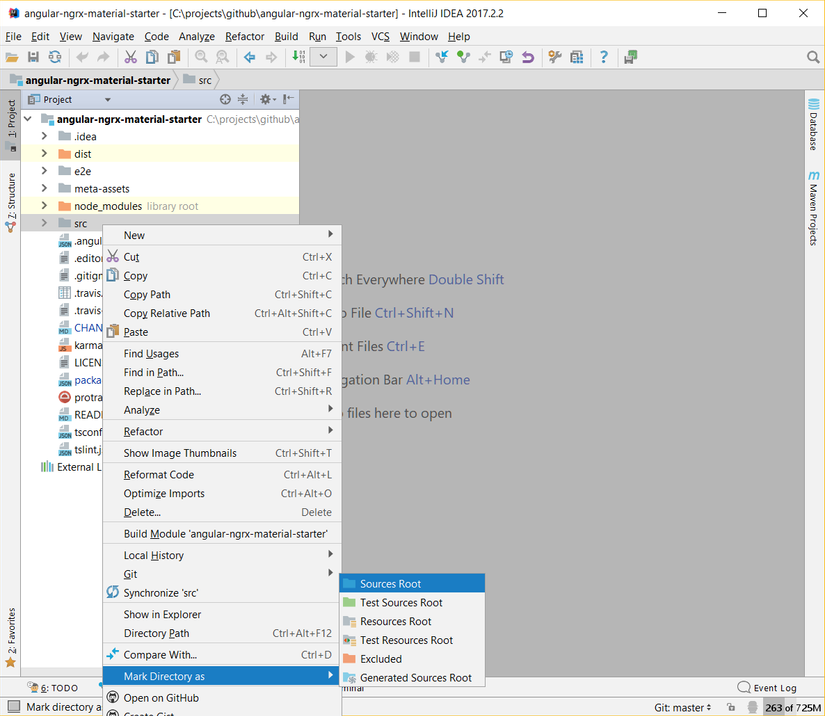
summary
In this article, I have mentioned some things you should do in an angular project, as well as learn more useful flags when using angular CLI, hope that you can apply it to your project. yourself. Thank you for reading this article.
Reference source: https://medium.com/@tomastrajan/6-best-practices-pro-tips-for-angular-cli-better-developer-experience-7b328bc9db81