overview
Sign in using Apple REST API: This is the communication between your app services and Apple’s authentication servers.
To sign in from a web app or another platform like Android, use Sign in with Apple JS . Additionally, for users setting up accounts and signing in with native iOS, masOS, tvOS, and the watch OS app, use the Authentication Services framework .
Authenticating Users with Sign in with Apple
Signing in with Apple allows users to log into your app across all of your platforms using two-factor authentication with Apple ID. After the user selects Sign In with Apple to log in, your application will receive a token and user information that you can verify from the server.
When the user selects Sign in with Apple, the processing flow will be described as follows:
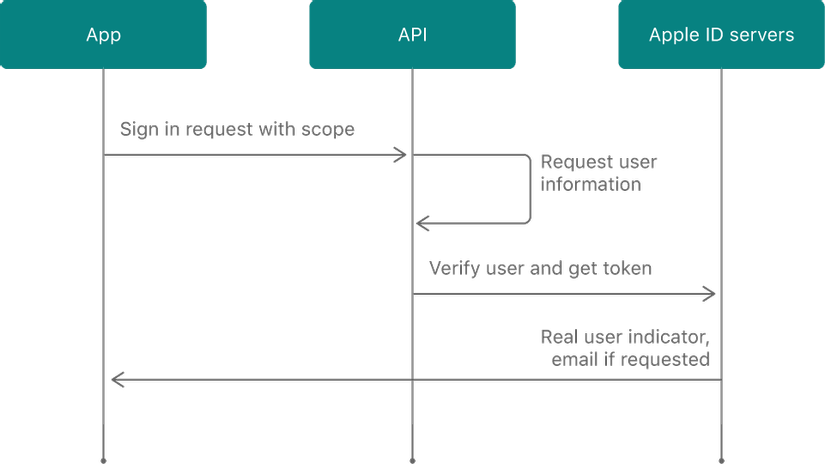
Initialize the authentication session with your server app and associate the client session with an ID token with the nonce value. You can request to receive user information, such as name and email address. If the user has approved access to this information, your authorization request includes the requested information.
Signing in with Apple protects user account information with 2-factor authentication. Users logged into Apple devices can quickly sign in to your apps in the following ways:
- Face ID or Touch ID on passcode protected devices
- Passcode, if Touch ID or Face ID is unavailable
- Apple ID password, if passcode is not set
The native app only allows users using iCloud signed in using Apple Sign-in. Web allows logging in with any Apple ID.
Note
On non-Apple devices, users must sign in with an Apple ID, password, and two-factor authentication code.
Get user information from Apple ID Servers
The information you retrieve must include the credentials needed to verify the user’s identity. The server returns credentials and user credentials based on the original request. The returned information may include user identity, name, verified email address, and actual user status.
After successfully authenticating the user, the server returns the identity token, an authorization code, and the user identifier for your application.
The Identity token is a JSON Web Token (JWT) code and contains claims:
iss: Apple token, is value: https://appleid.apple.com .
sub: The registered subject claim is the subject of identity token. Since this token is for your application, the value is a unique identifier for the user.
aud: The claimed entity identifies the recipient for which the identity token is intended. Since the token is for your app, the value is client_id from the developer account.
iat: The time that Apple released the identity token, in seconds since Epoch, in UTC hours.
exp: Expiration time of Identity token, in seconds since Epoch, in UTC.
nonce: String form: used to associate client session and identity token. This value is used to minimize replay attacks and is only present if passed during authorization request.
nonce_supported: Boolean: Indicates whether the transaction is on nonce-supported platform or not.
email: User’s email address.
email_verified: String or Boolean ,: indicates whether the email is verified. The value can be String (“true”) or a Boolean (true).
is_private_email: String or Boolean: Verify that the email address is a proxy address. The value can be String (“true”) or a Boolean (true).
real_user_status: An Integer that verifies that the user is real, uses this value to minimize fraud. Possible values are: 0 (or Unsupported). 1 (or Unknown), 2 (or Likely).
Use authorization code to verify token claims with Apple servers and get new refesh token. I will present in part 2 – Generate and Validate Tokens .
Send Information to App Servers and Verify Tokens
Make sure that your app forwards login and user information to your app server. The API collects this information and shares it with your app the first time a user logs in to the app by Signing in with Apple. If the user then uses Apple Sign-in on another device, the API will not re-ask for the user’s name or email. It will only collect the information if the user stops using Sign in with Apple and then reconnects to your app.
Since the user’s information is not shared with your app during any subsequent API calls, your app will be stored in local storage, as soon as you receive the information from the API response. In case something goes wrong or your network goes down, you can read the information from local storage and try again.
Your server app verifies the validity of the token with the Apple server ID. More information will be presented in part 3 – Verifying a User .
The article was referenced from the article Sign in with Apple REST API , Authenticating Users with Sign in with Apple . In the next article, I will present about Generate and Validate Tokens .