A locator can be called an address that identifies a unique web element in a web page. Locators are the HTML attributes of a web component, informing Selenium about the web component it needs to take action.
There are many web components. The most common of them are:
- Text box
- Button
- Drop Down
- Hyperlink (hyperlink)
- Check Box
- Radio Button
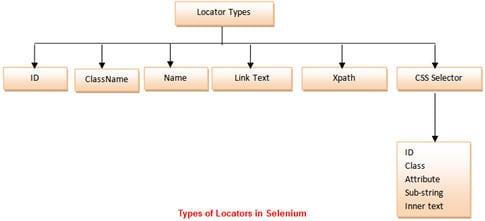
Types of locators
Selenium commands all require locating web elements to search. Moreover, element identification has always been a rather difficult topic, so it requires an efficient and accurate method. To identify these elements, we have the following types of locators:
Locate by ID
This is the most popular and most used web element locator ever. Within a web page, each element will have a unique and unique ID.

In the example below, we need to access the “Email” text box in the login form of gmail.com . The first is to:
a. Use Firebug to find the “Email” textbox ID
Step 1 : Open your browser (Firefox) and visit the link ” https://accounts.google.com/” .
Step 2 : Open firebug (press F12)
Step 3: Click on the “inspect” icon to identify the web element

Step 4: Point your mouse at the “Email” textbox. In the firebug section, you will see the corresponding HTML tag of this textbox is highlighted => ID of the currently accessing element: id = “Email” (Syntax: id = “id_of_the_element”) (image below)
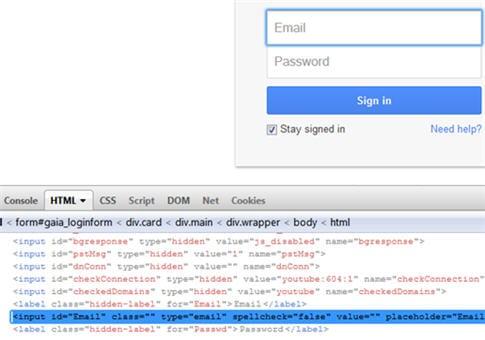
By searching in the HTML code, we can confirm that the ID we have just found is unique.
Other approaches:
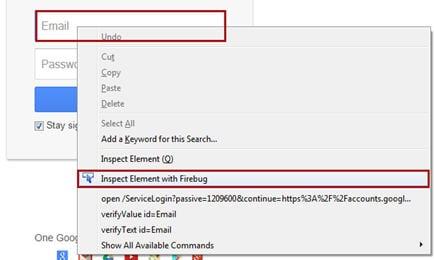
Instead of performing steps 2 through 4 above, we can locate / inspect the web element directly by right-clicking on the web element to check (in this example, Email textbox), then Click the “Inspect Element with Firebug” option. This event will expand the firebug section and highlight the corresponding element’s HTML tag.
b. Verify positioning value:
Assume that the browser is open and is on the page ” https://accounts.google.com/ “.
Step 1: Launch the Selenium IDE.
Step 2: Click the first line in the Editor area
Step 3: Type “id = Email” (id of web element just above) in the Target field
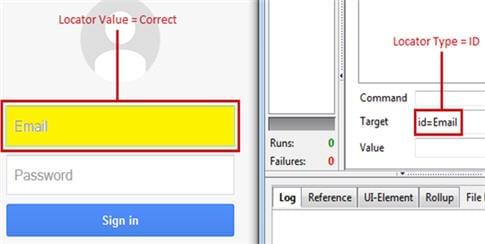
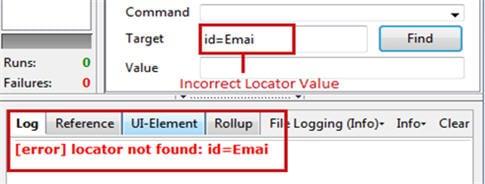
Step 4: Click the Find button. If the provided positioning value is correct, the Email textbox will be highlighted in yellow with a green border around it. If the positioning value is incorrect, the error message is displayed in the log pane at the bottom of the Selenium IDE (image below).
Case 1 – Locator Value = Correct (the provided positioning value is correct)
Case 2 – Locator Value = Incorrect (the provided positioning value is incorrect)
For further verification, you can enter some values into the “Value” section immediately below the “Target” field (being entered “id = Email”). After entering the “Value”, if the corresponding Email textbox is automatically entered as “Value”, the proving the location value provided is accurate and accessible.
Identifier by ClassName
ClassName is also a type of locator to identify elements on the Web similar to the ID above. The only difference is in a web page: ID is unique for each element, there may also be many elements with the same ClassName. In a web page, usually related elements or similarities are often given the same class name (1 surname …). In case we want to find a common set of elements, we can use this ClassName locator.
In the following example we will locate the “Need Help?” Link – displayed at the bottom of the login form above.
a. Use Firebug to find the classname of a web element
Step 1: Right-click on the web element to check (in this example, the link text “Need help?”), Then click the “Inspect Element with Firebug” option. This event will expand the firebug section and highlight the corresponding element’s HTML tag.
Step 2: In the highlighted HTML above, define the class name value of this element:

Syntax : class = classname of the element
Looking at the image above, we can easily identify classname = “need-help-reverse”
b. Verify positioning value:
Step 1: Type “class = need-help-reverse” (class name of the web element you have just taken above) into the Target section of the Selenium IDE.
Step 2: Click the Find button of Selenium IDE. If the provided positioning value is correct then the “Need help?” Textlink will be highlighted in yellow with a green border around it. If the positioning value is incorrect, the error message is displayed in the log pane at the bottom of the Selenium IDE (image below).

Identify by Name
The use of the “name” attribute to identify elements is the same as the above two types (ID and ClassName), only in syntax. Similar to the ID, the names of the elements are usually unique, unchanged after refreshes, and quite simple to use.
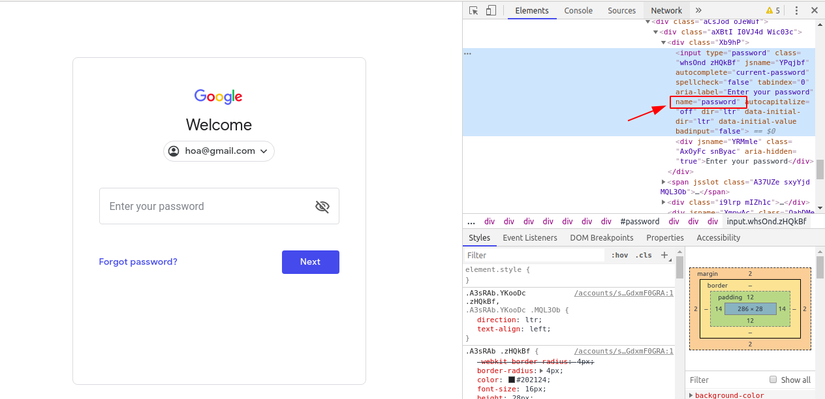
For example, we will use the “name” attribute to locate the “Password” textbox in the login form above.
Syntax : name = name of the element
Perform the same steps as above, using Firebug we will easily find the textbox “Password” with name = “password”
Verify positioning value:
Step 1: Type “name = password” (the name of the textbox “Password” just taken above) into the Target section of the Selenium IDE.
Step 2: Click the Find button of Selenium IDE => textbox “Password” will be highlighted in yellow with green border around it. Changing to an incorrect positioning value (eg “name = passwordabc” …) will display an error message in the log pane at the bottom of the Selenium IDE.
Identify by Link Text
Here’s how to identify / find links / hyperlinks. Any hyperlink with an “<a> … </a>” anchor tag (The structure of a link in HTML code: (<a> {content_displayed} </a>))
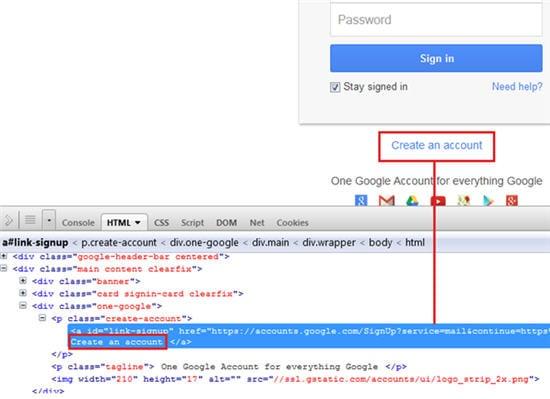
For example, we need to specify the path “Create an account” in the login form above.
a. Use Firebug to find the text link of a web element
Step 1: Right-click on the web element to check (in this example, the link text “Create an account”), then click the “Inspect Element with Firebug” option. This event will expand the firebug section and highlight the corresponding element’s HTML tag.
Step 2: In the highlighted HTML above, define the link text value of this element: the text displayed inside the “<a> … </a>” tag
Syntax: link = link text of the element
In this example, the link text is “Create an account” (image below).
Verify positioning value:
Step 1: Type “link = Create an account” (link text of the link “Create an account” just taken above) into the Target section of the Selenium IDE.
Step 2: Click the Find button of Selenium IDE => The link “Create an account” will be highlighted in yellow with a green border around it.

Use XPath as a Locator
XPath is used to locate a web element based on its XML path. XPath stands for XML markup language, is used to store, organize and transport arbitrary data. It stores data in a key-value pair very similar to HTML tags. It is a query language to select nodes from an XML document. The XPath is based on a tree representation of XML documents and provides the ability to navigate around the tree by selecting nodes using a variety of criteria. This is a popular choice because of its flexibility.
This is arguably the most effective technique, being able to identify all web elements including those that cannot be located with CSS (the above positioning methods). However, when there is a change in the page structure, you will need to update the relevant element information in this XML file.
(to be continue …)