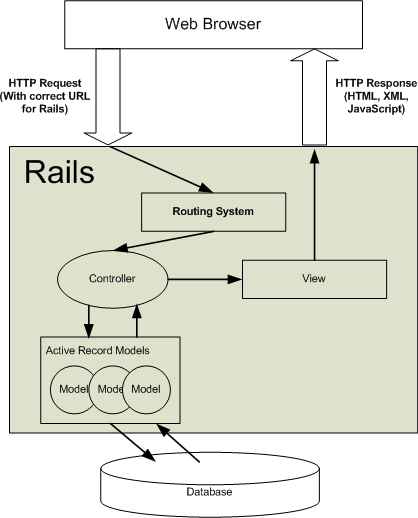
Router is a module located at angular / router that gives our Angular application the ability to navigate and display content matching the URL. With normal web applications, URL navigation is usually done by the server side, like the image below is an example
with Rails App:
1. Declare Route
First, in order to be able to access the different URLs, we will need to declare them so that Angular knows which route to take. The declaration will include the following two steps: Define each route. Each route will have a pair of Url Path – Component so that the application knows the Component needs to load when it comes to the corresponding URL. Load declarations of routes into your application (usually in app.module) Generating routes is done using the Routes class in angular router . Edit file app.module.ts as follows:
1 2 3 4 5 6 7 8 9 10 11 | import { Routes, RouterModule } from '@angular/router'; //import Routes từ module @angular/router ... //Khai báo một constant chứa các route của app const routes: Routes = [ { path: 'phones', component: ItemsListComponent }, { path: 'phones/:id/edit', component: ItemFormComponent }, { path: 'phones/new', component: ItemFormComponent }, { path: 'cart', component: CartComponent } ]; ... |
// Import RouterModule into the import of app.module
1 2 3 | imports: [ BrowserModule, FormsModule, RouterModule.forRoot(routes) ], |
Here the elements like phones, edit, new, and cart will be fixed values, while: id will be dynamic and variable (1,2,3,4, a, b, c ,. ..), and can be obtained through a Component of angular / router module
2. Display the route component
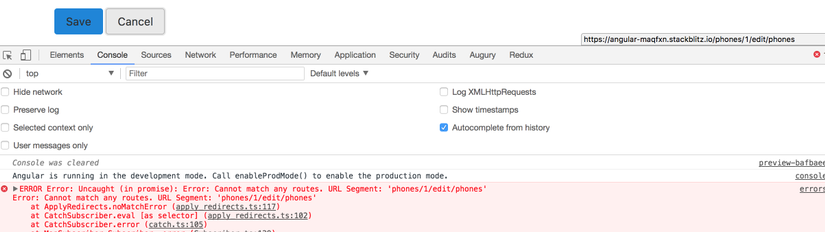
After editing the app.modules.ts file as above, we have just done one thing, which is to declare the paths in each object as constant routes when accessed by the user, which will be processed by the Angular app and loaded the corresponding components. . Now we can access those urls without getting ERROR Error: Uncaught (in promise): Error: Cannot match any routes. URL Segment: ‘xxx’. However, the content in each page is STILL displayed as the default phone listing page. The reason is that although we have loaded the corresponding components, but in the view of app.component.ts, we are still set statically:
1 2 3 | <app-items-list></app-items-list>. |
To display the respective content of the loaded component, we will need to use a component named router-outlet, the content of the specified component loaded with the url path will be located here. The reason to include a separate component like that is because we do not always want to change the entire content of the page when the new url path is loaded, but usually only need to change a part of the page. Using a router-outlet will help us to clearly specify changes and control over the page content. To display page-by-page changes, edit the app.component.html file as follows:
1 2 3 4 | <app-navigation></app-navigation> <router-outlet></router-outlet> |
Then if you go to each page:
- https://angular-xnpuwu.stackblitz.io/phones ,
- https://angular-xnpuwu.stackblitz.io/phones/new ,
- https://angular-xnpuwu.stackblitz.io/1/edit ,
- https://angular-xnpuwu.stackblitz.io/cart we will see the content has been changed. However, there are still some issues as follows: The homepage is not displaying anything
( https://angular-xnpuwu.stackblitz.io/ ) 2 pages https://angular-xnpuwu.stackblitz.io/phones/new and https://angular-xnpuwu.stackblitz.io/1/edit are showing the same content, not customizing more params Between the pages that have not linked to each other. If you want to access it, you must type directly on the url, but at that time Angular app reloads from the beginning very time. The following will handle each content one by one.
3. Set content for root path
Set Root Route
Currently, when we go to https://angular-xnpuwu.stackblitz.io/ we will not see anything, so because we have not declared the component when loaded with the root path, we can fix it by add const Routes in app.modules.ts like so:
1 2 3 4 5 6 7 8 | const routes: Routes = [ { path: '', component: ItemsListComponent }, // thêm dòng này { path: 'phones', component: ItemsListComponent }, { path: 'phones/:id/edit', component: ItemFormComponent }, { path: 'phones/new', component: ItemFormComponent }, { path: 'cart', component: CartComponent } ]; |
Now the page https://angular-xnpuwu.stackblitz.io/ will display the contents of the ItemsListComponent as we want. However, as ItemsListComponent has been declared duplicate twice, we can use another way so that when a user enters rootPath will automatically switch to / phones path, called Redirect.
Set Redirect
Instead of redefining the component that will load when entering rootPath, we will set the redirect command as follows:
1 2 3 4 5 6 7 8 | const routes: Routes = [ { path: '', redirect: 'phones', pathMatch: 'full' }, // thêm dòng này { path: 'phones', component: ItemsListComponent }, { path: 'phones/:id/edit', component: ItemFormComponent }, { path: 'phones/new', component: ItemFormComponent }, { path: 'cart', component: CartComponent } ]; |
Now when we access https://angular-xnpuwu.stackblitz.io/ we will automatically be redirected to https://angular-xnpuwu.stackblitz.io/phones and show the list of phones as before head. Using either of the two methods above is up to your needs, but keep in mind when setting the redirect, we should set the value pathMatch: full, because by default Angular will load the URL Path according to the prefix, so path: ” will be the prefix of all other urls, including / phones so when we set the redirect without setting pathMatch: full, we create an infinite loop between the rootPath and the component that needs to be redirected. This bug has also been detected and displayed by Angular if you unfortunately have encountered it. 
Set up routerLink
Now that we have all the necessary URLs, Angular also loads the corresponding components when we access those URLs. However, note that each time you access each URL, the app must re-load from the beginning (the Loading App displayed at first). Also, we haven’t been able to access the necessary pages from the product listing page. To fix this, we will need a directive named Angular’s routerLink using the following usage: # in navigation.component.ts file, change the template part to like below
1 2 3 4 5 6 7 8 9 10 11 12 13 14 15 16 | template: ` <div class="navbar navbar-default"> <div class="navbar-nav-scroll"> <ul class="nav nav-tabs"> <li class="nav-item"> <a class="nav-link active" [routerLink]="['phones']">Phone List</a> </li> <li class="nav-item"> <a class="nav-link" [routerLink]="['cart']">Shopping Cart</a> </li> </ul> </div> </div> `, |
We have added the [routerLink] property in Phone List and Shopping Cart. Now when you click on the Phone List or Shopping Cart tab on the interface, the ItemsListComponent and CartComponent will be displayed, and the Loading app interface and loading icon on the browser will NOT appear unchanged. This is because this directive has replaced the default page loading with Javascript code, and also updated the url address on the browser. In fact, we have never left Angular Application. However, the navigation bar when entering the Cart page is still showing active in Phone List. To fix this we will use another directive named RouterLinkActive: # in the file navigation.component.ts, change the template to look like below
1 2 3 4 5 6 7 8 9 10 11 12 13 14 15 | template: ` <div class="navbar navbar-default"> <div class="navbar-nav-scroll"> <ul class="nav nav-tabs"> <li class="nav-item"> <a class="nav-link" [routerLink]="['phones']" routerLinkActive="active">Phone List</a> </li> <li class="nav-item"> <a class="nav-link" [routerLink]="['cart']" routerLinkActive="active">Shopping Cart</a> </li> </ul> </div> </div> |
RouterLinkActive will add the classes defined in the value section (here a value, in case multiple array possible values) to the element attached to it when the corresponding route is loaded. As a result, when entering / phones or / cart the active status of each tab will be displayed accordingly. So we already know how to use RouterLink to navigate in Angular App, let’s do with the rest: #file items-list.component.ts
1 2 3 4 5 | ... <a class="btn btn-primary" routerLink="new">Create new Phone</a> ... |
#file item.component.ts
1 2 3 4 5 | ... <a href="#" class="btn btn-secondary" [routerLink]="[item.id, 'edit']">Edit</a> ... |
#file item-form.component.ts
1 2 3 4 | .... <a class="btn btn-secondary" routerLink="/phones">Cancel</a> … |
Notice that in the link for the cancel button, I wrote instead of just “phones”. The reason is because RouterLink will by default get the path in the form of a relative path with the current url, using / will help us create an absolute path with the app -> pointing to the correct one. / phones, but if set phones will point to / phones /: id / edit / phones -> does not exist.
Once completed, we can access the new creation and editing page, but these 2 pages are displaying the same content, not each item for us to edit or create. We will have to add the step of loading data into the respective component via the url path. Load data from the URL via a snapshot For the product edit page, we will need to load the item corresponding to the product id. To do this, in item.component.ts need to load a Component that contains information of the current Route, called ActivatedRoute. # item-form.component.ts
1 2 3 4 5 6 7 8 9 10 11 12 13 14 15 16 17 18 19 | ... import { ActivatedRoute, Router } from '@angular/router'; import { ItemService } from './item.service'; ... export class ItemFormComponent { item: Item; constructor(private route: ActivatedRoute, private itemService: ItemService, private router: Router) {} ngOnInit() { const itemId = +this.route.snapshot.params['id']; this.item = this.itemService.getItem(itemId); } onSaveItem() { this.itemService.updateItem(this.item); this.router.navigate(['']); } } ... |
Using ActivatedRoute, through the snapshot property, we can access the value of the parameter id in the URL and retrieve the item corresponding to that id, and display it on the form. Here we have just used the params property to get the id of the item. ActivatedRoute also provides two more types of data: queryParams: getting data is the parameters on the url after the question mark (? Id = 1 & name = 2 will set snapshot.queryParams = {id: ‘1’, name: ‘2’} fragment : get data as the value after the # sign on the url (#setting will set snapshot.fragment = ‘fragment’. Another note that all values in params, queryParam or fragment are String, so will need to convert about the corresponding data type (number, boolean, …) when calling a parameter handler function with a data type other than string.At the same time, in this section we also use an additional Router class for navigation. After saving the item.With the navigate function, we will define each url path to each item in the given array, with the path is relative to Root Path (so I leave it blank which means go back to homepage. , which will then be redirected to the phones page due to the settings above.) We can also set the path relative to the ActivatedRoute being loaded via the relativeTo property like so: this.router.n avigate ([‘../ ..’], {relativeTo: this.route});
We’re on / phones / 1 / edit, so setting the path to ../../ will help us return the 2 levels of the path -> to phones, you can also set it to ../../ .. will also go back to the home page and then redirect to / phones again. However, if we just set .. it will get an error since we don’t have the / phones / 1 route.