Why RecoilJS appeared
Redux seems to be the most popular and powerful state management library in the react ecosystem, mobx is also really popular and impressive, the react Context is also not a bad tool, so why does Facebook broadcast it? Recoil ? Here are some advantages of recoil over redux :
1. Create a simple state management tool, with an intuitive syntax similar to the pure state of react .
2. Asynchronous state management support.
3. Provide the ability to store long-term state (state persist).
We will learn in turn in this series .
The main components of RecoilJS
Atom
Recoil stores data in units called atoms , React components can access the data contained in the atom and change the value of the data. The atom requires two parameters, the unique identifier ( unique key ) and the default value of the data.
1 2 3 4 5 | <span class="token keyword">const</span> count <span class="token operator">=</span> <span class="token function">atom</span> <span class="token punctuation">(</span> <span class="token punctuation">{</span> key <span class="token punctuation">:</span> <span class="token string">'count'</span> <span class="token punctuation">,</span> <span class="token keyword">default</span> <span class="token punctuation">:</span> <span class="token number">0</span> <span class="token punctuation">,</span> <span class="token punctuation">}</span> <span class="token punctuation">)</span> |
RecoilRoot
To be able to use the recoil, the application needs to be surrounded by a component called RecoilRoot, we will learn more about this API than later, firstly on understanding it as Provider in Redux, and do not need to pass in store at all.
1 2 3 4 | <span class="token operator"><</span> RecoilRoot <span class="token operator">></span> <span class="token operator"><</span> App <span class="token operator">/</span> <span class="token operator">></span> <span class="token operator"><</span> <span class="token operator">/</span> RecoilRoot <span class="token operator">></span> |
Selectors
Selectors return calculated data (similar to the reselect library in the redux ecosystem). If you have not used reselect yet , we will learn the concept of computational data through the following example.
The selectors takes two parameters, the unique identifier and the get function returns the calculated data.
Hooks
The component will interact with the data through the hooks provided by recoil , we will learn more about that later.
First todo application
The rough theory is enough, let's try out the recoil with the basic todo app :
Install apps
Use create-react-app to create react application and install more recoil library
1 2 | npx create-react-app recoil-todo |
then
1 2 3 4 | npm install recoil or yarn add recoil |
Our directory structure will be as follows
1 2 3 4 5 6 7 | src index.js state.js TodoList.jsx TodoForm.jsx TodoItem.jsx |
Initialize the component root
We will create an App component then place it in RecoilRoot as follows:
1 2 3 4 5 6 7 8 9 10 11 12 13 14 15 16 17 18 19 20 21 22 | <span class="token keyword">import</span> React <span class="token keyword">from</span> <span class="token string">'react'</span> <span class="token punctuation">;</span> <span class="token keyword">import</span> ReactDOM <span class="token keyword">from</span> <span class="token string">'react-dom'</span> <span class="token punctuation">;</span> <span class="token keyword">import</span> <span class="token punctuation">{</span> RecoilRoot <span class="token punctuation">}</span> <span class="token keyword">from</span> <span class="token string">'recoil'</span> <span class="token punctuation">;</span> <span class="token keyword">import</span> TodoList <span class="token keyword">from</span> <span class="token string">'./TodoList'</span> <span class="token punctuation">;</span> <span class="token keyword">import</span> TodoForm <span class="token keyword">from</span> <span class="token string">'./TodoForm'</span> <span class="token punctuation">;</span> <span class="token keyword">function</span> <span class="token function">App</span> <span class="token punctuation">(</span> <span class="token punctuation">)</span> <span class="token punctuation">{</span> <span class="token keyword">return</span> <span class="token punctuation">(</span> <span class="token operator"><</span> div className <span class="token operator">=</span> <span class="token string">"todo-app"</span> <span class="token operator">></span> <span class="token operator"><</span> TodoForm <span class="token operator">/</span> <span class="token operator">></span> <span class="token operator"><</span> TodoList <span class="token operator">/</span> <span class="token operator">></span> <span class="token operator"><</span> <span class="token operator">/</span> div <span class="token operator">></span> <span class="token punctuation">)</span> <span class="token punctuation">;</span> <span class="token punctuation">}</span> ReactDOM <span class="token punctuation">.</span> <span class="token function">render</span> <span class="token punctuation">(</span> <span class="token operator"><</span> RecoilRoot <span class="token operator">></span> <span class="token operator"><</span> App <span class="token operator">/</span> <span class="token operator">></span> <span class="token operator"><</span> <span class="token operator">/</span> RecoilRoot <span class="token operator">></span> <span class="token punctuation">,</span> document <span class="token punctuation">.</span> <span class="token function">getElementById</span> <span class="token punctuation">(</span> <span class="token string">'root'</span> <span class="token punctuation">)</span> <span class="token punctuation">)</span> <span class="token punctuation">;</span> |
Data initialization
As mentioned before, we will save data by atoms , assuming we have a data list of todo , which is initialized by atom as follows:
state.js
1 2 3 4 5 6 7 8 9 10 11 | <span class="token keyword">import</span> <span class="token punctuation">{</span> atom <span class="token punctuation">}</span> <span class="token keyword">from</span> <span class="token string">'recoil'</span> <span class="token punctuation">;</span> <span class="token keyword">const</span> <span class="token constant">TODO_LIST</span> <span class="token operator">=</span> <span class="token string">'todoListData'</span> <span class="token punctuation">;</span> <span class="token keyword">const</span> todoListState <span class="token operator">=</span> <span class="token function">atom</span> <span class="token punctuation">(</span> <span class="token punctuation">{</span> key <span class="token punctuation">:</span> <span class="token constant">TODO_LIST</span> <span class="token punctuation">,</span> <span class="token keyword">default</span> <span class="token punctuation">:</span> <span class="token punctuation">[</span> <span class="token punctuation">]</span> <span class="token punctuation">}</span> <span class="token punctuation">)</span> <span class="token punctuation">;</span> <span class="token keyword">export</span> <span class="token punctuation">{</span> todoListState <span class="token punctuation">}</span> <span class="token punctuation">;</span> |
Here I have declared the state key with a constant for easy management, because note that the key of each atom must be unique. Initializing data is as simple as that, nothing complicated right?
Render data to component
Oke, we have initialized the data, the first basic thing is how the component can receive that data, in redux , we use the connect function with the two classic parameters mapStateToProps and matchDispatchToProps. many generations dev exposure to Redux (joked that, but I used a lot Redux and Redux still enjoyed then, in addition React-Redux also replace the function of hooks connect it).
As I said above, we will use it all by hooks . Let's start with the first hook in TodoList.jsx :
1 2 3 4 5 6 7 8 9 10 11 12 13 14 15 16 17 18 19 | <span class="token keyword">import</span> React <span class="token keyword">from</span> <span class="token string">'react'</span> <span class="token punctuation">;</span> <span class="token keyword">import</span> <span class="token punctuation">{</span> useRecoilValue <span class="token punctuation">}</span> <span class="token keyword">from</span> <span class="token string">'recoil'</span> <span class="token punctuation">;</span> <span class="token keyword">import</span> <span class="token punctuation">{</span> todoListState <span class="token punctuation">}</span> <span class="token keyword">from</span> <span class="token string">'./state'</span> <span class="token punctuation">;</span> <span class="token keyword">import</span> TodoItem <span class="token keyword">from</span> <span class="token string">'./TodoItem'</span> <span class="token punctuation">;</span> <span class="token keyword">function</span> <span class="token function">TodoList</span> <span class="token punctuation">(</span> <span class="token punctuation">)</span> <span class="token punctuation">{</span> <span class="token keyword">const</span> todoList <span class="token operator">=</span> <span class="token function">useRecoilValue</span> <span class="token punctuation">(</span> todoListState <span class="token punctuation">)</span> <span class="token punctuation">;</span> <span class="token keyword">return</span> <span class="token punctuation">(</span> <span class="token operator"><</span> ul <span class="token operator">></span> <span class="token punctuation">{</span> todoList <span class="token punctuation">.</span> <span class="token function">map</span> <span class="token punctuation">(</span> todo <span class="token operator">=></span> <span class="token punctuation">(</span> <span class="token operator"><</span> TodoListItem data <span class="token operator">=</span> <span class="token punctuation">{</span> todo <span class="token punctuation">}</span> key <span class="token operator">=</span> <span class="token punctuation">{</span> todo <span class="token punctuation">.</span> id <span class="token punctuation">}</span> <span class="token operator">/</span> <span class="token operator">></span> <span class="token punctuation">)</span> <span class="token punctuation">)</span> <span class="token punctuation">}</span> <span class="token operator"><</span> <span class="token operator">/</span> ul <span class="token operator">></span> <span class="token punctuation">)</span> <span class="token punctuation">;</span> <span class="token punctuation">}</span> <span class="token keyword">export</span> <span class="token keyword">default</span> TodoList <span class="token punctuation">;</span> |
It is quite easy, import the state and just need to use a hook to get the value of the state . It is easily understood that useRecoilValue provides the ability to access an atom 's data and use it in the component .
Create a new todo
After doing a simple job of getting data and rendering , we move on to the next job, which is to create a new todo , which will require changing the state 's value. Made in TodoForm :
1 2 3 4 5 6 7 8 9 10 11 12 13 14 15 16 17 18 19 20 21 22 23 24 25 26 27 28 29 30 31 32 33 34 35 36 37 38 39 40 41 42 43 | <span class="token keyword">import</span> React <span class="token punctuation">,</span> <span class="token punctuation">{</span> useState <span class="token punctuation">}</span> <span class="token keyword">from</span> <span class="token string">'react'</span> <span class="token punctuation">;</span> <span class="token keyword">import</span> <span class="token punctuation">{</span> useSetRecoilState <span class="token punctuation">}</span> <span class="token keyword">from</span> <span class="token string">'recoil'</span> <span class="token punctuation">;</span> <span class="token keyword">import</span> <span class="token punctuation">{</span> todoListState <span class="token punctuation">}</span> <span class="token keyword">from</span> <span class="token string">'./state'</span> <span class="token punctuation">;</span> <span class="token keyword">function</span> <span class="token function">TodoForm</span> <span class="token punctuation">(</span> <span class="token punctuation">)</span> <span class="token punctuation">{</span> <span class="token keyword">const</span> <span class="token punctuation">[</span> inputValue <span class="token punctuation">,</span> setInputValue <span class="token punctuation">]</span> <span class="token operator">=</span> <span class="token function">useState</span> <span class="token punctuation">(</span> <span class="token string">''</span> <span class="token punctuation">)</span> <span class="token punctuation">;</span> <span class="token keyword">const</span> setTodoList <span class="token operator">=</span> <span class="token function">useSetRecoilState</span> <span class="token punctuation">(</span> todoListState <span class="token punctuation">)</span> <span class="token punctuation">;</span> <span class="token keyword">function</span> <span class="token function">handleChange</span> <span class="token punctuation">(</span> e <span class="token punctuation">)</span> <span class="token punctuation">{</span> <span class="token function">setInputValue</span> <span class="token punctuation">(</span> e <span class="token punctuation">.</span> target <span class="token punctuation">.</span> value <span class="token punctuation">)</span> <span class="token punctuation">;</span> <span class="token punctuation">}</span> <span class="token keyword">function</span> <span class="token function">handleSubmit</span> <span class="token punctuation">(</span> e <span class="token punctuation">)</span> <span class="token punctuation">{</span> e <span class="token punctuation">.</span> <span class="token function">preventDefault</span> <span class="token punctuation">(</span> <span class="token punctuation">)</span> <span class="token punctuation">;</span> <span class="token keyword">const</span> getValue <span class="token operator">=</span> inputValue <span class="token punctuation">.</span> <span class="token function">trim</span> <span class="token punctuation">(</span> <span class="token punctuation">)</span> <span class="token punctuation">;</span> <span class="token comment">// check if value exists</span> <span class="token keyword">if</span> <span class="token punctuation">(</span> getValue <span class="token punctuation">)</span> <span class="token punctuation">{</span> <span class="token function">setTodoList</span> <span class="token punctuation">(</span> <span class="token punctuation">(</span> oldTodoList <span class="token punctuation">)</span> <span class="token operator">=></span> <span class="token punctuation">{</span> <span class="token keyword">return</span> <span class="token punctuation">[</span> <span class="token operator">...</span> oldTodoList <span class="token punctuation">,</span> <span class="token punctuation">{</span> id <span class="token punctuation">:</span> Math <span class="token punctuation">.</span> <span class="token function">random</span> <span class="token punctuation">(</span> <span class="token punctuation">)</span> <span class="token punctuation">.</span> <span class="token function">toString</span> <span class="token punctuation">(</span> <span class="token punctuation">)</span> <span class="token punctuation">,</span> content <span class="token punctuation">:</span> getValue <span class="token punctuation">,</span> isDone <span class="token punctuation">:</span> <span class="token boolean">false</span> <span class="token punctuation">}</span> <span class="token punctuation">]</span> <span class="token punctuation">;</span> <span class="token punctuation">}</span> <span class="token punctuation">)</span> <span class="token punctuation">;</span> <span class="token comment">// reset input value</span> <span class="token function">setInputValue</span> <span class="token punctuation">(</span> <span class="token string">''</span> <span class="token punctuation">)</span> <span class="token punctuation">;</span> <span class="token punctuation">}</span> <span class="token punctuation">}</span> <span class="token keyword">return</span> <span class="token punctuation">(</span> <span class="token operator"><</span> form onSubmit <span class="token operator">=</span> <span class="token punctuation">{</span> handleSubmit <span class="token punctuation">}</span> <span class="token operator">></span> <span class="token operator"><</span> input value <span class="token operator">=</span> <span class="token punctuation">{</span> inputValue <span class="token punctuation">}</span> onChange <span class="token operator">=</span> <span class="token punctuation">{</span> handleChange <span class="token punctuation">}</span> <span class="token operator">/</span> <span class="token operator">></span> <span class="token operator"><</span> input type <span class="token operator">=</span> <span class="token string">"submit"</span> value <span class="token operator">=</span> <span class="token string">"Create Todo"</span> <span class="token operator">/</span> <span class="token operator">></span> <span class="token operator"><</span> <span class="token operator">/</span> form <span class="token operator">></span> <span class="token punctuation">)</span> <span class="token punctuation">;</span> <span class="token punctuation">}</span> <span class="token keyword">export</span> <span class="token keyword">default</span> TodoForm <span class="token punctuation">;</span> |
We use the next hook provided by recoil , which allows us to receive functions that change the value of data in the atom . This function accepts a callback parameter is the present value (before the change) of the state, and returns the new value of that state. Here we see the TodoForm component does not need to render the value of todoListState but only needs to change it, so we use useSetRecoilState instead of useRecoilValue .
If the component needs to do both, render and change the state , we don't need to use both hooks at the same time, but recoil already provides a hook named useRecoilState , which returns both todoList and the setTodoList function with the same syntax as after:
1 2 3 4 5 6 7 | <span class="token keyword">import</span> <span class="token punctuation">{</span> useRecoilState <span class="token punctuation">}</span> <span class="token keyword">from</span> <span class="token string">'recoil'</span> <span class="token keyword">import</span> <span class="token punctuation">{</span> todoListState <span class="token punctuation">}</span> <span class="token keyword">from</span> <span class="token string">'./state'</span> <span class="token operator">...</span> <span class="token comment">// look like react useState :D</span> <span class="token keyword">const</span> <span class="token punctuation">[</span> todoList <span class="token punctuation">,</span> setTodoList <span class="token punctuation">]</span> <span class="token operator">=</span> <span class="token function">useRecoilState</span> <span class="token punctuation">(</span> todoListState <span class="token punctuation">)</span> <span class="token operator">...</span> |
Update Status of created tasks.
Expanding a bit of the application, we will add events, when clicking on a TodoItem , it will mark as completed, similarly, we will use useSetRecoilState as above:
1 2 3 4 5 6 7 8 9 10 11 12 13 14 15 16 17 18 19 20 21 22 23 24 25 26 27 28 29 30 | <span class="token keyword">import</span> React <span class="token keyword">from</span> <span class="token string">'react'</span> <span class="token keyword">import</span> <span class="token punctuation">{</span> todoListState <span class="token punctuation">}</span> <span class="token keyword">from</span> <span class="token string">'./state'</span> <span class="token keyword">import</span> <span class="token punctuation">{</span> useSetRecoilState <span class="token punctuation">}</span> <span class="token keyword">from</span> <span class="token string">'recoil'</span> <span class="token keyword">function</span> <span class="token function">TodoItem</span> <span class="token punctuation">(</span> <span class="token punctuation">{</span> data <span class="token punctuation">}</span> <span class="token punctuation">)</span> <span class="token punctuation">{</span> <span class="token keyword">const</span> setTodoItem <span class="token operator">=</span> <span class="token function">useSetRecoilState</span> <span class="token punctuation">(</span> todoListState <span class="token punctuation">)</span> <span class="token punctuation">;</span> <span class="token keyword">function</span> <span class="token function">handleComplete</span> <span class="token punctuation">(</span> <span class="token punctuation">)</span> <span class="token punctuation">{</span> <span class="token keyword">if</span> <span class="token punctuation">(</span> <span class="token operator">!</span> data <span class="token punctuation">.</span> isDone <span class="token punctuation">)</span> <span class="token punctuation">{</span> <span class="token function">setTodoItem</span> <span class="token punctuation">(</span> <span class="token punctuation">(</span> oldTodoList <span class="token punctuation">)</span> <span class="token operator">=></span> <span class="token punctuation">{</span> <span class="token keyword">return</span> oldTodoList <span class="token punctuation">.</span> <span class="token function">map</span> <span class="token punctuation">(</span> todo <span class="token operator">=></span> <span class="token punctuation">{</span> <span class="token keyword">if</span> <span class="token punctuation">(</span> todo <span class="token punctuation">.</span> id <span class="token operator">===</span> data <span class="token punctuation">.</span> id <span class="token punctuation">)</span> <span class="token keyword">return</span> <span class="token punctuation">{</span> <span class="token operator">...</span> todo <span class="token punctuation">,</span> isDone <span class="token punctuation">:</span> <span class="token boolean">true</span> <span class="token punctuation">}</span> <span class="token keyword">return</span> todo <span class="token punctuation">}</span> <span class="token punctuation">)</span> <span class="token punctuation">}</span> <span class="token punctuation">)</span> <span class="token punctuation">}</span> <span class="token punctuation">}</span> <span class="token keyword">const</span> className <span class="token operator">=</span> data <span class="token punctuation">.</span> isDone <span class="token operator">?</span> <span class="token string">'todo-item done'</span> <span class="token punctuation">:</span> <span class="token string">'todo-item'</span> <span class="token keyword">const</span> taskTitle <span class="token operator">=</span> data <span class="token punctuation">.</span> isDone <span class="token operator">?</span> <span class="token template-string"><span class="token string">`</span> <span class="token interpolation"><span class="token interpolation-punctuation punctuation">${</span> data <span class="token punctuation">.</span> content <span class="token interpolation-punctuation punctuation">}</span></span> <span class="token string"> => done`</span></span> <span class="token punctuation">:</span> data <span class="token punctuation">.</span> content <span class="token keyword">return</span> <span class="token punctuation">(</span> <span class="token operator"><</span> li onClick <span class="token operator">=</span> <span class="token punctuation">{</span> handleComplete <span class="token punctuation">}</span> className <span class="token operator">=</span> <span class="token punctuation">{</span> className <span class="token punctuation">}</span> <span class="token operator">></span> <span class="token operator"><</span> data <span class="token operator">></span> <span class="token punctuation">{</span> taskTitle <span class="token punctuation">}</span> <span class="token operator"><</span> <span class="token operator">/</span> data <span class="token operator">></span> <span class="token operator"><</span> <span class="token operator">/</span> li <span class="token operator">></span> <span class="token punctuation">)</span> <span class="token punctuation">;</span> <span class="token punctuation">}</span> <span class="token keyword">export</span> <span class="token keyword">default</span> TodoItem <span class="token punctuation">;</span> |
Add a little bit of css and check the result 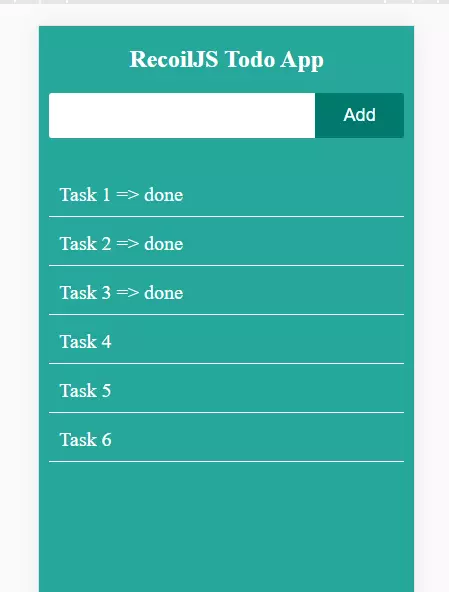
A few initial remarks
The state initialization is quite concise and relatively similar to React 's useState , the difference is that the state can be accessed anywhere within RecoilRoot . The interaction between component and state is really simple, I haven't had any trouble with recoil 's syntax yet because it looks pretty clear and easy to understand. But this is just a simple todo list , we need to test the ability of recoil for larger applications, and go deeper into other parts like async and persist processing to see whether recoil Is it an alternative to redux or mobx ?
Refer to recoiljs documentation
Demo code in the article: https://github.com/cuongnh-1139/recoil-demo