ReactJS – Using Google Map API with ReactJS
- Tram Ho
Hi everyone, my name is Hieu. Nice to come back to write another ReactJs article with the topic of integrating google map api into reactjs. Right and always let’s go to the article.
1. Opening:
Surely you have seen google maps integrated into IoT applications such as tracking smart devices, monitoring vehicle journeys like Uber, Grab… Looking at them, it seems difficult, but It’s not too difficult to learn gradually. Google map has provided us with a custom serving API that integrates into our application quite easily. From there we can perform tasks such as marking the store address, monitoring or viewing directions right on the application without having to go to the official page of google map. Google map also provides api for most devices like adnroid, ios, embed api or on website with Maps Javascript API. You can check it out right here : https://developers.google.com/maps/documentation. For pure javascript, everyone can follow the instructions at the homepage. And today, I will introduce a package that helps to integrate google map api into ReactJS which is react google maps.
2. Settings:
I already have a pre-initialized project with npx create-react-app. If anyone wants to learn more or re-read about ReactJs, everyone should have a look here: Similar to other packages using npm. We can install react-google-maps using the command
1 2 | $ <span class="token function">npm</span> i --save react-google-maps |
or
1 2 | $ <span class="token function">yarn</span> <span class="token function">add</span> react-google-maps |
Next we will create a component or an instance for Map. I will create a components folder and add the Map.js file as follows:
1 2 3 4 5 6 7 8 9 10 11 12 13 14 15 16 17 18 | <span class="token keyword">import</span> React <span class="token keyword">from</span> <span class="token string">'react'</span> <span class="token keyword">import</span> <span class="token punctuation">{</span> withGoogleMap<span class="token punctuation">,</span> withScriptjs<span class="token punctuation">,</span> GoogleMap <span class="token punctuation">}</span> <span class="token keyword">from</span> <span class="token string">"react-google-maps"</span> <span class="token keyword">const</span> <span class="token function-variable function">Map</span> <span class="token operator">=</span> <span class="token punctuation">(</span><span class="token punctuation">)</span> <span class="token operator">=></span> <span class="token punctuation">{</span> <span class="token keyword">return</span> <span class="token punctuation">(</span> <span class="token tag"><span class="token punctuation"><</span>div<span class="token punctuation">></span></span> <span class="token tag"><span class="token punctuation"><</span><span class="token class-name">GoogleMap</span> <span class="token attr-name">defaultZoom</span><span class="token script language-javascript"><span class="token script-punctuation punctuation">=</span><span class="token punctuation">{</span><span class="token number">8</span><span class="token punctuation">}</span></span> <span class="token attr-name">defaultCenter</span><span class="token script language-javascript"><span class="token script-punctuation punctuation">=</span><span class="token punctuation">{</span><span class="token punctuation">{</span> lat<span class="token operator">:</span> <span class="token operator">-</span><span class="token number">34.397</span><span class="token punctuation">,</span> lng<span class="token operator">:</span> <span class="token number">150.644</span> <span class="token punctuation">}</span><span class="token punctuation">}</span></span> <span class="token punctuation">></span></span> <span class="token tag"><span class="token punctuation"></</span><span class="token class-name">GoogleMap</span><span class="token punctuation">></span></span> <span class="token tag"><span class="token punctuation"></</span>div<span class="token punctuation">></span></span> <span class="token punctuation">)</span><span class="token punctuation">;</span> <span class="token punctuation">}</span> <span class="token keyword">export</span> <span class="token keyword">default</span> <span class="token function">withScriptjs</span><span class="token punctuation">(</span><span class="token function">withGoogleMap</span><span class="token punctuation">(</span>Map<span class="token punctuation">)</span><span class="token punctuation">)</span><span class="token punctuation">;</span> |
Here we see that two HOCs are required, withScriptjs and withGoogleMap, for our map to run.
The props I pass into GoogleMap include:
- defaultZoom: the initial zoom of the map, the larger the number, the closer the zoom will be
- defaultCenter: Default where the original midpoint of the map is located. You can choose the coordinates when you first open the map with a coordinate pair including : lat and lng.
For those of you who don’t know what lat and lng are, I’ll introduce you to these two parameters. For each location on the corresponding map we will have a pair of coordinates including longitude as Longitude and latitude as Latitude corresponding to lat and lng. Google map will determine the exact coordinates for us by passing in this coordinate pair.
Next in the App.js file we will add this component:
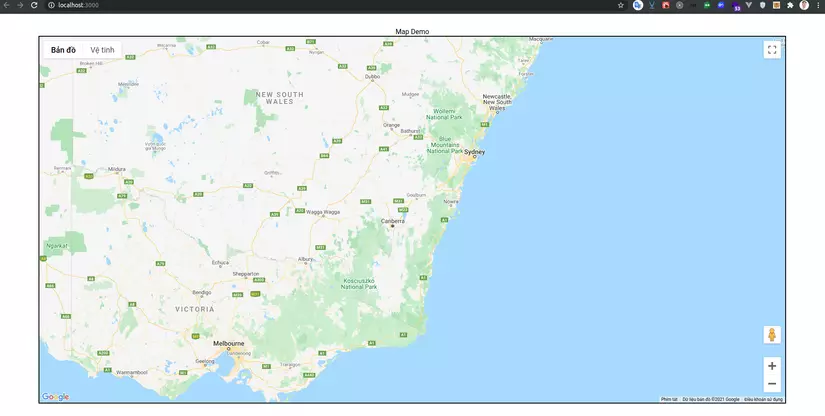
1 2 3 4 5 6 7 8 9 10 11 12 13 14 15 16 17 18 19 20 21 22 | <span class="token keyword">import</span> <span class="token string">'./App.css'</span><span class="token punctuation">;</span> <span class="token keyword">import</span> Map <span class="token keyword">from</span> <span class="token string">'./components/Map'</span> <span class="token keyword">function</span> <span class="token function">App</span><span class="token punctuation">(</span><span class="token punctuation">)</span> <span class="token punctuation">{</span> <span class="token keyword">const</span> key <span class="token operator">=</span> <span class="token string">'yourKey'</span> <span class="token keyword">return</span> <span class="token punctuation">(</span> <span class="token tag"><span class="token punctuation"><</span>div <span class="token attr-name">className</span><span class="token attr-value"><span class="token punctuation">=</span><span class="token punctuation">"</span>App<span class="token punctuation">"</span></span><span class="token punctuation">></span></span> <span class="token tag"><span class="token punctuation"><</span>header<span class="token punctuation">></span></span><span class="token plain-text"> Map Demo </span><span class="token tag"><span class="token punctuation"></</span>header<span class="token punctuation">></span></span> <span class="token tag"><span class="token punctuation"><</span><span class="token class-name">Map</span> <span class="token attr-name">googleMapURL</span><span class="token script language-javascript"><span class="token script-punctuation punctuation">=</span><span class="token punctuation">{</span><span class="token template-string"><span class="token template-punctuation string">`</span><span class="token string">https://maps.googleapis.com/maps/api/js?key=</span><span class="token interpolation"><span class="token interpolation-punctuation punctuation">${</span>key<span class="token interpolation-punctuation punctuation">}</span></span><span class="token string">&callback=initMap</span><span class="token template-punctuation string">`</span></span><span class="token punctuation">}</span></span> <span class="token attr-name">loadingElement</span><span class="token script language-javascript"><span class="token script-punctuation punctuation">=</span><span class="token punctuation">{</span><span class="token punctuation"><</span>div <span class="token attr-name">style</span><span class="token script-punctuation punctuation">=</span><span class="token punctuation">{</span><span class="token punctuation">{</span> height<span class="token operator">:</span> <span class="token template-string"><span class="token template-punctuation string">`</span><span class="token string">100%</span><span class="token template-punctuation string">`</span></span> <span class="token punctuation">}</span><span class="token punctuation">}</span> <span class="token punctuation">/></span><span class="token punctuation">}</span></span> <span class="token attr-name">containerElement</span><span class="token script language-javascript"><span class="token script-punctuation punctuation">=</span><span class="token punctuation">{</span><span class="token punctuation"><</span>div <span class="token attr-name">style</span><span class="token script-punctuation punctuation">=</span><span class="token punctuation">{</span><span class="token punctuation">{</span> height<span class="token operator">:</span> <span class="token template-string"><span class="token template-punctuation string">`</span><span class="token string">90vh</span><span class="token template-punctuation string">`</span></span><span class="token punctuation">,</span> margin<span class="token operator">:</span> <span class="token template-string"><span class="token template-punctuation string">`</span><span class="token string">auto</span><span class="token template-punctuation string">`</span></span><span class="token punctuation">,</span> border<span class="token operator">:</span> <span class="token string">'2px solid black'</span> <span class="token punctuation">}</span><span class="token punctuation">}</span> <span class="token punctuation">/></span><span class="token punctuation">}</span></span> <span class="token attr-name">mapElement</span><span class="token script language-javascript"><span class="token script-punctuation punctuation">=</span><span class="token punctuation">{</span><span class="token punctuation"><</span>div <span class="token attr-name">style</span><span class="token script-punctuation punctuation">=</span><span class="token punctuation">{</span><span class="token punctuation">{</span> height<span class="token operator">:</span> <span class="token template-string"><span class="token template-punctuation string">`</span><span class="token string">100%</span><span class="token template-punctuation string">`</span></span> <span class="token punctuation">}</span><span class="token punctuation">}</span> <span class="token punctuation">/></span><span class="token punctuation">}</span></span> <span class="token punctuation">/></span></span> <span class="token tag"><span class="token punctuation"></</span>div<span class="token punctuation">></span></span> <span class="token punctuation">)</span><span class="token punctuation">;</span> <span class="token punctuation">}</span> <span class="token keyword">export</span> <span class="token keyword">default</span> App<span class="token punctuation">;</span> |
Here we need to create an API Key on https://console.cloud.google.com/google/maps-apis/api-list?project=master-gecko-318603 and enable Maps JavaScript API . We’ll also add some props here:
- googleMapURL: url of google map , remember to add the key that has been set up to run it.
- loadingElement: insert loading effect before loading the map.
- containerElement, mapElement : is the div containing the map.
Our result will be like this:
3. Some basic uses:
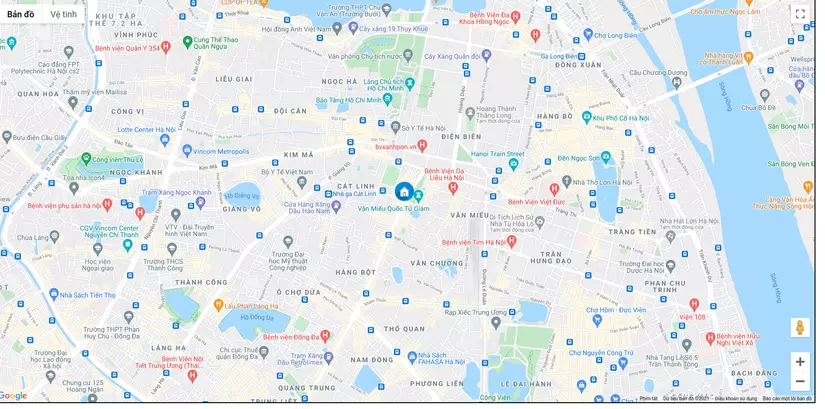
Marker:
The marker will mark a location on the map based on the given lat, lng. To use markers we use the Marker component of react-google-maps. below I will create a marker as well as for defaultCenter in Hanoi.
1 2 3 4 5 6 7 8 9 10 11 12 13 14 15 16 17 18 19 20 21 22 23 24 25 | <span class="token keyword">import</span> React <span class="token keyword">from</span> <span class="token string">'react'</span> <span class="token keyword">import</span> <span class="token punctuation">{</span> withGoogleMap<span class="token punctuation">,</span> withScriptjs<span class="token punctuation">,</span> GoogleMap <span class="token punctuation">}</span> <span class="token keyword">from</span> <span class="token string">"react-google-maps"</span> <span class="token keyword">const</span> <span class="token function-variable function">Map</span> <span class="token operator">=</span> <span class="token punctuation">(</span><span class="token punctuation">)</span> <span class="token operator">=></span> <span class="token punctuation">{</span> <span class="token keyword">return</span> <span class="token punctuation">(</span> <span class="token tag"><span class="token punctuation"><</span>div<span class="token punctuation">></span></span> <span class="token tag"><span class="token punctuation"><</span><span class="token class-name">GoogleMap</span> <span class="token attr-name">defaultZoom</span><span class="token script language-javascript"><span class="token script-punctuation punctuation">=</span><span class="token punctuation">{</span><span class="token number">15</span><span class="token punctuation">}</span></span> <span class="token attr-name">defaultCenter</span><span class="token script language-javascript"><span class="token script-punctuation punctuation">=</span><span class="token punctuation">{</span><span class="token punctuation">{</span> lat<span class="token operator">:</span> <span class="token number">21.027763</span><span class="token punctuation">,</span> lng<span class="token operator">:</span> <span class="token number">105.834160</span> <span class="token punctuation">}</span><span class="token punctuation">}</span></span> <span class="token punctuation">></span></span> <span class="token tag"><span class="token punctuation"><</span><span class="token class-name">Marker</span> <span class="token attr-name">icon</span><span class="token script language-javascript"><span class="token script-punctuation punctuation">=</span><span class="token punctuation">{</span><span class="token punctuation">{</span> url<span class="token operator">:</span> <span class="token string">'https://insulationpads.co.uk/wp-content/uploads/2017/10/Home.png'</span><span class="token punctuation">,</span> scaledSize<span class="token operator">:</span> <span class="token keyword">new</span> <span class="token class-name">window<span class="token punctuation">.</span>google<span class="token punctuation">.</span>maps<span class="token punctuation">.</span>Size</span><span class="token punctuation">(</span><span class="token number">40</span><span class="token punctuation">,</span> <span class="token number">40</span><span class="token punctuation">)</span><span class="token punctuation">,</span> <span class="token punctuation">}</span><span class="token punctuation">}</span></span> <span class="token attr-name">position</span><span class="token script language-javascript"><span class="token script-punctuation punctuation">=</span><span class="token punctuation">{</span><span class="token punctuation">{</span> lat<span class="token operator">:</span> <span class="token number">21.027763</span><span class="token punctuation">,</span> lng<span class="token operator">:</span> <span class="token number">105.834160</span> <span class="token punctuation">}</span><span class="token punctuation">}</span></span> <span class="token punctuation">/></span></span> <span class="token tag"><span class="token punctuation"></</span><span class="token class-name">GoogleMap</span><span class="token punctuation">></span></span> <span class="token tag"><span class="token punctuation"></</span>div<span class="token punctuation">></span></span> <span class="token punctuation">)</span><span class="token punctuation">;</span> <span class="token punctuation">}</span> <span class="token keyword">export</span> <span class="token keyword">default</span> <span class="token function">withScriptjs</span><span class="token punctuation">(</span><span class="token function">withGoogleMap</span><span class="token punctuation">(</span>Map<span class="token punctuation">)</span><span class="token punctuation">)</span><span class="token punctuation">;</span> |
Above I customize the marker with an icon that is an image file. the scale size of the marker and most importantly the position of the marker. Results are below.
InfoBox:
Infobox is an annotation dialog for marker . to add infobox we use :
1 2 3 4 5 6 7 8 9 10 11 12 13 14 15 16 17 18 19 20 21 22 23 24 25 26 27 28 29 30 31 32 33 34 35 36 37 38 39 40 41 | <span class="token keyword">import</span> React <span class="token keyword">from</span> <span class="token string">'react'</span> <span class="token keyword">import</span> <span class="token punctuation">{</span> withGoogleMap<span class="token punctuation">,</span> withScriptjs<span class="token punctuation">,</span> GoogleMap<span class="token punctuation">,</span> Marker <span class="token punctuation">}</span> <span class="token keyword">from</span> <span class="token string">"react-google-maps"</span> <span class="token keyword">import</span> InfoBox <span class="token keyword">from</span> <span class="token string">'react-google-maps/lib/components/addons/InfoBox'</span> <span class="token keyword">const</span> options <span class="token operator">=</span> <span class="token punctuation">{</span> closeBoxURL<span class="token operator">:</span> <span class="token string">''</span><span class="token punctuation">,</span> enableEventPropagation<span class="token operator">:</span> <span class="token boolean">true</span> <span class="token punctuation">}</span><span class="token punctuation">;</span> <span class="token keyword">const</span> <span class="token function-variable function">Map</span> <span class="token operator">=</span> <span class="token punctuation">(</span><span class="token punctuation">)</span> <span class="token operator">=></span> <span class="token punctuation">{</span> <span class="token keyword">return</span> <span class="token punctuation">(</span> <span class="token tag"><span class="token punctuation"><</span>div<span class="token punctuation">></span></span> <span class="token tag"><span class="token punctuation"><</span><span class="token class-name">GoogleMap</span> <span class="token attr-name">defaultZoom</span><span class="token script language-javascript"><span class="token script-punctuation punctuation">=</span><span class="token punctuation">{</span><span class="token number">15</span><span class="token punctuation">}</span></span> <span class="token attr-name">defaultCenter</span><span class="token script language-javascript"><span class="token script-punctuation punctuation">=</span><span class="token punctuation">{</span><span class="token punctuation">{</span> lat<span class="token operator">:</span> <span class="token number">21.027763</span><span class="token punctuation">,</span> lng<span class="token operator">:</span> <span class="token number">105.834160</span> <span class="token punctuation">}</span><span class="token punctuation">}</span></span> <span class="token punctuation">></span></span> <span class="token tag"><span class="token punctuation"><</span><span class="token class-name">Marker</span> <span class="token attr-name">icon</span><span class="token script language-javascript"><span class="token script-punctuation punctuation">=</span><span class="token punctuation">{</span><span class="token punctuation">{</span> url<span class="token operator">:</span> <span class="token string">'https://insulationpads.co.uk/wp-content/uploads/2017/10/Home.png'</span><span class="token punctuation">,</span> scaledSize<span class="token operator">:</span> <span class="token keyword">new</span> <span class="token class-name">window<span class="token punctuation">.</span>google<span class="token punctuation">.</span>maps<span class="token punctuation">.</span>Size</span><span class="token punctuation">(</span><span class="token number">40</span><span class="token punctuation">,</span> <span class="token number">40</span><span class="token punctuation">)</span><span class="token punctuation">,</span> <span class="token punctuation">}</span><span class="token punctuation">}</span></span> <span class="token attr-name">position</span><span class="token script language-javascript"><span class="token script-punctuation punctuation">=</span><span class="token punctuation">{</span><span class="token punctuation">{</span> lat<span class="token operator">:</span> <span class="token number">21.027763</span><span class="token punctuation">,</span> lng<span class="token operator">:</span> <span class="token number">105.834160</span> <span class="token punctuation">}</span><span class="token punctuation">}</span></span> <span class="token punctuation">></span></span> <span class="token tag"><span class="token punctuation"><</span><span class="token class-name">InfoBox</span> <span class="token attr-name">options</span><span class="token script language-javascript"><span class="token script-punctuation punctuation">=</span><span class="token punctuation">{</span>options<span class="token punctuation">}</span></span> <span class="token punctuation">></span></span> <span class="token tag"><span class="token punctuation"><</span><span class="token punctuation">></span></span> <span class="token tag"><span class="token punctuation"><</span>div <span class="token attr-name">style</span><span class="token script language-javascript"><span class="token script-punctuation punctuation">=</span><span class="token punctuation">{</span><span class="token punctuation">{</span> backgroundColor<span class="token operator">:</span> <span class="token string">'green'</span><span class="token punctuation">,</span> color<span class="token operator">:</span> <span class="token string">'white'</span><span class="token punctuation">,</span> borderRadius<span class="token operator">:</span><span class="token string">'1em'</span><span class="token punctuation">,</span> padding<span class="token operator">:</span> <span class="token string">'0.2em'</span> <span class="token punctuation">}</span><span class="token punctuation">}</span></span><span class="token punctuation">></span></span><span class="token plain-text"> someone's house </span><span class="token tag"><span class="token punctuation"></</span>div<span class="token punctuation">></span></span> <span class="token tag"><span class="token punctuation"></</span><span class="token punctuation">></span></span> <span class="token tag"><span class="token punctuation"></</span><span class="token class-name">InfoBox</span><span class="token punctuation">></span></span> <span class="token tag"><span class="token punctuation"></</span><span class="token class-name">Marker</span><span class="token punctuation">></span></span> <span class="token tag"><span class="token punctuation"></</span><span class="token class-name">GoogleMap</span><span class="token punctuation">></span></span> <span class="token tag"><span class="token punctuation"></</span>div<span class="token punctuation">></span></span> <span class="token punctuation">)</span><span class="token punctuation">;</span> <span class="token punctuation">}</span> <span class="token keyword">export</span> <span class="token keyword">default</span> <span class="token function">withScriptjs</span><span class="token punctuation">(</span><span class="token function">withGoogleMap</span><span class="token punctuation">(</span>Map<span class="token punctuation">)</span><span class="token punctuation">)</span><span class="token punctuation">;</span> |
Because we put InfoBox in Marker so we don’t need to pass position props to InfoBox. InfoBox gets coordinates from Marker itself. pictures as below:

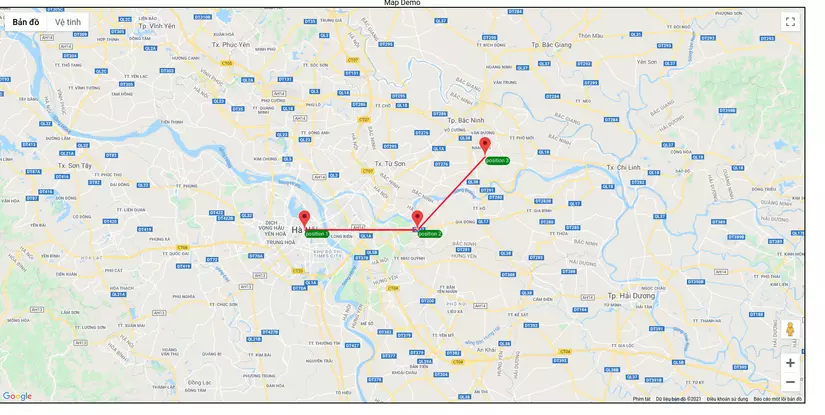
Polyline:
Polyline is the line connecting the Marker points together. Usually to track the path or distance of points. To use Polyline we need 2 or more positions.
1 2 3 4 5 6 7 8 9 10 11 12 13 14 15 16 17 18 19 20 21 22 23 24 25 26 27 28 29 30 31 32 33 34 35 36 37 38 39 40 41 42 43 44 45 46 47 48 49 50 51 52 53 54 55 56 57 58 59 60 61 62 63 64 65 66 67 | <span class="token keyword">import</span> React <span class="token keyword">from</span> <span class="token string">'react'</span> <span class="token keyword">import</span> <span class="token punctuation">{</span> withGoogleMap<span class="token punctuation">,</span> withScriptjs<span class="token punctuation">,</span> GoogleMap<span class="token punctuation">,</span> Marker<span class="token punctuation">,</span> Polyline <span class="token punctuation">}</span> <span class="token keyword">from</span> <span class="token string">"react-google-maps"</span> <span class="token keyword">import</span> InfoBox <span class="token keyword">from</span> <span class="token string">'react-google-maps/lib/components/addons/InfoBox'</span> <span class="token keyword">const</span> options <span class="token operator">=</span> <span class="token punctuation">{</span> closeBoxURL<span class="token operator">:</span> <span class="token string">''</span><span class="token punctuation">,</span> enableEventPropagation<span class="token operator">:</span> <span class="token boolean">true</span> <span class="token punctuation">}</span><span class="token punctuation">;</span> <span class="token keyword">const</span> optionsPolyline <span class="token operator">=</span> <span class="token punctuation">{</span> strokeColor<span class="token operator">:</span> <span class="token string">'red'</span><span class="token punctuation">,</span> strokeOpacity<span class="token operator">:</span> <span class="token number">0.8</span><span class="token punctuation">,</span> strokeWeight<span class="token operator">:</span> <span class="token number">3</span><span class="token punctuation">,</span> fillColor<span class="token operator">:</span> <span class="token string">'#085daa'</span><span class="token punctuation">,</span> fillOpacity<span class="token operator">:</span> <span class="token number">0.35</span><span class="token punctuation">,</span> clickable<span class="token operator">:</span> <span class="token boolean">false</span><span class="token punctuation">,</span> draggable<span class="token operator">:</span> <span class="token boolean">false</span><span class="token punctuation">,</span> editable<span class="token operator">:</span> <span class="token boolean">false</span><span class="token punctuation">,</span> visible<span class="token operator">:</span> <span class="token boolean">true</span><span class="token punctuation">,</span> radius<span class="token operator">:</span> <span class="token number">30000</span><span class="token punctuation">,</span> zIndex<span class="token operator">:</span> <span class="token number">1</span> <span class="token punctuation">}</span><span class="token punctuation">;</span> <span class="token keyword">const</span> positions <span class="token operator">=</span> <span class="token punctuation">[</span><span class="token punctuation">{</span> lat<span class="token operator">:</span> <span class="token number">21.027763</span><span class="token punctuation">,</span> lng<span class="token operator">:</span> <span class="token number">105.834160</span><span class="token punctuation">,</span> label<span class="token operator">:</span> <span class="token string">"position 1"</span> <span class="token punctuation">}</span><span class="token punctuation">,</span> <span class="token punctuation">{</span> lat<span class="token operator">:</span> <span class="token number">21.027763</span><span class="token punctuation">,</span> lng<span class="token operator">:</span> <span class="token number">106</span><span class="token punctuation">,</span> label<span class="token operator">:</span> <span class="token string">"position 2"</span> <span class="token punctuation">}</span><span class="token punctuation">,</span> <span class="token punctuation">{</span> lat<span class="token operator">:</span> <span class="token number">21.127763</span><span class="token punctuation">,</span> lng<span class="token operator">:</span> <span class="token number">106.1</span><span class="token punctuation">,</span> label<span class="token operator">:</span> <span class="token string">"position 3"</span> <span class="token punctuation">}</span><span class="token punctuation">]</span> <span class="token keyword">const</span> <span class="token function-variable function">Map</span> <span class="token operator">=</span> <span class="token punctuation">(</span><span class="token punctuation">)</span> <span class="token operator">=></span> <span class="token punctuation">{</span> <span class="token keyword">return</span> <span class="token punctuation">(</span> <span class="token tag"><span class="token punctuation"><</span>div<span class="token punctuation">></span></span> <span class="token tag"><span class="token punctuation"><</span><span class="token class-name">GoogleMap</span> <span class="token attr-name">defaultZoom</span><span class="token script language-javascript"><span class="token script-punctuation punctuation">=</span><span class="token punctuation">{</span><span class="token number">12</span><span class="token punctuation">}</span></span> <span class="token attr-name">defaultCenter</span><span class="token script language-javascript"><span class="token script-punctuation punctuation">=</span><span class="token punctuation">{</span><span class="token punctuation">{</span> lat<span class="token operator">:</span> <span class="token number">21.027763</span><span class="token punctuation">,</span> lng<span class="token operator">:</span> <span class="token number">106</span> <span class="token punctuation">}</span><span class="token punctuation">}</span></span> <span class="token punctuation">></span></span> <span class="token punctuation">{</span> positions <span class="token operator">&&</span> positions<span class="token punctuation">.</span><span class="token function">map</span><span class="token punctuation">(</span><span class="token punctuation">(</span><span class="token parameter">position<span class="token punctuation">,</span> index</span><span class="token punctuation">)</span> <span class="token operator">=></span> <span class="token tag"><span class="token punctuation"><</span><span class="token class-name">Marker</span> <span class="token attr-name">position</span><span class="token script language-javascript"><span class="token script-punctuation punctuation">=</span><span class="token punctuation">{</span><span class="token keyword">new</span> <span class="token class-name">window<span class="token punctuation">.</span>google<span class="token punctuation">.</span>maps<span class="token punctuation">.</span>LatLng</span><span class="token punctuation">(</span>position<span class="token punctuation">)</span><span class="token punctuation">}</span></span> <span class="token punctuation">></span></span> <span class="token tag"><span class="token punctuation"><</span><span class="token class-name">InfoBox</span> <span class="token attr-name">options</span><span class="token script language-javascript"><span class="token script-punctuation punctuation">=</span><span class="token punctuation">{</span>options<span class="token punctuation">}</span></span> <span class="token punctuation">></span></span> <span class="token tag"><span class="token punctuation"><</span><span class="token punctuation">></span></span> <span class="token tag"><span class="token punctuation"><</span>div <span class="token attr-name">style</span><span class="token script language-javascript"><span class="token script-punctuation punctuation">=</span><span class="token punctuation">{</span><span class="token punctuation">{</span> backgroundColor<span class="token operator">:</span> <span class="token string">'green'</span><span class="token punctuation">,</span> color<span class="token operator">:</span> <span class="token string">'white'</span><span class="token punctuation">,</span> borderRadius<span class="token operator">:</span><span class="token string">'1em'</span><span class="token punctuation">,</span> padding<span class="token operator">:</span> <span class="token string">'0.2em'</span> <span class="token punctuation">}</span><span class="token punctuation">}</span></span><span class="token punctuation">></span></span> <span class="token punctuation">{</span>position<span class="token punctuation">.</span>label<span class="token punctuation">}</span> <span class="token tag"><span class="token punctuation"></</span>div<span class="token punctuation">></span></span> <span class="token tag"><span class="token punctuation"></</span><span class="token punctuation">></span></span> <span class="token tag"><span class="token punctuation"></</span><span class="token class-name">InfoBox</span><span class="token punctuation">></span></span> <span class="token tag"><span class="token punctuation"></</span><span class="token class-name">Marker</span><span class="token punctuation">></span></span> <span class="token punctuation">)</span> <span class="token punctuation">}</span> <span class="token tag"><span class="token punctuation"><</span><span class="token class-name">Polyline</span> <span class="token attr-name">path</span><span class="token script language-javascript"><span class="token script-punctuation punctuation">=</span><span class="token punctuation">{</span>positions<span class="token punctuation">}</span></span> <span class="token attr-name">options</span><span class="token script language-javascript"><span class="token script-punctuation punctuation">=</span><span class="token punctuation">{</span>optionsPolyline<span class="token punctuation">}</span></span> <span class="token punctuation">/></span></span> <span class="token tag"><span class="token punctuation"></</span><span class="token class-name">GoogleMap</span><span class="token punctuation">></span></span> <span class="token tag"><span class="token punctuation"></</span>div<span class="token punctuation">></span></span> <span class="token punctuation">)</span><span class="token punctuation">;</span> <span class="token punctuation">}</span> <span class="token keyword">export</span> <span class="token keyword">default</span> <span class="token function">withScriptjs</span><span class="token punctuation">(</span><span class="token function">withGoogleMap</span><span class="token punctuation">(</span>Map<span class="token punctuation">)</span><span class="token punctuation">)</span><span class="token punctuation">;</span> |
Result :
Polygon:
Polygon is similar to Polyline but we will have closed seams. Try replacing Polyline with Polygon:
1 2 3 4 5 | <span class="token tag"><span class="token punctuation"><</span><span class="token class-name">Polygon</span> <span class="token attr-name">path</span><span class="token script language-javascript"><span class="token script-punctuation punctuation">=</span><span class="token punctuation">{</span>positions<span class="token punctuation">}</span></span> <span class="token attr-name">options</span><span class="token script language-javascript"><span class="token script-punctuation punctuation">=</span><span class="token punctuation">{</span>optionsPolyline<span class="token punctuation">}</span></span> <span class="token punctuation">/></span></span> |
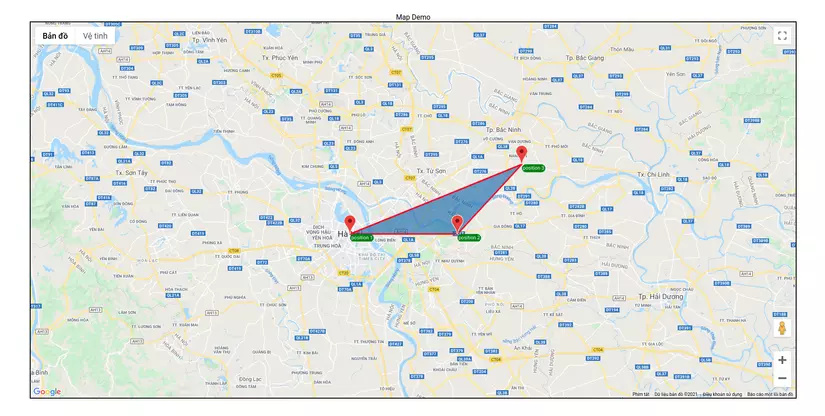
Polygon helps us to zoning based on 3 or more points.
There are also many other features, if you are interested, please visit the official document page of this library: https://tomchentw.github.io/react-google-maps to learn more. We can customize it as you like, like the realtime coordinates of a certain device. or optional handle when clicking on Marker. There is a lot of cool stuff from the google map api of google.
3. Conclusion:3. Conclusion:
Today, I have introduced, installed and implemented some basic features of react-google-maps. With google map api, there are some features we need to pay to use it so make sure you have paid or activated the feature to be able to use it. This article hopes to be of some help to everyone when accessing the google map api. Thank you to everyone who has followed this post. See you in the next posts.