ReactiveX is a great framework for elegant, easy-to-read event-based coding. However, getting started with it can be challenging. In fact, once you understand some of the key principles of ReactiveX, you can start coding easily. The purpose of this article is to explain these key principles and show how they apply through a simple example.
Before reading further, one important thing to note: Reactive programming is addictive! Once you start thinking like a luồng dữ liệu instead of luồng điều khiển , you tend to think that it solves the problem better than other programming methods, and you use reactive programming more and more.
Reactive and ReactiveX Programming
So what is reactive programming? There is one way to write event driven code. The name comes from the fact that reactive code consists of entities that interact with events emitted from the source. These entities apply transformations on these events and return other events as a result. So these entities – named operators – can be chained together, to create computational graphs. The reactive graph is always oriented. They only flow in one direction. Some graphs are a Directional Round Graph – DAG – as shown in the following chart: 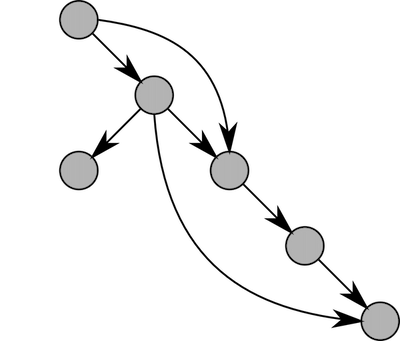
On this chart, the buttons represent the calculations and the links between them.
Some graphs can also be Periodic Graphs as follows:
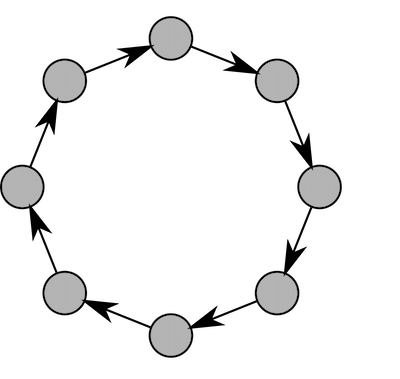
Cycle graphs are very common when writing a fully reactive application. Most of the time, the main part of the application graph is a non-cyclical form and the subsection can be cyclic. ReactiveX is the most popular reactive implementation. One reason is that it was one of the first response libraries. It was originally developed by Microsoft for the .net platform. Since 2012, it has become open source and has been ported to more than 20 programming languages. ReactiveX’s python implementation is RxPY. This library is available on pypi and can be installed using pip:
1 2 | pip3 install rx |
Observable, Observer, Operator
ReactiveX’s foundation is based on just a few of the main principles described in Observable Contract . Once you understand these principles, you will clearly understand the behavior of any ReactiveX code. The base entity in ReactiveX is Observable . Obserable is the source entity of the item . Item is the ReactiveX term for an event. You can consider that an Observable is a stream of events.
The second entity is the Observer . Observer are entities that subscribe to Observers so that it can process Items as they are emitted. This means an Observable does not emit Items until an Observer registers with it. When an Observable is created, no data stream occurs. Data flow started at the time of registration, not at creation time.
We can then combine an Observer and an Observable to create an Operator . An Operator registers a source Observable , applies some transformations to incoming Items and emits new Items on another Observable.
Here’s all you need to understand how ReactiveX works! We will go into more detail in the following paragraphs, but it all ends with understanding the following four concepts: Observable, Observer, Subscription, Operator
Marble Diagrams
Here’s the marble diagram: An example to show the behavior of an operator. You will find such diagrams almost everywhere in the literature. Consider operator map. This operator takes the items from an Observable source, applies a transformation function, and returns an Observable with the transform function applied on the source items . This is quite simple, but also quite verbose to explain in text. The marble diagram of the operator map is an easier way to explain this and also a visual way to understand how ReactiveX works:
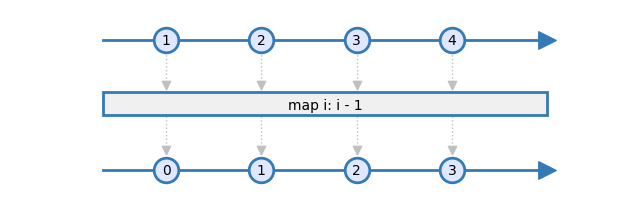
There are three parts in this diagram:
- The top arrow indicates the source Observable: When registered, this Observable source emits the numbers 1 through 4.
- The rectangle represents the calculation performed by the operator. In this example, each item is subtracted 1
- The bottom arrow represents the Obserable sink. As a result of subtracting 1 for each item, it will produce items 0 through 3.
On the marble scheme, the time increases gradually from left to right. So the leftmost item is played before the rightmost item. The end of the arrows can have different shapes, each indicating different ways the Observable completes: 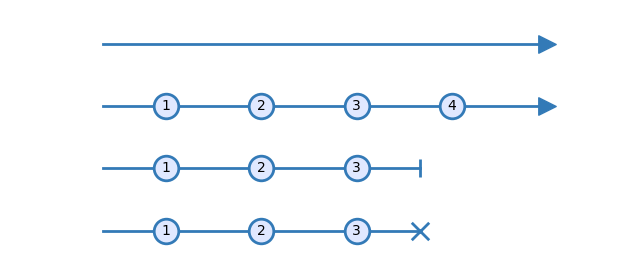
A Line ending with an arrow means Observable will continue emitting items in the future. The circle on the line is the position of the time when the items are emitted.
A line ends with a pipe – | – indicates that Observable ended on success. No more items can be emitted after that.
A line ending with a slash – X – indicates that Observable ended due to an error. No more items can be emitted after that.
Reactivity Diagram
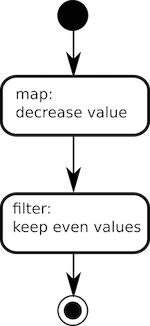
The reactivity graph is another form of representation. They are used to describe the behavior of an application or a component. They are similar to UML Activity Diagrams, but they describe the flow of data instead of the control flow. Consider an application that simply takes an Observable source as an input, decrements the value, and keeps only the even values. Here is the reactivity diagram of this app:
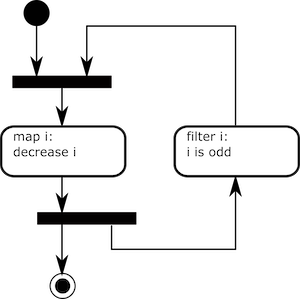
The black circle indicates the source Observable. The rounded rectangles are operators. Here we are stringing two operators: map and filter . The surrounding black circle is the sinking part of the data stream. More complex graphs can be described in a similar way. Reacivity diagrams are a good way to work on the architecture before coding. See here another simple example with a cycle graph:
Show Me some code!
Now you’re ready to read and write ReactiveX code! Let’s implement the code corresponding to the first reaction diagram from the previous section. We will need:
1 2 3 | import rx import rx.operators as ops |
The first step is to create an Observable source. We are not using real data here, but instead we create an Observable from a list.
1 2 3 4 5 | import rx import rx.operators as ops source = rx.from_iterable([1, 2, 3, 4]) |
Then, we build the calculation functions. This includes two operators: map and filter .
1 2 3 4 5 6 7 8 9 10 | import rx import rx.operators as ops source = rx.from_iterable([1, 2, 3, 4]) source.pipe( ops.map(lambda i: i - 1), ops.filter(lambda i: i % 2 == 0), ) |
Pipe Operator allows to create chain operators. Here’s an easy way to create Graphs. The map and filter operators take functions as parameters. We use lambdas here for these simple calculations. You can execute this code already. However, keep in mind that nothing will happen: Graph is generated but no one has registered it, so no data stream yet. Please do as follows:
1 2 3 4 5 6 7 8 9 10 11 12 13 14 | import rx import rx.operators as ops source = rx.from_iterable([1, 2, 3, 4]) source.pipe( ops.map(lambda i: i - 1), ops.filter(lambda i: i % 2 == 0), ).subscribe( on_next=lambda i: print("on_next: {}".format(i)), on_completed=lambda: print("on_completed"), on_error=lambda e: print("on_error: {}".format(e)) ) |
Registration method… registers an Observable. It has three callback commands. These callbacks will be called at different times:
- onnext is called every time an item is received.
- oncompleted is called when Observable completes successfully.
- onerror is called when Observable completes due to an error. Note that according to Observable Contract, the onnext callback will never be called after the oncompleted and onerror callback .
There is a final step needed to clean up the resource when it is complete. For this, the register method returns a disposable object. This Disposable object’s handler can be called to clean up resources:
1 2 3 4 5 6 7 8 9 10 11 12 13 14 15 16 17 | import rx import rx.operators as ops source = rx.from_iterable([1, 2, 3, 4]) disposable = source.pipe( ops.map(lambda i: i - 1), ops.filter(lambda i: i % 2 == 0), ).subscribe( on_next=lambda i: print("on_next: {}".format(i)), on_completed=lambda: print("on_completed"), on_error=lambda e: print("on_error: {}".format(e)), ) disposable.dispose() print("Done!") |
Error Management
Okay, the code runs fine, but what if the source Observable contains a string instead of an integer?
Replace the observable source with:
1 2 | source = rx.from iterable([1, ”foo” , 3, 4]) |
Results returned:
1 2 3 4 5 6 | $ python demo1_error.py on_next: 0 on_error: unsupported operand type(s) for -: ’str’ and ’int’ Done! |
on_error has been called with the exception. So what happened here? And then what does the filter operator do after the map operator? The full explanation is in the following figure:
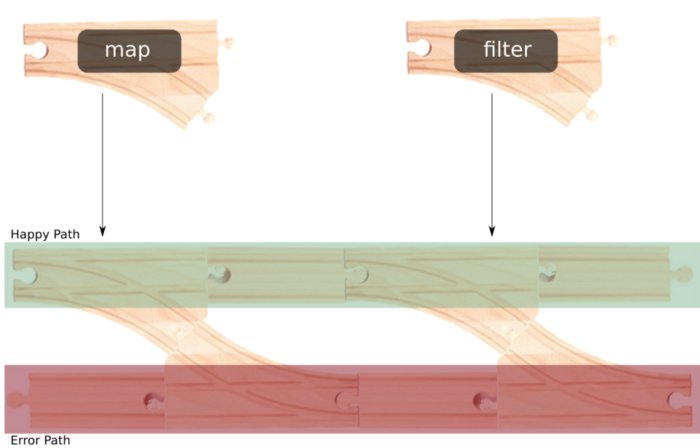
One operator can be seen working on two parallel data streams:
- Happy path processes all incoming items
- Error path error handling
This is how the application I wrote above runs: Every time an item is issued, it will pass the happy path of the map operator (ie its value is decreased). If all goes well, the resulting item will continue on the happy path of the filter operator. On success, the command on_next is called.
In case of an error in the map operator, the map operator will catch the exception and issue it on the error path. The exception is passed to the error path of the filter operator. The filter operator just forwards it downstream and the on_error command is called.
Easily noticed, the error operator handle is clear and transparent. There are also a number of dedicated operators for error management, such as registration retry or timeout.
The great thing with this structure is that in many cases, you get error free of charge.
Concurrency
In the implementation example above we did blocking : All computation is done in the call to the register method. This is the ReactiveX default behavior, but it is not always desirable. Sometimes we need to manage concurrent processes like IO or CPU. ReactiveX handles concurrency through operators and schedulers.
The scheduler is the object that manages the flow of events and the loop. RxPY implements schedulers to deal with parallel processing across threads and groups of threads. It also provides a scheduler for IO concurrently with AsyncIO, Twisted, GEvent, and Eventlet.
We will explore this later!
Conclude
You now have all the concepts you need to start using reactive programming. Once you are familiar with this, other concepts like multicasting, hot / cold Observable and higher order Observable will also be easily accessible. I will translate and learn more about this in the next articles.
Source: https://medium.com/swlh/an-introduction-to-reactive-programming-in-python-a9985e4c43b9