Hello friends!
Today I’m back with the advanced Reactjs series. In the previous post we learned about how to write a React hook that is complete and reusable for your entire project from now on. In this article I will talk about creating a general layout for the component, in order to reuse this component later.
Remember: Component reuse is vital when scaling your app! . Because when your application grows and has thousands of components, the more unrelated the components, the bigger the size of your application, the more troublesome, that every time you look at it you just want to throw computer go! Trust me!
Live demo
Before you read on, see a live demo Here you wait?
Preamble
Suppose we have components with similar layout, as shown below:
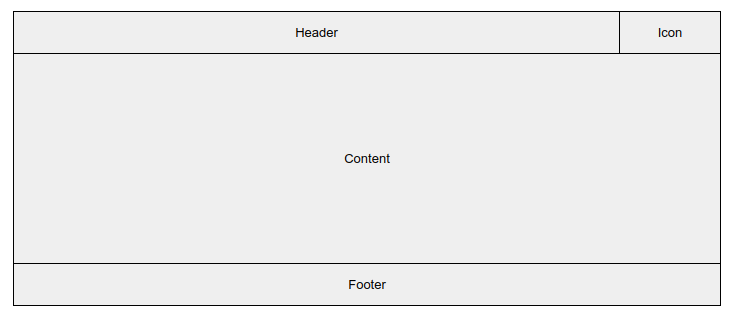
The component will be laid out in such areas, but rendering something in it is highly customizable. This layout can be suitable for Modal, also suitable for Alert, Toast, ….. and many other things. So it will be reused a lot in the project. Minimize the need to rewrite the same code over and over again.
Begin
1. Create a Slots Context Provider
Give me 1 slot! Do you find this saying very popular? A slot is an “order” to reserve a place first, then either to pick it up or not to take it.
The same is true of the Slots Provider that we are about to create, it will create a series of slots, then whoever takes the slots to display will enter the area that we have laid out. Here we will create the following slots:
- header
- closeIcon
- divider
- Nội dung
- footer
- buttonGroup
… Corresponding to the partitions of the designed layout in the image above.
So when using it, we would write something like this:
1 2 3 4 5 6 7 8 | <span class="token tag"><span class="token tag"><span class="token punctuation"><</span> <span class="token class-name">SlotsComponent</span></span> <span class="token punctuation">></span></span> <span class="token tag"><span class="token tag"><span class="token punctuation"><</span> <span class="token class-name">Slot</span></span> <span class="token attr-name">slot</span> <span class="token attr-value"><span class="token punctuation">=</span> <span class="token punctuation">"</span> header <span class="token punctuation">"</span></span> <span class="token punctuation">></span></span> <span class="token plain-text">Đây là header</span> <span class="token tag"><span class="token tag"><span class="token punctuation"></</span> <span class="token class-name">Slot</span></span> <span class="token punctuation">></span></span> <span class="token tag"><span class="token tag"><span class="token punctuation"><</span> <span class="token class-name">Slot</span></span> <span class="token attr-name">slot</span> <span class="token attr-value"><span class="token punctuation">=</span> <span class="token punctuation">"</span> closeIcon <span class="token punctuation">"</span></span> <span class="token punctuation">></span></span> <span class="token plain-text">Đây là close icon</span> <span class="token tag"><span class="token tag"><span class="token punctuation"></</span> <span class="token class-name">Slot</span></span> <span class="token punctuation">></span></span> <span class="token tag"><span class="token tag"><span class="token punctuation"><</span> <span class="token class-name">Slot</span></span> <span class="token attr-name">slot</span> <span class="token attr-value"><span class="token punctuation">=</span> <span class="token punctuation">"</span> divider <span class="token punctuation">"</span></span> <span class="token punctuation">></span></span> <span class="token plain-text">Đây là divider</span> <span class="token tag"><span class="token tag"><span class="token punctuation"></</span> <span class="token class-name">Slot</span></span> <span class="token punctuation">></span></span> <span class="token tag"><span class="token tag"><span class="token punctuation"><</span> <span class="token class-name">Slot</span></span> <span class="token attr-name">slot</span> <span class="token attr-value"><span class="token punctuation">=</span> <span class="token punctuation">"</span> content <span class="token punctuation">"</span></span> <span class="token punctuation">></span></span> <span class="token plain-text">Đây là content</span> <span class="token tag"><span class="token tag"><span class="token punctuation"></</span> <span class="token class-name">Slot</span></span> <span class="token punctuation">></span></span> <span class="token tag"><span class="token tag"><span class="token punctuation"><</span> <span class="token class-name">Slot</span></span> <span class="token attr-name">slot</span> <span class="token attr-value"><span class="token punctuation">=</span> <span class="token punctuation">"</span> buttonGroup <span class="token punctuation">"</span></span> <span class="token punctuation">></span></span> <span class="token plain-text">Đây là buttons group</span> <span class="token tag"><span class="token tag"><span class="token punctuation"></</span> <span class="token class-name">Slot</span></span> <span class="token punctuation">></span></span> <span class="token tag"><span class="token tag"><span class="token punctuation"></</span> <span class="token class-name">SlotsComponent</span></span> <span class="token punctuation">></span></span> |
The good thing about using Slots is that you don’t need to care about the order of the slots, just enter the correct slot name. For example, if you change the order in which slots are written as follows, the component will still render the same layout.
1 2 3 4 5 6 7 8 9 10 | <span class="token tag"><span class="token tag"><span class="token punctuation"><</span> <span class="token class-name">SlotsComponent</span></span> <span class="token punctuation">></span></span> <span class="token plain-text"> // Đưa cái nào lên trước cũng không thành vấn đề, // slot của mày là closeIcon thì mày phải nằm đúng vùng closeIcon do tao đặt ra cho mày </span> <span class="token tag"><span class="token tag"><span class="token punctuation"><</span> <span class="token class-name">Slot</span></span> <span class="token attr-name">slot</span> <span class="token attr-value"><span class="token punctuation">=</span> <span class="token punctuation">"</span> closeIcon <span class="token punctuation">"</span></span> <span class="token punctuation">></span></span> <span class="token plain-text">Đây là close icon</span> <span class="token tag"><span class="token tag"><span class="token punctuation"></</span> <span class="token class-name">Slot</span></span> <span class="token punctuation">></span></span> <span class="token tag"><span class="token tag"><span class="token punctuation"><</span> <span class="token class-name">Slot</span></span> <span class="token attr-name">slot</span> <span class="token attr-value"><span class="token punctuation">=</span> <span class="token punctuation">"</span> header <span class="token punctuation">"</span></span> <span class="token punctuation">></span></span> <span class="token plain-text">Đây là header</span> <span class="token tag"><span class="token tag"><span class="token punctuation"></</span> <span class="token class-name">Slot</span></span> <span class="token punctuation">></span></span> <span class="token tag"><span class="token tag"><span class="token punctuation"><</span> <span class="token class-name">Slot</span></span> <span class="token attr-name">slot</span> <span class="token attr-value"><span class="token punctuation">=</span> <span class="token punctuation">"</span> divider <span class="token punctuation">"</span></span> <span class="token punctuation">></span></span> <span class="token plain-text">Đây là divider</span> <span class="token tag"><span class="token tag"><span class="token punctuation"></</span> <span class="token class-name">Slot</span></span> <span class="token punctuation">></span></span> <span class="token tag"><span class="token tag"><span class="token punctuation"><</span> <span class="token class-name">Slot</span></span> <span class="token attr-name">slot</span> <span class="token attr-value"><span class="token punctuation">=</span> <span class="token punctuation">"</span> content <span class="token punctuation">"</span></span> <span class="token punctuation">></span></span> <span class="token plain-text">Đây là content</span> <span class="token tag"><span class="token tag"><span class="token punctuation"></</span> <span class="token class-name">Slot</span></span> <span class="token punctuation">></span></span> <span class="token tag"><span class="token tag"><span class="token punctuation"><</span> <span class="token class-name">Slot</span></span> <span class="token attr-name">slot</span> <span class="token attr-value"><span class="token punctuation">=</span> <span class="token punctuation">"</span> buttonGroup <span class="token punctuation">"</span></span> <span class="token punctuation">></span></span> <span class="token plain-text">Đây là buttons group</span> <span class="token tag"><span class="token tag"><span class="token punctuation"></</span> <span class="token class-name">Slot</span></span> <span class="token punctuation">></span></span> <span class="token tag"><span class="token tag"><span class="token punctuation"></</span> <span class="token class-name">SlotsComponent</span></span> <span class="token punctuation">></span></span> |
OK, come on! Here is the code for SlotsProvider, this is just pure React Context so there is nothing to discuss:
1 2 3 4 5 6 7 8 9 10 11 12 13 14 15 16 17 18 19 20 21 22 23 24 25 26 27 28 29 30 31 32 33 34 35 36 | <span class="token keyword">import</span> React <span class="token punctuation">,</span> <span class="token punctuation">{</span> useContext <span class="token punctuation">,</span> useMemo <span class="token punctuation">}</span> <span class="token keyword">from</span> <span class="token string">"react"</span> <span class="token punctuation">;</span> <span class="token keyword">interface</span> <span class="token class-name">SlotProps</span> <span class="token punctuation">{</span> slot <span class="token operator">?</span> <span class="token operator">:</span> <span class="token builtin">string</span> <span class="token punctuation">;</span> <span class="token punctuation">}</span> <span class="token keyword">let</span> SlotContext <span class="token operator">=</span> React <span class="token punctuation">.</span> <span class="token function">createContext</span> <span class="token punctuation">(</span> <span class="token keyword">null</span> <span class="token punctuation">)</span> <span class="token punctuation">;</span> <span class="token keyword">export</span> <span class="token keyword">function</span> useSlotProps <span class="token operator"><</span> <span class="token constant">T</span> <span class="token operator">></span> <span class="token punctuation">(</span> props <span class="token operator">:</span> <span class="token constant">T</span> <span class="token punctuation">,</span> defaultSlot <span class="token operator">?</span> <span class="token operator">:</span> <span class="token builtin">string</span> <span class="token punctuation">)</span> <span class="token operator">:</span> <span class="token constant">T</span> <span class="token punctuation">{</span> <span class="token keyword">let</span> slot <span class="token operator">=</span> <span class="token punctuation">(</span> props <span class="token keyword">as</span> SlotProps <span class="token punctuation">)</span> <span class="token punctuation">.</span> slot <span class="token operator">||</span> defaultSlot <span class="token punctuation">;</span> <span class="token keyword">let</span> <span class="token punctuation">{</span> <span class="token punctuation">[</span> slot <span class="token punctuation">]</span> <span class="token operator">:</span> slotProps <span class="token operator">=</span> <span class="token punctuation">{</span> <span class="token punctuation">}</span> <span class="token punctuation">}</span> <span class="token operator">=</span> <span class="token function">useContext</span> <span class="token punctuation">(</span> SlotContext <span class="token punctuation">)</span> <span class="token operator">||</span> <span class="token punctuation">{</span> <span class="token punctuation">}</span> <span class="token punctuation">;</span> <span class="token keyword">return</span> Object <span class="token punctuation">.</span> <span class="token function">assign</span> <span class="token punctuation">(</span> slotProps <span class="token punctuation">,</span> props <span class="token punctuation">)</span> <span class="token punctuation">;</span> <span class="token punctuation">}</span> <span class="token keyword">export</span> <span class="token keyword">function</span> <span class="token function">SlotProvider</span> <span class="token punctuation">(</span> <span class="token parameter">props</span> <span class="token punctuation">)</span> <span class="token punctuation">{</span> <span class="token keyword">let</span> parentSlots <span class="token operator">=</span> <span class="token function">useContext</span> <span class="token punctuation">(</span> SlotContext <span class="token punctuation">)</span> <span class="token operator">||</span> <span class="token punctuation">{</span> <span class="token punctuation">}</span> <span class="token punctuation">;</span> <span class="token keyword">let</span> <span class="token punctuation">{</span> slots <span class="token operator">=</span> <span class="token punctuation">{</span> <span class="token punctuation">}</span> <span class="token punctuation">,</span> children <span class="token punctuation">}</span> <span class="token operator">=</span> props <span class="token punctuation">;</span> <span class="token comment">// Merge props for each slot from parent context and props</span> <span class="token keyword">let</span> value <span class="token operator">=</span> <span class="token function">useMemo</span> <span class="token punctuation">(</span> <span class="token punctuation">(</span> <span class="token punctuation">)</span> <span class="token operator">=></span> Object <span class="token punctuation">.</span> <span class="token function">keys</span> <span class="token punctuation">(</span> parentSlots <span class="token punctuation">)</span> <span class="token punctuation">.</span> <span class="token function">concat</span> <span class="token punctuation">(</span> Object <span class="token punctuation">.</span> <span class="token function">keys</span> <span class="token punctuation">(</span> slots <span class="token punctuation">)</span> <span class="token punctuation">)</span> <span class="token punctuation">.</span> <span class="token function">reduce</span> <span class="token punctuation">(</span> <span class="token punctuation">(</span> <span class="token parameter">o <span class="token punctuation">,</span> p</span> <span class="token punctuation">)</span> <span class="token operator">=></span> <span class="token punctuation">(</span> <span class="token punctuation">{</span> <span class="token operator">...</span> o <span class="token punctuation">,</span> <span class="token punctuation">[</span> p <span class="token punctuation">]</span> <span class="token operator">:</span> Object <span class="token punctuation">.</span> <span class="token function">assign</span> <span class="token punctuation">(</span> parentSlots <span class="token punctuation">[</span> p <span class="token punctuation">]</span> <span class="token operator">||</span> <span class="token punctuation">{</span> <span class="token punctuation">}</span> <span class="token punctuation">,</span> slots <span class="token punctuation">[</span> p <span class="token punctuation">]</span> <span class="token operator">||</span> <span class="token punctuation">{</span> <span class="token punctuation">}</span> <span class="token punctuation">)</span> <span class="token punctuation">}</span> <span class="token punctuation">)</span> <span class="token punctuation">,</span> <span class="token punctuation">{</span> <span class="token punctuation">}</span> <span class="token punctuation">)</span> <span class="token punctuation">,</span> <span class="token punctuation">[</span> parentSlots <span class="token punctuation">,</span> slots <span class="token punctuation">]</span> <span class="token punctuation">)</span> <span class="token punctuation">;</span> <span class="token keyword">return</span> <span class="token operator"><</span> SlotContext <span class="token punctuation">.</span> Provider value <span class="token operator">=</span> <span class="token punctuation">{</span> value <span class="token punctuation">}</span> <span class="token operator">></span> <span class="token punctuation">{</span> children <span class="token punctuation">}</span> <span class="token operator"><</span> <span class="token operator">/</span> SlotContext <span class="token punctuation">.</span> Provider <span class="token operator">></span> <span class="token punctuation">;</span> <span class="token punctuation">}</span> |
2. Create a SlotWrapper
This is just a Wrapper, in order to wrap anything you want to render to the correct Slot by specifying a slot name for it:
1 2 3 4 5 6 7 8 9 10 11 12 13 14 15 16 17 18 | <span class="token keyword">import</span> <span class="token operator">*</span> <span class="token keyword">as</span> React <span class="token keyword">from</span> <span class="token string">"react"</span> <span class="token punctuation">;</span> <span class="token keyword">import</span> <span class="token punctuation">{</span> useSlotProps <span class="token punctuation">}</span> <span class="token keyword">from</span> <span class="token string">"./SlotsProvider"</span> <span class="token punctuation">;</span> <span class="token keyword">interface</span> <span class="token class-name">Props</span> <span class="token punctuation">{</span> slot <span class="token operator">?</span> <span class="token operator">:</span> <span class="token builtin">string</span> <span class="token punctuation">;</span> children <span class="token operator">:</span> React <span class="token punctuation">.</span> ReactElement <span class="token punctuation">;</span> <span class="token punctuation">}</span> <span class="token keyword">export</span> <span class="token keyword">const</span> <span class="token function-variable function">SlotWrapper</span> <span class="token operator">=</span> <span class="token punctuation">(</span> <span class="token parameter">props <span class="token operator">:</span> Props</span> <span class="token punctuation">)</span> <span class="token operator">=></span> <span class="token punctuation">{</span> props <span class="token operator">=</span> <span class="token function">useSlotProps</span> <span class="token punctuation">(</span> props <span class="token punctuation">,</span> <span class="token string">"text"</span> <span class="token punctuation">)</span> <span class="token punctuation">;</span> <span class="token keyword">const</span> <span class="token punctuation">{</span> children <span class="token punctuation">,</span> <span class="token operator">...</span> otherProps <span class="token punctuation">}</span> <span class="token operator">=</span> props <span class="token punctuation">;</span> <span class="token keyword">return</span> React <span class="token punctuation">.</span> <span class="token function">cloneElement</span> <span class="token punctuation">(</span> children <span class="token punctuation">,</span> <span class="token punctuation">{</span> <span class="token operator">...</span> otherProps <span class="token punctuation">}</span> <span class="token punctuation">)</span> <span class="token punctuation">;</span> <span class="token punctuation">}</span> <span class="token punctuation">;</span> |
3. Write a test component, showing the designed layout
1 2 3 4 5 6 7 8 9 10 11 12 13 14 15 16 17 18 19 20 21 22 23 24 25 26 27 28 29 30 31 32 33 34 35 36 37 38 39 | <span class="token keyword">import</span> <span class="token operator">*</span> <span class="token keyword">as</span> React <span class="token keyword">from</span> <span class="token string">"react"</span> <span class="token punctuation">;</span> <span class="token keyword">import</span> <span class="token punctuation">{</span> SlotProvider <span class="token punctuation">}</span> <span class="token keyword">from</span> <span class="token string">"./SlotsProvider"</span> <span class="token punctuation">;</span> <span class="token keyword">interface</span> <span class="token class-name">Props</span> <span class="token punctuation">{</span> children <span class="token operator">:</span> React <span class="token punctuation">.</span> ReactNode <span class="token operator">|</span> React <span class="token punctuation">.</span> ReactNode <span class="token punctuation">[</span> <span class="token punctuation">]</span> <span class="token punctuation">;</span> <span class="token punctuation">}</span> <span class="token keyword">export</span> <span class="token keyword">const</span> <span class="token function-variable function">TestComponent</span> <span class="token operator">=</span> <span class="token punctuation">(</span> <span class="token parameter">props <span class="token operator">:</span> Props</span> <span class="token punctuation">)</span> <span class="token operator">=></span> <span class="token punctuation">{</span> <span class="token keyword">return</span> <span class="token punctuation">(</span> <span class="token tag"><span class="token tag"><span class="token punctuation"><</span> div</span> <span class="token attr-name">className</span> <span class="token attr-value"><span class="token punctuation">=</span> <span class="token punctuation">"</span> grid <span class="token punctuation">"</span></span> <span class="token punctuation">></span></span> <span class="token tag"><span class="token tag"><span class="token punctuation"><</span> <span class="token class-name">SlotProvider</span></span> <span class="token attr-name">slots</span> <span class="token script language-javascript"><span class="token script-punctuation punctuation">=</span> <span class="token punctuation">{</span> <span class="token punctuation">{</span> header <span class="token operator">:</span> <span class="token punctuation">{</span> className <span class="token operator">:</span> <span class="token string">"header"</span> <span class="token punctuation">}</span> <span class="token punctuation">,</span> closeIcon <span class="token operator">:</span> <span class="token punctuation">{</span> className <span class="token operator">:</span> <span class="token string">"closeIcon"</span> <span class="token punctuation">}</span> <span class="token punctuation">,</span> divider <span class="token operator">:</span> <span class="token punctuation">{</span> className <span class="token operator">:</span> <span class="token string">"divider"</span> <span class="token punctuation">}</span> <span class="token punctuation">,</span> content <span class="token operator">:</span> <span class="token punctuation">{</span> className <span class="token operator">:</span> <span class="token string">"content"</span> <span class="token punctuation">}</span> <span class="token punctuation">,</span> footer <span class="token operator">:</span> <span class="token punctuation">{</span> className <span class="token operator">:</span> <span class="token string">"footer"</span> <span class="token punctuation">}</span> <span class="token punctuation">,</span> buttonGroup <span class="token operator">:</span> <span class="token punctuation">{</span> className <span class="token operator">:</span> <span class="token string">"buttonGroup"</span> <span class="token punctuation">}</span> <span class="token punctuation">}</span> <span class="token punctuation">}</span></span> <span class="token punctuation">></span></span> <span class="token punctuation">{</span> props <span class="token punctuation">.</span> children <span class="token punctuation">}</span> <span class="token tag"><span class="token tag"><span class="token punctuation"></</span> <span class="token class-name">SlotProvider</span></span> <span class="token punctuation">></span></span> <span class="token tag"><span class="token tag"><span class="token punctuation"></</span> div</span> <span class="token punctuation">></span></span> <span class="token punctuation">)</span> <span class="token punctuation">;</span> <span class="token punctuation">}</span> <span class="token punctuation">;</span> |
We just wrap all the children of the component in <SlotProvider... At the same time created slots for it, in each slot, here I have inserted a className for it.
4. Just a little CSS!
1 2 3 4 5 6 7 8 9 10 11 12 13 14 15 16 17 18 19 20 21 22 23 24 25 26 27 28 29 30 31 32 33 34 35 36 37 38 39 40 41 42 43 44 45 46 47 48 49 50 | <span class="token selector">.App</span> <span class="token punctuation">{</span> <span class="token property">font-family</span> <span class="token punctuation">:</span> sans-serif <span class="token punctuation">;</span> <span class="token property">text-align</span> <span class="token punctuation">:</span> center <span class="token punctuation">;</span> <span class="token property">background</span> <span class="token punctuation">:</span> #f0f1f2 <span class="token punctuation">;</span> <span class="token property">height</span> <span class="token punctuation">:</span> 100vh <span class="token punctuation">;</span> <span class="token property">padding</span> <span class="token punctuation">:</span> 0 <span class="token punctuation">;</span> <span class="token property">margin</span> <span class="token punctuation">:</span> 0 <span class="token punctuation">;</span> <span class="token punctuation">}</span> <span class="token selector">.grid</span> <span class="token punctuation">{</span> <span class="token property">display</span> <span class="token punctuation">:</span> grid <span class="token punctuation">;</span> <span class="token property">grid-template-columns</span> <span class="token punctuation">:</span> 12px auto 1fr auto <span class="token function">minmax</span> <span class="token punctuation">(</span> 0 <span class="token punctuation">,</span> auto <span class="token punctuation">)</span> 12px <span class="token punctuation">;</span> <span class="token property">grid-template-rows</span> <span class="token punctuation">:</span> auto auto 16px 1fr auto auto 12px <span class="token punctuation">;</span> <span class="token property">grid-template-areas</span> <span class="token punctuation">:</span> <span class="token string">". . . . . ."</span> <span class="token string">". header header header closeIcon ."</span> <span class="token string">"divider divider divider divider divider divider"</span> <span class="token string">"content content content content content content"</span> <span class="token string">". footer footer buttonGroup buttonGroup ."</span> <span class="token string">". . . . . ."</span> <span class="token punctuation">;</span> <span class="token property">width</span> <span class="token punctuation">:</span> 80% <span class="token punctuation">;</span> <span class="token property">background</span> <span class="token punctuation">:</span> #fff <span class="token punctuation">;</span> <span class="token property">border-radius</span> <span class="token punctuation">:</span> 8px <span class="token punctuation">;</span> <span class="token property">padding</span> <span class="token punctuation">:</span> 12px <span class="token punctuation">;</span> <span class="token punctuation">}</span> <span class="token selector">.header</span> <span class="token punctuation">{</span> <span class="token property">grid-area</span> <span class="token punctuation">:</span> header <span class="token punctuation">;</span> <span class="token punctuation">}</span> <span class="token selector">.closeIcon</span> <span class="token punctuation">{</span> <span class="token property">grid-area</span> <span class="token punctuation">:</span> closeIcon <span class="token punctuation">;</span> <span class="token punctuation">}</span> <span class="token selector">.divider</span> <span class="token punctuation">{</span> <span class="token property">grid-area</span> <span class="token punctuation">:</span> divider <span class="token punctuation">;</span> <span class="token punctuation">}</span> <span class="token selector">.content</span> <span class="token punctuation">{</span> <span class="token property">grid-area</span> <span class="token punctuation">:</span> content <span class="token punctuation">;</span> <span class="token punctuation">}</span> <span class="token selector">.footer</span> <span class="token punctuation">{</span> <span class="token property">grid-area</span> <span class="token punctuation">:</span> footer <span class="token punctuation">;</span> <span class="token punctuation">}</span> <span class="token selector">.buttonGroup</span> <span class="token punctuation">{</span> <span class="token property">grid-area</span> <span class="token punctuation">:</span> buttonGroup <span class="token punctuation">;</span> <span class="token punctuation">}</span> |
That is done Now let’s test!
5. Use
1 2 3 4 5 6 7 8 9 10 11 12 13 14 15 16 17 18 19 20 21 22 23 24 25 26 27 28 29 30 31 32 33 34 35 36 37 38 39 40 41 42 43 44 45 46 | <span class="token keyword">import</span> React <span class="token keyword">from</span> <span class="token string">"react"</span> <span class="token punctuation">;</span> <span class="token keyword">import</span> <span class="token punctuation">{</span> SlotWrapper <span class="token punctuation">}</span> <span class="token keyword">from</span> <span class="token string">"./SlotWrapper"</span> <span class="token punctuation">;</span> <span class="token keyword">import</span> <span class="token punctuation">{</span> TestComponent <span class="token punctuation">}</span> <span class="token keyword">from</span> <span class="token string">"./TestComponent"</span> <span class="token punctuation">;</span> <span class="token keyword">import</span> <span class="token string">"./styles.css"</span> <span class="token punctuation">;</span> <span class="token keyword">export</span> <span class="token keyword">default</span> <span class="token keyword">function</span> <span class="token function">App</span> <span class="token punctuation">(</span> <span class="token punctuation">)</span> <span class="token punctuation">{</span> <span class="token keyword">return</span> <span class="token punctuation">(</span> <span class="token tag"><span class="token tag"><span class="token punctuation"><</span> div</span> <span class="token attr-name">className</span> <span class="token attr-value"><span class="token punctuation">=</span> <span class="token punctuation">"</span> App <span class="token punctuation">"</span></span> <span class="token punctuation">></span></span> <span class="token tag"><span class="token tag"><span class="token punctuation"><</span> h1</span> <span class="token punctuation">></span></span> <span class="token plain-text">Slots provider test</span> <span class="token tag"><span class="token tag"><span class="token punctuation"></</span> h1</span> <span class="token punctuation">></span></span> <span class="token tag"><span class="token tag"><span class="token punctuation"><</span> div</span> <span class="token attr-name">style</span> <span class="token script language-javascript"><span class="token script-punctuation punctuation">=</span> <span class="token punctuation">{</span> <span class="token punctuation">{</span> display <span class="token operator">:</span> <span class="token string">"flex"</span> <span class="token punctuation">,</span> alignItems <span class="token operator">:</span> <span class="token string">"center"</span> <span class="token punctuation">,</span> justifyContent <span class="token operator">:</span> <span class="token string">"center"</span> <span class="token punctuation">}</span> <span class="token punctuation">}</span></span> <span class="token punctuation">></span></span> <span class="token tag"><span class="token tag"><span class="token punctuation"><</span> <span class="token class-name">TestComponent</span></span> <span class="token punctuation">></span></span> <span class="token tag"><span class="token tag"><span class="token punctuation"><</span> <span class="token class-name">SlotWrapper</span></span> <span class="token attr-name">slot</span> <span class="token attr-value"><span class="token punctuation">=</span> <span class="token punctuation">"</span> header <span class="token punctuation">"</span></span> <span class="token punctuation">></span></span> <span class="token tag"><span class="token tag"><span class="token punctuation"><</span> div</span> <span class="token punctuation">></span></span> <span class="token tag"><span class="token tag"><span class="token punctuation"><</span> h3</span> <span class="token punctuation">></span></span> <span class="token plain-text">This is header</span> <span class="token tag"><span class="token tag"><span class="token punctuation"></</span> h3</span> <span class="token punctuation">></span></span> <span class="token tag"><span class="token tag"><span class="token punctuation"></</span> div</span> <span class="token punctuation">></span></span> <span class="token tag"><span class="token tag"><span class="token punctuation"></</span> <span class="token class-name">SlotWrapper</span></span> <span class="token punctuation">></span></span> <span class="token tag"><span class="token tag"><span class="token punctuation"><</span> <span class="token class-name">SlotWrapper</span></span> <span class="token attr-name">slot</span> <span class="token attr-value"><span class="token punctuation">=</span> <span class="token punctuation">"</span> closeIcon <span class="token punctuation">"</span></span> <span class="token punctuation">></span></span> <span class="token tag"><span class="token tag"><span class="token punctuation"><</span> div</span> <span class="token punctuation">></span></span> <span class="token plain-text">Icon</span> <span class="token tag"><span class="token tag"><span class="token punctuation"></</span> div</span> <span class="token punctuation">></span></span> <span class="token tag"><span class="token tag"><span class="token punctuation"></</span> <span class="token class-name">SlotWrapper</span></span> <span class="token punctuation">></span></span> <span class="token tag"><span class="token tag"><span class="token punctuation"><</span> <span class="token class-name">SlotWrapper</span></span> <span class="token attr-name">slot</span> <span class="token attr-value"><span class="token punctuation">=</span> <span class="token punctuation">"</span> content <span class="token punctuation">"</span></span> <span class="token punctuation">></span></span> <span class="token tag"><span class="token tag"><span class="token punctuation"><</span> div</span> <span class="token punctuation">></span></span> <span class="token plain-text">This is content area, you can render any thing here</span> <span class="token tag"><span class="token tag"><span class="token punctuation"></</span> div</span> <span class="token punctuation">></span></span> <span class="token tag"><span class="token tag"><span class="token punctuation"></</span> <span class="token class-name">SlotWrapper</span></span> <span class="token punctuation">></span></span> <span class="token tag"><span class="token tag"><span class="token punctuation"><</span> <span class="token class-name">SlotWrapper</span></span> <span class="token attr-name">slot</span> <span class="token attr-value"><span class="token punctuation">=</span> <span class="token punctuation">"</span> divider <span class="token punctuation">"</span></span> <span class="token punctuation">></span></span> <span class="token tag"><span class="token tag"><span class="token punctuation"><</span> div</span> <span class="token punctuation">></span></span> <span class="token tag"><span class="token tag"><span class="token punctuation"><</span> hr</span> <span class="token punctuation">/></span></span> <span class="token tag"><span class="token tag"><span class="token punctuation"></</span> div</span> <span class="token punctuation">></span></span> <span class="token tag"><span class="token tag"><span class="token punctuation"></</span> <span class="token class-name">SlotWrapper</span></span> <span class="token punctuation">></span></span> <span class="token tag"><span class="token tag"><span class="token punctuation"><</span> <span class="token class-name">SlotWrapper</span></span> <span class="token attr-name">slot</span> <span class="token attr-value"><span class="token punctuation">=</span> <span class="token punctuation">"</span> buttonGroup <span class="token punctuation">"</span></span> <span class="token punctuation">></span></span> <span class="token tag"><span class="token tag"><span class="token punctuation"><</span> div</span> <span class="token punctuation">></span></span> <span class="token tag"><span class="token tag"><span class="token punctuation"><</span> button</span> <span class="token punctuation">></span></span> <span class="token plain-text">Button 1</span> <span class="token tag"><span class="token tag"><span class="token punctuation"></</span> button</span> <span class="token punctuation">></span></span> <span class="token tag"><span class="token tag"><span class="token punctuation"></</span> div</span> <span class="token punctuation">></span></span> <span class="token tag"><span class="token tag"><span class="token punctuation"></</span> <span class="token class-name">SlotWrapper</span></span> <span class="token punctuation">></span></span> <span class="token tag"><span class="token tag"><span class="token punctuation"></</span> <span class="token class-name">TestComponent</span></span> <span class="token punctuation">></span></span> <span class="token tag"><span class="token tag"><span class="token punctuation"></</span> div</span> <span class="token punctuation">></span></span> <span class="token tag"><span class="token tag"><span class="token punctuation"></</span> div</span> <span class="token punctuation">></span></span> <span class="token punctuation">)</span> <span class="token punctuation">;</span> <span class="token punctuation">}</span> |
6. Finish
Hope this article is useful to everyone, if there is any place that makes it difficult to understand, please comment below! I am very happy to answer! Thank you for watching my post!