As the title, in this article I will guide you to create a rails project, use docker, circle CI and check the statut pass before merging PR on github.
Create rails app with docker
Create rails app
First of all, you need to create a new rails app locally (so locally you need to install rails first)
1 2 | rails new circle-ci -d mysql |
I use db as mysql, so I have -d mysql
Once the rails app is created, don’t do anything in a hurry, we will move the app to docker as well.
First, you can roughly understand that docker will be a separate computer, helping you run the software and programs that you have installed. 1 computer will have hardware and software. In terms of hardware, usually docker will use the maximum resources that the host machine (your computer is installing docker), in this article I will not go into depth on this issue, if you want to learn, can go to here to read more. As for the software, there will usually be the operating system, which program is needed.
Create Docker
If you know how to install win, or ghost win, this docker part will be relatively easy to understand.
Create Dockerfile
Dockerfile roughly understands the commands for you to create an image , just like when you install win, you need a win .iso , to boot into the usb, and then install it on your computer. In fact, this process is more ghost than that, because in addition to the operating system, there will be necessary software available.
Create a file called Dockerfile right in the project directory
1 2 3 4 5 6 7 8 9 10 11 12 13 14 15 16 17 18 19 20 21 22 23 24 25 26 27 28 | <span class="token keyword">FROM</span> ruby <span class="token punctuation">:</span> 2.7.1 <span class="token punctuation">-</span> slim <span class="token punctuation">-</span> buster <span class="token keyword">RUN</span> apt <span class="token punctuation">-</span> get update && apt <span class="token punctuation">-</span> get install <span class="token punctuation">-</span> y <span class="token punctuation">-</span> <span class="token punctuation">-</span> no <span class="token punctuation">-</span> install <span class="token punctuation">-</span> recommends curl apt <span class="token punctuation">-</span> transport <span class="token punctuation">-</span> https build <span class="token punctuation">-</span> essential && curl <span class="token punctuation">-</span> sL https <span class="token punctuation">:</span> //deb.nodesource.com/setup_12.x <span class="token punctuation">|</span> bash <span class="token punctuation">-</span> && curl <span class="token punctuation">-</span> sL https <span class="token punctuation">:</span> //dl.yarnpkg.com/debian/pubkey.gpg <span class="token punctuation">|</span> apt <span class="token punctuation">-</span> key add <span class="token punctuation">-</span> && echo <span class="token string">"deb https://dl.yarnpkg.com/debian/ stable main"</span> <span class="token punctuation">|</span> tee /etc/apt/sources.list.d/yarn.list && apt <span class="token punctuation">-</span> get update && apt <span class="token punctuation">-</span> get install <span class="token punctuation">-</span> y <span class="token punctuation">-</span> <span class="token punctuation">-</span> no <span class="token punctuation">-</span> install <span class="token punctuation">-</span> recommends git nodejs yarn libssl <span class="token punctuation">-</span> dev default <span class="token punctuation">-</span> libmysqlclient <span class="token punctuation">-</span> dev && rm <span class="token punctuation">-</span> rf /var/lib/apt/lists/* <span class="token keyword">RUN</span> gem install bundler <span class="token punctuation">-</span> v 2.1.4 <span class="token keyword">RUN</span> mkdir /myapp <span class="token keyword">WORKDIR</span> /myapp <span class="token keyword">COPY</span> . /myapp <span class="token comment"># Add a script to be executed every time the container starts.</span> <span class="token keyword">COPY</span> entrypoint.sh /usr/bin/ <span class="token keyword">RUN</span> chmod +x /usr/bin/entrypoint.sh <span class="token keyword">ENTRYPOINT</span> <span class="token punctuation">[</span> <span class="token string">"entrypoint.sh"</span> <span class="token punctuation">]</span> <span class="token keyword">EXPOSE</span> 3000 |
Explain:
The capital letters are syntax of Dockerfile, you can refer to here
- FROM: as English name,
từ. The image that you are about to create will be based on another image, just like in order to create ghost win files, you must have1 máy chạy winbefore. Here I will be based on 1ubuntumachine, with pre-installed ruby 2.7.1.ruby:2.7.1-slim-busteris an image created by someone else, uploaded on the Internet, and you just need to download it for use. You can go to https://hub.docker.com/ to find more images. (I got the ruby image at https://hub.docker.com/_/ruby ) - RUN: will use you to run commands, the commands will be the same as those you type with your real machine, also need apt-get update, then install. Here I will run some commands to install the necessary software and lib for my rails app: git, nodejs, yarn, libssl-dev, default-libmysqlclient-dev, then bundler to be able to
bundle install - followed by the 3-line cluster
1 2 3 4 | RUN mkdir /myapp WORKDIR /myapp COPY . /myapp |
I create a folder called myapp in my máy tính mới . Next the myapp directory will be placed as the working directory, the following commands WORKDIR will run in the myapp directory, just like myapp will be the ổ C so that from now on installed, or copy what will be default install to ổ C After that, I will copy the entire contents of the circle-ci folder (which is the rails project on the real machine) into myapp.
- Next, I will copy the file
entrypoint.shinto/usr/bin/and authorize it to execute (that is, to run a bash file, instead of ./usr/bin/entrypoint.sh, you can call boy entrypoint.sh ). - ENTRYPOINT: will help run the command
entrypoint.shwhen your computer is booted - EXPOSE: will set the network port that your
máy tínhwill listen to
Create entrypoint.sh
Create a file entrypoint.sh in the directory of the project
1 2 3 4 5 6 7 8 9 10 11 12 13 14 15 | <span class="token shebang important">#!/bin/bash</span> <span class="token comment"># Remove a potentially pre-existing server.pid for Rails.</span> <span class="token function">rm</span> -f /myapp/tmp/pids/server.pid <span class="token comment"># bundle install</span> bundle check <span class="token operator">||</span> bundle <span class="token function">install</span> <span class="token comment"># if in Dockerfile have CMD</span> <span class="token comment"># Then exec the container's main process (what's set as CMD in the Dockerfile).</span> <span class="token comment"># exec " <a class="__cf_email__" href="/cdn-cgi/l/email-protection">[email protected]</a> "</span> <span class="token comment"># else</span> rails s -b <span class="token number">0.0</span> .0.0 |
Typically, in other tutorials you may find the line CMD ["rails", "server", "-b", "0.0.0.0"] at the end of the Dockerfile file. In essence, CMD is like ENTRYPOINT is also to run commands when máy tính is booted. Because here, I need to run many commands, so I included them in this bash file. You can read more about distinguishing CMD vs ENTRYPOINT
Create image
Next we will create an image for later use for cài hoặc ghost win .
In the project directory, run the command
1 2 | docker build -t hatd/circle-ci:3.0 . |
docker build: is the command to create the image-t hatd/circle-ci:3.0: is the option of the build command, helps to name the image, where my image is namedhatd/circle-ci, and the image has a tag of3.0. In the next section I will explain why I named it like this..: sign.This will imply that the build command is run under theDockerfilefile in the same directory
There are many other options of the build command, you can see here .
Wait a moment for the build command to finish running, and run the docker image ls command to display all of the images on your computer. And you will see the image you just created
Create docker-compose.yml
Docker compose is like a script, to help you boot your máy tính up
Create the file docker-compose.yml in the directory of the project
1 2 3 4 5 6 7 8 9 10 11 12 13 14 15 16 17 18 19 20 21 22 23 24 25 26 27 28 29 30 31 32 33 34 35 | <span class="token key atrule">version</span> <span class="token punctuation">:</span> <span class="token string">'3'</span> <span class="token key atrule">services</span> <span class="token punctuation">:</span> <span class="token key atrule">db</span> <span class="token punctuation">:</span> <span class="token key atrule">image</span> <span class="token punctuation">:</span> mysql <span class="token punctuation">:</span> 5.7.33 <span class="token key atrule">env_file</span> <span class="token punctuation">:</span> <span class="token punctuation">-</span> .env <span class="token key atrule">environment</span> <span class="token punctuation">:</span> <span class="token punctuation">-</span> MYSQL_ROOT_PASSWORD=$ <span class="token punctuation">{</span> DATABASE_PASSWORD <span class="token punctuation">}</span> <span class="token key atrule">volumes</span> <span class="token punctuation">:</span> <span class="token punctuation">-</span> mysql_cache <span class="token punctuation">:</span> /var/lib/mysql <span class="token key atrule">networks</span> <span class="token punctuation">:</span> <span class="token punctuation">-</span> internal <span class="token key atrule">web</span> <span class="token punctuation">:</span> <span class="token key atrule">image</span> <span class="token punctuation">:</span> hatd/circle <span class="token punctuation">-</span> ci <span class="token punctuation">:</span> <span class="token number">3.0</span> <span class="token key atrule">env_file</span> <span class="token punctuation">:</span> <span class="token punctuation">-</span> .env <span class="token key atrule">volumes</span> <span class="token punctuation">:</span> <span class="token punctuation">-</span> . <span class="token punctuation">:</span> /myapp <span class="token punctuation">-</span> bundle_cache <span class="token punctuation">:</span> /usr/local/bundle <span class="token key atrule">ports</span> <span class="token punctuation">:</span> <span class="token punctuation">-</span> <span class="token string">"3000:3000"</span> <span class="token key atrule">depends_on</span> <span class="token punctuation">:</span> <span class="token punctuation">-</span> db <span class="token key atrule">networks</span> <span class="token punctuation">:</span> <span class="token punctuation">-</span> internal <span class="token key atrule">tty</span> <span class="token punctuation">:</span> <span class="token boolean important">true</span> <span class="token key atrule">stdin_open</span> <span class="token punctuation">:</span> <span class="token boolean important">true</span> <span class="token key atrule">volumes</span> <span class="token punctuation">:</span> <span class="token key atrule">mysql_cache</span> <span class="token punctuation">:</span> <span class="token key atrule">bundle_cache</span> <span class="token punctuation">:</span> <span class="token key atrule">networks</span> <span class="token punctuation">:</span> <span class="token key atrule">internal</span> <span class="token punctuation">:</span> <span class="token key atrule">driver</span> <span class="token punctuation">:</span> bridge |
Explain:
- file docker-compose.yml will be written in the syntax of version 3, depending on different versions, different syntax, can refer to list version
- services: list the
máy tínhthat I will boot, here I will boot 2 computers,dbandweb.dbis for running mysql as the database, and thewebis for running the rails server - volumes: list the sub-disks, like in the computer with drive C, drive D, when installing win, it will be installed in drive C, and drive D remains intact, so there will be no data loss.
- networks : create networks, so that computers can connect with each other
Computer db : installed under the file ghost : mysql: 5.7.33. Environment variables are taken from the .env file. Since there is no .env variable in the .env file, it should be listed separately in the environment . With the command mysql_cache:/var/lib/mysql , allows you to synchronize data from /var/lib/mysql (config, mysql data) out of mysql_cache and vice versa. And this computer will be connected to the internal network
Web computer : installed according to the ghost file that we just created earlier hatd/circle-ci:3.0 . This machine also fetches the environment variables from the .env file. This computer will synchronize the myapp folder in máy tính web , in addition to the circle-ci folder on our real machine (this will help us when editing the code in the circle-ci folder, the code in máy tính web also corrected). ports: "3000:3000" will map port 3000 on the máy tính web to port 3000 of the real computer (because the rails server runs by default at port 3000). depends_on: db máy tính web depends_on: db will have to wait for the máy tính db be opened before opening, of course, if the server is turned on while the database is not turned on, it will be OK. Connect to the internal network together to be able to communicate with each other. 2 stdin_open: true tty: true , stdin_open: true understand that it will help you when you enter máy tính web will display what you type, the same log lines as on the terminal on the real machine.
The docker-compose.yml version 3 syntax + options are listed here
Start rails server
First you need to add the .env file and edit the config / database.yml file
.env
1 2 3 4 | DATABASE_HOSTNAME=db DATABASE_USERNAME=root DATABASE_PASSWORD=password |
p / s: db is the name of the service db in docker-compose.yml
config / database.yml
1 2 3 4 5 6 7 8 9 10 | ..... default: &default adapter: mysql2 encoding: utf8mb4 pool: <%= ENV.fetch("RAILS_MAX_THREADS") { 5 } %> username: <%= ENV["DATABASE_USERNAME"] %> password: <%= ENV["DATABASE_PASSWORD"] %> host: <%= ENV["DATABASE_HOSTNAME"] %> ..... |
Run the following command to boot our 2 máy tính
1 2 | docker-compose up |
Wait a moment for the rails server to start successfully
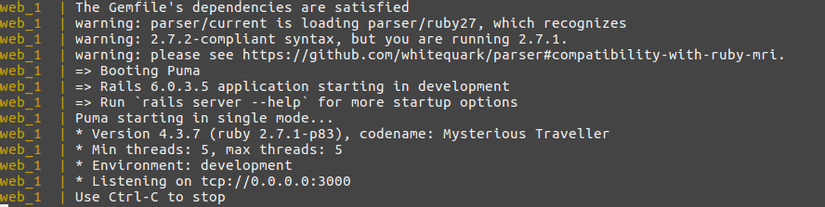
Next comes the create db job. Since the app is already running on máy tính web , you need to be on máy tính web to be able to run the command.
To get into máy tính web (web container), run the command
1 2 | docker exec -it circle-ci_web_1 bash |
- docker exec : is a command that helps get into the
máy tính web - -it: is an option of the exec command, making input and output similar to the actual terminal on the machine
- circle-ci_web_1: is the container name (the name of the
máy tính web), you can use the container id here, but I often use the container name because it’s easy to remember, the structure of the container name is{tên project}_{tên service}_1(usually the service seldom has the same name, so it ends with 1). The active list container can be checked with thedocker container lscommand - bash: this is the command that will run when we get into the container, it will open a terminal
Once inside the container, run the create db commands as usual: rails db:create , rails db:migrate . And then you can access localhost: 3000 and you will see the root page of the rails app
From now on, but commands related to rails like bundle install, rspec, rubocop will run in the web container.
Config Circle Ci
In this lesson, I will use circle Ci to check whether running rspec or rubocop has a pass or not
Add a gem
Add some necessary gems: rspec-rails, rubocop, rubocop-rails, simplecov, rspec_junit_formatter. Run bundle install
Add 1 Post model: rails generate scaffold Post title:string body:text published:boolean , db:migrate
More test: I can take some tests to be able to run rspec ( https://github.com/hatd/circle-ci/tree/master/spec )
Then run rspec spec/ , rubocop to confirm the pass locally first
Upload docker image
Since the Circle CI also uses docker to build the environment, a docker image will also be required. So we will need to upload the hatd/circle-ci:3.0 we just created to the internet, so that Circle CI can download:
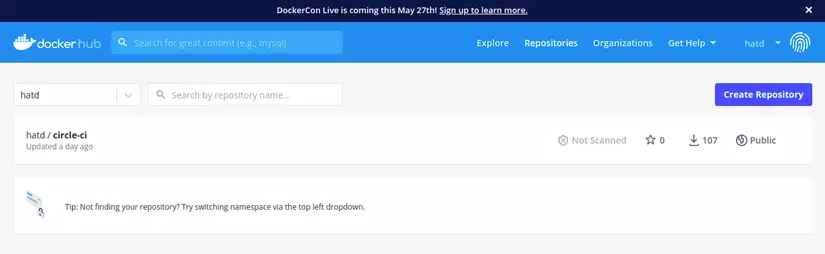
- Please register an account on https://hub.docker.com/
- Create a repository named: circle-ci (identical to the name of our image)
- Login docker locally with the command:
docker login --username=yourhubusername,yourhubusernameis the username that when you register for an account, mine ishatd - Push image with the command:
docker push yourhubusername:imagename, in my case it will bedocker push hatd/circle-ci. That is why, from the beginning, I named the image like that. If you don’t have a given name in the beginning, you can use the commanddocker tag image_id yourhubusername/repo_name:version_tagto change the name with the tag of an image. Refer
That way, your image is uploaded, and circle ci can be pulled back and built the docker
Add config circle ci
Add the .circleci/config.yml file in the project
1 2 3 4 5 6 7 8 9 10 11 12 13 14 15 16 17 18 19 20 21 22 23 24 25 26 27 28 29 30 31 32 33 34 35 36 37 38 39 40 41 42 43 44 45 46 47 48 49 50 51 52 | <span class="token key atrule">version</span> <span class="token punctuation">:</span> <span class="token number">2.1</span> <span class="token comment"># orbs:</span> <span class="token comment"># ruby: circleci/ <a class="__cf_email__" href="/cdn-cgi/l/email-protection">[email protected]</a></span> <span class="token key atrule">references</span> <span class="token punctuation">:</span> <span class="token key atrule">ruby_envs</span> <span class="token punctuation">:</span> <span class="token important">&ruby_envs</span> <span class="token key atrule">environment</span> <span class="token punctuation">:</span> <span class="token key atrule">DATABASE_HOSTNAME</span> <span class="token punctuation">:</span> 127.0.0.1 <span class="token key atrule">DATABASE_USERNAME</span> <span class="token punctuation">:</span> root <span class="token key atrule">DATABASE_PASSWORD</span> <span class="token punctuation">:</span> password <span class="token key atrule">BUNDLER_VERSION</span> <span class="token punctuation">:</span> 2.1.4 <span class="token key atrule">RAILS_ENV</span> <span class="token punctuation">:</span> test <span class="token key atrule">mysql_envs</span> <span class="token punctuation">:</span> <span class="token important">&mysql_envs</span> <span class="token key atrule">environment</span> <span class="token punctuation">:</span> <span class="token key atrule">DATABASE_USERNAME</span> <span class="token punctuation">:</span> root <span class="token key atrule">DATABASE_PASSWORD</span> <span class="token punctuation">:</span> password <span class="token key atrule">MYSQL_ROOT_PASSWORD</span> <span class="token punctuation">:</span> password <span class="token key atrule">jobs</span> <span class="token punctuation">:</span> <span class="token key atrule">test_rspec</span> <span class="token punctuation">:</span> <span class="token key atrule">docker</span> <span class="token punctuation">:</span> <span class="token punctuation">-</span> <span class="token key atrule">image</span> <span class="token punctuation">:</span> hatd/circle <span class="token punctuation">-</span> ci <span class="token punctuation">:</span> <span class="token number">3.0</span> <span class="token key atrule"><<</span> <span class="token punctuation">:</span> <span class="token important">*ruby_envs</span> <span class="token punctuation">-</span> <span class="token key atrule">image</span> <span class="token punctuation">:</span> mysql <span class="token punctuation">:</span> 5.7.33 <span class="token key atrule"><<</span> <span class="token punctuation">:</span> <span class="token important">*mysql_envs</span> <span class="token key atrule">steps</span> <span class="token punctuation">:</span> <span class="token punctuation">-</span> checkout <span class="token punctuation">-</span> <span class="token key atrule">run</span> <span class="token punctuation">:</span> <span class="token key atrule">name</span> <span class="token punctuation">:</span> Which bundler <span class="token punctuation">?</span> <span class="token key atrule">command</span> <span class="token punctuation">:</span> bundle <span class="token punctuation">-</span> v <span class="token punctuation">-</span> <span class="token key atrule">run</span> <span class="token punctuation">:</span> <span class="token key atrule">name</span> <span class="token punctuation">:</span> Bundle Install <span class="token key atrule">command</span> <span class="token punctuation">:</span> bundle check <span class="token punctuation">|</span> <span class="token punctuation">|</span> bundle install <span class="token punctuation">-</span> <span class="token punctuation">-</span> jobs=4 <span class="token punctuation">-</span> <span class="token punctuation">-</span> retry=3 <span class="token punctuation">-</span> <span class="token key atrule">run</span> <span class="token punctuation">:</span> <span class="token key atrule">name</span> <span class="token punctuation">:</span> Build assets <span class="token key atrule">command</span> <span class="token punctuation">:</span> bundle exec rails assets <span class="token punctuation">:</span> precompile <span class="token punctuation">-</span> <span class="token key atrule">run</span> <span class="token punctuation">:</span> <span class="token key atrule">name</span> <span class="token punctuation">:</span> Database setup <span class="token key atrule">command</span> <span class="token punctuation">:</span> RAILS_ENV=test bundle exec rails db <span class="token punctuation">:</span> drop db <span class="token punctuation">:</span> create <span class="token punctuation">-</span> <span class="token key atrule">run</span> <span class="token punctuation">:</span> <span class="token key atrule">name</span> <span class="token punctuation">:</span> Run Migrate <span class="token key atrule">command</span> <span class="token punctuation">:</span> RAILS_ENV=test bundle exec rails db <span class="token punctuation">:</span> migrate <span class="token punctuation">-</span> <span class="token key atrule">run</span> <span class="token punctuation">:</span> <span class="token key atrule">name</span> <span class="token punctuation">:</span> Rubocop test <span class="token key atrule">command</span> <span class="token punctuation">:</span> bundle exec rubocop <span class="token punctuation">-</span> <span class="token key atrule">run</span> <span class="token punctuation">:</span> <span class="token key atrule">name</span> <span class="token punctuation">:</span> Rspec test <span class="token key atrule">command</span> <span class="token punctuation">:</span> bundle exec rspec spec/ <span class="token key atrule">workflows</span> <span class="token punctuation">:</span> <span class="token key atrule">version</span> <span class="token punctuation">:</span> <span class="token number">2</span> <span class="token key atrule">test</span> <span class="token punctuation">:</span> <span class="token key atrule">jobs</span> <span class="token punctuation">:</span> <span class="token punctuation">-</span> test_rspec |
Explain:
- Currently the version where circle ci support is 2, and the highest version is 2.1
- Version 2.1 support orbs, I do not know very well, so please ignore it
- references: list the environment variables to use, since these variables are simple here, they can be listed directly in the file, but later on with sensitive information, we will have to set it in circle ci ( DATABASE_HOSTNAME is
127.0.0.1, notdblike in docker-compose.yml anymore) - jobs: list of jobs that will be run, here I have only 1 job named
test_rspec - workflows: list the jobs that will be run through, in order, Here I have a workflow named
test, run a jobtest_rspec
job test_rspec : will be built using docker.
- There will be 2 dockers built here, 1 using the
hatd/circle-ci:3.0that I uploaded to the docker hub earlier, 2 is the mysql image, similar to the mysql I used in docker-compose.yml, both there will be the necessary env variables. - steps: lists the steps that will need to be run in the job, in order.
- checkout: means git checkout, help pull the code back, and put it in ~ / project
- run: help run the commands, here will need to run a series of commands, to finally be able to run the command
bundle exec rubocopandbundle exec rspec spec/to successfully check
You can read more about configs here
Setup Circle CI on the web
Remember to push the code to github first
- Log in to https://app.circleci.com/dashboard , through your github account
- Go to the Projects tab, you will see the github repository, select
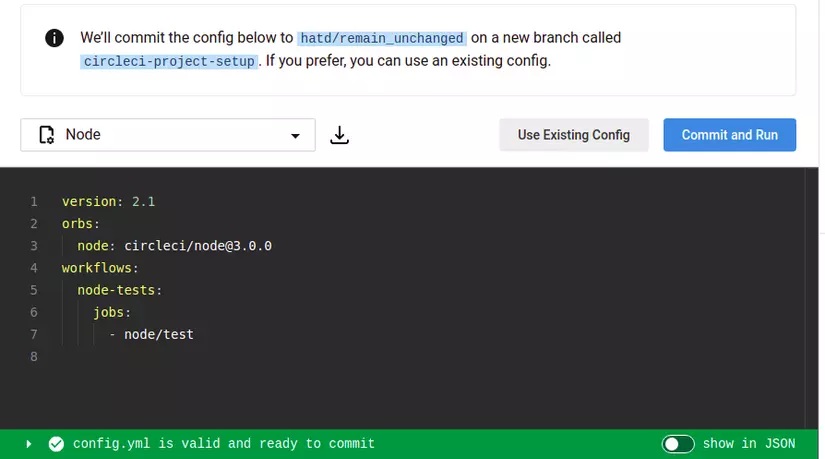
Set Up Project, this will always display theStart Buildbutton, because we already have a .circleci / config.yml file and a valid file. If there is no config.yml file, or the file is corrupted, there will be a download button for config file, or commit a config file to the project.
project has file config.yml
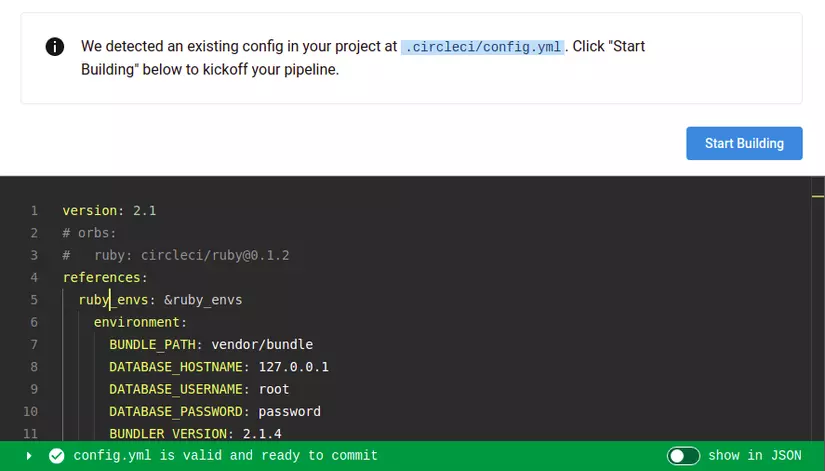
project does not have config.yml file
- After clicking the
Start Buildbutton, you will be transferred to the pipelines screen, where you will see the first pipeline running, wait until it finishes, if success is successful, you have already completed the circle setup.
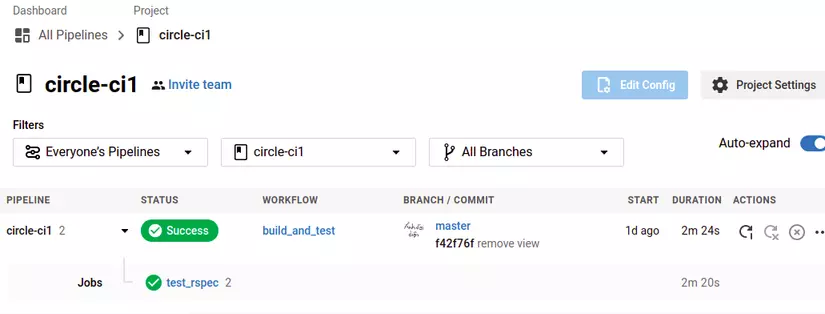
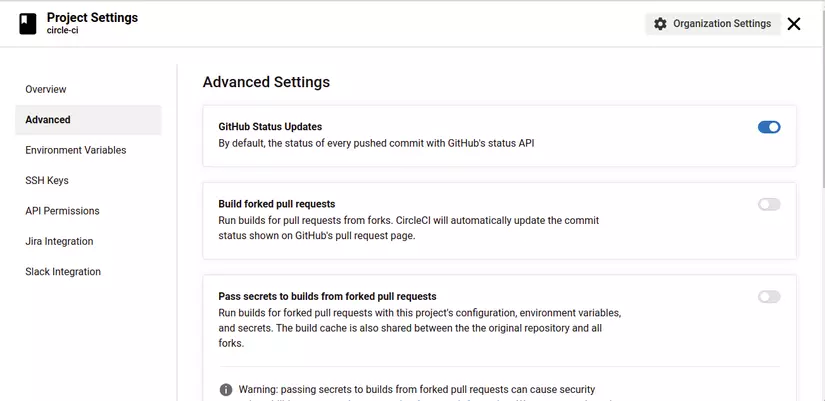
Next, so that when there is a new commit to github, circle ci will run, you need to go to Project Settings , in Advanced , enable GitHub Status Updates
Caching
Try to push a new commit to github, and wait for the new pipeline to finish, then click job test_rspec , and watch out for step Bundle install
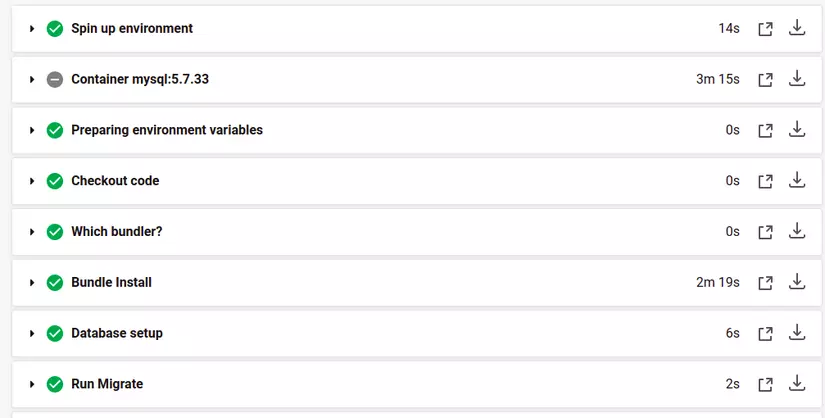
seen it for a long time, right? Since each new pipeline, we will build 1 out a new docker, and will run the new bundle install again, although there is no fix to the gemfile, that will be very time consuming. So we will need to cache this section again
Modify the step bundle install as follows
1 2 3 4 5 6 7 8 9 10 11 12 13 14 | <span class="token punctuation">...</span> <span class="token punctuation">-</span> <span class="token key atrule">restore_cache</span> <span class="token punctuation">:</span> <span class="token key atrule">keys</span> <span class="token punctuation">:</span> <span class="token punctuation">-</span> v1 <span class="token punctuation">-</span> gem <span class="token punctuation">-</span> cache <span class="token punctuation">-</span> <span class="token punctuation">{</span> <span class="token punctuation">{</span> checksum "Gemfile.lock" <span class="token punctuation">}</span> <span class="token punctuation">}</span> <span class="token punctuation">-</span> v1 <span class="token punctuation">-</span> gem <span class="token punctuation">-</span> cache <span class="token punctuation">-</span> <span class="token punctuation">-</span> <span class="token key atrule">run</span> <span class="token punctuation">:</span> <span class="token key atrule">name</span> <span class="token punctuation">:</span> Bundle Install <span class="token key atrule">command</span> <span class="token punctuation">:</span> bundle check <span class="token punctuation">|</span> <span class="token punctuation">|</span> bundle install <span class="token punctuation">-</span> <span class="token punctuation">-</span> jobs=4 <span class="token punctuation">-</span> <span class="token punctuation">-</span> retry=3 <span class="token punctuation">-</span> <span class="token key atrule">save_cache</span> <span class="token punctuation">:</span> <span class="token key atrule">key</span> <span class="token punctuation">:</span> v1 <span class="token punctuation">-</span> gem <span class="token punctuation">-</span> cache <span class="token punctuation">-</span> <span class="token punctuation">{</span> <span class="token punctuation">{</span> checksum "Gemfile.lock" <span class="token punctuation">}</span> <span class="token punctuation">}</span> <span class="token key atrule">paths</span> <span class="token punctuation">:</span> <span class="token punctuation">-</span> vendor/bundle <span class="token punctuation">...</span> |
- restore_cache: will restore the cache with the key
v1-gem-cache-{{ checksum "Gemfile.lock" }}, if this cache is not available, circle ci will find the cache with the keyv1-gem-cache-, if If there is no more, there is no cache - save_cache: will save the cache, with the key is
v1-gem-cache-{{ checksum "Gemfile.lock" }}, the data is taken from the pathvendor/bundle. Why isvendor/bundle, you notice, in the env list, I have toBUNDLE_PATH: vendor/bundle, with this env variable, bundle install will install the gem to this path , so we will cache the gems already install
After adding config, let’s see the results

So in the Bundle Install step, it only takes time to bundle check
You can read more about caching here
Wait db:
After adding the cache bundle, there is a problem, that is, the steps are executed too quickly, so when running the step Database setup , docker mysql has not been built yet. 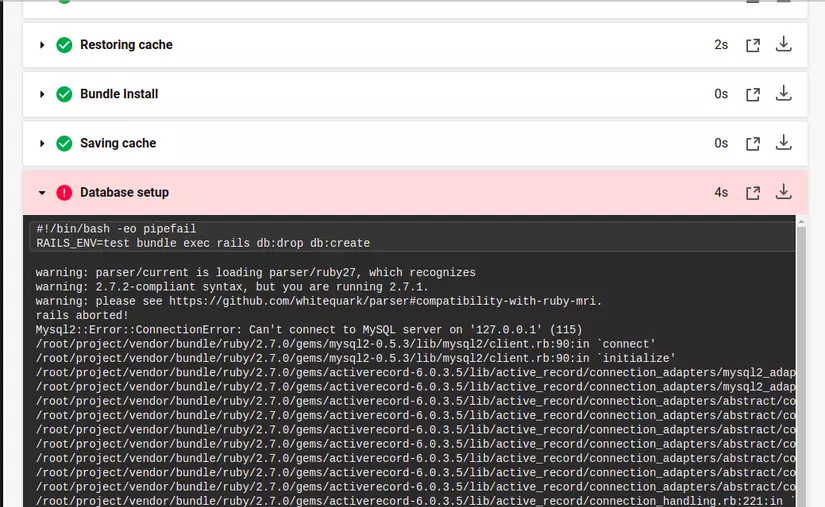
So we need to have one more step to wait for the database to be ready to connect before running step Database setup
After a while, I saw this way https://stackoverflow.com/a/54249757 , something like using a script to check if mysql host is ready or not. I will use wait-for-it.sh .
After adding wait-for-it.sh file to the project, add step before the Database setup step
1 2 3 4 5 6 7 8 9 | <span class="token punctuation">...</span> <span class="token punctuation">-</span> <span class="token key atrule">run</span> <span class="token punctuation">:</span> <span class="token key atrule">name</span> <span class="token punctuation">:</span> Grant script permission <span class="token key atrule">command</span> <span class="token punctuation">:</span> chmod a+x wait <span class="token punctuation">-</span> for <span class="token punctuation">-</span> it.sh <span class="token punctuation">-</span> <span class="token key atrule">run</span> <span class="token punctuation">:</span> <span class="token key atrule">name</span> <span class="token punctuation">:</span> Wait db <span class="token key atrule">command</span> <span class="token punctuation">:</span> ./wait <span class="token punctuation">-</span> for <span class="token punctuation">-</span> it.sh 127.0.0.1 <span class="token punctuation">:</span> 3306 <span class="token punctuation">-</span> <span class="token punctuation">-</span> timeout=300 <span class="token punctuation">-</span> <span class="token punctuation">-</span> echo 'Mysql service is ready <span class="token tag">!'</span> <span class="token punctuation">...</span> |
Get test results and coverage
Usually, when running tests on ci, in addition to knowing the success / error test, you also need to know where the error is, how much% the coverage is, then where those show up.
Circle CI supports collect test data and coverage
Let’s revise step Rspec test a little bit, and add 2 new steps
1 2 3 4 5 6 7 8 9 10 11 12 13 14 15 16 | <span class="token punctuation">...</span> <span class="token punctuation">-</span> <span class="token key atrule">run</span> <span class="token punctuation">:</span> <span class="token key atrule">name</span> <span class="token punctuation">:</span> Rspec test <span class="token key atrule">command</span> <span class="token punctuation">:</span> <span class="token punctuation">|</span><span class="token scalar string"> mkdir ~/rspec bundle exec rspec --format progress --format RspecJunitFormatter -o ~/rspec/rspec.xml mv coverage ~/rspec/coverage</span> <span class="token key atrule">no_output_timeout</span> <span class="token punctuation">:</span> 20m <span class="token comment"># collect reports</span> <span class="token punctuation">-</span> <span class="token key atrule">store_test_results</span> <span class="token punctuation">:</span> <span class="token key atrule">path</span> <span class="token punctuation">:</span> ~/rspec <span class="token punctuation">-</span> <span class="token key atrule">store_artifacts</span> <span class="token punctuation">:</span> <span class="token key atrule">path</span> <span class="token punctuation">:</span> ~/rspec <span class="token punctuation">...</span> |
this time we will output the rpsec output to html, and put it in the ~/rspec folder, and copy the coverage folder (the directory generated by the gem coverage). And then save it
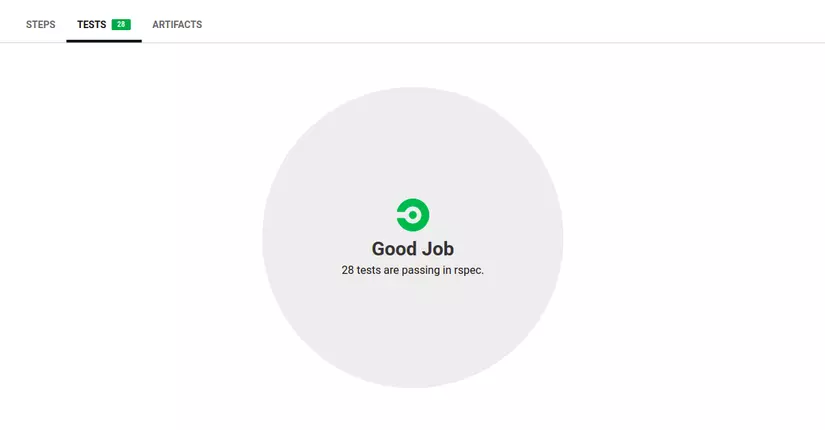
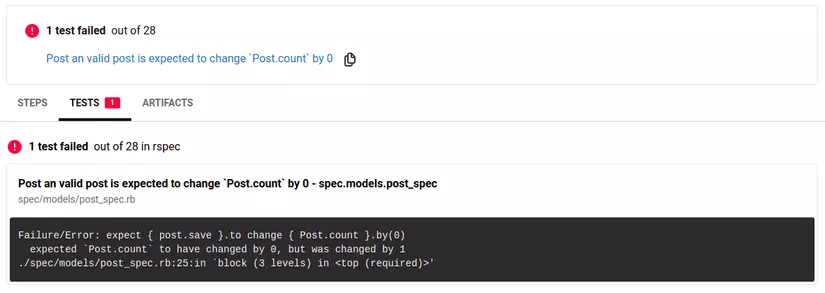
When you click on the job test_rspec , there will be 2 more tabs, TESTS and ARTIFACTS
TESTS tab
ARTIFACTS tab
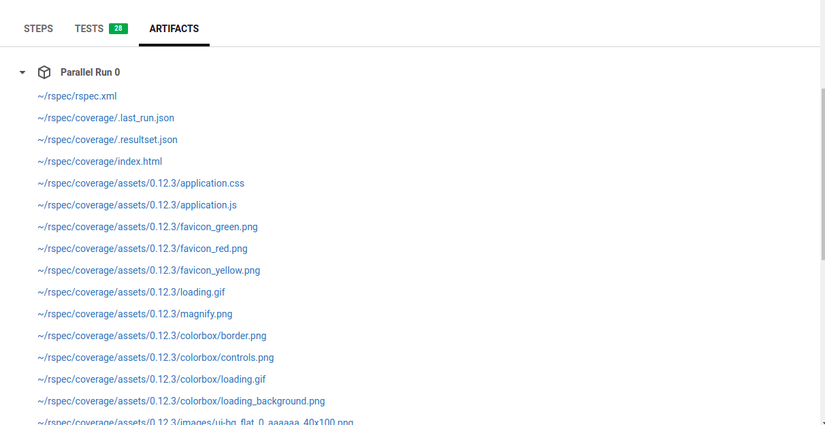
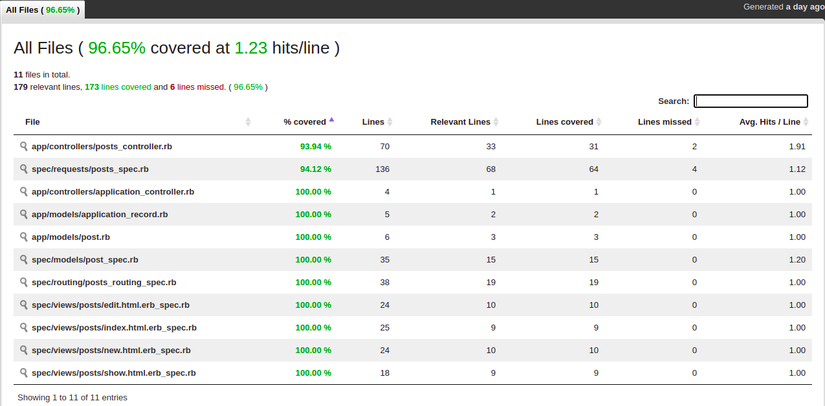
Clicking to ~/rspec/coverage/index.html you can go to the coverage page for that commit
Status check Github
Now, let’s set up so that PR must pass circle ci to merge
- Go to the settings of the repo
- On the Branches tab, add a new rule
- Enter the Branch name pattern as the branch that will compare in PR, usually master
- Select
Require status checks to pass before mergingand chooseci/circleci: test_rspec
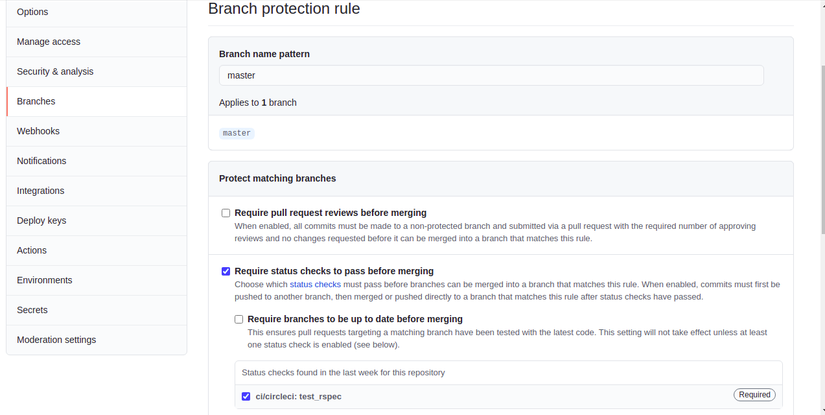
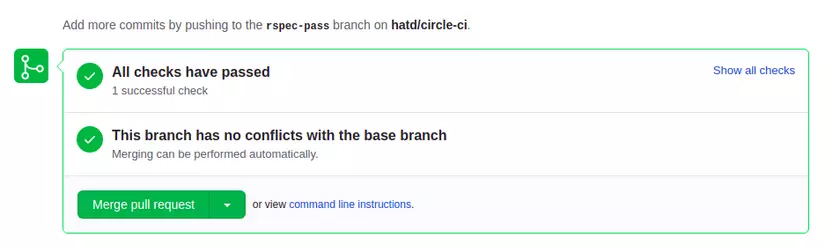
Thus in PR there will be more check status

must pass to merge PR
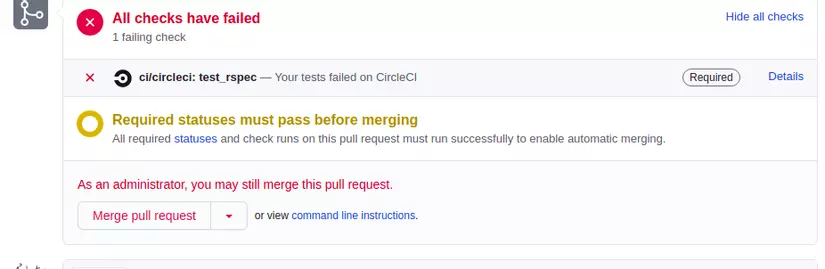
And you can see where the fail is
The article is still sketchy, please comment in the comments for me