Hello everyone, today I will write about a familiar topic: Deploy 1 Rails app with Capistrano.
Entering the world of Ruby and Rails, you will probably read through Ruby on Rails Tutorial, a book that helps you approach Ruby on Rails from zero to deploy.
You will be familiar with commands like git push heroku master , heroku run rails db:migrate , … and your Rails app will run smoothly on Heroku’s server.
Step into real life projects, you will start a bit further with Heroku, instead will be the AWS server, the physical server, and how to deploy your Rails app onto those servers. There are quite a few ways, from using Docker, Codedeploy, Capistrano, … or even you can directly access the server and do everything with rice.
Today’s article I will guide you to build a server on a local machine, simulate the steps to deploy a Rails app to that server using Capistrano – a deployable support library that can be said to be the best today of Rails.
Build a deploy server
To deploy, for sure, first you need to have a server for Rails app to run on
Quite easy, you can spend money to buy a certain physical server, or sign up for an AWS account, GCP creates an instance. The ultimate goal is to have a complete environment setup machine on which your Rails app can run.
However, if you do not have the conditions, you can follow yourself to build a virtual server right on your own PC.
I will guide you to install Docker and run a container with Ubuntu 18.04 installed
1 2 3 4 5 6 7 8 9 10 11 12 13 14 15 16 17 | <span class="token comment"># cài docker</span> <span class="token function">curl</span> -fsSL https://get.docker.com/ <span class="token operator">|</span> <span class="token function">sh</span> <span class="token comment"># Thêm current user vào docker group để khỏi dùng sudo</span> <span class="token function">sudo</span> <span class="token function">usermod</span> -aG docker <span class="token environment constant">$USER</span> <span class="token comment"># Nếu vẫn phải dùng sudo thì reset máy lại cho chắc</span> <span class="token function">sudo</span> <span class="token function">reboot</span> <span class="token comment"># Kiểm tra docker đã cài đặt thành công</span> docker --version <span class="token comment"># Run 1 container cài sẵn Ubuntu 18.04</span> docker run --name ubuntu_server -it ubuntu:18.04 <span class="token function">bash</span> <span class="token comment"># Lúc này con trỏ trong terminal của bạn đang nháy ở dòng có dạng</span> <a class="__cf_email__" href="/cdn-cgi/l/email-protection">[email protected]</a> :/ <span class="token comment">#</span> <span class="token comment"># thì chúc mừng bạn đã có 1 server để sẵn sàng deploy rồi đấy</span> |
What is that docker? This is quite a wide knowledge, so I will not explain in this article. If you still want to be curious to know why only a few of the commands above have 1 server, you can research Docker. You can also see it as a virtual machine, but in fact it is not a virtual machine. Well, if you do not want to use Docker, you can also install a virtual machine running on your OS, but make sure your hardware is guaranteed to run without lag.
OK, so we have a server running Ubuntu 18.04
Install the environment
Imagine you just bought a brand-new computer, installed Ubuntu 18.04. Now, what to do if I want to run a Rails app on it? Do the same thing with the server I just built above.
Let’s get back to our terminal, when you are standing
1 2 | <a class="__cf_email__" href="/cdn-cgi/l/email-protection">[email protected]</a> :/ <span class="token comment"># </span> |
At this point you are accessing the machine named 3788a1e70189 as root .
Well, if you turned off the terminal or quit the deploy machine above, you can re-enable it with the command
1 2 3 4 5 | docker start ubuntu_server <span class="token comment"># Rồi access vào server bằng lệnh</span> docker <span class="token builtin class-name">exec</span> -it ubuntu_server <span class="token function">bash</span> |
In fact, you will have to create more users, grant sufficient permissions to deploy, not deploy as root. Try creating a user called deploy
1 2 3 4 5 6 7 8 9 10 11 12 13 14 15 16 17 18 | adduser deploy <span class="token comment"># Nhập password cho user deploy, các thông tin khác có thể để default</span> <span class="token comment"># Install sudo</span> <span class="token function">apt-get</span> update <span class="token function">apt-get</span> <span class="token function">install</span> <span class="token function">sudo</span> <span class="token comment"># Cấp quyền sudo cho deploy</span> <span class="token function">apt-get</span> <span class="token function">install</span> <span class="token function">nano</span> <span class="token function">sudo</span> <span class="token function">nano</span> /etc/sudoers <span class="token comment"># Add thêm dòng này vào rồi lưu lại</span> %deploy <span class="token assign-left variable">ALL</span> <span class="token operator">=</span> <span class="token punctuation">(</span> ALL <span class="token punctuation">)</span> ALL <span class="token comment"># Chuyển sang user deploy để cài đặt môi trường</span> <span class="token function">sudo</span> <span class="token function">su</span> - deploy |
Ok now let’s install the environment following this familiar guide https://gorails.com/setup/ubuntu/18.04
Config deploy
Now add Capistrano and support gems to your project. You just need to add these Gems to group development. Because in essence it will stand in your local to deploy the code to the server staging, production, …
1 2 3 4 5 6 7 8 9 | <span class="token comment"># Gemfile</span> group <span class="token symbol">:development</span> <span class="token keyword">do</span> gem <span class="token string">"capistrano"</span> gem <span class="token string">"capistrano3-puma"</span> gem <span class="token string">"capistrano-rails"</span> <span class="token punctuation">,</span> <span class="token keyword">require</span> <span class="token punctuation">:</span> <span class="token boolean">false</span> gem <span class="token string">"capistrano-bundler"</span> <span class="token punctuation">,</span> <span class="token keyword">require</span> <span class="token punctuation">:</span> <span class="token boolean">false</span> gem <span class="token string">"capistrano-rvm"</span> <span class="token keyword">end</span> |
bundle install to install the Capistrano libraries on your local machine.
bundle exec cap install and Capistrano will generate the following config files
1 2 3 4 5 6 7 8 9 10 | ├── Capfile # Đây là file require các thư viện liên quan ├── config │ ├── deploy │ │ ├── production.rb # File config deploy cho môi trường production │ │ └── staging.rb # File config deploy cho môi trường staging │ └── deploy.rb # File config deploy chung └── lib └── capistrano └── tasks |
When you do deploy, Capistrano will do require libraries from Capfile , read the config/deploy.rb from config/deploy.rb and then read the config/deploy.rb from config/deploy/{env}.rb . Same config but different value between 2 files deploy.rb and {env}.rb , the value in {env}.rb is the final value.
For now, let’s dabble in some basic configurations:
1 2 3 4 5 6 7 8 9 10 11 | set <span class="token symbol">:repo_url</span> <span class="token punctuation">,</span> <span class="token string">" <a class="__cf_email__" href="/cdn-cgi/l/email-protection">[email protected]</a> :{your_repo}.git"</span> <span class="token comment"># Chir ra cho Cap biết bạn sẽ muốn lấy code từ repo nào</span> set <span class="token symbol">:branch</span> <span class="token punctuation">,</span> <span class="token symbol">:master</span> <span class="token comment"># Bạn sẽ deploy code mới nhất từ branch nào, cái này sẽ khác nhau giữa các môi trường</span> server <span class="token string">"172.17.0.2"</span> <span class="token punctuation">,</span> user <span class="token punctuation">:</span> <span class="token string">"deploy"</span> <span class="token punctuation">,</span> roles <span class="token punctuation">:</span> <span class="token string">%w(web app db)</span> <span class="token comment"># Thông tin về host và user của server deploy</span> set <span class="token symbol">:stage</span> <span class="token punctuation">,</span> <span class="token symbol">:production</span> set <span class="token symbol">:rails_env</span> <span class="token punctuation">,</span> <span class="token symbol">:production</span> <span class="token comment"># Set biến môi trường cho Rails app</span> set <span class="token symbol">:deploy_to</span> <span class="token punctuation">,</span> <span class="token string">"~/my_app"</span> <span class="token comment"># Chọn folder (ở máy server) để deploy vào</span> set <span class="token symbol">:keep_releases</span> <span class="token punctuation">,</span> <span class="token number">5</span> <span class="token comment"># Số phiên bản release mà bạn muốn giữ lại</span> <span class="token comment"># 2 config tiếp theo sẽ lưu lại những file, folder cần giữ lại mỗi lần deploy, chúng sẽ được lưu ở folder "shared"</span> set <span class="token symbol">:linked_files</span> <span class="token punctuation">,</span> <span class="token string">%w{.env}</span> set <span class="token symbol">:linked_dirs</span> <span class="token punctuation">,</span> <span class="token string">%w{log tmp/pids tmp/cache tmp/sockets vendor/bundle public/upload node_modules}</span> |
Capistrano is an automated deploy tool built on Ruby, Rake and SSH. It will stand in your local machine SSH to the server and execute Rake tasks in sequence. So the first condition to deploy is that your local machine can access the server via SSH.
To be able to access the server via SSH, it is very simple to simply provide SSH public key to the deploy server. From your local machine type cat ~/.ssh/id_rsa.pub to get the SSH public key
Let’s go back to our Terminal, where we are now accessing the deploy server with the deploy user. Make sure you are on the deploy user
1 2 3 4 5 6 7 8 9 10 11 12 13 14 | <a class="__cf_email__" href="/cdn-cgi/l/email-protection">[email protected]</a> :~$ <span class="token comment"># Cho phép server run SSH ở port 22</span> <span class="token function">sudo</span> <span class="token function">apt-get</span> <span class="token function">install</span> -y openssh-server <span class="token function">sudo</span> <span class="token function">service</span> <span class="token function">ssh</span> start <span class="token comment"># Tạo folder .ssh</span> <span class="token function">mkdir</span> ~/.ssh <span class="token builtin class-name">cd</span> ~./ssh <span class="token comment"># Tạo file authorized_keys để add các SSH key được phép truy cập vào server</span> <span class="token function">touch</span> authorized_keys <span class="token comment"># Cấp quyền thực thi cho authorized_keys</span> <span class="token function">chmod</span> <span class="token number">600</span> authorized_keys |
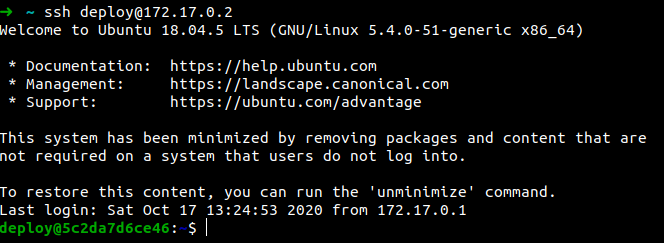
Now open the authorized_keys file and paste your SSH public key into it, and you can access the server from local access using the command ssh {user}@{host} . In which the main user is deploy , the host is the address of the server. To get the location of the server you built earlier, type docker inspect ubuntu_server | grep IPAddress , the IPAddress value is the IP of the server above. Assuming this value is 172.17.0.2, try to connect to the server using the command ssh [email protected]
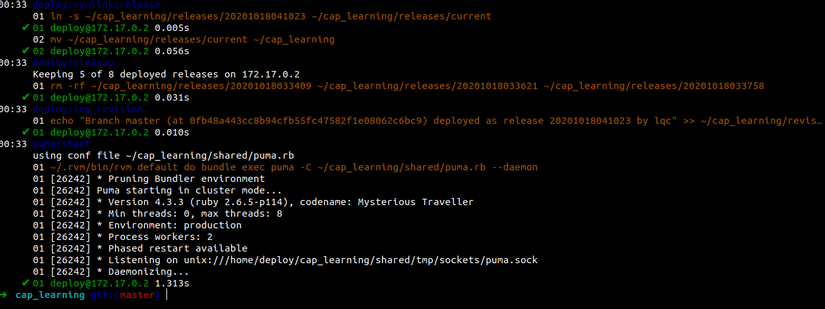
So the preparation is almost done, now let’s say you set the environment for the other deploy server to production. Please config/deploy.rb the values for the config/deploy.rb and config/deploy/production.rb . Standing in your project folder on local machine type the command cap production deploy , Cap will help you automatically get the code from the Github repo, and deploy it on your deploy server. Read all the generated log lines to understand what steps Capistrano will do when deploying your code on a server.
However, life will not be a dream, the first deployments you will encounter many errors, such as not creating .env file, installing Ruby is not the correct version, no DB, missing RAILS_MASTER_KEY, …. Do not be discouraged, try to read the log (Capistrano it records log quite clearly) and fix each error one by one.
The most troublesome was to turn on the puma. On the server, the capistrano will not turn on puma at port 3000 like our local machine, it will run the puma as a socket through the config file stored at #{your_project_path}/shared/puma.rb on the server machine. SSH into your server, creating the file #{your_project_path}/shared/puma.rb
1 2 3 4 5 6 7 8 9 10 11 12 13 14 15 16 17 18 19 20 21 22 23 24 25 26 27 | <span class="token comment">#!/usr/bin/env puma</span> directory <span class="token string">" <span class="token interpolation"><span class="token delimiter tag">#{</span> project_path <span class="token delimiter tag">}</span></span> /current"</span> rackup <span class="token string">" <span class="token interpolation"><span class="token delimiter tag">#{</span> project_path <span class="token delimiter tag">}</span></span> /current/config.ru"</span> environment <span class="token string">"production"</span> tag <span class="token string">""</span> pidfile <span class="token string">" <span class="token interpolation"><span class="token delimiter tag">#{</span> project_path <span class="token delimiter tag">}</span></span> /shared/tmp/pids/puma.pid"</span> state_path <span class="token string">" <span class="token interpolation"><span class="token delimiter tag">#{</span> project_path <span class="token delimiter tag">}</span></span> /shared/tmp/pids/puma.state"</span> stdout_redirect <span class="token string">" <span class="token interpolation"><span class="token delimiter tag">#{</span> project_path <span class="token delimiter tag">}</span></span> /shared/log/puma_access.log"</span> <span class="token punctuation">,</span> <span class="token string">" <span class="token interpolation"><span class="token delimiter tag">#{</span> project_path <span class="token delimiter tag">}</span></span> /shared/log/puma_error.log"</span> <span class="token punctuation">,</span> <span class="token boolean">true</span> threads <span class="token number">0</span> <span class="token punctuation">,</span> <span class="token number">8</span> bind <span class="token string">"unix:// <span class="token interpolation"><span class="token delimiter tag">#{</span> project_path <span class="token delimiter tag">}</span></span> /shared/tmp/sockets/puma.sock"</span> workers <span class="token number">2</span> daemonize <span class="token boolean">true</span> prune_bundler on_restart <span class="token keyword">do</span> puts <span class="token string">"Refreshing Gemfile"</span> <span class="token constant">ENV</span> <span class="token punctuation">[</span> <span class="token string">"BUNDLE_GEMFILE"</span> <span class="token punctuation">]</span> <span class="token operator">=</span> <span class="token string">""</span> <span class="token keyword">end</span> |
Try deploying again, fix minor errors until Capistrano notices that all your tasks success means your code has been successfully deployed on the deploy server.
Public results
Since the puma on the deploy server is running under the socket, your application cannot be accessed using the public URL. As a final step, install and configure nginx to allow external viewing of your product
Access to the deploy server using SSH, install nginx sudo apt-get install nginx . Delete the default config file of nginx sudo rm /etc/nginx/sites-enabled/default Create a config file sudo touch /etc/nginx/conf.d/default.conf Open the config file and try the following config. explain about the config in this article)
1 2 3 4 5 6 7 8 9 10 11 12 13 14 15 16 17 18 19 20 21 22 23 24 25 26 27 28 29 30 31 32 33 34 | upstream app { # Path to Puma SOCK file, as defined previously server unix:{your_project_folder}/shared/tmp/sockets/puma.sock fail_timeout=0; } server { listen 80; root {your_project_folder}/current/public; try_files $uri/index.html $uri @app; location / { proxy_set_header X-Forwarded-Proto $scheme; proxy_set_header X-Forwarded-For $proxy_add_x_forwarded_for; proxy_set_header X-Real-IP $remote_addr; proxy_set_header Host $host; proxy_redirect off; proxy_set_header Connection ''; proxy_pass http://app; proxy_read_timeout 150; } location ~ ^/(assets|fonts|system)/|favicon.ico|robots.txt { gzip_static on; expires max; add_header Cache-Control public; } error_page 500 502 503 504 /500.html; client_max_body_size 4G; keepalive_timeout 10; } |
Save and restart nginx sudo service nginx restart
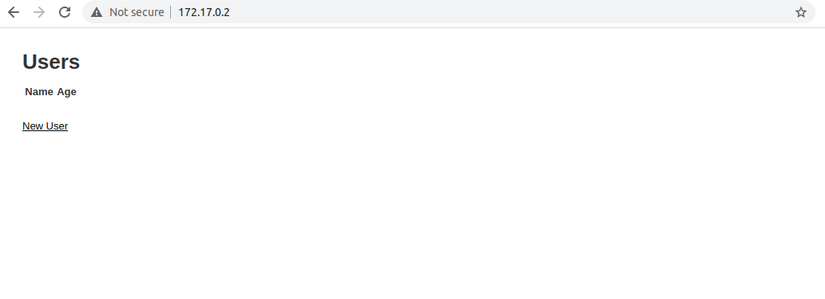
Open your browser and access your server, like our example is 172.17.0.2 and see the result
Wish you success and through that hope you have an overview of how to deploy a Rails application on the server of Capistrano.