What is Git?
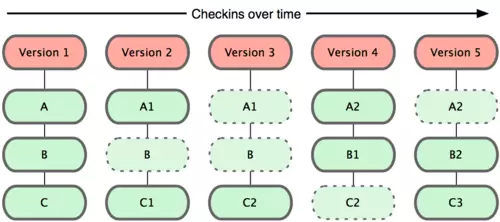
Git is a Distributed Version Control (DVCS), it is one of the most popular distributed version management systems today. Git provides each programmer with a separate repository containing a complete history of changes. Git treats the stored information as a collection of snapshots – a snapshot of the contents of all files at the moment. Every time you commit, Git will “snap” and create a snapshot with a reference to that snapshot. To be effective, if the files don’t change, Git won’t re-archive the file – just a link to the same file as the previous file it stored. Git thinks of its data like this:
Real world projects often have many developers working in parallel. Therefore, a version control system like Git is needed to ensure there are no code conflicts between developers. In addition, the requirements in such projects change frequently. So a version control system allows developers to revert and revert to older versions of code.
Important Git terms
Repository?
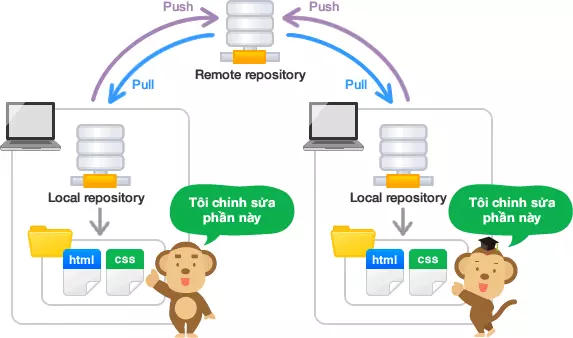
Where source code is stored, each repository will represent a project. Repository will be divided into 2 types, Local repository and Remote repository.
- Remote repository: A repository for sharing among many people and located on a dedicated server.
- Local repository: A repository located on my own machine, for a user to use.

- Init repository: Is the operation to initialize a Local repository.
- Clone: Is the operation of duplicating a Remote repository to a Local repository on your computer.
Branch?
GIT manages source versions in the form of a tree with multiple branches, each branch being an instance.
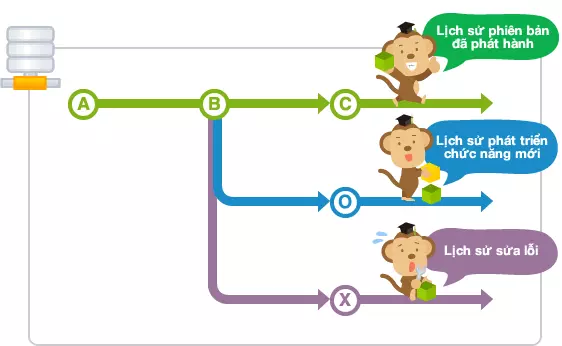
Team members create a branch for their own work from the main branch so as not to affect other members’ work. Then members who have completed their work will implement their changes to the main branch. In such a way, will not be affected from the work of other members, and I can do my own work. has branched branch can edit into one branch synthesized by combined (merge) with the other branch.
Branches in GIT are divided into 2 types, the branch master (the main branch) and the other branches you created during the work. Branch master : As the first branch when creating a GIT repository, the branch master is usually the place where the source code is running stably. Branch types:
- Branch local : is a branch stored locally (of course). It can be linked to a branch remotely or not. To display the branch available on the local we use the git branch command
- Branch remote : the branch stored in the remote. This branch can fetch locally but does not create more branches locally. Simply put, you can download the branch remotely but don’t create a branch locally with the same name and of course you won’t associate it with a local branch at all. To display the local branch remote use the command git branch -r
Create a branch
$ git branch <branchname>
Delete a branch on the local side
Method 1: * $ git branch --delete <branch_name>
or $ git branch -d <branch_name>
Method 2: * git branch --delete --force <branch_name>
or $ git branch -D <branch_name>
Delete a remote branch stored locally
$ git branch --delete --remotes <remote_name>/<branch_name>
or $ git branch -d -r <remote_name>/<branch_name>
Attention:
Method 1 only deletes the local branch once it has been merged into the current branch and it has been pushed to the remote if it is associated with a remote branch.
Method 2 will delete all branches, even if they do not meet the above conditions. Only delete the branch while in another branch
Delete a branch on the remote side
$ git push <remote_name> --delete <branch_name>
Example: $ git push origin --delete <branch_name>
Attention:
You must checkout the branch with the same name as the branch on the remote to delete it. That is, when we are in the develop branch, we cannot delete the master branch on the remote.
Switch between branches
To switch branches to work, it performs a task called a checkout.
$ git checkout <branch>
When you do a checkout, the contents of the last commit in the branch you moved will first open up in the worktree. And the commit that was made after check out will be added to the branch after the move to.
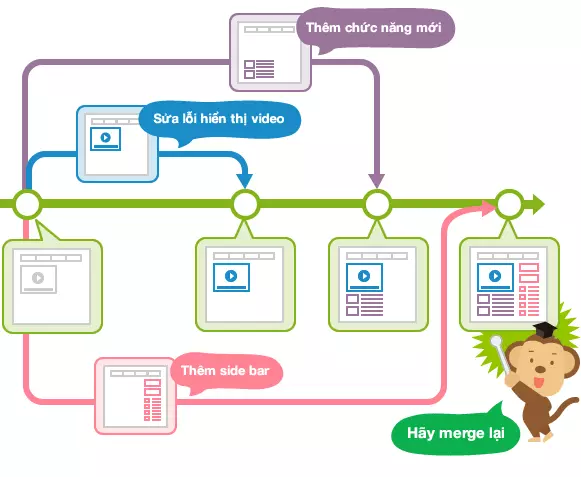
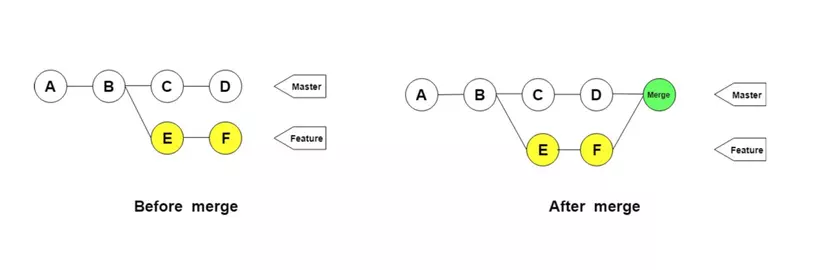
Merge branches
The merging of the branch will be performed using the merge command.
$ git merge <commit>
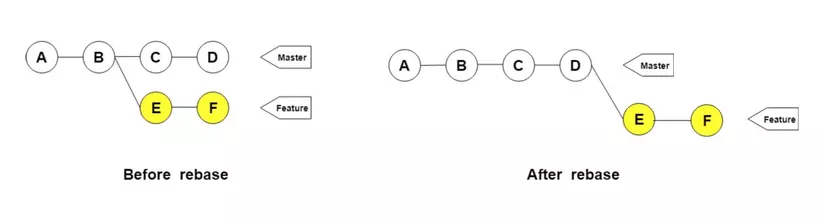
Git Rebase
Rebase is a convenient way to recombine new commits in one branch on top of another branch.
To better understand the above definition, it is best to start using this statement.
For example, your repository has two branches, master and topic. In the branch topic you have new commits named A, B, and C that the branch master doesn’t have. Also at this time the branch topic does not have E, F, and G commits on the branch master. You can refer to the following illustration for easy visualization:

Now use the command:
$ git rebase master topic
Will apply the new commits in branch topic on the latest commit of branch A. The result after running the command will be as shown below:

If the branch you are currently working on is a topic, you can ignore the name of this branch when running the above command:
$ git rebase master
In case the master branch already has a commit from the branch topic, when rebasing, Git will ignore this commit. For example, commit A on branch topic was merged into branch master at commit A ‘ 
Now when performing the rebase, the result will be as follows:

Differentiate rebase and merge
Suppose we have 2 bamboo sticks with many bamboo segments, when we want to merge these 2 bamboo sticks into one block, we will connect the bamboo segments together in many ways. Then rebase and merge here are two methods used to join the bamboo burns. Or technically they are used to integrate changes from branches into a base branch (can be understood as master). After using these two methods to connect, we will all get a tightly bonded block between the bamboo bars, but their shape will be completely different.
- With the merge we will have to do by merging the two burning ends in a V shape and tying them together. Initially 2 bamboo bars will have their own burning tips, after collapsing with glue or tying they will have a new tip which is the common tip.
- If in the merge we proceed to join 2 bamboo bars in a V-shape, in rebase we will proceed to join the bamboo bars back into a bamboo bar with more segments. we will place the bamboo sticks in a straight line, and attach ourselves so that no more burns will be created. It can be understood that it takes all commits from the moment we branched the feature from master and put each of those commits on master in the correct order.
- So when to use rebase : When you want a clearly visible history, also known as a linear history, and avoid a field with merge commits.
- So when to use merge : If you want to keep track of or preserve the history of the repo (eg see which branch the commit was from) and avoid rewriting all changes
summary
Above are the basic knowledge when getting acquainted with git that I have summarized in the learning process. In the next part, I will introduce to you the basic commands and commonly used to deal with git in the working process.